- Materials for making candles
- Candle wick
- Candle mold
- Coloring a candle
- Pouring a candle
- DIY aroma candles
- Gel candles
- Coffee candles
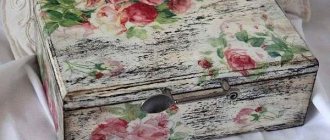
- Candle decoration options
Individuality in your interior design will always be its winning side. Nothing adds a homely feel to an apartment like things made by the owners’ hands. And if until now you could not boast of such fruits of handicraft, you have a great opportunity to fix it. We invite you to try making candles with your own hands.
Candles are a wonderful souvenir that can brighten the atmosphere of any family holiday. Candles have long been an attribute of celebration, significant dates, and romantic evenings. Yes, just sitting in silence, listening to your favorite music to the trembling of a gentle light - this is sometimes so missing.
For some, a candle is nothing more than a cute decorative item. And there is nothing wrong with this either; such products serve as wonderful decorations in the home. But scented candles can become a real psychotherapeutic tool: they will help create the necessary atmosphere for relaxation, taking a person into the world of dreams and pleasant memories.
In addition, a candle is a wonderful gift. The warmth of your hands and the light of a beautiful candle will be the best wish for a loved one. Candles will decorate even the most modest furnishings, highlight the color scheme of your apartment, and become evidence of the excellent taste of the owner.
Needless to say, mothers on maternity leave can even earn extra money from such a pleasant activity. And not only mothers - everyone who is fascinated by the process of creating a candle. And you can be sure that there will be people who want to purchase such hand-made beauty.
So, we have many reasons to finally begin our creative process. But to make a candle, we need to stock up on certain materials and tools.
DIY candles at home: recipe for scented and colored candles
Having mastered the manufacturing principle, you can create more complex variations of candles. To make colored candles, place wax crayons along with paraffin in a melting dish. Fantasize, experiment with combinations and as a result you will get a stunning composition of bright rainbow candles.
Candle decor made from dried flowers
Anyone can make a beautiful candle decorated with dried flowers. In addition, such work will be unique, since you can use a variety of plants and flowers.
Let's prepare materials:
- white candle;
- simple candle;
- dried flowers;
- spoon;
- scissors;
- tweezers.
Before you begin, we recommend roughly drawing up the desired composition of dried flowers. Then we heat a simple candle and hold a spoon over it as shown in the photo.
When the spoon warms up a little, take the flower and gently smooth it. You need to do this very carefully so as not to damage the petals.
If some part does not stick, is unnecessary, or is simply in the way, you can cut it off.
We continue to gradually decorate the candle with the remaining dried flowers. We do this slowly and very carefully so as not to damage them.
If some elements cannot be attached with a spoon, you can use glue. But it needs to be applied in a very thin layer.
To consolidate the result, take a simple candle, cut it and remove the wick. Melt over low heat, but do not boil. Pour the paraffin into another container and carefully, holding the wick, dip the candle with dried flowers. A stylish candle with natural decor is ready.
Secrets of aromatherapy
When making a new candle, use essential oils. Add a little of your favorite aromatic oil to the liquid (melted) wax before pouring it into the mold.
The composition of aromas of bergamot and lavender has a relaxing effect, while rosemary and lemon have a healing effect. A mixture of one part rose and geranium oil and two parts lavender has a calming effect. For mood, use an aromatic composition of cloves and orange, and to relieve stress - cedar and lemon.
Eco-decor of candles
You can create a cozy atmosphere in the autumn-winter period using natural eco-decor. For example, cinnamon sticks filled the room with an amazing aroma.
By decorating a candle with beautiful leaves and pine cones, you will create a beautiful decorative element for your room.
As you can see, you can beautifully decorate a candle using budget materials. The result is a truly worthwhile decorative element - even more interesting than the purchased version.
Do you decorate candles yourself or do you prefer to buy ready-made products?
Gel transparent candles at home
The technique for creating a gel candle is exactly the same as for a wax candle. Only in this case the mold is filled not with paraffin, but with a transparent candle gel. Inside such a candle you can place stones, shells, twigs, flowers, beads, beads, buttons, slices of fruit and anything you can imagine.
The arrangement of elements inside may vary. If you lower them to the bottom before pouring the gel, they will remain at the bottom. Decorations lowered into the poured mold will remain on the surface or hang in the middle.
You can add color to the candle using gel dyes. You can also add essential aromatic oils to these candles.
Note: Before pouring the melted gel, heat the mold. This will prevent bubbles from appearing.
Glitter candles
You can make simple candles festive with the help of glitter. To do this, you just need double-sided tape and glitter, as well as foil if desired.
Apply double-sided tape to the candle, then remove the top layer and sprinkle it with glitter.
You can also use metallized foil, then the effect will be a little different.
You can use double-sided tape not only to create stripes on a candle. Using a hole punch you can make circles of small diameter.
Glue them to the candle in any order.
Just as in the previous version, sprinkle the circles with glitter and remove the remains with a brush or rag.
Option for decorating a finished candle
A candle with a photograph printed on it will become an original room decor. To do this, prepare:
- regular wax candle;
- tissue paper or tracing paper;
- wax paper;
- scissors, tape;
- hairdryer and printer.
Step 1. Select a photo to decorate the candle. Tape the tracing paper to the printer paper.
Step 2: Print the photo. To do this, you need to insert the paper into the printer so that the photo is printed on tracing paper. Next, separate the tracing paper from the paper and cut out the image. Leave a white frame around the photo.
Step 3. Wrap the candle tightly with wax paper and heat the image with a hairdryer.
Step 4. Warm up until the photo becomes bright and clear.
Step 5: Carefully and slowly remove the wax paper.
In this way, you can decorate a candle with absolutely any pattern printed on a printer. Or you can draw your own work, inscription, pattern or some saying that is meaningful to you on tracing paper.
In addition to the techniques described above, there are many more ideas for decorating a candle:
- wrapping with lace, burlap or fabric;
- painting with sugar mastic, acrylic paints;
- decor of the vessel in which the candle is located;
- all kinds of applications with dried flowers;
- decoration with sparkles.
Burlap decor
Material such as burlap is very often used in candle decoration. With its help you can create entire compositions that look amazingly beautiful.
We will prepare the following materials:
- simple candle;
- sackcloth;
- ribbon;
- watch;
- needle and thread.
We cut the burlap to the required size and secure it with a pin or sew it together.
We tie a ribbon around the candle and tie a clock to it.
A beautiful candle for home decor is ready!
Very often, burlap is used to create autumn compositions. For this you will need dried leaves, twigs and other elements.
To decorate in this style, we will prepare the following:
- candle;
- sackcloth;
- leg-split;
- lace;
- glue in a gun or “moment” glue;
- kraft paper;
- scissors;
- leaves.
Cut a piece of burlap to the required size. Unravel the top and bottom of the fabric to create a fringe.
We wrap the burlap tightly to the candle using twine. Glue the end of the cord to the material.
Glue a strip of lace on top of the twine.
We cut out leaves from craft paper, slightly larger than the prepared ones. We make a small bow out of twine, connect the decor and glue it to the candle.
Here are some examples of really beautiful candle decor using burlap. They are perfect for creating coziness in the autumn-winter season.
Kitchen ideas
Eggshells are an excellent option for molds for future candles.
To create such a candle, prepare eggs, wax, paint, and wick.
We extract the contents of the eggs through the hole at the top. We insert the wick inside.
Fill with wax.
We wait until the candle hardens and clean the shell.
Candle in a dish
Inscription on the candle
If you want to give a gift to a loved one and give a candle, we recommend being original and putting an interesting inscription on it. This could be a motivating phrase or just a wish.
For this you will need:
- candle of any color;
- decorative paints;
- two brushes of different sizes;
- embossing tool;
- a printed phrase or wish.
We apply the printed phrase to the candle and transfer it with a special embossing tool, pressing slightly.
We remove the stencil and cut out the text along the transferred trace. Using a large brush, brush off the wax shavings.
Fill the cut out pattern with decorative paint of a contrasting color, then leave the candle until completely dry. A stylish and original gift is ready!
Preparing the wicks
Now you need to place a wick in each glass. The first time I did this job, I made a mistake. I immediately cut the wicks very short, and as a result, when the wax began to harden, they bent to the sides. I had to lift them, and a barely noticeable trail of them remained on the surface of the candle. Later, I began to leave a longer wick length and tie it onto a stick, which I placed on the sides of the glass. I also note that the base of the wick, if it has a so-called metal stand, can be glued to the bottom of the glass. This will not save you from tilting the wick if you do not secure it to the stick, but it will make the structure more durable.
Seven daily habits of happy people
Paralympian Talay without arms and legs: “the harder the fight, the greater the victory”
When toothpaste is harmful to children: permissible age doses
Fragrant cinnamon
You can add a pleasant aroma to a candle not only with the help of coffee beans. Cinnamon sticks smell no less pleasant. In addition, such a candle looks very aesthetically pleasing and can be used for a romantic dinner or simply for room decor.
Let's give the candles some color
If you just wanted to learn the technology of making candles at home, then this step could be omitted. If you need unique candles to decorate your room, don’t neglect coloring.
For this purpose we will take children's colored wax crayons. They are the best option because... do not dissolve in water, mix well with paraffin and will not “delight” you with a surprise in the form of an incomprehensible sediment at the bottom.
The technology for adding color to a candle is very simple: you just need to select a piece of chalk of the desired color and grate it. Mix the resulting shavings with cinders using a wooden stick and send to melt. This seemingly simple process plays a big role in decorating candles and should not be skipped.
Workflow: How to Make a Candle
Cozy candles in transparent form
Prepare your work area
Working with wax is quite a messy business. It melts, drops can get everywhere, you won't even know it until it dries. Place newspaper or paper towels around the work area. Use them to set the thermometer, spatula - be careful, they will probably stick a little. Luckily, the wax isn't that difficult to clean; you can simply scrape it off with your fingernail. Prepare your molds and wicks.
Melt the wax
Monitor the temperature - the norm is between 70 - 75 degrees
Using a double-bottomed saucepan or water bath, melt the wax. Place about 200-300 grams, watch it melt by breaking it into pieces with a spatula and stirring it. It melts in about 10-15 minutes. Remember to monitor the temperature - you want it to be between 70 - 75 degrees. If the temperature starts to rise, remove it from the heat.
Secure the wick
Dip the end of the wick into the melted wax and then quickly attach it
While it is melting, attach the wick to the container. The rare wicks have a small sticker embedded on the bottom, but the main part does not. Super glue is one option, but you can use an old candle trick: dip a metal wick tongue into melted wax, then quickly attach it to the bottom center of the container. After a couple of minutes, when it hardens, the wick will be fixed to the bottom.
Add aromatic oils, stir
Follow the instructions on the package when adding oil.
When completely melted, add desired fragrance oils. Each type is different and requires a different amount per kilogram, so follow the instructions on the package. Taking a block that is suitable for different purposes, remember the following proportion: 60 grams of oil per kilogram of wax. Pour it into the pan, stirring for one minute to ensure even distribution.
Add color
Instead of color, you can add dried flower leaves
This step is optional. Your candles will come out a natural milky white, but you can add a little color by using a non-toxic colored pencil or block. For example, you can add half a millimeter of red pencil to 500 grams of wax to get a soft pastel shade. Want a bright color? Use more pencil.
The color will be much brighter in the melted mixture, but will turn milky as it cools.
Let the mixture cool
The optimal temperature for pouring wax is about 55-60 degrees
After adding the aromatic oil, turn off the heat and let cool for a couple of minutes. The optimal temperature for pouring into a container is about 55-60 degrees. This won't take long - just a few minutes - so pay attention to your thermometer. Once it is properly cooled, pour it into the container. Hold the wick so that it remains centered, without over-tightening it. We recommend leaving some in the pan - you will need it at the end.
The secret to attaching the wick
Place the handle on top of the mold and tie the wick to it to secure it.
The wick, attached to the bottom, may initially wobble a little in the liquid wax. You definitely want it to stay level and centered while everything cures. Simply place the handle on top of the mold, tie a wick to it, and leave to set for a few hours.
As the candle cools, you will notice a slight dip in the wick. The wax will also come away from the edges of the jar. Reheat the remaining mixture in the pan and fill the holes that appear.
Trim the wick
If the flame is larger than 2.5 centimeters, trim the wick
You will probably have a few extra inches of wick sticking out. A wick that is too long will burn too brightly. Light it and check it: if the flame is more than 2.5 centimeters, cut the thread.
Cool candles at room temperature to avoid cracking.
Materials for making candles
Indeed, how to make candles with your own hands without special materials? We will need the following in our work:
- Wax melting vessel
- Candle molds
- Pan (for water bath)
- Sticks (the first is to attach the wick, the second is to stir the wax)
- Decorative elements for decorating the product
- Wax crayons
- Household candles or stubs of old candles
- Paper threads (100% cotton)
All this will help us create, if not a wax masterpiece, then a beautiful original candle. So let's begin!
Varieties of candlesticks made from glasses
There are many options for how glasses can be used as candlesticks.
Candlestick made from an inverted glass
The simplest among them is to simply turn the glass upside down and place a suitable candle on the base of the stem. In this case, the glass can be decorated by wrapping a rope around it, a white lace border can be glued to the base, and textile flowers of the same shades can be glued above it. The candle itself, which will be placed on the stem of the glass, can also be tied several times with a tourniquet; overall, the result will be a very beautiful composition.
A very simple, but at the same time very elegant candlestick can be made if you create a decorative composition of cinnamon sticks and spruce branches, fresh flowers and leaves, berries, and Christmas tree balls in an inverted glass. To make such a candlestick more convenient, you can glue a CD to its base, thus removing the hole in the glass.
Painted with acrylic paint
You can create very beautiful candlesticks for the New Year holidays by painting them with acrylic paints. As a result, we can get excellent candlesticks from glasses in the shape of snowmen, Santa Clauses, penguins - everything will depend on your imagination!
30 ways to economically decorate your apartment for the New Year with your own hands! and Master classes for them - read in this article!
Candlestick with floating candles
A candlestick with a floating candle would be a very romantic option. In the middle you can place decorated balls, rose hips, flowers, twigs, Christmas tree needles, sea pebbles, fern leaves, then fill with water, and place a small candle-tablet on the surface.
With beads and stones
Incredibly delicate and beautiful candlesticks will be obtained if you place mother-of-pearl beads in a glass and install a candle. The glass can be filled with absolutely any decor that matches the theme of the evening; these can be sea pebbles and shells, dry maple leaves, twigs and acorns. It will also look very original if you make several small layers of different grains.
What else can you make candlesticks from:
- Wooden candlesticks
- From shells
- From empty cans
- Candlesticks for the New Year
- Tangerine candle
- From a plastic bottle
Follow all the links to find detailed Master Class!
Candlestick with lampshade
A very original candlestick from a glass, you can make it yourself in the form of a table lamp. To do this, you need to cut out a lampshade from thick colored paper, glue it and put it on a glass with candles. Thanks to the conical shape, the lampshade doesn’t even need to be fixed. Such an unusual lamp can be additionally decorated with any decor, such as braid, rhinestones, flowers, appliqués.
With lace
A candlestick will look incredibly elegant if you cover a small glass with beautiful lace or an openwork napkin.
As we see, there are many options for how to make a candlestick from a glass with your own hands, everything here depends only on your imagination, because you can use a variety of objects for decoration.