A compact and durable folding table for the balcony is a tempting idea for many apartment owners. It is easy to do it yourself if you have the necessary materials and drawings.
Foundation calculation
Try a new product
Try for free Find out more
Before you start making a balcony table, you need to choose the right type. This is important, since furniture that fits optimally into the space can significantly increase the functionality of the loggia, and the layout method affects ease of use.
Practical use of the table: pros and cons
The folding table on the balcony is a standard transformer. This quality largely determines its merits. If there is no need for a table, it is fixed on the wall, freeing up space on the balcony. At the same time, the piece of furniture does not require additional storage space.
Depending on the size, configuration and placement of the table, several people can use it simultaneously. It allows you to turn the loggia into an additional recreation area. Tea drinking, a beautiful panorama, fresh air contribute to a pleasant pastime. If necessary, the folding table can be used as a workplace.
A significant advantage of a folding table is the ease of its manufacture. Having basic construction skills, it is easy to calculate the dimensions of individual components and install the product. If desired, you can make an exclusive design option that will decorate the balcony.
With all the obvious advantages of this subject, objectivity requires noting the relative disadvantages. To take full advantage of the practical bonuses of the table, the balcony must be insulated. Otherwise, most of the time the product will stand idle folded. In addition, the design creates additional surfaces on which dust and dirt accumulate. If there is no glazing or windows are often opened on a glazed balcony, you have to spend more time on cleaning.
The purpose of the folding table
Basically, balconies are designed with a small usable area, so it is advisable not to clutter up these valuable square meters with large furniture. It is necessary to seriously approach the development of interior design, select compact furniture and accessories so that the balcony becomes more functional and spacious. For such a room, a small folding table is quite suitable, which will give the interior originality and special style.
A folding table will not only visually increase the living space, but will also add practicality and functionality to the interior, as well as a stylish and unusual look. When assembled, the table will allow you to maximize the space of the balcony, and when unfolded, it will allow you to make all your dreams come true; it is quite suitable for both work and handicrafts, or just for spending time in the evening with friends.
We make a folding table for the balcony with our own hands
It is quite possible to make a folding table with your own hands; the work is quite simple and requires special skills. It is easy to install on the balcony, and on any wall. The main feature of the table is its functionality; it can be unfolded and folded at any time. When unfolded, it is a compact, stable and durable table that can be used in a variety of ways.
- Table for work. If you want privacy and do not have a personal office, this folding table for work is suitable for this. It is quite possible to place a laptop on it or, as a rarity, a typewriter, work with documents, and if you are a teacher, prepare for lessons or check notebooks.
- For breakfast. The folding table is perfect for breakfast. Waking up in the morning, it’s always wonderful to breathe in the fresh air, listen to the birds singing and drink strong coffee or fragrant tea, admire the nature or the awakening city. Therefore, by laying out a small table on the balcony, you will have a wonderful breakfast.
- For your favorite activities. This table can be used for your favorite activities. If you are interested in wood carving, this solution will be ideal for you; wood debris will not be scattered around the apartment. In addition, the folding table is convenient for doing handicrafts, metal chasing, or just playing chess. The only thing is that to practice your favorite hobbies you need to install high-quality lighting.
If you want to retire or just drink a cup of aromatic coffee, talk with friends in the fresh air, all this can be done on the balcony using a folding table.
Buy or make it yourself?
To resolve this issue, it is necessary to weigh the pros and cons. A ready-made table does not require developing a project or spending time on assembly. All that is required from the owner is to install the structure. This option is suitable for busy people, as well as those who cannot make the product with their own hands. Another plus is that in the store you can choose an interesting copy, decorated in an original design. However, in this case you will have to spend much more money and be content with the dimensions proposed by the manufacturer.
By assembling a folding table for the balcony yourself, you have the opportunity to save money. An individual approach is also a big advantage. Furniture is made to the required dimensions, measuring them with the area and shape of the balcony. In this case, the folding tabletop always fits organically into a small space without blocking the passage. But when deciding to install it yourself, you need to find time to work and master basic carpentry skills.
Table manufacturing stages
The folding table on the balcony is the most complex according to its production technology. How to make this type of table and chairs for the balcony yourself? The work is done step by step.
Using furniture catalogs or your own imagination, select a suitable model. For example, let’s take the simplest one, which clearly shows how the system for unfolding and folding the table works:
Based on the picture, a manufacturing technology for the tabletop, legs, and collets is developed, and the required dimensions are established, taking into account the fact that according to GOST, the height of the table should be 720 mm.
The sequence of actions when making a table is as follows:
- A board for the table top and timber for fastening the tabletop elements are purchased from a specialized store. All wooden parts must be calibrated and planed on a planer.
- At the same time, you need to buy self-tapping screws for fixing the table parts and four bolts with washers and nuts for fastening the legs to each other and to one end of the table crossbars. At the same time, the bolts serve as axes that ensure the layout and dismantling of the product. It is preferable to insert bushings into the holes intended for bolts. They can be made from plastic plumbing pipe.
- Using a jigsaw or hacksaw, all table parts are cut to the specified dimensions.
- Drill out from one end for bolts with bushings of the table crossbar and the upper edges of the legs adjacent to them. There are 4 holes in total.
- The tabletop is assembled from boards cut to size. On the reverse side, the boards are fastened at the edges with two crossbars.
- Both leg crosspieces are fastened together using bolts with bushings, washers and nuts.
- In the same way, one of the edges of each leg is attached to the drilled edge of the corresponding cross member. The non-drilled edge of the legs rests on the lower plane of the table and serves as a support for it when it is unfolded. To prevent the free ends of the legs from jumping out beyond the tabletop, stops made of short blocks are installed on its crossbars.
- The lower ends of both legs are fastened with overlapping collets.
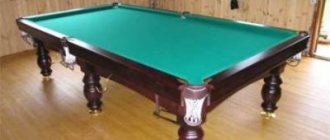
So, the folding table is ready. In the balcony version it may look, for example, like this:
Chairs are mounted in the same way. The only peculiarity of their designs is that the role of the table top is transferred to the seat, and in the crosses one of the legs is much longer than the other. The legs are fastened to each other by several crossbars and serve as a support for the back and the “seat” itself when unfolding the product.
Making a folding table for a balcony is much easier. In this case, you need to do the following:
- On a plank board, thick plywood or laminated chipboard, using a ruler and compass, carefully draw a tabletop according to predetermined dimensions.
- Cut out the lid with a jigsaw and sand the edges. Screw a piano hinge to the underside of the lid adjacent to the wall.
- Saw off a cross member from a 30-40 mm thick block - a fragment equal in size to the length of the tabletop, sand it and screw it to the wall with self-tapping screws according to the markings drawn by the level.
- From a board slightly thinner than a block, cut out a stand for the table. It can be rectangular or triangular - there is no difference. The edge resting on the table top cannot be less than 15 millimeters in width. Otherwise, the stability of the tabletop will be compromised. The vertical length of the stand in contact with the wall must be at least 25 mm. The piano hinge is also attached here.
- Screw the tabletop to the crossbar using a piano hinge,
- In the same way, screw the stand to the wall through a loop, perpendicular to the table top and exactly in its middle.
Types of tables
Balcony tables differ from each other in size, shape, material, and folding method. The shape of the tabletop can be rectangular, square, semicircular, triangular. The most popular dimensions of a miniature folding table for a typical loggia are 60 x 40 cm. The height at which the tabletop is fixed is approximately 70-75 cm. For work tables, the length and width can reach from 80 and 50 cm, respectively. Such specimens are suitable for spacious loggias, which can be converted into an office.
There are several types of tables based on the type of transformation. Each case has its own method of attaching and transforming the tabletop:
- Classic version with hinges. The canvas is fixed to the wall using loops. When unfolding the table, pull out the legs from the recesses and place the tabletop on them.
- Frame-based design. The tabletop and folding frame, consisting of one or two elements, are secured to the wall with hinges. The product is larger in size.
- Side table. The folding table has an additional storage compartment. Such a piece of furniture is multifunctional, but takes up a certain place on the balcony.
Making a folding table on hinges with a support
To make a transformable table, you can use various materials: wood, plywood, chipboard, MDF, plastic, metal. The most popular raw materials are wood and chipboard. Since the loggia table does not have complex structural elements, its assembly is quick. Moreover, each material requires certain nuances of work. Having chosen natural wood or chipboard for installation, you need to prepare the following tools: a jigsaw, a hacksaw, a hammer drill or drill, a screwdriver (it can be replaced with ordinary screwdrivers), a pencil, a ruler, a level.
Made of wood
To make a folding table for the balcony with your own hands, you first need to decide on the shape of the tabletop and its dimensions. For a strong and durable wooden table, choose a canvas about 3 cm thick. Lining is also suitable for the job. A drawing is made on paper with the main parts drawn, dimensions and attachment points indicated.
When making a table, first the tabletop is cut out according to the given parameters. To do this, its outlines are marked on a piece of wood. If the table is semicircular, then first draw a straight line equal to the length of the product. Then, using a compass, draw half a circle from its center.
As a compass, you can use an improvised tool made from a strip equal to the radius of the table. One end of it is loosely secured with a nail in the marked center of the line, and a hole is made in the second end and a pencil is inserted there. Next, use a jigsaw to cut out the shape along the marked line. The top surface of the table must be perfectly smooth. To do this, it is polished.
The end of the cut workpiece must also be processed with a grinding machine so that the edge does not have sharp jagged edges and is perfectly smooth.
The second stage is preparing the support. Most often it is a triangle. To make sharp corners more aesthetically pleasing, they are slightly filed. If desired, the stand can be decorated, for example, by cutting round holes in it. Next, cut out a strip that will be fixed to the wall and hold the support.
When all the main blanks are ready, they are coated with paint or varnish. Water-based or enamel-based paints are suitable for wood. While the table parts are drying, cut off the required sections of the piano furniture hinge. This can be done using a hacksaw.
Connect the fixing bar and the support with loops. The connection line with the support is marked on the tabletop. Fix it to the bar using butterfly loops or a piano loop. Mark the line for placing the support on the balcony wall. Before final fastening, it is important to try on the table on the balcony. At the final stage, fix the stand strip to the wall using self-tapping screws.
From chipboard
Making a similar design with your own hands is also possible from chipboard. This material is easy to process and practical to use. To make a folding table, you need two laminated boards and four butterfly hinges. Two identical blanks are cut out of chipboard, the size and shape of which are chosen at your discretion. The ends of the cut panels are carefully processed with a milling cutter and fine sandpaper.
One copy is a finished tabletop. The second is a blank for support. The middle is cut out of this panel so that the remaining part looks like the letter “U” with a width of approximately 10-12 cm. The lower edge of the cut out “door”, which will serve as a support, is cut off obliquely. This is done to make opening the support easier. At the edges of the tabletop, frame and supports, mark the places where the hinges are attached.
Next, the process of making the table includes installing all the hinges. When the folding table is ready, the place of its attachment is marked on the wall of the balcony. Check the horizontal level and secure the structure with dowels or anchors. At this point, the process of installing a folding table for a loggia can be considered complete.
Manufacturing and installation process
We make the table top first. We mark the outline of the structure on your material and very carefully cut out our future tabletop along it. Then, in exactly the same way, the stationary part of the table is made, which will be attached to the wall and serve as our support. The next step is to make the stop and connect it to our entire structure using hinges. You can paint the table both before and after installing the table (this is at your discretion, whichever is more convenient for you).
The table is installed as follows:
- We mark the level of the future structure on the wall and highlight the locations of future holes.
- We drill the stationary part of the table.
- We check the accuracy of the markings on the wall and drill the necessary holes there.
- Using screws or bolts we mount our structure on the balcony.
Installing a table with a folding footrest
The folding model takes up a little more space on the balcony. Therefore, this choice requires preliminary measurements of the loggia so that the finished table does not interfere with the placement of other balcony items. To work, you need to prepare the following parts and materials:
- Wood boards.
- Connecting dowels.
- Loops - “butterflies”
- Mounting rail.
- Support corners.
First, prepare the support posts. For them, eight planks are cut from the board. Four of them will be vertical posts, the rest will be connecting jumpers. Two frames are assembled from blanks. To do this, 8 mm holes are made in the boards, into which two dowels are driven with a rubber hammer. The fasteners are pre-coated with glue.
To make the frame of the footrest stronger, after connecting the elements, it is additionally tightened with clamps and wait until the glue has completely dried.
A narrow strip is attached to each frame along a vertical stand on hinges. Mark on the wall the locations of two corners on which the tabletop plank will rest. After the corners are fixed with self-tapping screws, proceed to installing the table frames. They are attached strictly vertically between the corners close to them. To do this, each frame strip is screwed to the wall with self-tapping screws.
According to the planned dimensions, a tabletop is drawn and cut out of the canvas. External corners are rounded if necessary, and the edges are milled. A strip is cut from the smooth edge of the tabletop, which is then attached to the corners. Before this, the bar and the main part of the table are connected with hinges. The last step is to fix the tabletop to the wall of the balcony.
How to care for a table on the balcony
Furniture items on open and closed balconies require regular maintenance. A wooden folding table on a loggia must be coated with a protective compound during the production process. Over time, varnish or paint loses its aesthetic qualities. This is facilitated by temperature changes, humidity, and dust. Therefore, the old table covering is removed with sandpaper and a new one is applied.
It is necessary to take care of the interior item between repairs. A folding table requires regular removal of dust, dirt and moisture from the surface. The product must be protected from exposure to aggressive liquids and mechanical stress. When creaking occurs in the fasteners, lubricate them with machine oil.
What type of table to choose for your balcony
To make a final decision on the type of future table, you need to first balance your wishes with real possibilities. First of all, we are talking about the dimensions of the loggia and the degree of its isolation from the external environment - parameters that put forward special requirements for the quality of materials used to assemble the table, as well as for the place and method of attaching the tabletop.
The specific type of table is selected based on the following criteria:
- For open balconies with beautiful fencing, it is preferable to install folding tabletops with a hanging mounting system on the railing. In this case, the color of the tabletop should be in harmony with the color of the loggia fence.
- If you plan to place a large load on the lid, it is appropriate to install its folding version with vertical support on the floor. This will add additional rigidity to the structure.
- With relatively low pressure on the surface of the tabletop, a model with small dimensions, supported by a stand on the wall, is quite sufficient.
A folding table on the balcony looks good in both open and closed spaces. The main condition for this is that the dimensions of the table do not restrict free movement around the loggia.
Attention! If any electrical devices or computer communication elements will be placed on the board, wiring to them should be done before finishing the balcony. When choosing a place to install your computer, it is important to consider the direction of natural light: it should not fall on the monitor.