743
A potbelly stove is often used to heat a garage or utility buildings. This is a special oven that has a simple design. You can do it yourself, following simple instructions and step-by-step technology. To do this, you need to find metal sheets and parts made of this material. A potbelly stove for a garage with your own hands using wood is done within one day, if you follow the instructions and have practical experience with tools and a welding machine.
General view of the structure
Features and principle of operation of a potbelly stove
Unlike a classic stove, a potbelly stove does not require a foundation, a complex chimney, or a platform. You can heat with wood, sawdust, wood chips, peat, coal, and used machine oil. Simple design and installation are available for DIY by people with basic metal working knowledge. Due to its small dimensions and weight, a homemade potbelly stove can easily be placed even in a small garage.
Compared to a brick stove, a potbelly stove cools down quickly. Therefore, to maintain a comfortable temperature, you will have to heat it the entire time you are in the garage. The metal becomes very hot, which can cause burns if accidentally touched.
The principle of operation of a potbelly stove is the same as that of a classic stove:
- the air necessary for fuel combustion enters the firebox through the ash pan;
- the heat generated heats the walls;
- combustion products are removed through the chimney due to natural draft;
- The rate of fuel combustion is regulated by the position of the ash door.
The principle of operation of a potbelly stove
On wood or waste oil
Depending on the size, a potbelly stove can be used to heat not only small, but also large rooms. In addition to machine oil, you can use other types of oil and diesel fuel.
The advantages of the stove during testing include:
- no need to be distracted by adding firewood, one filling lasts for a long time;
- due to 2-stage combustion, the efficiency is higher than that of its wood-burning counterpart;
- The potbelly stove does not smoke during production in any weather.
Disadvantages include:
- noise;
- when burned, the waste emits a specific odor, so ventilation is required;
- the need for frequent cleaning of the combustion chamber and chimney;
- the difficulty of removing the coked layer formed during oil combustion from the lower chamber.
The main advantage of a wood-burning stove is the ability to use any solid fuel. Disadvantages to consider:
- The efficiency is low, since a significant part of the heat flies out into the pipe;
- the need to regularly add firewood, break firebrands, and ensure that coals do not jump out of the firebox;
- time spent on fuel preparation;
- small range of regulation of the combustion process.
The characteristics of the stove during testing are better, but according to fire safety rules, the room for its installation must be equipped with supply and exhaust ventilation. Fulfilling this requirement is difficult for private owners, so they make a potbelly stove for the garage with their own hands using wood.
Preparing for work
You immediately need to decide on the size of the future oven. As a rule, for small garages for one car, a size of 60x60 centimeters is suitable. The width of the wall in this case will be two bricks. When choosing a location, you need to make sure that the stove will not interfere with entry and work on the car. Most often the stove is placed at the back wall.
Next, you need to prepare a drawing of the future design, according to which you can calculate the material for the stove in the garage. For construction you will need the following tools:
- Metal tape measure.
- Building level.
- Master OK.
- Plumb.
- Square.
- Furnace hammer.
- Container for mixing the solution.
You will also need the following materials:
- Metal wire.
- Crushed stone.
- Clay.
- Fireclay brick.
- Ceramic brick.
- Cement.
- Ruberoid.
- Sand.
Building a brick oven
For construction you also need such elements as:
- Steel pipes for the chimney.
- Chimney valves.
- Doors for the firebox and ash pan.
Important! It is not necessary to use a foundation for the furnace. But provided that its weight does not exceed 500-600 kilograms. You can limit yourself to only a reinforced screed poured onto the floor. And only with a higher mass of the structure is a foundation formed, which should not be connected to the base of the room.
To assemble the foundation, perform the following steps:
- A hole no more than 70 centimeters deep is dug.
- It is filled with sand and then gravel.
- A solution is made from one bucket of cement and water, as well as three buckets of sand. And it is poured over crushed stone.
- It is leveled, after which the cement must harden for at least a day.
- 2-3 layers of roofing material are laid.
The mortar for laying the furnace is being prepared. To do this you need:
- Soak the clay for at least three days.
- Stir and remove lumps.
Important! Depending on the type of clay, it may be necessary to add river sand in order to eliminate excess fat content of the clay.
The correct consistency of the clay is checked as follows:
- A five-centimeter ball of clay is dried.
- If the ball does not crack during drying, it must be thrown onto the concrete floor from a meter height.
- If the ball has retained its hardness, then the solution is suitable for use.
Features of construction
Types of designs
Many designs of potbelly stoves for the garage have been invented, so choosing the appropriate option based on the available material is not difficult. The drawing is drawn up independently, taking into account the characteristics of the room, or taken ready-made from the Internet. The structure, depending on the size of the garage, is made horizontal or vertical.
A classic potbelly stove is made from sheet iron. The easiest way to make a stove is from an iron barrel, but the service life of the structure is short, since the thin walls quickly burn out. The option made from a gas cylinder or pipe will last much longer due to the greater thickness of the metal. Simple structures for garages are made from old rims and iron cans.
Construction of the furnace structure
The laying of the furnace is carried out according to the established algorithm. The process looks like this:
- To begin with, the foundation is laid out. To do this, markings are first carried out and the diagonals are checked. An important factor is the correct geometric figure.
- The walls are laid in continuous rows. In this case, the first two rows must be laid out horizontally. Also, in the future, each row should be checked for distortions.
- Doors are being installed. Starting from the third row, the door is secured using wire and metal fasteners.
- The combustion chamber is laid out, approximately from the third to the sixth rows.
- In the seventh row, a “lid” is made, with a hole in the center, the size of one brick.
- The next row needs to be laid out crosswise to create an expansion. And then put another one “on the edge”.
- Next, you need to make a narrowing by laying bricks, as in the previous rows. In conclusion, you need to once again make the masonry “on edge” and additionally lay the brick across the hole.
standard design
Making a classic stove-stove
Since you need to make a potbelly stove of a rectangular shape, you will need sheet metal with a thickness of at least 3 mm. The work is performed in the following order:
- Blanks are cut from the sheet.
- The side walls are welded to the bottom.
- Weld the back wall.
- Inside, the boundaries of the space between the ash pan, firebox, and smoke circulation are outlined. At a distance of 10 -15 cm from the bottom, 2 corners are welded to install a removable grate, which is assembled from reinforcement with a diameter of 10 - 15 mm.
- In the upper part, 2 rods are welded on which a reflector made of a metal sheet for smoke circulation will be placed. There should be a gap between it and the wall for the passage of smoke.
- Weld a lid with a hole for a sleeve with a diameter of 15 - 20 cm for installing a chimney pipe.
- For convenient removal of the grate and reflector during cleaning, the door with a latch and handle is made in a size close to the width of the potbelly stove.
- Legs from a pipe with a diameter of 20 - 50 mm and a height of 8 - 10 cm are welded to the bottom of the furnace body.
- The chimney is made from 3 pieces of pipe with a diameter of 15 - 18 cm, connected at an angle of 45°.
- A sleeve is welded into the hole in the lid.
- Before fastening, a rotary damper is installed in the chimney with a size smaller than the internal diameter of the pipe.
After installation, the potbelly stove is adjusted in height. The pipe is brought outside through a hole in the wall or roof. Simplified designs are assembled without a grate and reflector.
How to make a potbelly stove for the garage with your own hands
To work with metal, you will need two main tools: a grinder and a welding machine. Without them, it is impossible to create the right potbelly stove for the garage. The set of materials depends on the design according to which the stove is supposed to be manufactured.
Potbelly stove in the garage made of disks
Using solid fuel and sawdust, you can weld a small potbelly stove with your own hands for the garage from used car wheels. You will need 4 elements. They are connected together in a stack. The disk of the first tier will be the ash chamber. The bottom is welded with sheet metal. Grate bars are fitted on the top part. In the side of the disk, cut a window with a grinder, and attach the blower door.
You will need 4 discs to create a potbelly stove
The disk of the second tier will act as a firebox. Two holes are cut on the side opposite each other. One window is equipped with a firebox door. At the second hole, a pipe is fitted to connect to the chimney.
The disks of the third and fourth tier are a continuation of the firebox. They are simply stacked and welded together. The hole in the upper fourth disk can be welded tightly, but it is better to make a removable plate. It is convenient to pour sawdust through the top if you suddenly need to use it instead of firewood.
Brick stove in the garage
The disadvantage of wood-burning stoves made of metal is rapid cooling and a fire hazard. A brick structure will help solve two problems at once. Even in a wooden garage, installing a potbelly stove of such a device is completely safe. The only brick here is the protective screen. The stove itself is traditionally welded from metal. Brick protects the walls of the garage from fire. In addition, it heats up, holds and releases heat for a long time.
The basis of the design is a metal stove. They weld it into a rectangular shape from sheet metal or make it round if they use a cylinder, barrel, or can. The next stage is the construction of a brick screen.
A concrete base is poured under a brick stove
Since the mass of the stove structure increases due to the brick, a concrete foundation is poured in the garage. A depression of about 50 cm is dug on the floor and a 10 cm layer of sand and crushed stone is poured. A reinforcing mesh is placed on the cushion and concrete and crushed stone are poured. When the solution hardens, the base is covered with roofing felt. A solid platform is laid out of brick.
Brick walls are installed on the base, forming a protective screen
The next step is the construction of three walls. They should rise a couple of rows of brickwork above the top slab of the stove. There is no fourth wall. The opening is left free on the front side, where the firebox and blower doors will be located. When the three-wall screen is ready, the metal stove is simply placed inside the created niche.
A potbelly stove with a brick screen is fireproof and retains heat for a long time
Advice! Starting from the 3-4th row of brickwork, ventilation windows can be made on the walls. They will help warm up the air in the garage faster.
Potbelly stove for a garage using wood from a barrel
A metal barrel is a ready-made base for a stove. Its disadvantage is considered to be thin walls. They will burn out after a few seasons after intensive use.
To make a barrel stove take up less space, it is better to install it vertically
If the barrel has only a bottom, the other side is sealed with a sheet metal plug. From sections of pipe with a diameter of 50-75 mm and a length of 100-150 mm, 4 legs are welded. The barrel is placed in a vertical position. On the side shelf in the lower part, two rectangular windows are cut for the firebox and vent. The doors are secured with hinges made from the same cut pieces of metal. From the inside between the chambers, corners are welded onto the walls of the barrel, and grate bars are laid on them. A hole is cut in the top of the barrel. A pipe is welded here to connect to the chimney.
Potbelly stove in the garage from a gas cylinder
A used gas cylinder can be used as a stove, just like a barrel. The advantage is the large thickness of the metal. The cylinder will last much longer. In addition, it is smaller in size than a barrel, in particular in terms of diameter. The stove can be made in vertical and horizontal shapes.
Important! Before cutting the cylinder, you need to bleed the remaining gas and condensate out of it, unscrew the valve and pour water inside.
When the cylinder is positioned horizontally, the stove takes up more space
A horizontal potbelly stove is convenient because you can load firewood about 1 m long into the firebox. To build a structure under the cylinder, a stand made of pipes is welded. At the end where the valve stood, a window is cut out and the combustion chamber door is attached. A blower with an ash chamber is welded to the side of the cylinder. When it is placed on the stand, the box will be at the bottom.
The grate will be replaced by perforation on the side wall of the cylinder
The side wall of the cylinder is perforated with a drill with a diameter of 10-15 mm. Holes are made through directly into the ash chamber. They will play the role of grate bars. The chimney is welded to the back of the cylinder from a pipe with a diameter of 100-150 mm.
In a vertical position, the potbelly stove takes up less space
To make a vertical stove, perform the same steps as with a barrel. The exhaust pipe can be welded at the end where the gas valve was located. You just need to first cut a hole here. The legs do not need to be welded, but use a standard original cylinder stand.
Do-it-yourself potbelly stove from a pipe or barrel
This furnace is made in a horizontal or vertical design. The diameter of the pipe or barrel is chosen depending on the size of the free space in the garage. The vertical version is assembled in the following sequence:
- 2 rectangular holes are cut out on the side surface at the locations of the firebox and blower.
- Doors are made from the cut pieces by welding a frame of metal strips. Install latches and handles.
- Inside, at a distance of 10 cm from the bottom edge of the firebox door, brackets from the corners are welded under a grate made of reinforcement.
- The ends of the pipe structure are welded.
- Legs are welded from below
- A hole for the chimney is cut out in the upper part.
- Weld the hinges and hang the doors.
- Connect the chimney pipe.
The assembly of the horizontal version is slightly different:
- The door for the firebox from a cut piece is installed at the end.
- There is no blower; instead, a hole with a diameter of 20 mm is drilled below the door.
- To install the stove, a stand is made from corners or pipes.
- The removable grate is made from a sheet of metal of such a width that the center is at a distance of 7 cm from the most distant point of the side surface of the body. To allow air to pass through the entire area of the sheet, holes are drilled.
- If the potbelly stove is made of a pipe, a pipe for the chimney is welded at the back at the top. First, a circle of the required diameter is drawn on the barrel, then radial cuts are made at an angle of 15⁰. The resulting sectors are folded upward. The pipe is attached to them with rivets.
Tips for stove makers
Despite the simplicity of the design, a small brick oven for a garage is difficult to make for an inexperienced person. In addition, incorrect first kindling can lead to cracking of the joints. A few useful tips will help you avoid mistakes:
- After completing the brick laying, the stove is given time to dry completely. You cannot immediately light the stove without first drying it.
- The first kindlings are trial, sent for final drying. For two days, paper is burned twice a day. The duration of each procedure is 20 minutes. The fire is lit alternately inside the firebox and the ash pan to dry all areas evenly.
- Starting from the third day, wood is burned throughout the week. Garage doors are fully opened for better ventilation, release of vapors and fumes. Brickwork should not be heated to temperatures exceeding 50 °C.
The stove is ready for the main firebox when damp spots no longer appear on its walls.
Stove-stove from a gas cylinder
To remove residual gas from the cylinder, unscrew the valve, fill it with water, and leave it overnight. After draining the water, start working:
- The upper part where the valve was is cut off and a plug is welded in its place.
- If you make a horizontal potbelly stove for a garage with your own hands, cut a square hole at the bottom, and make a door for the firebox from the cut metal.
- After welding the hinges, hang the door.
- Instead of a grate, holes are drilled at the bottom of the future furnace to allow air to pass through.
- A box is made from thin metal, which will serve as both an ash pan and an ash pan. Weld under the holes and hang the door.
- The body is mounted on legs.
- A hole is cut out at the top in the back and a chimney pipe is welded.
To heat food, a frame of metal rods is installed on top. There is enough space to place 2 items. The vertical version is made in the same way as from a barrel.
Advantages and disadvantages of potbelly stoves for heating
A homemade potbelly stove fits perfectly into the garage. Small sizes, affordable materials, ease of manufacture.
A homemade potbelly stove is ideal for the garage
There are several options for making a potbelly stove from scrap materials:
- Made from an old barrel. Advantages: few materials are made quickly. Disadvantages: thin walls (low heat capacity, will burn out quickly).
- Made from an old milk flask. Advantages: there is even less work here - weld the legs, weld the pipe, install the grate and drill holes in the door for air access. Disadvantages: the thickness of the walls of the flask is the same as that of a barrel.
- Made from an old gas cylinder. Advantages: the walls of the gas cylinder are quite thick and made of high-quality steel. It's easy to find the old one. There are options for manufacturing vertically and horizontally. Disadvantages: you need to be very careful during the opening process. Even after standing open for a week in the air, the cylinder can cause an explosion when cut. It is recommended to first fill the bottle with water.
- Made from metal sheet. Advantages: you can choose any sizes and materials, make a screen and make technical additions to increase the heat capacity (for example, pour sand between the walls or cover it with bricks). Disadvantages: Weight gain will require building a normal foundation.
From rims
The materials to weld a potbelly stove, in addition to a couple of disks, will also require a piece of pipe 30 - 45 cm long with a similar diameter, a sheet of metal, and a pipe for removing smoke. This potbelly stove is easy to assemble:
- To adjust the diameter of the pipe to the size of the disks, the ribs are cut off at the joints. After welding, a vertical structure is obtained.
- An opening for the firebox is made on the side surface.
- A door is made from the cut piece.
- To allow air to enter the firebox, a square hole with a side of 10-12 cm is cut out in the lower disk.
- A hole is made on the back of the upper disk for the chimney pipe.
- To construct an ash pan, a metal circle is welded to the bottom.
- To heat food on a potbelly stove made with your own hands, install a hob made of metal 4 - 5 mm thick on the upper disk.
Milk flask stove
Before you put such a potbelly stove in the garage, you need to know that the scale of welding work here is smaller. In fact, here the legs and the chimney pipe are welded to the body. The door remains standard. Holes are drilled in it for air flow. The grate is made from a metal rod. It is mounted horizontally at the bottom of the flask.
It is installed in the desired place and the chimney is attached to the sleeve.
Such a stove is more suitable for burning garbage than for heating.
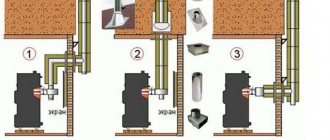
How to install correctly
Operational safety depends on how the potbelly stove is installed in the garage. The stove is usually placed in the corner farthest from the gate on a base made of non-combustible material: bricks, asbestos-cement board, ceramic tile. A sheet of metal is placed on the floor near the doors to prevent sparks and falling embers from causing a fire.
The distance from the stove to the car and flammable substances must be at least 1.5 m. In a wooden garage, a space of at least 1 m is left between the stove and the wall. The walls near the stove are covered with non-flammable material.
Basic requirements for stoves in the garage
First of all, it is necessary to determine what standards the garage stove must meet. Of course, you can choose another heating option, for example, an electric heater or a water heating system. However, the arrangement of such heating is very labor-intensive. And making the system autonomous is even more difficult.
Stoves are also different: some prefer traditional potbelly stoves, others prefer waste stoves, while other garage workers choose long-burning heaters. But brick kilns are also trustworthy.
Let's see what requirements apply to stoves in a garage.
- It is important that the oven heats up to the desired temperature faster.
- The size of the stove is of great importance, since garages often lack usable space. The oven should be compact. Then it will not interfere with the entry of a car or the free passage of people.
- The optimal solution is to make a stove that will operate simultaneously on solid and liquid fuel.
- It is good when the achieved temperature is maintained for a long time.
- The equipment should be quite economical. You need to choose an option in which the materials have a reasonable price.
- It’s great when the design as a whole is simple, it’s not difficult to install. Then the car enthusiast himself will be able to cope with the task, that is, he will not have to pay for the work of the craftsmen.
- It is very important that no harmful substances are released into the surrounding atmosphere when burning fuel.
- It is advisable to find a stand-alone option.
- The stove needs practicality and ease of use.
Some car enthusiasts prefer to install a brick stove in the garage, since it generally meets the above requirements.
Useful tips
A potbelly stove will be easy to use if you listen to the recommendations of experts:
- To check the quality of welded joints, the first ignition is carried out outdoors.
- To ensure tightness, the chimney running inside the garage is made from an all-welded pipe without horizontal sections.
- There should be a box of sand and a fire extinguisher next to the stove.
- The places where the chimney pipe passes through the wall or ceiling are insulated with fireproof material.
- A brick screen lined on 3 sides of the stove will protect against accidental burns and retain heat after the fuel burns out. The distance from it to the walls of the potbelly stove should be 5 - 7 cm.
Despite its simple design, a potbelly stove is considered the most reliable and cheapest way to heat a garage. Even garbage can be burned in such a stove. When choosing, it should be taken into account that horizontal structures last longer than vertical ones.
What you will need
We will announce a list of current materials and tools that are needed to build a brick garage with your own hands and install a stove inside it.
| Tools: | Materials: |
| yardstick | brick |
| building level | doors of the firebox, ash pan, chimney valves |
| furnace hammer | metal wire |
| container for solution | steel chimney pipe |
| square | sand, crushed stone, cement, clay |
| plumb line | roofing felt |
What requirements must be kept in mind to ensure high-quality heating
- The stove in the garage should be small in size.
- It is preferable to use solid or liquid fuel.
- It is desirable that the oven heats up quickly and maintains the desired temperature for a long time.
- It is better to choose structures made from inexpensive building materials, easy to assemble and easy to maintain.
A small brick oven is optimally suited to these requirements.
Advantages
- It can provide a suitable temperature regime: the dampers and the blower serve as regulators of the fuel combustion process. If you need to achieve a higher temperature inside the garage, simply increase the amount of wood in the firebox.
- The main difference between a brick oven is that it takes longer to cool down compared to steel and cast iron ovens.
- The dependence of power on the size of the firebox is linear.
- The structure is relatively inexpensive if you decide to build it yourself.
- Brick kiln fuel is also inexpensive.
Flaws
- Long warm up.
- To maintain an acceptable temperature, the oven must be lit daily.
- If you limit the flow of fresh air through the blower door, the efficiency of the device will drop.
- So that the construction does not take a lot of money, you will have to use not the most expensive materials.