The main purpose of a garage is to store cars. However, this does not prevent car owners from using it for other purposes: storing canned goods, tools, household appliances, unnecessary items, and car parts. Over time, mountains of various household supplies accumulate in the room. The garage is slowly turning into a chaotic dump, and there is less and less space. This is a sign - it’s time to properly organize the space by installing shelves in the garage. They will allow you to rationally place things, save useful space, and improve the interior of the room.
A garage with a convenient storage system when everything is in its place
Making garage shelving with your own hands is quite simple. You need to prepare tools, buy some materials, and free yourself a few hours from work. In this article we will look at detailed instructions, some tips, and recommendations for arranging such a structure.
Shelves with storage shelves
Welded or bolted shelving: which is better?
Permissible loads on homemade shelves in the garage
Before planning the shelves for the garage, you need to determine a more convenient way to attach them. Today, the two most popular methods are welded and bolted. Welded technology is usually used for metal structures, bolted - for wooden structures. Both technologies work well. Such garage shelves are easy to use and can withstand heavy loads. However, they have some disadvantages.
One of the options for shelving with a frame made of profile pipe and plywood shelves
Welded shelves are non-removable. If the layout of the garage or its purpose changes, simply disassembling the product will not work. Transporting welded shelves is also inconvenient. Their weight can exceed one hundred kilograms. The main advantage of this design is its reliability. Welding seams firmly fix the elements together. It is not at all easy to achieve their destruction.
It is better to connect a wooden garage rack using nails rather than self-tapping screws, so they are less likely to come loose
Bolted racks are less stable. They cannot provide sufficient rigidity. For stability, the structure must be additionally secured to the wall. However, this method of fastening has a significant advantage – mobility. The shelves can be disassembled, assembled, and made into hanging shelves of various sizes. It is impossible to give a definite answer to the question of which technology is better. Each person will have their own parameters that are important.
Wood shelf
Wood is more environmentally friendly and economical compared to metal
The most common solution for arranging a garage is the installation of wooden shelves. The choice of this option is due to the availability and low price of wood: bars and boards . In order for the structure to be aesthetically attractive and safe to use, all its elements are pre-treated: leveled, sanded, coated with a fire-retardant composition.
Advice! A surface planer is used to calibrate lumber. With its help, you can make all identical structural elements identical in size.
Design + drawing
Drawing of a wooden shelf
Designing a shelf made of wood is no different from a similar process in the manufacture of metal structures. The dimensions of the parts are chosen at your discretion. The most convenient are shelves whose length corresponds to the distance of an outstretched arm. The height can be any, up to the ceiling. The easiest way to design and manufacture a permanent wall structure. It is installed in a corner or on a plane.
Required tools and materials
Before starting work, the tree must be planed
To work with wood you will need:
- drill or screwdriver;
- drill;
- hacksaw or jigsaw;
- sander;
- bubble level;
- construction square;
- ruler and tape measure;
- simple pencil.
Materials for making a simple wall shelf 110 cm long, 30 cm high and 25 cm deep (width):
- planed boards 16 mm thick;
- wood screws;
- dowels for fastening to the wall;
- brackets
- fire-retardant composition.
Advice! If the shelves are made of chipboard, it is advisable to laminate the ends with special adhesive tape. This will prevent moisture from penetrating and swelling of the particle board.
Manufacturing instructions
Surface preparation in full swing
Step 1. Using a jigsaw or hacksaw, prepare two blades for the side walls. Between them there will be two horizontal shelves. The distance between them is equal to the height of the end ones.
Step 2. Prepare canvas for horizontal shelves.
Step 3. Process the parts with a grinder.
Step 4. Cover the workpieces with a fire-retardant composition and allow drying time recommended by the manufacturer.
Step 5. Start assembling the structure and lay the bottom sheet on a flat horizontal surface. Take a ruler and a simple pencil, measure 8 mm on the right and left, draw two parallel lines.
Step 6. On each line from above and below towards the middle of the canvas, measure 5 mm and put marks.
Step 7. Drill 4 holes at the found points.
Step 8. In a similar way, mark the surface of the top shelf and drill 4 holes in it.
Step 9. Install the left end shelf on the bottom shelf. Connect the parts with self-tapping screws.
Step 10. The right end board is attached in a similar way.
Step 11. Place the top shelf on the resulting structure and attach it through the previously drilled holes.
Step 12. Brackets are attached to the upper part of the back surface of the end boards.
Step 13. Try the shelf against the wall, make markings for the dowels.
Step 14. Drill holes in the wall.
Step 15. Screw in the dowels.
Step 16. Hang the shelf.
Based on the proposed step-by-step instructions, you can make a structure from several shelves, strengthening it with vertically installed bars with a section of 40x50 mm or 50x50 mm. In order to give the shelf stability, it is attached to the wall with anchors or dowels.
Deciding on the design
Scheme of a simple garage shelving
Making your own garage shelving is quite easy. The most important thing is to clearly define your own desires and needs, plan the design and type of construction in advance. Anyone can do such tasks, especially if they have a great desire to do something with their own hands.
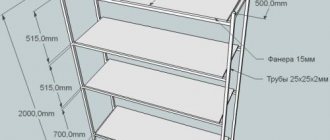
Drawing of a rack made of pipes with wooden shelves
The design of the racks has three elements: vertical posts, shelves, crossbars. In some cases, transverse tightening is used. They are not required. They are needed only to increase the rigidity of the frame. To determine the exact design option for the future rack, follow these recommendations.
- The depth and height of the shelves are arbitrary. These parameters are selected only based on the purpose of the niche. Each shelf can be designed to store a specific type of item. It is better to decide all this in advance;
- The distance between the vertical posts must be selected based on the rigidity of the material. For very heavy accessories, the distance should be about 1.5 meters. For long racks, you need to prepare intermediate vertical racks. They will make the system more resilient;
- The lower shelves should be at some distance from the floor. Approximately 50-70 cm. Heavy objects should be stored on them. The optimal height of the remaining shelves will be 37 cm. This is the most rational height, often used in the manufacture of any furniture structure.
Drawing of a metal rack for a garage
It is always easy to decide on design features. Garage owners simply take into account the dimensions and features of the things that will be stored in the structure.
Option for a small garage with a workbench
It is a little more difficult to choose a product design. The garage is intended for practical purposes. However, this does not mean that its interior should be boring and ugly. You can easily create an attractive interior in your garage for little money. In particular, you can decorate the shelving design with regular paint. Today there are paints designed for any material. The color for painting should match the overall color scheme of the room. Colored plastic boxes for storing accessories and tools will become a kind of decoration. They are inexpensive and allow you to create perfect order.
Transparent and multi-colored plastic boxes for garage shelves
Materials and tools
Various materials can be used to make shelving. Metal profiles are among the most durable, long-lasting and affordable. To make it you will need the following materials:
- Profile pipe. For work, you can use products measuring 20*40 or 30*40 mm. However, any size profile can be used, and lintels can be used to provide additional structural strength. An alternative to a profile pipe can be a corner, which can be conveniently used for making side posts.
- Boards. Used as shelves. You can make shelves with gaps or solid structures. Depends on the size of the things that will be stored on them. For shelves, you can use metal sheets, plywood sheets or wooden boards.
- Self-tapping screws. Used to attach shelves to the main structure.
In addition to materials, it is necessary to prepare tools to perform the work:
- welding machine;
- grinder and metal circle;
- drill and drills of the required diameter to create holes for fixing the shelves;
- building level, corner and tape measure;
- wood saw when using boards or plywood for shelves.
To calculate the required amount of material, you should first make a drawing of the future rack.
You can learn about making a rack from a profile pipe from the video:
Choosing material
Durable metal shelves for the garage
DIY wooden shelves in the garage
The choice of base material plays a huge role in the design, stability of the frame, and practicality of operation of the structure. The rack can be made from different raw materials, which have their own advantages and disadvantages. Let's look at the main types of materials and their features in the table.
| Material | Advantages and disadvantages |
| Metal | Many car owners prefer metal for its durability. This material is durable and can withstand heavy loads. Only high humidity can have a negative effect on it. In normal climates, metal structures will last almost forever. Another advantage of such raw materials is ease of care. The products will need to be periodically simply wiped with a cloth to maintain cleanliness. The main disadvantage of metal is its high price. However, many people have unnecessary pieces of metal at their dachas or with friends. Metal elements are usually joined using a welding machine. It is not recommended to use it without proper experience. |
| Tree | Wood is a noble, useful raw material. It makes excellent hanging shelves, racks, and storage systems. Wood has a very beneficial effect on the human respiratory system, has an attractive appearance, and is easy to process. When making storage systems, you can use oak, pine, and birch. The frame should be secured only with metal bolts. Wood is relatively inexpensive. It can be purchased at any construction hypermarket. The downside of this option is that it is difficult to care for. The tree gets dirty, can darken, and rot. It should be constantly looked after. This is not always convenient. To reduce such negative consequences, it is recommended to use special impregnations. |
| Plastic | A good option for storing various small items and light-weight accessories. Plastic began to be used for making shelves relatively recently. It can withstand no more than 75 kg. This is worth considering! The advantage of plastic is its light weight, mobility, ease of care, and low price. The downside is fragility. It is easy to damage and beat. Plastic is not suitable for storing metal tools. |
| Combination of two materials | For example, wood and metal. This is an excellent option for creating a multifunctional storage system. This way you can save money, diversify the design of your garage, and simplify the process of manufacturing the structure. You can combine almost any type of raw material. |
Metal rack, collapsible with plastic containers
Types of corners for making shelves
Construction stores offer several types of metal corners that can be used to make shelves in a metal garage. They differ in metal thickness and wall width.
Corners are designated by the size of the walls, for example, a corner 5*5, means that the width of each wall is 5 cm. 3*5, which means one wall is 3 cm and the other 5. Depending on the thickness of the material from which you plan to make the flooring, you can use corners of one size or another.
Materials for making flooring
A deck is a work surface on which something is stored. It can be made from various materials.
For example, from:
- solid boards;
- chipboard;
- Fiberboard;
- sheet metal;
- tin;
Flooring made of chipboard and fiberboard is considered less practical compared to wood or metal, because it can withstand light loads and is very demanding on room humidity.
If the garage is not heated, then it is better to choose metal or solid boards for making the flooring. Such shelves will last much longer compared to options made from chipboard or fiberboard.
Another popular option is plywood flooring. It is less susceptible to moisture and can withstand heavy loads, but is still inferior to solid wood flooring in terms of strength.
Conclusion
A shelf for a metal garage can be made from any available materials. Parts from old cabinets or elements of refrigerator cases can be used as flooring.
Instead of chains or angles, you can use metal plates or studs for wall mounting. The structure, which will not bear a significant load, can be secured using steel or aluminum wire.
In order to make your own shelf from metal corners, you need to have a drill, a grinder, a welding machine and a desire to make your garage more convenient and spacious.
The benefits of making it yourself
Many people ask a completely logical question: is it better to make shelves in the garage on your own or buy a ready-made option on the market? Let's look at the main advantages of creating a garage storage system yourself.
Collapsible racks have an aesthetic appearance and are convenient for installation and dismantling
Possibility of developing a unique design. For many car owners, a garage is a real pride. I don’t want to put ugly furniture in it. Standard shelves are also not very attractive. In this case, you can take on the work yourself, coming up with a unique design. Ideas for implementation can be found on the Internet. But it’s better to give free rein to your own imagination.
The idea of arranging a garage from the inside with your own hands
Making hanging shelves and racks on your own is not as difficult as it seems. Any man with at least minimal experience working with tools will be able to do this task.
The manufacturing process will not take much time. Lack of free time is the main reason why car owners buy garage furniture in a store. However, manufacturing a storage system does not require a huge amount of time. It’s enough to set aside a few hours and call a friend for help.
Homemade shelves and racks for the needs of the garage owner
Shelves can be made according to your personal plan. Only the car owner himself knows what size, depth, height he needs the shelves. Finding the perfect option in a store is almost impossible. Everything is standard in hypermarkets. It’s better to put in a little effort, spend time, but create the most practical thing possible.
Small financial costs. Warehouse furniture is quite expensive. Even the simplest models will cost a large sum. Do-it-yourself production is the best solution to save money. Many of the necessary spare parts can be found on your farm.
Wardrobe built into shelving system in garage
Making shelves in the garage with your own hands: practical tips, recommendations
The main purpose of a garage is to store cars.
However, this does not prevent car owners from using it for other purposes: storing canned goods, tools, household appliances, unnecessary items, and car parts. Over time, mountains of various household supplies accumulate in the room. The garage is slowly turning into a chaotic dump, and there is less and less space. This is a sign - it’s time to properly organize the space by installing shelves in the garage. They will allow you to rationally place things, save useful space, and improve the interior of the room. A garage with a convenient storage system when everything is in its place
Making garage shelving with your own hands is quite simple. You need to prepare tools, buy some materials, and free yourself a few hours from work. In this article we will look at detailed instructions, some tips, and recommendations for arranging such a structure.
Shelves with storage shelves
Required Tools
Necessary tools for making shelves
To ensure that the process of making shelves takes a minimum of time, you should prepare the tools in advance. You won’t need much: a set of wrenches, pliers, hacksaws for wood, metal, a hammer, a screwdriver, a hammer drill, a jigsaw, an angle grinder. Almost any good owner has all of the listed items. The selection of basic materials will depend solely on the choice of each individual. It can be plywood, metal pipes, bars, chipboard, plastic, and much more.
Popular options for shelves for storing tools in the garage
How to build a rack
Now let's figure out how to make a rack from a metal profile with your own hands. For simplicity, we will divide the process into two parts - preparation and the work itself. First, you need to stock up on the necessary materials and tools, and only then can you begin assembling the rack.
Materials and tools
The rack is assembled from the following materials:
Dimensions are selected based on the loads to which the structure will be subjected.
Advice! It is better to take options with a sharp tip. A drill screw punches a very wide hole in the metal, causing the fastener to hold less well.
- Regular board 20-30 mm thick;
- Plywood with a thickness of 10 mm;
- OSB sheets with a thickness of 12 mm or more;
- Moisture-resistant plywood, as in the photo, is the best solution, but its price is the highest.
The tool you need is the following:
Build process
If you have everything you need at hand, then assembling a shelving unit from a metal profile with your own hands will not be difficult.
The process looks like this:
Also decide in advance on the height of the shelves and location.
Important! The width between the posts should not exceed 100 cm. The greater the load on the structure, the smaller the distance needs to be.
- First, an incision is made from one side and the other to the very base;
- Next, the element is bent;
- The profile can be cut easily and evenly along the bend
If there are bends inward on the inside of the profile, then they also need to be cut off.
It is important to set everything level so that the connections are at right angles.
Note! When assembling shelves from a profile with your own hands, it is very important to control the position of the elements during work: if they move, the structure will turn out to be skewed.
- The lower jumpers are installed first;
- Next, the upper crossbars are attached;
- The geometry is checked, and if everything is normal, then all other jumpers are fixed.
Advice! Checking the geometry is simple: measure the diagonals, they should be even.
You need to mark the middle, then determine the height of the leg that needs to be cut.
Advice! Do not forget that the leg should be folded to the sides for fastening.
Note! It is best to fasten wood or plywood to the profile using fine-pitch drywall screws.
The finished structure is installed where it will be located. If the floor is uneven, you need to place pieces of plywood or boards under the supports to level the structure.
For safety, some craftsmen additionally attach the rack to the wall using dowels. This prevents the rack from tipping over even under high loads.
Advice! If the walls are made of foam or cinder blocks, special anchor bolts will be required.
Braces can be added to the rear to provide additional rigidity. They prevent the racks from warping and ensure ideal rack geometry, even if there is a lot of weight on it.
Do-it-yourself shelving in the garage: preparation before production
So, you've decided to make your own garage shelving. Before you begin making shelves from any material, you must carry out the necessary preparation for this.
Preparatory stage. Taking measurements and making a drawing.
First of all, decide on the size of the structure and then take all the necessary measurements.
- start by measuring the height and width of your future shelving;
- then consider the required number of shelves and their height;
- decide on the material of the shelves;
- Draw on paper the desired appearance of the finished structure. Having a drawing in front of your eyes will make it easier for you to make a shelving unit.
How to make shelving in the garage with your own hands - photo drawings:
How can you make a shelving unit in your garage with your own hands? Photos, drawings of homemade shelves
A garage is more than just a place to park a car. Very often, it is in the garage that we store certain things that we do not need at the moment, but will definitely need a little later.
avoid clutter inside the garage , it is very important to use the storage space correctly. Therefore, no good garage is complete without a reliable storage system. .
A shelving unit is one of the most important attributes of a garage, and if for some reason your garage does not yet have one, then let’s find out how to make a shelving unit for your garage with your own hands from a corner, from a profile, from metal and wood.
First, let's figure out what types of racks there are and what materials they can be made from.
By type of design, racks are divided into:
- Not mobile (stationary) shelves. Such shelves are firmly attached to the garage wall and can stand for a long time. This is the most stable type of shelving that can support the heaviest items and tools.
- Modular shelving systems. Such shelving systems are sold in many construction and furniture stores. They can be quickly and easily assembled and disassembled. You can also add new segments to them if you wish.
- Mobile (movable) racks on wheels. They are small in size and have limited weight. They are convenient because they can be moved to another place at any time without dismantling the rack.
- Hanging shelves. Mounted on walls or under the ceiling. Not intended for storing heavy items.
- Small rotating racks. They are very convenient for storing small tools, parts, cables and other necessary items. But you can rarely find them on sale.
Garage storage systems can be made from different materials:
- metal. The strongest and most durable type of shelving. They are not afraid of temperature changes, do not burn and can withstand any weight;
- tree. Such racks are cheaper than metal ones and less durable due to frequent changes in temperature and humidity levels inside the garage;
- plastic. Structures with shelves made of this material are the cheapest and lightest in weight. Designed for storing light items;
- combination of several materials. For example, a wooden frame and plastic shelves.
The required type of structure is chosen based on the weight of things and the amount of free space for storing which shelves and racks are made in the garage.
What do-it-yourself garage shelving looks like - photo :
