Trying to organize the chaos that has formed in the closets, many housewives dream of a whole room where each item would have a separate place.
The vast majority of citizens do not have that much extra space. But in almost every apartment there is a place that can be adapted to build a dressing room made of plasterboard.
Requirements for a dressing room
It’s easier to make a plasterboard dressing room without an open top.
Before you dive into work, you need to understand what a dressing room should be like. Everything is thought out in order to organize the storage of clothes and shoes, as well as to have quick access to them. It’s clear that you need to save space as much as possible. Let us immediately note that a dressing room is made with your own hands from plasterboard in large rooms. There is no point in creating it in a 2 by 3 meter room.
You may not need to do anything at all, because often closets are converted to store clothes. But if there is no pantry, then you will have to create everything yourself.
There is no point in making a dressing room less than 1x1.5 meters. If it is even smaller, then no layout will help to properly store things in it. The more things, the larger the area. If you need to store a lot of dresses, then the space for the dressing room should correspond to this volume. The fact is that long clothes take up height, which means there will be fewer shelves and, accordingly, less space for other clothes or shoes.
Drywall dressing room
- "Corridor". With this option, the new room is stretched along one of the free walls. Racks with shelves and rods are built in a fenced-off area.
- Although such a design allows you to remove all things from the bedroom, it is considered not very convenient - in a cramped passage you will most likely feel uncomfortable sorting out your wardrobe.
Important! If the storage room will be closed tightly, you should additionally ensure its ventilation by making gaps at the top or installing grilles in the walls. Without these measures, textiles may begin to smell unpleasant.
Creating a dressing room from plasterboard will take you no more than 2-3 days, but before installing the structure, you should carefully consider all the important aspects: convenient location, dimensions of the structure and its functional content. All these factors must be taken into account at the design stage in order to avoid mistakes. In addition, when planning the space, it is necessary to select one of the walls for a large mirror and organize optimal lighting in the created room, since there will be no natural light in it. Corner.
Another option for creating a spacious room for storing things, which does not stand out so clearly in the interior and does not take away useful space from the bedroom.
Choosing a place in the apartment
Since there is no convenient storage room, you need to find another suitable place. A plasterboard wardrobe in the bedroom is an obvious option. Let's look at all the possible places.
If properly decorated, the dressing room in the bedroom will be invisible
- Bedroom. Usually has a large area and is an ideal option. Things are always at hand and in quick access.
- Pantry. A very economical option if available. Problems arise only with dimensions (they are predetermined) and ventilation.
- Dead end of the corridor. If there is a long corridor that ends in a dead end, then this is an ideal place for a plasterboard dressing room. But such situations are extremely rare.
- Hall. If the apartment has a hall, then it always has the largest area. You can also make a dressing room in it, but not everyone has such a room.
- A balcony or loggia can be a good place for a plasterboard dressing room. However, for this they must be insulated. It is also necessary that there is heating there, otherwise in winter things will simply deteriorate. You will have to use moisture-resistant drywall and insulation between the sheets.
Finishing: dressing room in the niche of the room
You have installed the frame and covered it with drywall. When everything is ready, we begin finishing. The decoration of the dressing room in the niche of the room can be different. First you need to seal the seams between the sheets and the fastening points. You will need to putty them. After the putty has dried, sand the surface to get rid of excess putty. When everything is ready, apply a layer of primer with a roller to the plasterboard structure.
If the room is made in high-tech style, then an excellent option for separating the dressing room and the room is to use sliding doors
The final stage is the decorative finishing of the dressing room in the niche.
As finishing you can use:
- Paint;
- Wallpaper;
- Mirror coating;
- Drywall sheets with printed images.
Finishing is easy and quick with your own hands. The main thing is that the design of the dressing room fits into the interior of the room and is in harmony with it.
Layout features
Before starting work, you need to find out how much material is needed for the job. To do this, you need to understand the layout. Only by solving this issue will it be clear how many sheets of drywall, screws, profiles and other things are needed.
If nothing limits you in the layout, then it might make sense to order a huge wardrobe or hire workers to do everything. If the financial issue is acute, then every detail should be thought through. A DIY dressing room made of plasterboard will help you save money if you think economically.
Corner dressing room is an economical option
The first step is to understand how much free space there is. If it is possible to allocate 6-8 square meters, then this is ideal. If not, then you will have to get out. After determining the footage, you need to decide how many compartments will be allocated for shelves, and how many for clothes hangers. Usually they make 1-2 shelves at the bottom, then on top there is space for hangers with clothes, and above that there are 1-2 more shelves for other things. And this is done in several sections.
A characteristic feature of the dressing room is the presence of doors. They need to be designed so that it is convenient to enter. Poorly designed doors reduce the usable area of the room.
To summarize, we can say that it is necessary to know in advance the area of the dressing room, as well as its layout. Ideally, draw a sketch where everything will be provided. This sketch will be needed in the work to create a frame from metal profiles and cover it with sheets of plasterboard. Therefore, you need to know where the opening for the door will be created, where the fastenings for the bar will be, and where the shelves will be attached.
DIY dressing room
A storage room for a dressing room is a convenient option for self-furnishing. You won't have to work hard on finishing. It is enough to simply remove everything unnecessary from the pantry and carry out cosmetic or complete repairs.
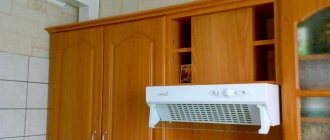
All that remains is to plan the areas and purchase all the necessary wardrobe details. Then install them and enjoy your work. Dressing room lighting. It is optimal to place the lighting fixture directly inside the resulting room. One spotlight will be enough.
Additional lighting can be considered next to the mirror. Seam taping, puttying and priming. There will definitely be seams between the laid slabs.
They need to be glued with bandage tape and then puttied. The resulting joints are primed. With the right approach and following the instructions (which we give in our article), you can make a dressing room with your own hands in two ways: The first is a long vertical area.
Things will be stored here on hangers. At the bottom there are places to store shoes.
What to consider in the project
Constructing a dressing room from plasterboard is much faster if you have a project or sketch. In the project, you need to designate in as much detail as possible both the entire dressing room and each section separately. You need to be especially careful when drawing designs with a beveled corner. What a dressing room layout might look like:
The standard depth of the shelves is 50 cm (no longer required), and the distance between them does not exceed 40 cm. The space parameters for the clothes rail depend on the type of clothing. Perhaps you will only have shirts and jackets there, or perhaps you need to provide space for evening dresses.
In the project, we do not forget about the thickness of the walls, otherwise it often turns out that the dimensions turn out to be smaller than planned. The thickness of the walls consists of the width of the profile used and the thickness of the plasterboard with which it is sheathed.
Often a dressing room made of plasterboard is left without doors. At least they are not taken into account in the project. The door width should be 80 cm (in extreme cases - 60 cm). Many people get into real trouble with them. Doors made of plasterboard or other material are always a problem area in the dressing room due to the complexity of their installation. Some people use a sliding door system, others choose a swing design. Some people refuse doors altogether to avoid fooling around. Everyone makes this choice independently.
Drawing up a design for a plasterboard dressing room
First of all, it is important to determine for yourself the dimensions of the future dressing room, its shape and capacity. The choice of location and subsequent steps will depend on this. At the same time, we should not forget about the area of the bedroom itself, so that the dressing room does not end up taking up most of the room. The shape of the dressing room can be square, triangular or rectangular, in the form of a huge closet covering the entire wall.
When drawing up a bedroom design project, it is important to choose the right place for the future dressing room.
In order to choose the right dimensions of the dressing room, it is important to determine its purpose. It can be used simply to store things, like a closet, or as a dressing room.
How to choose the size of the dressing room:
- If the dressing room is planned only for storing things, the distance from the facade to the wall can vary from 0.5 to 1.2 m;
- In the case of a locker room, its width should not be less than 1.5 m.
The most convenient option is a square-shaped dressing room. In it, everything is in quick access, and there is space for movement. Such a dressing room can be equipped with a mirror and a dressing table.
A drawing of all shelves, brackets and pull-out sections for storage should be drawn up in advance so that you can save on shelving and attach it all directly to the wall frame.
There is no specific algorithm for drawing up a dressing room plan: everyone plans the room in accordance with their needs and preferences. But before purchasing materials and starting installation, it is advisable to have a detailed drawing with dimensions and parameters. It will help you save on finances and avoid mistakes during construction.
Preparation of materials, tools and other devices
When all the preliminary work has been completed and there is an understanding of how much of what is needed, then it’s time to move on to purchasing. For work you will need the following consumables:
- ordinary drywall 12.5 mm thick. It is necessary to calculate the required area in advance and convert it into the number of sheets, taking into account cutting;
- metal profile 50x50 mm. The design is quite simple and without additional burdens, so you can get by with one type of standard profile;
- metal screws 25 mm or 35 mm for fastening drywall;
- dowels for attaching profiles to the floor and ceiling.
Since the plasterboard wardrobe will need finishing, primer and putty will also be required. In addition, you will need the following working tools:
- knife for cutting drywall sheets;
- metal scissors for cutting profiles;
- cutter for fastening profiles together (you can use small metal screws);
- screwdriver and drill for screwing in screws and creating holes for dowels;
- roller with spatula for primer and putty;
- level.
Some advise for some reason to insulate the dressing room, but if it is in the bedroom, then there is no point in this. Even in other heated rooms, insulation will only be an additional expense that will not bring any benefit. An important point is lighting. It is not necessary for small areas, but for a large dressing room light is necessary. Therefore, you should purchase the necessary wires and lighting fixtures.
This is a more or less standard list of what is needed, but it can be expanded. For example, hinges, door handles, sliding door systems, etc. may be required.
How to make a dressing room from plasterboard with your own hands
You can design and make a dressing room from plasterboard with your own hands according to an individual design. First you need to secure the profiles in the desired position.
The racks are installed vertically relative to the floor and ceiling. Their cross-sectional thickness should be 5x5 cm or 5x10 cm. The racks are mounted at a distance of 0.6 m or more from the walls. A horizontal crossbar is installed between them. Its location should be at the level of the part where the door will be installed.
For cladding, many people use gypsum boards. Drywall sheets are resistant to interaction with moisture.
Before you start making a dressing room in a niche, you should draw up a drawing on paper, indicating the dimensions and locations of the shelves
Sheathing occurs in two stages:
- We install sheets of drywall on the inside of the dressing room;
- We install sheets from the outside.
Drywall sheets should be cut correctly so that cracks and kinks do not appear on their surface. Using a construction cutter, we cut the sheets on both sides.
At this stage, you are making shelves, drawers, and hangers. Secure them inside the dressing room. A wardrobe can be filled with a large number of these elements. You can always remake it if you don’t have enough shelves to store clothes and shoes.
The external decoration of a dressing room in a niche can be made from any material: wood, mirrors, tiles, mosaics, or painted with special paint.
Assembling a frame from a metal profile
This is what a simple frame for a dressing room looks like.
Now it’s time to talk about how to make a dressing room from plasterboard with your own hands. You need to transfer the drawing to the wall, floor and ceiling so that you can see where to attach the profiles. The frame will be assembled from a metal profile, so you need to mark everything correctly. Since the dimensions of the structure are small, you can manage it using a level, tape measure and pencil. The profile is used instead of a ruler.
The places where the profile will be attached to the wall are marked on the floor, wall and ceiling. A step of 40-60 cm is quite enough. In these places, the surface is drilled for dowels (dowels themselves measuring 6x40 mm are quite suitable). The profile is applied to the surface and holes are also drilled in it, and then it is secured with driving screws. This is how the profile is attached in all places where it touches the wall, ceiling or floor. Some people use a rack profile for these purposes, and the rest is assembled into a structure from guides. Others prefer to carry out all work with a guide profile. Neither option is wrong.
Before installing profiles to the wall, ceiling and floor, it is advisable to lay sealing tape at the fastening points. It is used for additional sound insulation and reduces the level of vibrations of the entire structure. When things are put on a shelf, doors are closed or coats are hung up, there will be much less noise.
When assembling the box, it is important to take into account the space under the door so that the profile does not run along the floor. Since the dressing room is made of plasterboard, additional reinforcement of the frame in the doorway may be required. Also, the entire frame is reinforced around the perimeter with the help of jumpers, which are inserted into the assembled box in increments of 60 cm. The racks are attached to the frame with metal screws 25 mm long. You need to make sure that one of the posts goes through the place where the tramp rod is attached.
If the dressing room already has an outlet, then great. If not, then you need to think about how to bring it through profiles. You should also do the wiring at this stage if there are several light sources in the dressing room. If you also make shelves from plasterboard, then it will be a very labor-intensive dressing room. And such shelves take up a lot of space. But built-in partitions for dividing the dressing room into sections can come in handy. They are made in the same way as the base frame.
Installation: dressing room made of plasterboard
Any woman will be glad to have a dressing room in her apartment. You can do it yourself. You don't need any special education to do this. You must be able to apply your skills and abilities, following the developed plan. You can make a dressing room from plasterboard in a niche in any living space. The main thing is that it is the right size and fits into the interior of the apartment.
Drywall is a modern and suitable material for making a dressing room. The sheets have a strong structure and are easy to care for. They are not expensive. It is possible to buy this material at a hardware store.
First you need to develop a wardrobe design, then make a drawing with dimensions. To do this, you must decide on the location of the room for things and take measurements.
Buy all the necessary materials and tools for the job.
Drywall is great for niches because it has a long service life and attractive appearance
At the first stage, transfer the markings to the floor, walls and ceiling. This is necessary so that the dressing room is installed as accurately, correctly and evenly as possible.
To make a dressing room in a niche you will need materials and tools:
- Drywall sheets;
- Metal profiles;
- Roulette;
- Metal scissors;
- Magnetic level;
- Hammer;
- Self-tapping screws.
You can connect the profile with self-tapping screws or a cutter. Using a cutter, you can build a structure faster.
After we have taken measurements and put marks, we begin the main work. We attach the metal profiles to the wall and to each other. We create a reliable frame from profiles, based on the developed project.
At the second stage, we cut the sheets of drywall to the required size. We attach them to the frame with self-tapping screws.
If the design of the dressing room has a door in a niche, then we make it separately and fasten it on hinges. If you have sliding sashes, then install the profile at the top and bottom. We insert two doors into it, which will move using wheels.
Plasterboard covering and finishing
The plasterboard is fastened with self-tapping screws in increments of 15-20 cm.
Sheathing the entire structure with plasterboard begins from the inside. Where possible, whole sheets are used, and in other places they are trimmed. It is important that the edges of the sheets fall on the profile, otherwise their fixation will be problematic. Self-tapping screws 25 mm long (maximum 35 mm) are used for fastening.
Drywall must be screwed in all places where it comes into contact with the profile. The screw heads should not stick out; they should be slightly deepened so that the surface remains smooth.
When a plasterboard dressing room is lined from the inside, you need to provide space for sockets, lamps or wire outlets. Depends on the project. A cavity is formed between the sheets of drywall (inside and outside the dressing room), in which it is convenient to route wires for future lighting. Some people carry out additional insulation and sound insulation, but for a dressing room in the bedroom this is clearly a waste of time and money.
When all the sheets of drywall are secured, you need to putty all the joints and screw heads. The joints are additionally strengthened with reinforcing tape so that they do not cause cracks in the future. It is also necessary to putty all corners. Trimmed seams must be primed before puttying to prevent the mortar from falling off. After puttying, the surface of the dressing room will become uniform and ready for finishing.
Dressing room before and after finishing
Further work depends on the type of finishing coating chosen for the dressing room. Its walls can be simply painted or covered with wallpaper. Some people add additional decorative panels or plywood. Some people like covering walls with mirrors.
Installation of a dressing room made of plasterboard
- the apartment has a guest bathroom, which can be converted into a dressing room;
- a niche in the room will be an ideal solution for this piece of furniture;
- in the children's room there are high ceilings, then you can arrange a dressing room and put a sleeping place on it, and attach a small staircase made of plasterboard;
- if a separate place is not provided in the area of the apartment, then you can slightly reduce the corridor or room, but at the same time all things will be in perfect order in the dressing room;
Options for sliding doors for a dressing room
- Also, for the aesthetics of the structure, it is worth gluing all the ends of the shelves with edge tape. The work is simple, just apply the edge to the edge of the shelf and heat it with an iron;
- The rods are made from furniture pipe, which can be bought in a store of the required length. Drill a small recess, insert flanges into them and hang the pipe.
- First of all, according to the sketch, the installation location of the guide profile is marked. Typically lines are drawn using a pencil and level. If the pencil is hard to see, you can stick masking tape over the markings. You can use chop lacing, it is very easy to use, and you do not need to draw lines with a pencil;
- After this, you need to apply marks in those places where the rack profiles will be installed;
- Draw straight lines along the walls on which the profiles will be installed, using an angle and a level.
A do-it-yourself plasterboard dressing room is a convenient, practical, ergonomic structure that can accommodate the belongings of all family members. This piece of furniture can be arranged in any room, and it will fit into any interior. In addition, you can determine the number of shelves yourself and make the required number of cabinets.
A dressing room made of plasterboard in the bedroom can be located on the loggia, then you will not have to reduce the area of the room. Be sure to carefully insulate this room, since temperature changes can warp the drywall.
Dressing room in the bedroom made of plasterboard: how to make it cheap and easy
The most convenient option is a square-shaped dressing room. In it, everything is in quick access, and there is space for movement. Such a dressing room can be equipped with a mirror and a dressing table.
To build a dressing room, you will need a set of tools for working with drywall, as well as spatulas, a hammer drill, a drill, metal scissors, an angle grinder, etc. Depending on how full the dressing room is, you may need different materials. If all sections are made to order, then you only need to equip a room for them. First, markings are made on the wall in accordance with the drawing: the profile will be mounted along it.
Next, the supporting strip is attached using dowels. It must be installed strictly according to the level, since the quality of the entire structure will depend on this. A rack profile is inserted into the grooves of the supporting profile - later shelves, crossbars, drawers and other storage systems will be attached to it (using self-tapping screws).
First of all, it is important to determine for yourself the dimensions of the future dressing room, its shape and capacity. The choice of location and subsequent steps will depend on this. At the same time, we should not forget about the area of the bedroom itself, so that the dressing room does not end up taking up most of the room.
The shape of the dressing room can be square, triangular or rectangular, in the form of a huge closet covering the entire wall.
Making a dressing room from plasterboard with your own hands
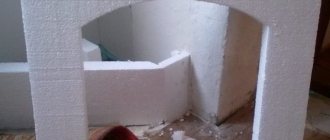
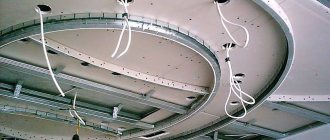
As an example, we consider a room measuring about 20 square meters. m., which is a passage. During the major renovation, it was decided to isolate it (make it non-passable, with its own door) and separate a part for the dressing area. The size of the dressing room was 3 square meters. m., the remaining residential part is 15 sq. m. m, with 2 sq. m. became a corridor. The initial ceiling height was 2.5 m; after installing the plasterboard suspended ceiling, the height decreased to 2.4 m. The photo shows that along with the structure for the dressing room, a decorative ceiling element for the room was erected, but it is not considered in this article. Frame The future walls and ceiling are ready, you can start attaching the plasterboard sheets.
In this example, sheets of size 150 by 60 cm, 12.5 mm thick are used. They are no different from the usual large sheets, but they can be brought from the store in any passenger car and fit in a small elevator. In addition, they are convenient for one person to attach.
Are you wondering how to make a dressing room in your room, but don’t know what material to choose for the walls? To build a dressing room in an apartment, lightweight plasterboard partitions that you can build with your own hands are suitable. The article shows photos of the process of building the walls and ceiling of a dressing room measuring about 3 square meters. meters.
The width of the PN and PS profiles is selected depending on the desired thickness of future partitions and can be 4.2, 5, 6.6, 7.5, 10, 12.5, 15 cm.