A beautiful and stylish solution for decorating a country house in a European style. Made from practical material, such a roof can be complemented with elegant elements, such as roof windows.
Laying a hip roof with your own hands is not so easy. To do this, you need to consult with specialists who carry out calculations of hip roof structures in order to design a strong and durable roof.
By doing the work according to the instructions and following the diagrams, you can achieve the desired result.
Types of hip roofs
There are many popular hip roof designs. The most popular hip roofs are shown in the photo.
Half hip roof. The most common methods for installing a Dutch hip are. It is characterized by trimmed slopes if there are attic compartments in which windows need to be cut. The Danish hip is distinguished by a shortened front, on which lies a trapezoidal slope.
Hip hip roof. In his scheme there are four equal-sized slopes. Suitable for square rooms. It is organized on four diagonal rafters, with a slight angle of inclination (no more than 30 degrees).
American hip roof. The design involves optimizing the space under the roof to increase the attic room.
Roof with a “cuckoo”. Functional and decorative solution. Increases the area of the attic. It is also possible to organize additional sections, such as storage rooms or attics. This structure allows you to glaze vertical walls.
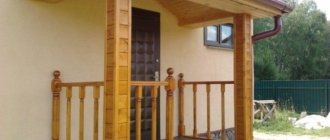
Roof with canopy. Typically, this design is chosen for a house with a porch. It differs in that the sheathing for the canopy protrudes over the main rafter part.
Gable roof. If the diagonal rafters meet (as is the case with a square roof shape), the ridge is not installed. This type of system belongs to the tent type. There is no need to install a ridge in symmetrical dome roofs.
Asymmetrical hip roof. If it is necessary to optimize the space under the roof as much as possible, this type of construction is used. All slopes in it have different lengths and angles of inclination. A very complex design to implement.
Mansard roof rafter system: instructions
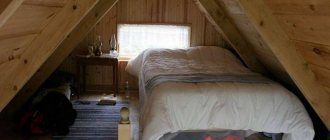
If the height of the attic allows, you can make a flat ceiling instead of a broken one. However, as a rule, this option is the most optimal. You can install window units in such a way that the natural light in the room will be maximum.
The design of the rafter system consists of the required elements:
- Rafters.
- Mauerlat (bearing beams).
- Racks.
- Lathing.
- Metal fasteners.
- Ridge beam.
- External covering.
- Insulation and steam/waterproofing.
The rafter system looks approximately as follows as in the photo:
Mansard roof rafter system
Mauerlat is the base of the rafter system. In fact, it is a beam fixed along the perimeter to the load-bearing walls of the building. If the house is built of logs, then the Mauerlat is considered the last crown.
Advice! To ensure that the attic roof is secured as firmly as possible to the frame of the house, the Mauerlat is additionally reinforced with metal elements.
Mounting the Mauerlat
So, the installation of an attic roof of a private house begins with the installation of a Mauerlat. In this case, it is advisable to lay waterproofing material between the beam and the wall. Next, the rafters are attached to the Mauerlat as follows:
To relieve the rafters of the lower slope, side internal purlins are installed. The main rafter system is called a “truss” (templates). There are two ways to install it: assemble it on the ground and lift it onto a box, or assemble it at the top.
The most time-consuming activity is to make and mount the first template and the last one. Next, the following structures are installed according to the given dimensions using a building level and stretched threads. When installing a classic attic, you need to focus on 3 points: the mauerlat, the junction of the slopes and the ridge.
Attaching the rafters to the support beam
Naturally, all lines must be clearly aligned and located at the same angle. The pitch of the templates is calculated based on future wind and snow loads and the capabilities of the house frame. The more often the better, but the final weight on the load-bearing walls of the building should be taken into account.
After the installation of the trusses is completed, they begin lathing, as shown in the video in this article. These are cross bars that give rigidity to the system.
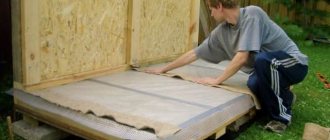
Next, a “roofing pie” is placed on the sheathing, consisting of several layers:
- Vapor barrier.
- Insulation.
- Waterproofing.
- Duplicate (counter) battens.
- Roofing material.
The vapor barrier material is nailed or “targeted” to the rafter sheathing. Next comes the insulation, waterproofing is attached on top, a counter lath and the last stage is the roofing material. The interior of the attic also needs to be insulated and insulated. Next, you can begin finishing the walls and ceiling.
Roof pie
Advice! Before installing the rafter system, you need to think about where the windows will be located so that you do not have to subsequently compromise the integrity of the structure.
It should be taken into account that the rafter system is made of boards and is therefore subject to the destructive influence of humidity, fungi, and insects. Therefore, it is imperative to treat the wood with antibacterial compounds and primers.
You also need to pay attention to good ventilation . Especially if there are no windows planned in the attic. The easiest way is to install wall supply valves. Or, if there are windows, use a modern air exchange option: install double-glazed windows with built-in ventilation ducts.
Ventilated window design diagram
Advantages and disadvantages
Pros:
- The coating is resistant to winds and loads (snow);
- The design is made in such a way that it allows the installation of eaves overhangs along the entire perimeter of the building;
- I do not let moisture into the room;
- Visually elongate the height of the attic structure.
Minuses:
- Difficult arrangement of the roof truss system. The difficulty lies in the volumetric calculations of hip roofs, and this leads to an increase in the price of the roof.
- Since the design assumes a wide angle between the slopes, this leads to a narrowing of the space under the attic.
- If windows are installed in a hip roof, moisture may enter the premises. To eliminate this problem, windows must be covered with moisture-proof materials.
- The rafter system can only be completed by an experienced craftsman who knows the intricacies of this type of roofing.
Attic construction technology
Often, when drawing up a mansard roof project, architects do not take into account the errors of the ventilation system and the insulating layer. If there are such errors, the result may be disastrous. After just a few years, the roof will begin to leak. Since the attic is located quite close to the wall inside the room, it is quite difficult to ensure the optimal level of heat transfer. The attic design must include elements such as thermal insulation and ventilation.
Important! Elements of the rafter system should be treated in advance with various protective agents that will reduce the impact of fire and microorganisms.
The thermal insulation layer is 20 cm thick. This is due to the cold climate in most regions of Russia. In addition, if you create good thermal insulation in the summer, it will be cool under the attic roof. The advantages of this solution indicate the need to choose high-quality protective material.
In addition, you will need to create a roof ventilation system. In the summer, when the temperature is quite high, the roof will warm up very much, this can make staying in the attic quite uncomfortable. With a properly equipped air supply and exhaust system, being in the room will become much more pleasant. This same solution will protect the roof from destruction. A layer of sound insulation is laid to create a quiet and comfortable environment inside the attic. At the same time, rain, hail or strong winds will not be heard much.
Advice! When laying insulation materials, it is better to work with an experienced installer. This will avoid mistakes.
Roof diagram for a rectangular building frame
The design diagram for this type of roof is like a sealed envelope. The hip roof drawings indicate the following elements:
- The ridge of the roof is the junction of the ribs of the trapezoidal sides. The ridge is shorter than the base of the room being covered. Slopes are attached from the ridge to the overhang;
- The other two triangular sides of the covering (hips), held together by diagonal rafters;
- Four ribs at the junction of the slopes and hips.
Attic finishing work
Today, in the construction industry there are many materials that can be used to decorate an attic. The main finishing material for an attic room is considered to be lining. In addition to lining, house, plywood, and sometimes plasterboard can be used to decorate the attic; plastic panels or siding are laid on the outside.
Attic ventilation
Another necessary thing in arranging an attic is to provide a ventilation space in the depths of which air masses will circulate. This is necessary so that moist air does not stagnate in the walls, otherwise fungi and mold may form.
Installation of roof windows
Installation of roof windows is done directly on the roof, this allows more light to enter the room. With the help of an attic window, lighting, ventilation and even evacuation from the attic are carried out. In addition, the use of dormer windows has a positive effect on the aesthetic component of the attic and the building as a whole.
Design elements
- Supports made of beams based on Mauerlat. Necessary for uniform distribution of roof mass over all load-bearing parts. The width of one beam is 100-150 × 150 mm.
- Racks supported by supports, the height of which depends on the angle of inclination of the hips.
- The ridge rail, fixed to the posts, is the support for the rafter hip roof.
- Main rafters. They rest on a Mauerlat base and a ridge rail.
- Diagonal rafters.
- Narozhniks - continue the surface of the main slopes, trusses - strengthen the supporting structure.
- Struts and sheathing. The sheathing forms a platform for the roof.
Requirements for the roof structure
In order for your roof to last for many years, you must comply with the mandatory requirements for choosing the right material and installing the future structure.
- Structural strength . All system parts and connecting points of the structure must be rigidly installed so as not to deform , even when moving with force. The design should be based on a triangle. This form has frames, they are attached parallel to each other. And rigid fixation during their installation guarantees stability of the roof . But if the trusses begin to move, the structure may collapse already at the stage of attaching slate or other finishing material for the roof.
- Light weight . The mass of the roof should be small, because of this the rafter system is built from wood material . If the final weight of the roof is decent, it is necessary to install a metal rafter base . You can take a coniferous tree, at least first grade, with low humidity. It is also necessary to treat the wood with an antiseptic and fire retardant to protect it from fire and pests. In this case, the fastening points of the entire rafter system of the future roof will be strong.
- An important element is the high quality of the future wooden base of the attic .
IMPORTANT!
If you decide to install an attic on the roof, then the best option would be to choose a layered system for the rafter base. This will help you save a large amount of free space without much inconvenience during installation.
Installation of the attic roof is carried out using the following elements :
- Iron;
- Lightweight galvanized steel;
- Reinforced concrete structure.
Such a solution will help strengthen the attic and place additional small rooms on the roof. But you should remember the weight of the future finished roof and its pressure on the walls of the house.
Rafter system
Required calculations
In order to avoid mistakes when designing an attic, it is important to carry out a number of preliminary calculations. Depending on the chosen type of rafter system and type of roof, they may differ. The easiest way is to use a special program, but you can try to do all the calculations manually.
It is important to determine the area of the final roof, the dimensions of the attic, and the width of the floors. The calculation is made based on the following data:
- length and width of the house;
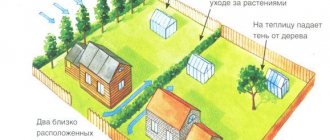
- volumes of precipitation in winter and summer (this will help determine the required roof slope angle);
- the width of the joints between parts of the floors.
An example of calculating the pitch of rafters in the program "Rafters 1.1"
Let's consider an example calculation: the length of the house is 12 m, the width is 3 m. The amount of precipitation in the area indicates that the required roof slope angle should be about 40 degrees. The calculation is made using the formula Hk = L x tgA, where Hk is the required height, L is ½ the width of the building, tgA is the tangent of the angle. Total: Nl = 3/2 x tg40 = 1.26. This means that the recommended roof height should be 1.26 m.
On a note! Most often, when installing mansard roofs, owners opt for broken rafter systems. The methodology for calculating parameters in this case can be found in SNiP 2.08.01-89 and TKP 45-5.05-146-2009.
Attic insulation calculator
Go to calculations
Prices for various types of fasteners for rafters
Rafter fasteners