When furnishing a children's room, you need to pay close attention to every detail. And it’s not just about the beauty of the interior items, but also about their safety. For example, children's furniture should be as environmentally friendly as possible and also not pose a danger to the child. Unfortunately, not all items sold in the store fully meet the requirements for them from this point of view. So sometimes the most environmentally friendly and safest children's furniture made of wood is considered to be made by yourself, and far from being purchased ready-made in a store. Making it is not so difficult if you know what and how.
DIY children's furniture made of wood
Basic requirements for children's furniture
Furniture installed in a children's room must meet increased requirements. Here are the main criteria that you need to pay attention to when making it yourself at home:
- Safety. To prevent the child from getting hurt while playing in the room, the corners of the structures should be streamlined. It is desirable that the furniture items have a soft coating, and their edges are trimmed with PVC edges.
- Environmental friendliness. Polymer models are not suitable for installation in a children's room. The safest material is wood.
- Strength and durability of furniture.
- Ergonomics is an important indicator of quality. The bed should be comfortable for sleeping and suitable for the child’s age, the back of the chair should follow the curves of the back, and the seat should have a bend. This will help maintain the health of your growing baby.
- Multifunctionality. A sofa with additional shelves, computer tables with bedside tables and other similar models will save space in the room and will be convenient for storing various items.
The design of children's furniture should be interesting to the child and suitable for his age and gender. Too bright colors are undesirable, so as not to harm the child’s psyche. Natural wood tones are considered the best option.
Making a tree table
Step 1. With a little effort and imagination, you can make an original but simple table in the shape of a tree for your child. Its tabletop It will be made, like the chair in the instructions above, from plywood. First of all, you need to draw a blank “crown” tabletop on a sheet of plywood and cut it out with a jigsaw.
Cutting out the “crown” of the tabletop
Finished countertop
Step 2. After this, the edges of the tabletop need to be sanded.
Sanding the edges of the tabletop
Step 3. Next you need to draw two trunk legs on the plywood. They will be the same in size, but in the finished version they will be connected to each other by means of a sawn lock. That is, on one of them the drink will be made from below, and on the other - from above. So you need to mark the middle of each workpiece in height.
Legs painted on plywood
Step 4. Next, you need to use the jigsaw again and cut out the legs, and then sand them with sandpaper.
Legs are cut out
Prices for popular models of jigsaws
Jigsaw
Sanding the cut out legs
Step 5. Then on the countertop you need to mark the locations of future holes for self-tapping screws, and then drill these same holes. They are necessary for attaching the legs to the tabletop.
The locations of future holes are marked
Drilling holes
Step 6. Both parts of the legs need to be connected using a saw lock on the elements, and then in the end upper part, mark and drill holes that coincide with the holes in the tabletop.
Leg connection
Holes are drilled in the legs
Step 7. Now you should first prime and then paint the surfaces of the table parts. It is important to dry each layer before continuing work.
First you need to apply primer
Painting table parts
Step 8. All that remains is to assemble all the elements of the table together, and you can install it in the children's room to the delight of the baby.
Assembled table for children's room
Video - Do-it-yourself bed-house
Video - DIY crib
Video - Making a chair and table
As can be seen from everything written above, making children's furniture with your own hands provides enormous opportunities to bring any child's wishes to life. At the same time, if parents treat the production with full responsibility, it will be possible to realize all the ideas of adults from the point of view of caring for the health of the child. The main thing is to choose the right materials, and also decide what type of future children's furniture should have. And remember that there is nothing more environmentally friendly and better than wood for making interior items in a nursery.
Types of designs
The children's room should be divided into three functional areas: a sleeping area, a play area, a creative area and a learning area. Based on this, different types of furniture are used:
- Soft designs. They are installed for sleeping and relaxing, giving the interior a special coziness. To save space in the room, you can choose sofas with additional accessories: shelves, drawers, cabinets. The functionality of such furniture also lies in the fact that at night it is used as a place to sleep, and during the day - for games or reading.
- Play furniture. Often the space in the room is equipped with such items as a do-it-yourself children's kitchen, a puppet theater, a hair salon with a dressing table and various shelves for combs, a hospital complex with medical supplies. It can also be furniture that imitates cars, trains, carriages. Sports complexes, consisting of horizontal bars, swings, and slides, will develop the physical abilities of children.
- Cabinet furniture. It consists of closed structures: pencil cases, cabinets, wardrobes, beds with drawers for bed linen, chests of drawers, tables (computer or bedside). Such DIY products for a children's room should be functional and spacious.
Ready-made sets, consisting of several items, allow you to decorate the room in the same style
Soft
Gaming
Hull
A child’s room can be equipped with the following do-it-yourself furniture set:
- a bed or sofa for sleeping and relaxing;
- desk, study chair;
- a wardrobe for books, writing instruments and a wardrobe for clothes;
- shelves for various things;
- special furniture for toys, for example, a children's kitchen set is in demand;
- sports corner.
Features of choosing youth furniture, popular interior styles
Soft ottomans will ideally complement the interior of the room and add coziness. They are safe, and you can easily sew them with your own hands using patterns. Frame products are also easy to manufacture. Wardrobes, beds, bedside tables, shelves - you can do all this yourself.
Assembling a children's bed inexpensively
Experts in assembling children's furniture come to the site with a ready-made set of working tools, which allow them to assemble as quickly and efficiently as possible. All structures are carefully checked for reliability, stability and compliance with safety requirements.
Assembling children's furniture - our carpenters will assemble:
- Cribs, playpens, cradles for newborns;
- Dressers for clothes, changing tables;
- Physical education walls, game complexes;
- Wardrobes for clothes and toys;
- They will hang shelves, mirrors, computer and work tables.
We also install children's furniture in order to properly organize the space. At a preliminary consultation with the client, we provide valuable recommendations on creating a comfortable interior for children of different ages. By choosing the service of assembling children's furniture from our specialists, you can be sure that the children's furniture will last for many years and will be assembled in compliance with all standards and technologies applied by the manufacturer.
Materials
The furniture departments offer a wide range of products for the children's room, made from different materials. Each has its own pros and cons that need to be taken into account when choosing. The main requirements for them are: environmental safety and high quality.
| Material | Description | pros | Minuses |
| Tree | The frame is made from solid wood | Environmental safety, absence of emitted harmful substances. Natural color, pleasant woody smell | Sensitivity to humidity and temperature changes, which leads to swelling or cracking. High price. Soft woods are susceptible to dents and scratches if not handled carefully. |
| MDF | The frame is made of compressed wood boards covered with plastic, veneer or synthetic film | High strength. Environmentally friendly material, as it does not contain carcinogens and synthetic resins. Various designs of furniture products, attractive appearance | The surface may be damaged during play, causing the veneer or film to peel off. High price |
| Chipboard | Furniture is made from particle board, the surface of which is covered with paints, veneer or film | Low cost. After treatment with special compounds, the material acquires fire resistance and durability properties. | Toxic material (except class E1) |
| Plywood | The frame is made of plywood sheets, the surface is laminated or veneered | Furniture made from high-quality plywood is strong and durable. Variety of design solutions. Low cost | Low-quality material contains formaldehyde and synthetic resins, which lead to allergies. Strength characteristics are lower than those of wood and MDF. The surface is highly susceptible to deterioration |
| Plastic | The main types of plastic structures: tables, chairs, chests of drawers, doll furniture | Light weight products, compactness. Interesting design and various colors. Low cost. Easy care | Low-quality plastic is toxic. Quite fragile material |
| Cardboard | To make furniture you need cardboard with a corrugated insert. Suitable for making a children's house with your own hands | Environmentally friendly. Quite durable furniture if properly processed. Light in weight. Does not require large financial investments; Unusual design | Does not tolerate humidity and temperature changes |
| Foam rubber | The main type of products made from it is upholstered furniture | A light weight. Mobility of the structure. Low cost | Poor quality material quickly loses strength characteristics |
Raw materials should not emit harmful substances that can harm children.
Thick burlap or cotton fabric is used as a covering material for furniture. They cover springs and other frame elements, and also sew back covers. Beautiful, practical materials are used for upholstery: jacquard, tapestry, chenille, velor, flock and others. These fabrics are durable and easy to care for, and are not subject to rapid wear.
How to choose furniture for a teenager in a modern style, tips for parents
You may also need various compositions: varnishes, paints, emulsions that protect the surface from environmental influences. When assembling furniture, the following fasteners are required: screws, nuts, screws, self-tapping screws, eccentric couplers, dowels and corners. Drawings and assembly diagrams are easy to find on thematic resources.
Tree
MDF
Chipboard Plywood
Plastic
Cardboard
Foam rubber
Velours
Chenille
Tapestry
Jacquard
Flock
How much does it cost to assemble children's furniture in Moscow?
Our company offers the lowest prices for calling a specialist to assemble children's furniture in Moscow . Standard prices for different types of services are available in the price list on our website, and the final cost is determined during an individual consultation. When calculating the estimate, the complexity of the design, the number of elements, the amount of work, and the materials spent on assembly are taken into account. The time spent and the deadlines specified by the customer are also taken into account.
Assembling children's furniture at home, for more detailed information, call us right now and we will answer all your questions.
The best workshops on making children's furniture
At home, you can make different designs that will be appropriate in your child’s room. The most common models are not at all difficult to implement. There are a lot of examples in open sources on how to make children's furniture with your own hands.
Frameless pouf
The simplest furniture models that you can make with your own hands are frameless poufs. To make it you will need fabric, thread, a sewing machine and filler. The cover can be made of dense material, for example, raincoat fabric. Foam balls are used as filler.
Sequencing:
- The cover is cut out in the desired shape: round, elongated, square.
- The edges are neatly stitched.
- The side that is sewn last is filled with filler.
To prevent the air from stagnating inside, it is recommended to leave small holes in the case for ventilation. However, you need to make sure that they are of a size through which the contents of the pouf will not spill out. Do-it-yourself frameless furniture will become softer if you additionally sew a cape onto it.
Filler selection
Cutting out the parts for the case
Stitching parts
Filling the bag
The chair is ready
Simple bed
The bed can also be made at home from old furniture. You will need fastenings: corners and screws, as well as non-toxic glue and varnish that covers the product. Tools needed: screwdriver, screwdriver, wood saw, sandpaper.
Making the bed:
- A drawing is created with the required dimensions.
- The bed parts are cut out from it.
- All elements are processed with sandpaper and varnished.
- The parts are connected using corners and self-tapping screws.
- A mattress is placed on the bottom.
The legs of the bed are made of bars, and the bottom is made of slats that allow air to circulate. The backs are cut out in the form of rectangles, as well as the bottom, which should be sized according to the height of the child.
Create a drawing
Cutting out the parts
Grinding
Painting
Assembly
Installation and decoration
Plywood playhouse
Such a “home” will be interesting for any child to play with. For a children's house, it is necessary to determine the height of the floors: the dolls with which the baby plays must fit into it at full height. For the work you will need the following materials and tools: plywood, drill, jigsaw, nails, hammer, wood glue, paint or varnish, paint brushes, pencil, ruler.
Sequencing:
- According to the drawing, parts are cut out of plywood using a jigsaw.
- The edges of the sheets are sanded.
- You can make window openings in the blanks for the “walls”.
- After this, the parts are assembled using glue and secured with nails.
You can install LED light bulbs in the house, and also make furniture for dolls with your own hands.
Drawing selection
Cutting and marking parts Grinding elements
Painting
Assembly and decoration
Modular sofa made of cardboard
Despite the fact that cardboard is a paper material, furniture made from it is quite durable and functional. The sofa can be made from large boxes, for example, from household appliances. For work you need: PVA glue, furniture stapler, stationery knife, ruler, upholstery fabric, foam rubber.
Distinctive characteristics of different types of wardrobes for children's rooms, their sizes
Stages of work:
- A square-shaped sample is drawn on a piece of Whatman paper. It must match the child's height.
- A backrest, also equal in height, is attached to it - a vertical rectangle.
- Using this template, about fifty identical blanks are cut out of cardboard. Strips of the same material are used as gaskets, which are glued together in pairs. The required number of parts is 100 pieces, corresponding in height to the sofa and equal in width to the back, 200 strips - equal to the height of the seat.
- Gaskets are glued to the first blank: long - to the back, short - in the seat area to the middle and to the edge.
- This is how all the prepared elements are glued together. The resulting sofa frame should dry.
- Prepared Whatman paper and foam rubber are glued to the product, after which the workpiece is dried again.
- At the last stage, a pre-sewn cover is put on the sofa and secured with a stapler.
You can prepare several such modules of children’s furniture with your own hands and rearrange them during operation according to the child’s wishes.
Cut and glue cardboard pieces
Stick foam rubber
Pull the covers
Chair made of thick foam rubber
To make a chair with your own hands for a child's room, thick foam rubber is also suitable. Furniture made from this material will be light and comfortable. To make it you will need foam rubber, PVA glue, and a knife.
Sequencing:
- Blanks are cut out in the shape of the letter “L” - you will need 5 of them.
- They stick together.
- The top of the chair is covered with soft fabric.
To prevent the joints from being felt, you can additionally use felt or batting, which are glued to the module.
Cut out parts from foam rubber Glue the elements
Put on the cover
Making a children's chair
Step 1. This version of the chair is made from plywood, but in a similar way, the exact same chair can be made from solid wood. First of all, on a sheet of plywood you need to draw the outline of the parts of the high chair using a pencil and a ruler. In this model, the legs of the chair on one side will diverge to the sides at an angle of 15 degrees, and the height of the back will be 17 cm. In the upper part, the contour of the legs of the chair will close - thus forming an armrest.
First, the details of the chair are drawn
Step 2. All sharp corners, except the bottom of the legs, must be rounded. To do this, you can use a suitable round object.
All sharp corners must be rounded
Step 3. When the shape of the parts of the chair is depicted on the plywood, you need to take a jigsaw and cut out the elements strictly along the lines.
Structural elements are cut out
Step 4. Based on the received part of the legs and armrest of the chair for one side, you need to make the second part. To do this, you need to put the already cut part of the chair on another sheet of plywood and trace it with a pencil, and then cut out the part.
Plywood is marked using an already cut piece
Step 5. Next, all parts must be thoroughly sanded so that there are no sharp edges or splinters.
Sanding parts
Step 6. You also need to make blanks for the seat, backrest and so-called legs, which will help make the chair stronger and hold its legs together across the board.
Preparations for other elements are made
Step 7. You need to make 4 holes in the back and seat for further screwing of the parts.
Drilling holes
Step 8. Now you can coat the wooden elements of the chair with wood primer, dry the layer and sand the surface of the parts.
Re-sanding of parts
Prices for popular models of eccentric sanders
Random orbital sander
Step 9. Next, you need to cover the wooden elements of the chair with paint, first white and then green. Between applying layers of paint, parts must be subjected to intermediate sanding, but only after the first layer of paint has completely dried.
First, the parts are coated with white paint.
And then green
Step 10. On the legs of the chair you need to mark the places where the legs are attached. The locations where holes for fastening are made are also marked.
The places where the legs are attached are marked
Step 11. Now you need to make holes for screwing in screws or self-tapping screws according to the previously applied markings. Holes for self-tapping screws are also made at the ends of the legs.
Then the holes are drilled
Holes in the ends of the legs
Step 12. Next, you need to assemble the frame of the chair by screwing the legs to the legs and armrests.
Assembling the high chair frame
Build process
Step 13. Now you should coat this frame with varnish or special oil for wood.
Subsequent processing of the structure
Step 14. All that remains is to screw on the seat and backrest. The seat is attached to the corners and screws, and the main thing here is not to make a mistake with the length of the fasteners, so as not to drill through the surfaces.
Screwing the backrest
Prices for cordless drill/driver
Cordless drill/driver
Ready-made children's highchair made of wood
Decoration nuances
Children's furniture should not only be comfortable, but also attractive, so that the baby enjoys using all the furnishings placed. Color design in natural tones will help with this. Green or woody tones will have a calming effect, while red is an irritant that can provoke an excited state . But to place accents, you can use bright elements in the form of applications, stickers of your favorite cartoon characters. Floral motifs are suitable for girls, and more dynamic scenes for boys.
To make the baby feel like a full-fledged owner in the room, you can involve him in decorating items that his parents made with their own hands. If age allows, he can decoupage the surface himself.
The furniture itself for children can also be decorated with various elements, for example, carved slats and shaped legs. Thematic details will decorate the room and make it more cheerful. And if you equip it with a bed in the shape of a car, a train or a boat, this will not only diversify the interior, but will also help the child quickly get used to laying down on his own.
Children's kitchen in the country
A great option to keep your child occupied in the summer at the dacha is to arrange a play area for him. Make a country version of a children's kitchen, and believe me, the child will be captivated by the game for long hours.
You can make a country version of a children's kitchen from wooden pallets, old chairs and stools, as well as from the most ordinary logs and stumps. At the dacha, the child will be able to cook shortbread pies, cereals, soups, make herbal salads and other “delicacies”.
For those who think big, we propose to build a real children's summer cafe with a children's kitchen.
In order to let your imagination run wild, we offer you several options for making a wide variety of children's kitchens from old furniture.
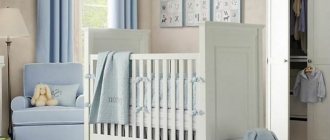
Children's room design for toddlers
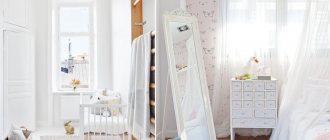
When decorating a room for a baby, parents can try to make all their dreams come true. Just when developing the design of a nursery, do not forget that adults will take care of it. Things like a crib with a variable mattress height are not an unnecessary option, but an urgent need: putting too much strain on your back is harmful for mom, dad, and grandparents.
The changing stand is not an extra detail at all
The same goes for the changing table. Even though children are no longer swaddled, it is more convenient to change clothes at waist height, rather than bending down. This is why high changing tables are made; they have quite high projections on three sides - so that the child does not turn over and fall.
So that it is not just a table with high legs, you can make many drawers under it in which baby clothes and all sorts of ointments/powders and other items that are necessary when caring for a baby will be stored. Then, replacing the lid, turn it into a closet or chest of drawers.
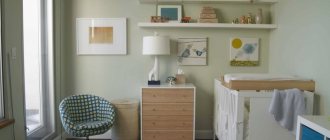
A chair is a useful accessory
In the nursery, you also need a comfortable chair or sofa: the mother will need to feed the baby often, and it is more convenient to do this in a chair where there is support for the back and arms. And then, during games, it is more convenient to watch the child from a chair or from a sofa.
When designing the interior of nurseries for babies, the colors used are very soft. Often this is white and its shades, with the addition of pink and blue. Add some bright pops of color to the walls. Such rooms can then easily be transformed into brighter ones - for older and more active children.
Girls' rooms
Traditional colors in which the design of girls' rooms is developed are pink, lilac and transitional shades. But be sure to ask the girl’s opinion: she may have her own “rules.” And in general, involve your child in developing the project, ask for advice and offer to choose something, and come to a decision together.
The easiest way is if the child has a favorite character, cartoon, or fairy tale. Add a few touches - photo wallpaper with cartoon frames, several pictures, objects designed in the same vein. And the unique design of the nursery is ready.
Pasting photo wallpaper with a frame from a cartoon is a great idea for decorating a nursery.
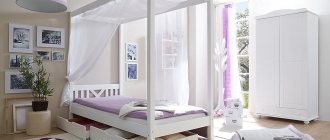
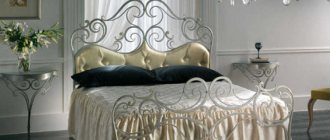
When decorating a bed, girls often dream of a canopy. It may not be entirely hygienic or correct, but it’s worth making your dream come true. Make it light, weightless, from a fabric that washes well. And the design should provide for frequent washing: so that the fabric can be easily and quickly removed.
You can hang tulle or organza above the bed
Girls also love to build “houses”. Organize this opportunity for them. This could be a closet that can be curtained, a two-story bed, one of the floors of which - the upper or lower - can be used as a play area. You can’t forget about safety even for a minute, and you need to fence and secure everything that you can.
Girlish version of a two-story bed
To save space under the bed, you can make drawers, but there are options on the contrary - a podium from under which the bed slides out. Also an interesting option, but more difficult to implement.
Both space saving and secluded corner
The design of a nursery for teenage girls may already require different colors. Pink and lilac can displace beige, brown and other shades of the same range. Some young ladies may prefer darker tones. It may be possible to reach a compromise and add dark accents to a bright room.
Teenage girls may prefer muted colors
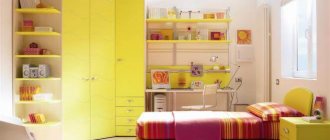
Boy's room
With boys it’s both easier and more difficult at the same time. They like Spiderman, Cars, and other similar stories. And there are no problems with this. There is even matching furniture (as in the photo).
Nursery design for a boy
But after some time, interests change, new heroes appear... it’s expensive to completely change the situation every time. Therefore, it is more rational to arrange everything, say, in a traditionally masculine style. For example, a sports corner, a bed that has a second floor for interesting activities.
Interesting ideas for decorating a boys room
Another option is to play up the young man’s sporting preferences. If he likes to play basketball - make hoops, nets, etc., a football player will need a goal. Just remove all breakable objects away and protect fragile ones with nets...
Room for a sporty young man
When there are two children and one room
If children are of different sexes, or have their own interests or preferences, the easiest way is to divide the room into two zones. Decorate each one depending on the wishes of the “owners” of the area. Only here it is necessary to approach it in such a way that no conflict arises between the children. Now the cards are in your hands...
If children don’t conflict, that’s great.
If there is competition, the design will have to be identical. This is probably the only way to soften the confrontation. Then parents will have to maneuver, taking into account the wishes of the children.
Identical design - a solution to conflicts
If you are lucky, the children do not quarrel or the conflicts are not serious, you can install a two-story bed. It’s usually difficult to agree on who will sleep where: everyone wants to be upstairs. But as a “bonus” for the lower tier, you can come up with a descent in the form of a slide. True, the lower tier will also have to be raised, but this could be a solution to the problem: the younger one, if there is a slide, will be interested in the bottom.
Sliding down from the bed is a bonus for the lower tier
If space is tight, you can use transformable furniture in the children's room. The bed can be lowered from the closet, moved out from under the podium, even descended from under the ceiling. There are different options. Choose the one that is easier or more convenient to implement in your case.
The bed comes down from the closet
In general, designing a nursery is a creative endeavor. All family members need to be involved. This is exactly the case when one head is good, but a family is better. And so that you have plenty to choose from, below are photos with interesting ideas and ideas. Maybe something will be useful for you...
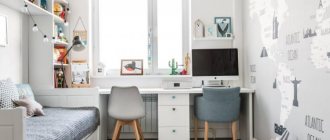
General rules for designing a small children's interior
• For small rooms, pastel basic colors are selected. In a small nursery, pleasant shades of light colors should prevail, reminiscent of summer and warmth - light green, coral, beige.
• Since the furnishings will be updated, the games area will become a work corner; monochromatic wall decoration is encouraged. An interior designed in one pastel tone will look freer. But at the same time, the room should have bright details in the spirit of pop art, appropriate to the child’s age - striped curtains, colored pillows, posters or photo collages.
• A narrow room will be visually expanded by contrasting wallpaper. In this case, the back wall should be highlighted with a brighter color than the rest, or with an interesting small print.
• If the room is long and tall, the accent wall can be decorated with horizontal stripes. They will make the space freer and more harmonious.
• Horizontal stripes on the floor will also expand the walls. And the same effect of lines can be used in the furnishings of the room. In a long room, along a narrow wall you can place a bed, a table or a low chest of drawers with horizontal shelves.
• In general, try to use compact furniture that saves maximum space instead of classic furniture walls. The cabinets in the small play area will be replaced by hanging shelves and open shelving, and the role of a chest of drawers will be played by hidden storage systems.
• And one more important point: both in the bedroom and in the child’s work area there must be good lighting. Diffused soft light slightly expands the walls and will be useful for children's vision.
Therefore, to decorate the window, use tulle, translucent curtains or light-diffusing roller shutters, without a darkening effect.
Lamps located on the ceiling near the walls of a small room will maintain a feeling of spaciousness in the evening.
And most importantly: when choosing a general color scheme, curtains and fancy lamps, remember that boys and girls have different ideas about a cozy fairy-tale room.
Already in children's games, a boy shows the instinct of a conqueror and a hunter, and girls show a love of home comfort, beauty, and dreams of luxury.
Therefore, let’s say in more detail what should be in the men’s and women’s nurseries, and in the room in which more than one child will live.