13485
Adults know how important it is to be able to put their things in order. The child learns through play, so it is important to organize the baby’s doll space in a similar way to the real world. Caring parents can make toy furniture with their own hands. Let's look at examples of how to make a doll closet in various ways.
What can it be made from?
There are many things in the house that will turn into a full-fledged cabinet in just a few minutes. A shoebox in mother’s skillful hands will become the basis, and shelves with doors can be easily cut from cardboard or a box lid. For a larger doll, corrugated boxes can be used as a wardrobe system. They already have “doors”; all that remains is to install the box in the desired position, glue in the cardboard shelves, and attach the legs. Drawers are made from smaller boxes. After this, all that remains is to attach the wire handles and insert the compartments into the cabinet.
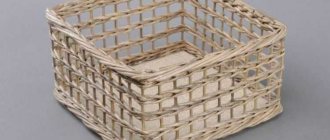
Paper wicker doll cabinet
Weaving experts using newspaper tubes can easily weave a wardrobe for dolls. Such a cabinet will be very beautiful and quite strong, especially if the tubes are painted before and after weaving.
To weave a wardrobe from paper wicker you will need:
- Newspapers.
- PVA glue.
- A piece of cardboard for the base.
- Scissors.
- Hot gun.
Execution process:
Weaving from newspapers is a rather time-consuming process, so it is recommended to divide all the work into several stages. First you can prepare the tubes. Their length will depend on the size of the cabinet.- Prepare cardboard on which to attach several tubes as the main twigs. They should be secured with a hot gun.
- The weaving process itself may vary. There are several techniques for weaving paper wicker. Examples can be found on the Internet
- In order for the cabinet to be stronger, it is necessary to reinforce it with wooden slats in the corners.
- Next, move on to decorating the cabinet with decorations, attaching handles made of wire or buttons. The child will be happy to join this process or take it completely into his own hands, because it is so interesting.
Materials and tools
Various auxiliary materials are suitable for making doll furniture:
- cardboard;
- boxes;
- thick paper;
- transparent glue “Moment” or PVA, glue gun;
- wire;
- plywood.
For finishing facades the following will be useful:
- acrylic paints or gouache;
- napkins for decoupage;
- beads;
- colored paper;
- fabric and braid;
- natural material (watermelon seeds, melon seeds, acorn caps, fruit seeds)
The work will also require tools:
- scissors;
- sanding block;
- pliers;
- clamp;
- hacksaw for a plywood cabinet.
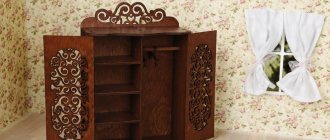
Dads like to approach the issue thoroughly. That is why they can assemble a doll cabinet with their own hands from scraps of plywood or MDF. And the daughter will be proud that daddy made it himself.
Corrugated cardboard
Tools
Material selection
Children's toys must meet the following requirements: safety, durability, attractive appearance. Proper doll furniture, made by yourself, must be well processed and not have sharp, protruding elements or small parts. Select the material for doll furniture, taking into account your skills in working with tools, the size of the doll, and the age of the child.
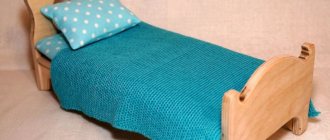
Tree
Ideal option: environmentally friendly, durable, aesthetic.
However, not everyone can make such furniture. To make it you will need furniture boards up to 1 cm thick, a jigsaw, and a screwdriver. And, of course, woodworking skills. Here you won’t be able to do it “by eye”: first you need to make a pattern from cardboard, adjust the parts to size, and then transfer the drawing to wood.
Attention! The wooden product must be carefully sanded so that the child does not plant a splinter.
Unfinished furniture is beautiful in its own right.
You can varnish it or paint it.
The shape of the furniture depends on the needs of the owner: it is interesting to place the baby doll in a cradle to rock him to sleep.
If there are several dolls and little space, a bunk bed will come in handy.
And not only your children, but also your grandchildren will put dolls in a durable wooden crib.
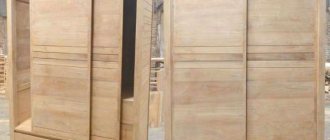
Plywood
Plywood cribs are inferior to wooden cribs in strength, but they are lighter and easier to manufacture.
Parts of doll furniture made of plywood, including beds, can be joined into a groove. To do this, you need to develop a diagram of the product, carefully observe all dimensions and cut it out to the nearest millimeter. But independently assembling such furniture will captivate the child no less than playing.
It is easier to place the parts on self-tapping screws.
Even an untreated plywood crib can become a decoration for a dollhouse if you cut out patterns with a jigsaw.
Finished furniture can be painted in any color with water-based acrylic paint.
Cardboard
Anyone can make a cardboard crib. To do this, you only need rigid corrugated cardboard, scissors and decorating material.
The simplest cardboard bed is suitable as a “camping” option. It is very easy to make: the backs, base and side walls are connected into a groove. When disassembled, it takes up very little space.
If you cover the crib with colored paper or beautiful fabric, it will look quite decent.
For constant use, a more serious design is needed. Using tape, glue and paper for decoration, you can make a two-tier model.
There is no need to cut anything if there is a box with a lid. Covered with fabric, it looks like a neatly made bed.
Chipboard
It is not advisable to use particleboard. Chipboard crumbles at the cut points and breaks if used carelessly.
Preparing parts
Before you make a doll closet, you need to decide on the place where it will stand. A strong but heavy cabinet made of MDF or thick plywood is not suitable for a Barbie house. To avoid injury to the child, such a wardrobe can only be placed on the floor, but cardboard furniture will fit perfectly into a doll’s home.
Let's look at the procedure for cutting blanks made of plywood and thick cardboard. To make a wardrobe you will need to take measurements. The section with the barbell should be 3 cm larger than the doll's clothes. We measure the longest dress, add 3 cm to this value and 1 cm for the legs. This will be the height of the finished structure. The width and depth are calculated based on the space allocated for the cabinet, the planned number of doors, and the size of plywood or cardboard scraps. When all the dimensions are known, the parts are cut out, and grooves are marked on the side walls for inserting shelves. Next, the shelves are cut out, and the edges are processed to remove burrs with a grinding stone.
If the cardboard is not dense enough, it needs to be reinforced. In this case, all parts must be cut out in twos and glued together in pairs.
Details
Assembly
After the preparatory work on cutting out the blanks is completed, you can begin assembly. The frame of the product is glued from the side, top and bottom planes. Fix the structure with the back wall. If necessary, the parts are compressed with a clamp and dried after each stage. Then the shelves are installed. They can be glued or inserted into slots. For the second option, cuts are made in advance on the vertical walls and in the shelves themselves according to the thickness of the parts. It is necessary to ensure that they are located strictly perpendicular to the walls. Next, the pull-out shelves are glued together and inserted. The bar can be made from paper, rolled into a thin roll, or a stick of suitable size can be used. The doors are glued into a small cardboard wardrobe for a Barbie doll, but it is better to hang the doors on a plywood product with real hinges. We roll a thin strip of paper into a tight roll and fix it with glue - we get legs. They can also be replaced with plywood squares or rectangles.
Another option is an origami paper cabinet for dolls. To make it you will need several squares of paper; you can watch the detailed master class in the video.
Collecting parts is based on the principle of a puzzle
Children's
Just like in a real family, dolls can have children. You should come up with options for the nursery. If the doll child is still just a baby, then you can place a crib in the room. In addition, you can complement the furniture set with a box of children's toys. As this element, it is convenient to use a small cardboard box, painted or covered with fabric at the child’s discretion. The children's room can have an armchair for parents or just guests.
Decor
The resulting structure is painted or decorated using decoupage technique with napkins, trimmed with fabric and the edges are decorated with braid, stickers or natural material. You can entrust this work to your daughter, let her develop her imagination!
Handles for doors and drawers are attached at the last moment, when the surface of the cabinet is already completely decorated. Wire and round beads look good. The wire is cut into small identical pieces and a loop is formed. The middle is covered with paper or wrapped with the same wire. An awl is used to poke holes in the doors and insert a handle. The ends of the wire are bent on the reverse side and fixed by twisting together. The closet is ready, all that remains is for my daughter’s doll to carefully hang her things here and start playing.