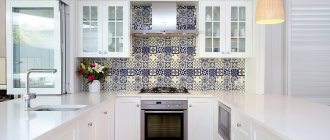
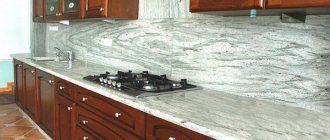
Project creation and development
Algorithm for creating a kitchen according to individual parameters:
- We measure the kitchen. On the project, we note the features: the location of communications, heating equipment, door and window openings, protrusions.
- A list of appliances that will be in the kitchen is compiled. Their exact parameters can be found in the technical documentation.
- We approve the shape of the set in accordance with the characteristics of the kitchen and its material. We choose a manufacturer (if you do not plan to manufacture it yourself). Style of kitchen furniture.
- We choose design features: the number of shelves, cabinets, drawers.
- Next is the selection of colors and accessories.
- Calculation of the depth of wall and floor (depending on the parameters of large kitchen appliances) sections, indents and plugs.
It is better to provide an accurate calculation of the kitchen and furniture project to a qualified master technologist.
You can also create a project using a computer program, such as Pro100 (on video) or AutoCAD or Autodesk revit.
Tool
To make wooden products you will need:
- a circular saw;
- jointer;
- thicknesser;
- milling machine;
- Miter saw;
- manual frezer;
- electric plane;
- jigsaw;
- drilling machine;
- slotting machine;
- drill;
- screwdriver
The list is impressive. This is a whole workshop for the production of furniture. Not everyone can boast of such machines. If desired, you can get by with the bare minimum. And the missing equipment can be replaced with hand tools, from which the same jointing and circular machines can be made. Within the scope of our article we will not consider detailed mechanical engineering. For these purposes, there is a lot of specialized literature on the Internet, as well as video reviews of suitable topics.
But to assemble furniture from chipboard you will need an order of magnitude less specialized equipment. Must have:
- screwdriver;
- jigsaw;
- drill;
- screwdrivers;
- hand saw;
- rule;
- carpenter's ruler;
- roulette;
- plumb line
The latter is needed to install vertical posts strictly perpendicular to the floor surface.
What to pay attention to when drawing up
The first thing you need is to know the number of electrical and gas appliances, their parameters and installation location. This is necessary to determine the number of switches and sockets, and their location.
It is necessary to take into account the location of communications: sewer outlet, gas pipeline, ventilation duct. Pay attention to the location of radiators and heating pipes.
Also, the location of window and door openings is important. Window sill projections. Especially if the set is installed against a wall with a window. In this case, it is necessary to take into account the window opening mechanism. Will the sash be blocked?
When using window space, ensure that the window sashes open unobstructed. Any non-standard protrusion will make a difference.
How to take measurements correctly
At the first stage, we take measurements of the perimeter of the kitchen and its components. Accurate measurements guarantee precise placement of furniture. Measurements should be taken from the corner. To avoid inaccuracies, they must be performed in stages:
- X - at the bottom. The wall in which the kitchen set will be installed is measured along the baseboard or 10-15 cm from the floor.
- Y is in the middle. The tabletop is located at the level, from 75 to 95 cm from the floor.
- Z - along the top edge of the wall sections. Approximately 220 cm.
- Along the upper plinth or 10-15 cm from the ceiling (if the wall sections are “under the ceiling”).
The “from the corner” measurement technique allows you to timely identify wall unevenness.
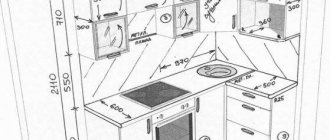
The image below shows an example of a sketch with lettering for the required measurements:
Measurement result using the example of a kitchen sketch
- Ceiling H – ceiling height.
- A is the length of the room at the top.
- B – width of the room.
- B, B1 – the distance from the doorway to the corners on both sides.
- G – the length of the room along the bottom.
- D – distance from the corner to the window opening.
- D, D1 – distance from the corners to the window opening.
- D2 – width of the window opening.
- h o – window height.
- D3 – distance from the window opening to the ceiling.
- h VP – height of the window sill protrusion.
- h under – from the floor to the window sill.
- E - from the corner to the window sill.
- And - the width of the window sill protrusion.
- T – from the corner to the radiator.
- T1 – from the corner to the end of the radiator.
- Y is the size of the radiator protrusion to the wall.
- F - from the corner to the heating pipe.
- X – from the wall to the return heating pipe (along the floor).
- M – from the gas pipeline to the corner.
- P, R, S, O – parameters of the gas pipeline protrusions.
- K – from the corner to the ventilation.
- h vent – from the corner to the ventilation.
- L, L1 – ventilation parameters.
- B1, B2, B3 – parameters of the box for the refrigerator.
At this stage it is easy to make a mistake, which will make all further calculations incorrect. Therefore, it is better to invite a professional measurer.
An example of a wall layout done by a specialist
Planning
Before you create a “finish sketch”, you need to sketch out a rough schematic design. Already on it try all possible options for installing furniture and equipment. Once the optimal arrangement has been selected, you can transfer it to the final copy, taking into account all the parameters. When drawing up a plan, observe the dimensions of the kitchen elements.
- Reflect the outline of the room, with windows and doorways, by reducing the scale.
- According to the dimensions, indicate on the plan the main communications (gas, water, sewerage, ventilation). It is from these points that the calculation of the kitchen set will begin. Their transfer is difficult to carry out, and sometimes it is not possible at all.
Gas equipment must be located in close proximity (up to 50 cm) to the gas pipeline. We immediately note the hood.
The same goes for wet areas. The location of the sink should be close to the sewer hose. A dishwasher or washing machine (if available) is installed to the right of the sink.
- There should be a work surface between the hot and wet zones.
- Next, we reflect the location of the refrigerator - away from the heating elements.
- After the main elements of the kitchen are arranged, we apply the sockets.
- Next, we display all elements that have protrusions: a water heating column, a window sill, a ventilation duct.
- After this, the optimal configuration of the floor sections and their filling is selected.
- The upper modules are selected in the same way.
When the plan is ready, you can start drawing up a sketch.
Main details
After determining the number of cabinets and their sizes, you can proceed to the manufacture of parts.
Marking places for fasteners
A standard cabinet consists of 4 parts:
- Horizontal (2 pcs). It is located between the side walls, to which it is attached with confirmatory screws. Its width should be less than the finished cabinet by two thicknesses of the side walls. If the chipboard is 1.6 cm, and the cabinet width is 80 cm, then the horizontal size is: 80-(1.6*2) = 76.8 cm;
- Side wall (2 pcs);
- Shelf (usually 1 piece). It can be screwed to the walls, then its width should be equal to the horizontal. If you make it removable and lay it on shelf holders, for convenient installation you need to make it 3 mm narrower than horizontal;
- Back wall (1 piece). To make the structure lighter, it is made of fiberboard. The height and width should be 5 mm less than the body parameters. This eliminates the wall from bulging with small cutting errors.
Cut material for future headset
The parts are cut out with a jigsaw after careful measurements. You can order a cut when purchasing materials. It will be done for an additional fee. The furniture factory already has blanks that are used for sawing. As a standard, their sizes are multiples of 15, which must be taken into account when drawing up your own drawings and diagrams for a kitchen set. Blanks can be made to individual sizes, but it costs more. Finished parts for each module must be numbered to avoid confusion during subsequent work.
Lower kitchen cabinets assembled
Features of corner kitchen drawings
The calculation of the corner set begins with the lower section, with the corner module. It is considered the support and starting point for further placement of furniture and appliances. Otherwise, there are no differences from the drawings of a linear (or other form) headset.
Household appliances are placed from the corner cabinet. Paying special attention to gas equipment. Arrange standard and non-standard furniture models.
The size of the parts is calculated several times before being applied to the sketch. Using a trapezoidal module, you can upgrade a linear kitchen into a corner one, without making any other changes. Most often, a sink is placed in it.
Making a corner cabinet
To make it yourself, all you need is the necessary material and a standard set of tools:
- PVC sheets that will be used to decorate the facade;
- material for assembling the box (MDF, chipboard, chipboard or wood);
- euroscrews of suitable size (usually 40/4.5 and 50/7 mm);
- drill with the necessary drill bits. For woodworking, diameters 4.5, 7, 8 are used;
- jigsaw;
- level;
- self-tapping screws;
- pendants;
- roulette;
- hex wrench;
- sealant;
- dowels;
- screed for furniture (confirmation);
- small fittings (hinges, handles).
Before purchasing the necessary material, it is necessary to draw up a drawing of the future model. You can choose the most suitable scheme, the main thing is that it can be adjusted to the required dimensions of the cabinet and its components.
Preparing for assembly
First of all, it is necessary to prepare the basis for the future block. It is cut strictly according to the applied markings (using a jigsaw) from a single sheet of the selected material.
The process of sawing a product from a sheet of wood
It is not always possible to make a high-quality cut at home . In order to simplify the manufacture of blanks, you can contact a company providing carpentry services, which will cut out the necessary parts from the provided material that correspond to the drawing. And also, he will trim the box elements.
The easiest way, at home, is to assemble a box with a rectangular bottom at the base. In this way, you can avoid skewed corners and the resulting troubles. However, this design is not always appropriate.
Interesting! If you need a pentagonal module, it is better to assemble it from two rectangular blocks.
Product drawing indicating dimensions
Finished cabinet
Cabinet assembly process
Subsequence:
- To pre-fix the frame and strengthen the structure, you need to make recesses for the dowels. Before fixing the dowels into the holes, you need to apply glue to them.
- The part, with dowels already attached, is connected to the holes of the adjacent element. The chopsticks should fit tightly into the recesses. This may require some effort.
The process of connecting parts
Bottom fastening
Fastening the side edges
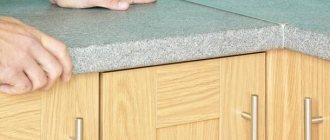
Installing the base under the countertop
- Before installing the cabinet, you need to check (using a level) how evenly the segments of the structure are located.
- Using a hex key, the ties are screwed into the dowels.
- At this stage, the structure is equipped with legs (if they are provided for in the drawing).
Installing the T-leg
- At the ends of the module, holes are made into which fasteners for the doors will fit. To do this, you will need self-tapping screws.
Fastening the edging on which the doors will be attached.
The process of installing edging using self-tapping screws
- If the cabinet design contains drawers, then it is necessary to fix the rails along which they will slide out. The rails are attached to the inner side panels of the cabinet.
Instead of boxes, rotating platforms are installed
Finished installation result
- The back opening is covered with a sheet of chipboard, which will serve as the back wall.
The principle of operation does not change if a wall block is made. The only difference is that fittings are attached to the rear ends of the wall-mounted module, with which it is fixed to the wall. Using adjustable hangers will make it easy to level the cabinet.
When the block being manufactured is placed in the set, it is necessary to prepare the tabletop and hang the doors:
- The doors are installed on cross-shaped fasteners, which were fixed on the side walls of the module. After the doors are installed, you need to tighten the bolts.
Door installation
- If there is a misalignment between the doors, it is necessary to adjust their level by tightening or loosening the bolts.
Must be hung straight
Start assembling the kitchen set with wall cabinets. Before doing this, carefully select the details for each element of the headset.
Piece-by-piece assembly of a hanging cabinet
Installation of accessories and fasteners
Install door hinges, shelf supports, and drawer guides.
Assembly of the supporting structure
For assembly accuracy, holes for cotter pins are provided at the places where the parts meet. Connect the side and horizontal walls, make sure that the mating angle is 90 degrees.
FOR YOUR INFORMATION! To avoid damage, assemble them in a position where the holes are in a plane perpendicular to the surface of the assembly area.
Also join the second pair. Assemble the box from two halves and make sure there is no distortion - measure the diagonals.
Box tie
For this purpose, screws with a countersunk head with an internal hexagon or furniture corners can be used. Insert and loosely tighten all fastening screws. Make sure there is no distortion and perform the final screed.
Rear wall installation
In the designs of wall cabinets, two methods of installation are used. The first is to attach fiberboard or hardboard to the outside using a staple gun or small nails.
- Place the box face down on the assembly surface and place the fiberboard on top so that the edges do not extend beyond it.
- To avoid warping, secure it at the corners first.
- Fasten along the perimeter, maintaining an interval of 10 cm.
In the second method, the sheet is inserted into grooves machined along the rear edge of the racks.