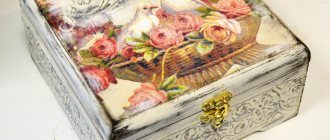
Varieties of decoupage
The ancient technique of decorative design of objects today has several popular directions.
Why is decoupage used on bottles?
Decoupage technology allows you to make a beautiful and unique decorative element at home: decorated bottles can be used as a flower vase, a special container for storing holy water, or an original vessel for olive oil.
Decorated bottles of champagne brought to the registry office for painting, in honor of a newborn’s birthday, for the child’s discharge from the maternity hospital, etc. create an appropriate festive atmosphere, and containers decorated in a specific theme are an excellent gift for a professional holiday!
In addition, a bottle decorated using decoupage technique is perfect for congratulations on a birthday, anniversary, national and professional holiday. The main thing is to choose the right decor.
Decoupage on bottles is used as souvenirs and gifts for the holidays
To decorate a gift bottle for Border Guard Day, wood and drapery with fabric in military colors can be used as decor. On Fisherman's Day, you can give bottles decorated with ropes, twine, and appliqués with ships. For New Year's bottles, napkins with images of Father Frost and the Snow Maiden, decor with artificial cones, etc. are suitable. Kanzashi will be an ideal decorative element for decorating wedding bottles.
Decopatch
The technique is essentially similar to creating a patchwork quilt. The design consists of individual small elements that are united by a common theme or similar color scheme.
Selecting details for decoration requires a competent and thoughtful approach. To make the task easier, purchasing a ready-made kit designed to work specifically with this technique will help.
Photo bottle decor
Look here: Table decor: 105 photos of the best examples and videos of the main ways to decorate a table
Did you like the article?
0
Classic (direct) decoupage
It is the simplest technique with which it is recommended to begin acquaintance with this decorative art.
The creative process consists of gluing paper elements onto a previously prepared surface. Creating decor requires care, otherwise unsightly bubbles and folds will appear on the surface of the bottle being processed.
There are several basic methods of working in the direct decoupage technique:
- using a file;
- brushes;
- ironing.
For beginners, it is recommended to master bottle decoupage using classical techniques.
Fabric decoupage of bottles for beginners
You can beautifully decorate a bottle using different fabric scraps, and the thinner the fabric, the more elegant the folds in the decoupage will be.
Stockings are perfect as fabric for decoupage.
Fabric decoupage of bottles for beginners is best done in combination with napkins:
- The first step is to prepare all the necessary materials: a bottle, cotton fabric, scissors, PVA glue, three-layer napkins, brushes and acrylic paints.
- The bottle must be thoroughly cleaned of labels and glue; this can be done by soaking it in soapy water.
- It is important to degrease the surface with acetone or alcohol.
- The next step is to think about the composition of the decoupage.
- The selected napkin pattern must be carefully torn from the canvas.
- The design of the napkin must be applied to the product, and its edges must be marked with a marker.
- Chintz should be cut randomly into strips.
- Strips of fabric must be soaked in glue diluted with water in a ratio of 3:1, i.e. The consistency of the glue should not be very thick, but not liquid either. If the glue is initially quite liquid, then there is no need to dilute it with water.
- The fabric soaked in glue should be wrung out a little and glued to the bottle in a random order, bypassing the area intended for the napkin.
- The bottle, covered with cloth, should be thoroughly dried at room temperature.
- After drying, the fabric part must be painted with acrylic paint.
- After the paint has dried, you can start gluing the picture from the napkin; to do this, you need to separate the napkin.
- Apply glue to the bottle and attach the image, then very carefully coat the surface of the napkin with glue.
The final stage will be the final painting of the fabric area with the desired shade and the further application of acrylic varnish.
Varnish can be coated in several layers to create a more moisture-resistant surface.
You can decorate with fabric in other ways. Cut a piece of fabric into small pieces and glue it without wrinkles. Further decoupage can be done with any decorative little things, for example, beads, rhinestones or shells.
Artistic (smoky) decoupage
The peculiarity of this method is that the resulting design is very similar to an artistic painting or a wall fresco. A similar visual effect appears as a result of complex and smooth transitions between the details of the pattern with a slight haze.
DIY bottle decoupage: how to get growths
Often, volumetric elements are required to decoupage a bottle. You can get growths on bottles in various ways. The best way is to use polymer clay. This method makes it possible to obtain a plain, convex element of any shape. Clay decorations are attached using decoupage glue, “Second”.
When working with polymer clay, you should use a special softening agent; you should bake the material in the oven at 130 degrees.
Three-dimensional patterns on a bottle can be made with ordinary putty by filling an empty PVA tube and squeezing the material along the contour of the desired pattern.
When decoupaging bottles, you can use improvised means that everyone usually has in their home.
After drying (about a day), the putty must be sanded: this way all unevenness and sharp edges are removed.
You can also obtain voluminous decorative details using improvised means. For example, growths on a bottle can be made with salt dough or pasta. The dough is kneaded from flour, glue, water, vegetable oil. Pasta is glued to the surface and painted in the desired color.
Volumetric decoupage
This is a relatively young decorative technique that is rapidly gaining popularity. The decor allows the use of shells and molded parts to create three-dimensional decorations on the glass surface.
Experienced craftsmen often use a special plastic paste as a base.
An important advantage of the decoupage technique is the absence of strict frameworks that limit the creative imagination of the master.
You can use any techniques, decorative details and artistic design methods to create unique designer items. You can admire the creations of experienced craftsmen by studying pictures of bottle decoupage.
Decoupage bottles with three-dimensional cards
Craft stores sell so-called three-dimensional cards. Your bottle with them will be embossed and even sculptural - which means you can create much more unusual solutions. By the way, you can make such cards yourself if you print the picture on 6-7 sheets and layer individual volumetric fragments.
Preparing for work
Working in the decoupage technique will require equipping a convenient place for creative activities. The best option is a table with good lighting and a sufficiently large work surface. An important point is a comfortable chair and the ability to properly ventilate the work area.
Note!
- Birch bark: simple step-by-step master classes on creating crafts from birch bark with your own hands. Ideas for original products with photo examples
Kinusaiga technique - TOP-140 photos of the best ways to create crafts using the Kinusaiga technique with your own hands + instructions for beginners
- Do-it-yourself passe-partout - a master class with step-by-step do-it-yourself schemes. Making tips + photos of the best examples
Using tights
Thanks to their qualities, tights have become a popular material for decorating bottles. They are easy to drape, tightly fit the product, taking any shape. The work is carried out as follows:
- Remove labels from the bottle and degrease the surface.
- Trim the tights to make a stocking. Coat it with glue, squeeze out excess glue and pull it onto the bottle. Distribute the folds on the edges of the stocking evenly around the perimeter. Leave to dry for several days.
- Cover with acrylic paint.
- Decorate the product according to your preference and apply varnish.
Using the technique of decoupage, it is possible to transform the appearance of an object, giving it a new, more interesting look. A bottle decorated in this way will perfectly decorate a festive table and surprise guests.
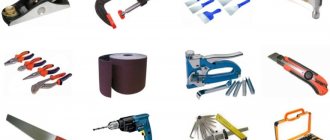
Tools
The list of necessary devices is small. Usually these tools are found in any home. Therefore, a new hobby will not require serious financial investments.
You will need:
- brushes of different sizes;
- containers for water and various materials;
- soft fabric;
- stationery knife;
- foam sponges;
- sandpaper;
- sharp small scissors.
Decoupage bottles with rice paper
Loose, textured and translucent rice paper gives the decoupage technique a special chic. Most often it is used for baking or spring rolls - that is, in cooking. This means that it is completely safe, environmentally friendly and even healthy.
You will need a pre-skimmed bottle, the rice paper itself and some interesting pattern. It is better not to cut the paper, but to tear it into pieces by hand - its uneven edges look much more beautiful. You can use PVA for gluing, or you can simply moisten the sheet, press it tightly to the glass and dry it with a hairdryer.
Decoupage with napkins
Decoupage of bottles with napkins is a simple decorative technique that allows you to turn a simple bottle into an original interior element. The technique does not require the purchase of expensive decorative elements and extensive experience in such work. Simple decoupage of a bottle for beginners using napkins will help you understand the principles and techniques of work.
Napkin decoupage of bottles: master class step by step
The most popular is decoupage of bottles with napkins.
The paper has good adhesive properties and can be glued to almost any surface. Napkins are a very thin material, and the presence of different colors and patterns on them allows your imagination to run wild.
Before starting work, you must prepare all the necessary materials. The most important thing is to find a suitable bottle; it should be smooth with smooth curves. The napkins should be three-layer, and various magazine clippings will also come in handy. Regular acetone is suitable as a degreaser. All decoupage elements must be glued using PVA glue.
After decoupaging the bottle using napkins, you need to cover its surface with acrylic varnish
Bottle decoupage master class step by step:
- The first step is to prepare the bottle for decoupage; to do this, you need to get rid of the pasted labels. This can be done by soaking the bottle in a soapy solution.
- After removing labels and glue, it is necessary to degrease its surface using acetone or an alcohol-containing compound.
- The next step will be priming the surface.
- After priming, you need to cover it with acrylic paint in an even layer and let it dry.
- Use a foam sponge to darken part of the bottle or its entire surface with acrylic paints.
- Now comes the decoupage process itself. Cut out a design from a napkin and separate it, removing the top layer with the design.
- Apply glue to the bottle, in the place where the picture is glued, and attach the picture, carefully coat it with glue on top with a brush.
- The final step will be to apply a layer of acrylic varnish, and if the application is done in several layers, the decorated product can be washed.
In fact, there is nothing complicated in napkin decoupage; it is important to perform all actions carefully. This craft can be used to decorate the interior or given as a gift for a celebration.
Preparation
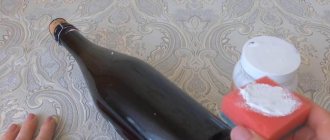
Work always begins with preparing the glass surface. A prerequisite for obtaining a quality product is the complete removal of stickers and labels from the surface of the selected bottle.
Then it is thoroughly washed with dishwashing detergent and dried. Experts use alcohol solutions or solvents to effectively degrease glass surfaces.
The glass is carefully sanded with sandpaper and degreased again.
How to decoupage bottles with leather
Leather can be used to effectively decorate both an ordinary rectangular bottle and a pot-bellied jug (leather can create exquisite folds on round, large containers, which are perfect for decor in an antique style).
Decoupage of bottles with leather occurs in several stages
Decoupage with leather begins with standard preparation of the glass surface (cleaning, degreasing, priming). Then the surface is covered with leather, pre-impregnated with PVA, forming a relief with your fingers. When working with leather for the first time, it is better to cut the material into pieces and apply one at a time: this method is quite simple and will be more convenient for an inexperienced craftsman. Working with a whole canvas is more difficult, but gives a cleaner and more accurate result. Upon completion of decoupage, the leather is tinted to the desired color and varnished.
The thinner the skin, the easier it is to create different reliefs on it.
Primer
This step allows you to create a more impressive and high-quality surface for further decoration. Acrylic paint is usually used as a primer. The soil layer is spread with a sponge or wide brush.
Decoupage on boxes
It’s worth trying to repeat a simple master class on decoupage of a shoe box. The materials you will need are a thick box, napkins, acrylic paints, glue and brushes.
| Image | Stages of work |
| Apply white paint to the box and then dry thoroughly. | |
| Cut out a pattern from napkins. At the same time, we separate the top layer. Glue is applied to the part, which is glued to the box. | |
| The glue is applied from the middle to the edges with slight pressure. | |
| After the image has dried, you can decorate the surface using decorative stamps. | |
| To give an aged look, you need to go over the edges with dark paint. | |
| The drawings are fixed on top with acrylic varnish. | |
| This is what it looks like after the work is done. |
Preparing paper elements
A variety of paper blanks are acceptable for artistic decoration.
- When using special napkins, the elements are simply cut out and removed from the base.
- Magazine illustrations and postcards require pre-soaking in warm water so that they can be easily removed from excess layers of paper. The parts are cut out with sharp scissors.
- Using regular napkins will require cutting out the intended patterns.
To learn more about the process of preparing various paper parts, watch the video tutorials.
Operating rules
Do-it-yourself decoupage of bottles should be done taking into account the rules developed for this technique:
- You should select bottles with a flat surface that does not have raised protrusions;
- For more precise cutting of the image, it is recommended to use nail scissors;
- When using napkins, stick only the top layer of paper removed from the cut out picture;
- It is better to use special decoupage glue for the work; if it is not available, PVA diluted with water (1:1) will do;
- Gluing a picture is done as follows: lubricate the surface of the product with glue and apply the image to it, carefully leveling it and avoiding the appearance of wrinkles;
- When working with decoupage cards, they are first dipped in warm water for a while and dried by placing them on a towel;
- After the pasted pattern has dried, it should be protected from moisture and mechanical damage with a layer of varnish.
Gluing parts
The most exciting step in the creative process is gluing paper elements onto the glass surface.
The work will require accuracy, attention and concentration.
- The parts are carefully coated with an adhesive; in addition, it is easy to apply it to glass.
- The blanks are placed on the glass and their surface is very carefully smoothed, expelling air bubbles and excess glue.
LiveInternetLiveInternet
Quote from MonaLina's message
Read in full In your quotation book or community!
Master Class.
Bottle decor using 3D decoupage technique. SOURCE
Author MK Ksyta: Good day. I’ll show you how I worked on the “Cherry Blossom” competition bottle using the “Wild Swans” bottle as an example.
For work we will need:
Primed bottle Tracing paper Acrylic putty (I use wood) Acrylic pearlescent and metallic paints Printout of the desired picture Thick film from packaging boxes Acrylic varnish and spray Microbeads and silver beads Contour with glass effect as well as scissors, sandpaper, stacks, tweezers, candle.
Place tracing paper on the drawing and outline the elements that you want to make voluminous. Cut along the contour and glue it onto the bottle. After drying, apply putty to the outlined parts and give it relief using whatever is convenient: fingers, spatula, brush. We squeeze the wood out of a tube of hair dye. We draw the texture of the trunk with a fork and a hard brush.
Complete drying occurs on average within a day. This depends on the thickness of the putty applied. Then we cover the printout with varnish, layer it in water and stick it on the bottle, combining the picture with the created volume. Then we complete the background, according to the given palette and your imagination. We make the necessary drawings on the drawing. We tint the wood with black acrylic with a sponge, and then apply silver paint to the protruding parts with a dry, hard brush. Cover with varnish.
Now about the flowers. Instead of special film, I used thick film, which can be found in various gift boxes. They are used to make windows, inserts, and even the boxes themselves. It is a little thinner than plastic bottles. And the rest I did “as it should be according to technology.” We glue printouts or napkins onto film (I do this with acrylic varnish), dry them, cut them out, heat them over a candle and use our fingers and tweezers (since the flowers are very small) to shape them. For champagne I made poinsettia, the leaves are large, so I used homemade boules. The need for invention is cunning. I attached wooden beads of various diameters to wooden skewers.
Drop a drop of GLASS EFFECT into the center of the flower and dip it into microbeads. The middle is ready. Using the same outline we attach the flowers to the bottle. It holds up great. We string suitable beads onto a fishing line and glue them to the neck. If desired, add contours as accents. We cover it with spray varnish and admire the creation of our hands.
Thank you for your attention.
Applying varnish
The final step in the work is applying a varnish coating to the surface of the product.
This is necessary to protect the bottle from aggressive environmental influences, abrasion, and scratches.
The varnish is applied to a thoroughly dried surface. For better protection, experts recommend applying several layers of varnish. Any master class includes the final varnish coating stage. It is important to thoroughly dry the previous layer before applying a new coat.
Decoupage algorithm using napkins
All work can be divided into several stages:
- Working with a container: select a bottle of an interesting shape and a flat surface; the label is removed; Glass is degreased using an alcohol solution.
- Preparatory process on the surface: a primer is applied, a layer of acrylic paint in a color close to the tone of the selected image (the picture should be a little lighter).
- Preparing the picture: using small scissors, cut out the image on the napkin and remove its surface layer.
- Drawing: PVA glue is not used in its pure form, it is diluted with water in a 1:1 ratio. The applied pattern is smoothed onto the surface with special care so as not to tear the pattern and remove all irregularities.
- The final stage: when the picture on the surface has dried, it must be coated with varnish, which will protect it from mechanical damage. It is recommended to apply several layers of varnish, but each new layer is applied if the previous one has already dried. Drying should take place under natural conditions.
Applications of rice paper
Simple decoupage of a wine bottle can be done using rice paper, which is used for baking.
The best option would be paper with a floral pattern.
Operating procedure.
- The surface of the washed bottle must be dried and degreased.
- It is recommended to tear the paper to obtain an original effect.
- It is easy to glue the elements onto the glass using glue. Another way involves placing damp paper on the bottle and drying it with a hairdryer.
- At the final stage, the bottle is coated with transparent varnish.
Decoupage bottles via file
The file decoupage technique is a good way for large pictures or thin paper that can get wet and fall apart. Carefully peel off the top layer of the napkin and attach it with the design to the file. Spray with water from a spray bottle until the design is completely soaked, and carefully straighten it by hand.
Place another file on top, and then go over the “sandwich” with a soft, elastic sponge or sponge. You need to smooth the pattern well and remove any remaining water from under it. Then remove the top file, and carefully apply the bottom one with the pattern to the bottle and smooth it out again. In the end, all that remains is to remove the top film, secure the result with glue and varnish.
Decoupage with tights
An original option for voluminous design is the use of tights for voluminous decoupage.
The advantage of this method is that it is easy to shape the tights into any shape and create a beautiful drapery on the surface of the bottle.
Using this method, it is easy to perform original decoupage of a bottle of champagne.
Operating procedure.
- The first step is to prepare the surface of the bottle.
- The tights must be soaked in the adhesive composition, having first cut off their upper part.
- Then the tights are pulled over the bottle, gathering them into folds.
- The dried workpiece is painted with acrylic paint.
- Additional design involves the use of paper parts, beads, and decorative varnish to give the bottle an impressive look.
- At the end of the work, it is necessary to apply a varnish coating.
The original design involves the use of beads or coins for additional stylish decor of the gift bottle.
Decoupage bottles in rustic style. Hot gluing napkins
Today I invite you to join me in decorating a bottle of wine for a wedding in a rustic style. Such a bottle of wine can be presented to newlyweds both for the celebration itself and for the first wedding anniversary - a chintz wedding.
To decoupage a bottle of wedding wine in a rustic style, we will need: - a bottle of wine, cleaned and washed of labels and glue; — primer for glass and metal; — white acrylic paint; — ivory paint; - decoupage glue; — matte acrylic furniture varnish; - napkins for decoupage; - twine, linen lace, sisal of natural color; — blank overlay made of plywood 4mm thick; — alcohol-containing liquid for degreasing glass; — foam rubber pads, cotton pads, wide synthetic brush, bristle brush, heat gun, iron, colorless tracing paper or parchment paper, fine-grained sandpaper.
Let's start decorating. Degrease the surface of the bottle with a product containing alcohol.
Cover the entire surface of the bottle with a foam sponge with a thin layer of primer for difficult surfaces. I do this with Tikurila Otex Aqua primer. Glass is a tricky surface for decoupage, but this primer provides a very durable coating, and during the decorating process, all subsequent layers of paint, glue and other decor fit perfectly onto the prepared surface.
After the primer has completely dried, cover the bottle with white acrylic paint, obtaining a uniform white coating. If necessary, do this twice with intermediate drying. Once the paint has dried, sand the surface of the bottle with fine-grained sandpaper, removing possible unevenness in the paint with a sponge.
The bottle is ready for the napkin to be glued on. Don't forget that napkins have 2-3 layers; in decoupage we only need 1 layer of paint. We define the height of the napkin as 2/3 of the “pot-bellied” part of the bottle.
Since the bottle has a conical shape and to accurately determine its size, we place a napkin on the bottle along the seam. We mark the location of the bottle seam along the upper and lower edges of the napkin.
We wrap the napkin around the bottle and mark with a pencil where the seam of the bottle passes.
Make markings on a napkin and cut off the excess.
We will glue the napkin using the “hot” method using an iron.
To do this, apply glue to the surface of the bottle where the napkin will be glued and wait for it to dry completely.
In order for the napkin to lay down and stick smoothly, it must first be ironed.
Heat the iron at medium temperature, turn off the “steam” completely. We apply the napkin to the bottle, cover it with parchment paper and smooth it thoroughly. Under the influence of the temperature of the iron, the glue melts and thereby sticks the napkin. We move the iron along the bottle in small sections, gradually scrolling it and moving the parchment paper.
There are usually ridges along the bottom of the bottle. To ensure that the napkin sticks well in these places, iron the napkin without parchment with the tip of the iron.
At the junction of gluing the napkin, there may be a slight overlap, since the napkin stretches a little when gluing. With this gluing method, it is easy to remove, since this one does not stick to the whip. Carefully lift it with your fingernail and cut it off with curved manicure scissors or nippers.
We cover the napkin with acrylic furniture matte varnish. I use furniture varnishes because they do not stick, unlike artistic ones. Apply the varnish using light movements with enough varnish on the brush so as not to move or damage the napkin.
When applying varnish, the napkin is slightly deformed. To fix this, apply 2 layers of varnish with intermediate drying, and after the second layer has completely dried, we go over the surface of the napkin with fine sandpaper. After sanding, you need to apply another thin layer of varnish.
After the varnish has completely dried on the napkin motif, cover the top of the bottle with acrylic paint in the color “Ivory.” Let the first layer dry and apply another one for better coverage.
The paint has dried - cover the entire bottle with 2 layers of matte varnish with intermediate drying.
Let's start making the brooch cover. We sand the oval plywood blank, cover it with 2 layers of white paint, and sand it again. Glue the prepared napkin motif onto the overlay, applying glue directly to the napkin from the center to the edges.
After the glue has dried, remove the excess napkin with sandpaper.
We paint the ends of the overlay with a sponge using “Acrylic Hobby De Luxe” paint, color Ivory. We cover the overlay with 2 layers of varnish.
On the back side of the lining we glue lace onto the hot gun, laying it in even folds and sisal.
We also glue the twine along the bottom of the bottle using a heat gun. We glue the first turn completely; subsequent turns just need to apply glue in places.
Glue the twine at the junction of the napkin and under the neck of the bottle.
We tint the twine with acrylic paint in the color “Ivory” using the “dry brush” method - put a small amount of paint on the bristle brush, remove the excess on the paper and lightly move over the twine.
Apply a sufficient amount of glue from a heat gun to the finished overlay on the reverse side and immediately, before the glue has cooled, press it into place.
Decoupage of wedding wine is finished. I recommend allowing the product and materials to dry and gain “final strength” within 7-10 days.
Author of the master class Elena Tukaeva, creative workshop “Decoupage by Lena Tukaeva. Master classes, gifts, decor.”
Decoupage bottles for a wedding or anniversary
Wedding decorations are usually kept in the same style. This affects the decor of flower bouquets, celebration halls, and festive glasses. It’s easy to complement the style with original decoupage bottles.
You can use paper napkins, original wedding cards, or even photographs of the newlyweds as decorative details.
Additionally, it is easy to decorate such bottles using lace, beads or beads.
An original bottle of champagne with the image of the hero of the day will be a memorable and pleasant birthday gift.
As additional decorative elements, it is easy to use thematic drawings or spectacular craquelure varnish to create a unique product.
Wine Bottle Decoration
Step-by-step lessons on decorating glass bottles have gained particular popularity on the Internet. To decorate them, not only classic volumetric decoupage is used. A master class on decorating surfaces with fabric allows you to create unique textured patterns on the most ordinary glass bottle.
The presented decoration technique is practically no different from the usual one. However, fabric is used as the basis for the craft. A variety of materials are used: silk, chintz, cotton and velor.
Step-by-step master class in the paperthol technique for fabric:
- The bottle is washed and cleared of labels. The surface is degreased with alcohol.
- Prepare a solution by mixing PVA glue and a small amount of water.
- A piece of fabric of the required size is dipped into the adhesive solution.
- Glue is also applied to the bottle.
- Place the dampened cloth on the bottle, distributing the folds.
- The product is left in the fresh air until completely dry.
- The dried fabric is covered with acrylic paints.
- When the paint has dried, the fabric is coated with finishing varnish.
You can decorate the craft with any elements. Beads, stones and shells are used. You can combine the technique of volumetric decoupage with master classes on creating a three-dimensional drawing. By being creative, the interior can be decorated with unique handmade items.
New Year's decoupage
Celebrating the New Year also involves a non-standard approach to decorating the festive table or arranging New Year's gifts.
Decoupage of a New Year's bottle involves the use of a white background or openwork lace as decoration. New Year themed designs are easy to cut out from greeting cards.
An excellent design option would be beautiful snowflakes, which are easy to cut out of ordinary paper napkins, towels or toilet paper.
You can get ideas for decorating bottles by looking at a photo of a decoupaged bottle. A creative approach will allow you to create an original interior element or customize a gift.
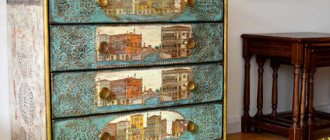
Master class on decoupage furniture in Provence style
Provence style is often present in original ideas for do-it-yourself decoupage of kitchen furniture. Photos of interesting solutions can be seen on the website. If you have old pieces of furniture from your grandmother’s time, then with the help of this technique you can give them a second life.
Decoupage for an entire furniture set in Provence style
The interior in Provence style is distinguished by its extraordinary beauty. To decorate a room in this style you don’t need to spend a lot of money; you can make a stylish thing with your own hands from scrap materials. To decorate furniture in a similar style, motifs characteristic of the French province are used. These are flower gardens, lavender fields, picturesque streets and vineyard plantations.
You can see how to make a masterpiece in Provence style in our master class using the example of a chest of drawers.
| Image | Description of actions |
| Prepare a chest of drawers, beautiful designs on napkins, paint, glue, roller, brush, sandpaper and scissors. | |
| The piece of furniture itself is painted with paint. Apply layers with a roller, and after drying, sand down any imperfections with sandpaper. | |
| While the chest of drawers is drying, you can cut out elements of napkins for decoration. | |
| The glue is distributed over the location of the pattern and over the image itself. To create a scuffed effect, sandpaper is used. | |
| The surface is varnished. You need to apply 10 to 15 layers. | |
| It is recommended to sand every fourth layer with a varnish compound. | |
| Excess paint is removed. | |
| To complete the work, you need to wait until the chest of drawers is completely dry. |