How to sew oven mitts for the kitchen with your own hands for beginners:
An oven mitt is a must have item in the kitchen. It protects your hands from burns when using hot utensils. Of course, today you can purchase these kitchen accessories at a regular hardware store. But it is much more pleasant to use potholders made by yourself, especially since for sewing potholders you will only need the skills acquired in labor lessons at school.
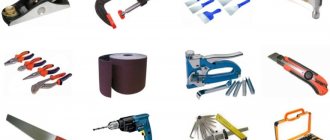
everything you need for work
To start sewing potholders, you first need to assess your strengths and, based on your skills, choose or come up with a model for the future product. If your skills end with sewing on buttons, then it is better to sew a potholder more simply, using simple options for shapes and decor. But if you are already an experienced seamstress, then it will not be difficult for you to make a product in the patchwork style or come up with unusual decorations for it.
Once you have made your choice, start looking for the right fabric. The advantage of sewing potholders is that they are made from unnecessary things. Old coats, shirts, dresses, skirts - everything will be used. But there is one caveat: potholders must be sewn from natural fabrics, since synthetic ones are easily flammable and melt at high temperatures.
An excellent option would be:
- linen;
- chintz
- cotton;
- denim.
A potholder made without filler will not be of any use, so prepare material for the inner layer.
As a “filling” you can use:
- felt;
- fleece;
- padding polyester;
- denim fabric.
To make the finished product look beautiful, prepare edging tape and decoration items.
how to make a pattern
On the Internet today you can find the most bizarre types and forms of potholders, but the following are considered classic:
- square;
- circle;
- mitten.
Making a pattern for potholders is not difficult, because unlike clothing, there is no need to create complex designs. For patterns, you can download ready-made ones from the Internet or trace an old potholder. A square or circle can generally be drawn using ordinary stationery.
No matter how simple the shape of the future potholder, to create it we recommend making a paper pattern and using it to transfer the design onto the fabric. This will prevent uneven parts during the sewing process. The material itself should be washed, dried and ironed before cutting out.
To sew a potholder, you need to make two parts from the filler and two parts from the main fabric. In total you will get four pieces of the future kitchen accessory.
When making a pattern, make sure that all the details are the same, otherwise the finished potholder will have a sloppy appearance. Don't forget to leave an allowance of 0.7-1 cm along the edges of the pieces for seams.
how to assemble the product
Now that you have already transferred the patterns onto the fabric, now it’s time to put all the details together. Depending on where the stitching will take place - inside or outside - the parts should be placed differently.
If the product will be sewn from the inside, then first place the upper parts facing each other, then put insulation on both sides.
If the product will be sewn from the outside, then first of all, fold the insulation parts together, and then place the main fabric parts on them with the front side facing out.
After all the components are combined as required, secure them with a running stitch and then sew them on a machine. If you are sewing a potholder from the inside, do not sew everything completely, but leave a place where you will turn the product outward.
At the very end of the work, sew (if desired) trim along the edges, make a loop and decorate.
Where to begin
Before you start working, you need to understand why you need a potholder. If it performs only a decorative function, then the composition of the fabric does not matter. For items used for their intended purpose, it is necessary to select only natural fabrics.
Help: you can use old clothes, including denim, unnecessary sheets, and towels. They will serve as free consumables and will receive a “second life.”
Then you need to select a filler. It is needed so that the product reliably protects your hands from burns. Suitable for laying inside:
- batting;
- felt;
- felt;
- terry or waffle towel.
If it is necessary for the finished potholder to hold its shape well, then you will additionally need adhesive interlining.
You also need to think about decorations and a loop holder at the idea stage. By the way, you can involve children in the implementation of your plans; they will definitely come up with something unexpected and original. For example, make an oven mitt that resembles their favorite T-shirt or toy. However, for the first experience it is better to choose a simple form.
The simplest potholder is square. First you can try to sew it. The standard size is 20x20 cm, but each housewife selects the optimal parameters for herself.
How to sew a square potholder for the kitchen with your own hands
The simplest option, which even an inexperienced craftswoman can handle, is a square-shaped potholder. If the loop is sewn not on the side, but in the corner, then the potholder will automatically take on a diamond shape.
To make it, you will need:
- fabric for the base;
- insulation;
- scissors;
- threads;
- needle
- braid.
Potholder size 20 x 20 cm
- Make a pattern out of paper in the shape of a square measuring 20 x 20 cm;
- Transfer the pattern to the main fabric and insulation, leaving 1 cm allowances at the edges. Make two outer parts and two inner layer parts (4 pieces in total);
- Place the outer parts right sides together, then place insulation on them;
- Sew the seams using a machine, leaving room for turning;
- Turn out the potholder. Finish it with braid along the edges and sew a loop in the corner.
Modern options for potholders
Not long ago, silicone potholders in the shape of a duck beak, a dog's mouth, and a frog's face appeared on sale. They consist of two halves: one for the thumb, the second for the other four fingers. With the help of such an oven mitt it is convenient to remove baking dishes from a hot stove.
Is it possible to sew something like this? Certainly! The main difference between this potholder and the others is three parts: one large and two smaller. As a training sample, you can sew an oval or rectangular potholder.
Manufacturing technology:
- Draw a 25x20 cm rectangle on a sheet of paper;
- transfer it to the main fabric folded in half, cut it out to make 2 parts;
- using this template, make parts from cushioning material;
- fold so that the filling is between the wrong sides of the base, sew;
- repeat steps 1-3, but cut each part into two identical parts;
- Sew two blanks from the resulting halves and finish the outer sections with braid or trim;
- place two small ones with processed cuts facing each other onto a large workpiece to create pocket-flaps facing each other;
- sew around the perimeter, decorate the seams, sew on a loop.
Now you can roll up the pot holder to check the fit.
Tip: An oven mitt with flaps can be used as a cutlery pocket for table settings.
Using this pattern, you can sew an oven mitt, which can be used to conveniently hold a saucepan or ceramic pot. It looks like a scarf with pockets on the edges. The length of the largest piece is calculated based on the size of the largest pan used. It is necessary to measure the diameter and add 20 cm. Width – 20 cm. For two small parts, cut out rectangles 15x20 cm.
Interesting oven mitts for the kitchen, photo
In addition to protecting hands from high temperatures, oven mitts also perform a decorative function. They can add coziness and diversify the interior. Today you can find a lot of unusual types of this kitchen accessory on the Internet. We have selected the most interesting of them for you.
The first option is an oven mitt for large frying pans and pots. An unusual combination of fabrics with different patterns makes it also a stylish accessory for the kitchen.
Such a cat will require a lot of time and skills from the needlewoman. But you must agree that the result is worth it!
And the following potholders in the shape of teapots can be used both for their main purpose and as a stand for hot food.
Patchwork leaf potholders look unusual and only an experienced craftswoman can handle them.
For those needlewomen whose skills are not enough to create “leaves,” there is a simpler option - a square potholder made from scraps of fabric.
How to sew a potholder with your own hands from scraps master class
Patchwork, or patchwork style, has been used by our ancestors from time immemorial. This type of needlework is notable for the fact that to create it you can use leftover fabric from sewing other things or unnecessary things, but at the same time the pattern turns out to be unusual and beautiful.
Making potholders in patchwork style is a simple, but very labor-intensive process that requires attention and precision. We will show you a master class on how to make a simple potholder from scraps.
To work you will need:
- two pieces of main fabric and two pieces for the inner layer measuring 24 x 24 cm;
- strips measuring 2.5 x 24 cm;
- edging tape.
1. Take a square of the main fabric, place a square of filler on top of it and begin sewing strips to the squares.
2. Take two strips, fold them face to face and stitch them to the base on one side. Then turn them outward, iron them and attach another strip, also stitch them to the future tack, turn them over and iron them.
Continue doing this until the entire surface is filled with stripes.
3. Attach the tape to the wrong side of the potholder and secure it around the entire perimeter. At the same time, at each corner, bend the binding at an angle of 45 degrees.
4. Sew the binding to the potholder, but not all the way, leaving a “tail” for the loop.
5. Turn the binding right side out and secure with pins or stitches.
6. Make a small loop from the remaining binding and hide the “tail” inside.
7. Sew the binding to the pot holder.
So, to sew potholders you will need:
jeans or any other thick fabric for the top;
lining (in our case - natural silk, but you can choose, for example, chintz);
thin padding polyester;
sewing thread to match the stitching on the jeans or matching the color of the main fabric, as well as thread to match the color of the lining fabric.
How to sew a pot mitten with your own hands, step by step with photos
As we wrote earlier, a mitten potholder is a very common type along with square and round ones. “Mittens” are convenient not only when cooking on the stove, but also in the oven, since the back of your hand often gets burned from the oven walls when you put in or take out the baking dish. They can be sewn on one or both hands. We will show you a master class for one glove. The second is done in a mirror way.
For work, prepare:
- textile;
- insulation;
- braid;
- pencil;
- tracing paper;
- scissors;
- threads;
- sewing machine
1. Make a pattern according to size. indicated in the photo.
2. Transfer the pattern to the fabric and cut out four parts from the main fabric and two from insulation.
3. Place the two main parts right sides together.
4. Apply a “filling” of insulation to them on each side, and on top of one more main part with the front side facing out.
5. Machine stitch the pot holder.
6. Trim the excess fabric around the thumb to make the line sharper.
7. Turn the potholder outward, trim the bottom with braid and sew on a loop.
Classic square potholder
For such a product you need to prepare: 2 pieces of main fabric, material for laying inside, braid, scissors, threads and needles.
How to sew a square potholder:
- wash and iron the selected main fabric;
- make a template out of paper to determine the size and avoid defects when cutting the product;
- attach the templates to the fabric and trace them, adding 1 cm for allowances on each side;
- cut two squares from the main fabric;
- transfer the templates to the cushioning material, folded in half;
- cut a square without taking into account allowances;
- fold the squares of the main fabric facing each other, put insulation on top;
- sew three sides either on a machine or by hand using a needle or chain stitch;
- Turn the product inside out, iron it, fold the free edges inward, insert a loop of braid into the corner, and sew everything together.
Beginning needlewomen are afraid that when turning the product inside out, the corners will lose their shape or the laid batting will be deformed. Another way will suit them: repeat the first six steps from the previous description.
The seventh step will be the following: put insulation on the wrong side of the first main square, cover it with the second main square, right side up. Sew all sides, departing 0.7-1 cm from the edge. In order to decorate the cuts, you will need bias tape.
To make binding, lines are drawn diagonally at a distance of 5-6 cm on a suitable or contrasting fabric, cut, folded in half, and smoothed. The resulting tape can be used to edge the edge of any product. It’s better to start from the corner where the loop will be. It is formed at the final stage of finishing from the “tail” of the trim.
If desired, you can quilt the potholder, trim it with braid around the perimeter, sew an applique on it, or decorate it in some other way. It is important to remember only one thing: rhinestones, beads, and synthetic lace are not suitable for decorating kitchen accessories that will come into contact with hot objects.
Tip: if you don’t have a hot stand, then a potholder can successfully replace it.
DIY butterfly pot holder, photo
Butterflies are called potholders that are put on only the fingers, where for the thumb the indentation is made on one side, and for the rest - on the opposite side. If you bring your fingers to the center several times and then spread them apart, you get something like the flapping of a butterfly’s wings, which is how the potholder got its name and is often made in the shape of this insect.
Such oven mitts are very convenient in everyday life; it is impossible to burn your fingers or palms with them. Many housewives, having tried to use such an accessory once, do not want to use other types of potholders anymore.
But a butterfly potholder in this form is not the only option. It can be done in the shape of an apple:
Another interesting option in the form of laying hens, only the fingers are placed on top of the body from the side of the head. Such potholders will add coziness to the interior and can be an excellent gift.
Heart-shaped “butterflies” made from scraps of different colors look unusual and cute:
The simplest version of a butterfly potholder can be sewn in the shape of an egg. Unlike previous options, it is easy to perform, but this does not make it any less interesting.
Other classic potholders
Among the many shapes, square, round and mitten-shaped potholders are considered classic.
Round
It is made similarly to the square one. If desired, you can make a whole set of identical potholders of different sizes. For example, in order to remove a hot lid with a metal handle from a pan, a small-diameter oven mitt is suitable, but in order to remove a frying pan from the oven, it is better to take a larger oven mitt.
Important: every home has a stencil for a pattern - an ordinary plate for second courses has the ideal diameter for making a template for a small potholder.
Mitten
It is good because it protects not only the back of the hand, but also the outer side. Using a oven mitt is convenient for removing the baking sheet from the oven; it is indispensable when working near a wood-burning kebab grill.
To sew a pot mitten, you will need a pattern. You can find it on the Internet or make your own. To do this, place your hand on a sheet of paper, circle it, and duplicate the resulting line at a distance of 3 cm.
Important: for easy putting on, the bottom of the product should have the same width as the middle part.
After the pattern is ready, it must be transferred to the fabric. Unlike a square potholder, a mitten has 2 parts cut from the main fabric, 2 from fabric for interior decoration and 2 from insulation.
Technology:
- fold like a cake: the main part for interior decoration face down, insulation, the main part face up;
- sew along the perimeter, lay additional seams across, along or diagonally so that the mitten does not lose its shape during use;
- make a second similar part;
- fold both blanks, sew, leaving the bottom open;
- turn it inside out, trim the edge with braid, trim, and attach a loop for hanging.
DIY ideas for interesting potholders for March 8th, photo
Potholders are made not only for their own use. They can be given to mothers, girlfriends, sisters, colleagues, mothers-in-law, etc. There can also be an unlimited number of reasons: New Year, Easter or just a good mood. But such gifts will be most appropriate on March 8th.
DIY dog grip, photo
Another interesting type of potholders is made in the shape of a dog's face. In order to sew such a potholder, more time and skill is required. But how cute these kitchen accessories can turn out!
DIY round pot holder, photo
Even the round potholders we are used to can be made stylish and original if desired. If you add a little imagination, a simple potholder will turn into a ladybug with wing-shaped finger pockets.
A pot holder can also become a sunflower mitten.
DIY potholder towel, photo
An oven mitt can perform more than one function, especially if it is combined with a towel. Agree that you should always have both at hand in the kitchen. We have prepared for you a selection of photographs demonstrating what this might look like.
In the kitchen you can have not one, but several potholders and towels at once.
The towel and potholder can be combined or contrast with each other in color.
An experienced needlewoman can make a set of kitchen accessories made in the same style, including a potholder and towel.
In order to diversify the atmosphere in the kitchen, you don’t need much - sew elegant and beautiful accessories. Take things you haven't worn for a long time, come up with a design and go for it! The reward for your efforts will be an updated look for the kitchen.