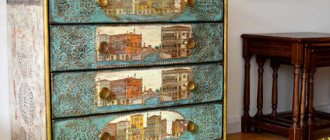
Decoupage is a fairly old technique, with the help of which craftsmen decorate whatever the soul desires: from furniture to small decorative trinkets, as well as household items. And don’t think that this technique is only suitable for handicraft professionals. Not at all!
Absolutely anyone can master this art. The main thing is to start small. For example, decoupage a box.
A few words about technology
Many beginners, having heard the strange and incomprehensible word decoupage, mistakenly assume that a difficult-to-understand name equals a type of technique that is equally difficult to perform. But if you translate this name into simple language, then everything turns out to be much simpler than it seems at first glance.
In fact, the French word decoupage in translation means just “cutting” . That is, the essence of this technique is to cut out pictures and paste them onto the surface of objects in such a way that the resulting attached picture looks like a kind of painting.
The master’s main task is to erase the line between a paper picture and a decorated plane, and this is both a simple and complex job at the same time.
Varieties of decoupage
If you dig deep into the concept of decoupage, you will find a rather serious art, divided into types, effects and styles. So, first of all, technology is divided into five types:
- classic (or straight);
- reverse decoupage;
- artistic (or smoky);
- deco patch;
- 3D (volumetric decoupage).
Craftsmen who have mastered one or more types of this decorative and applied art apply additional effects that give the finished product a finished look that corresponds to the artist’s original idea and the chosen style.
The most popular effects are:
- worn effect - antique stylization;
- craquelure is another artificial aging effect that imitates cracks on a varnished or painted surface;
- toning - creating color accents using watercolors, varnish, strong coffee or tea (often used to apply stains supposedly formed from the age of an object);
- shading is a technique in which paint is applied to an item in order to create a smooth transition between the pasted pattern and the background of the item;
- potal - the use of paints and special materials to imitate gold and precious jewelry;
- patination is another technique that allows you to get the visual effect of an item being worn out from frequent use.
Decorating styles
Before you begin to implement your creative idea - decorating the box, it is very important to decide on the decoupage style. Today there are many trends in this type of needlework technique, but the most common and favorite among craftsmen are:
- Provence - this destination is characterized by the expensive simplicity of the French province. Sunflowers, bouquets of lavender, roses, different types of country birds, rural small houses - all these are elements of the Provence style.
- Victorian style is a mixture of classics and luxury inherent in royal palaces. The style is characterized by bright colors and golden shades. The subjects give preference to still lifes, landscapes, portraits and scenes with animals and hunting.
- Shabby chic will delight lovers of retro styles. The main feature of shabby chic is the effect of artificial aging. Generally characterized by soft tones, floral motifs, patterns, unclear lines and slight blurriness.
- Simple City is the most democratic and universal style, which uses materials available in almost every household: newspapers, magazines, scraps of children's drawings and old photographs.
- Ethno is a very interesting trend that combines the traditional styles of different countries. Mostly ornaments, landscapes and exotic fruits are depicted, conveying the flavor of a particular state.
- Vintage style - with the help of various aging effects, the product turns into an ancient rarity, as if it came from time immemorial.
Step-by-step instructions for beginners
Before you begin master classes on decoupage boxes, you need to understand the essence of its implementation. This will help beginners to master the technology of such decoration at the initial stage. First of all, you need to prepare tools and materials, namely:
- Decoupage box. For beginning craftsmen, it is best to take a ready-made wooden blank (such a product can be purchased at handicraft stores).
- You also need to get decoupage cards or napkins, which are sold at retail outlets specializing in hobby goods. In general, any type of paper with a pattern is suitable for the technique (regular table napkins, wallpaper, postcards, clippings from literature, etc.), but for a beginner it is still better to use special blanks.
- Sharp scissors for cutting out pictures.
- Brushes of different sizes for glue and varnish.
- Glue (regular PVA or for decoupage).
- Glossy or matte high-quality acrylic varnish (the durability of the product depends on the quality of the varnish).
- Acrylic primer.
- Sandpaper.
As auxiliary tools you may need: an old toothbrush, tape, foam sponge, finishing putty, wax candle, various decorative elements.
Surface preparation
In order for the decoupage to turn out neat, the surface of the object being decorated must be perfectly smooth, so it must be properly prepared. This is done in several stages:
- Using sandpaper, you need to carefully sand the workpiece. This will help remove paint or varnish from the old product, as well as remove minor scratches and other defects.
- If the surface has very deep cracks or chips, they are first puttied, then the putty is allowed to dry for 3 to 5 hours, and then sanded again to a smooth state.
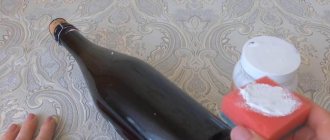
- Dust and debris remaining on the object after such treatment must be carefully removed, and then degrease the surface with acetone or an alcohol solution.
- After the workpiece is completely dry, an acrylic primer is applied.
- 30-40 minutes after the primer has dried, you can begin decoupage.
Paper thinning
The thinner the paper with the image, the more effective the decoupage will be. Thinning the material is one of the important stages of the technique, so it must be treated with special attention, otherwise the design will look sloppy or completely deteriorate. For this reason, beginners are recommended to use special decoupage cards on rice paper, which do not require prior preparation. In other cases, the paper is thinned using one of the following methods:
- Using tape. Varnish is applied to the front side of the picture in several layers, and after it dries, tape is glued to the back side of the picture. The adhesive tape is carefully peeled off along with the excess layers of paper. The procedure can be repeated several times until the picture becomes almost transparent.
- Softening in water. As in the previous method, the outer side of the image is treated with varnish, then the picture is lowered into a container with warm water for several minutes. The time it takes for the paper to soak depends on its density. The soaked drawing is carefully removed from the water and placed face down on a stationery file. Next, remove excess layers of paper, rolling them from the wrong side using careful finger movements. As a result, only a thin layer with a pattern should remain.
Let's start creating
Let's consider what kind of painting and how you can do it on a wooden box.
You can paint a box in different ways, using various techniques: from free painting to folk traditional styles. Painting and painting can be complemented by “aging”, decoupage or all kinds of accessories.
Before you start directly painting and decorating the box, you should process the blank or wooden box and prepare it for painting. To do this, follow these steps:
- Sand the surface of the future box so that it is completely smooth, without roughness or burrs;
- Prime the product with acrylic primer outside and inside (several layers are possible) and dry.
Related article: How to make a paper cat with your own hands: templates for beginners
A primer is needed for a more even and bright application of paint. If the workpiece is fairly even, smooth and white, then you can skip this point. You can also skip priming if you initially plan to make a dark general background.
Perhaps one of the simplest, but at the same time labor-intensive techniques is dot painting. It is done using contour paints. The essence of the technique is to fill the picture with multi-colored dots. The most suitable images for this painting are complex patterns and ornaments that are applied using a stencil or template.
Artistic painting is done by hand on a free theme and can contain any subjects and elements. If we are talking about a box, then most often it depicts flowers, leaves, berries, birds (you can use stencils and templates). However, experienced craftsmen can give free rein to their imagination and depict whatever their heart desires on a small box format.
We should also not forget that there are different styles of folk painting. Caskets and dowry chests were painted with simple ornaments back in the Middle Ages. Each locality had its own tradition of painting wooden dishes and utensils. Many types of painting that have survived to this day can be considered cultural heritage.
Decoration of a round box
This simple master class on decoupage of a Provence style box will help a beginner create his first masterpiece. The product will be decorated in soft colors, which will give it delicate French sophistication.
What is needed for decoupage: a round box, acrylic paints and varnish, an image with roses and leaves along the entire diameter of the top of the blank cover, PVA glue, brushes, a foam sponge.
Creating decoupage:
- prepare the box and pictures according to all the rules described above;
- paint the workpiece with white paint, and after complete drying, apply another layer of ivory paint;
- glue a picture with a rose to the lid of the box;
- Use several layers of gray paint with a hard brush to paint the side areas of the workpiece, as well as the corners and upper edges of the lid;
- Apply a layer of dark honey-colored paint over the areas painted gray with a foam kitchen sponge;
- Finally, coat the box with acrylic varnish.
Painting a box with acrylic paints
Master class: “Painting a box”
Master class on drawing using Gorodets painting motifs
Information about the author: Yakushenko Zinaida Alekseevna, additional education teacher at the Municipal Budgetary Educational Institution for Additional Education of Children at the Children's Art House in Karasuksky District, Novosibirsk Region. Audience: for 5th grade students. Purpose: master class on drawing. Goal: decorate the box using Gorodets painting motifs. Objectives: 1. Familiarization with various elements of Gorodets painting. 2. Application of elements in practice. 3. Instilling a love for folk art. Required tools and materials:
- PVA glue; - acrylic paints; — brushes No. 1, No. 4 squirrel round and flat synthetic No. 9; - a jar of water; - napkin; - palette for mixing paints; - wooden box blank; - finished sketch of the drawing;
- sandpaper No. 1 or No. 0;
- tracing paper; - a simple pencil; - empty pen refill; - acrylic varnish; - oilcloth. Progress of the master class
When starting to work with a wooden surface, you should already have an idea of what exactly will be depicted on it and in what style and technique.
After all, it depends on how to prime the surface: whether the background will remain natural wood, tinted, or will be completely covered by color. 1.
Before painting, a wooden blank measuring 5x9cm.
should be lightly sanded with fine-grained sandpaper and wiped with a dry, clean cloth. 2.
Carefully paint the workpiece with PVA glue with a flat brush so that there are no lumps or sagging.
This will be the first layer - primer. Then you need to repeat the operation so that the surface is even in quality and color. To preserve the natural appearance of the wood, it can be treated with transparent primers before painting. Apply the primer at intervals of 1-2 hours, dry at a temperature of 18-23ºC. The primer is applied so that the color does not “fail.” 3.
Apply tint – yellow acrylic paint, using a flat brush. Dry well.
4.
When performing work, you need to turn the object to be painted in all directions to make it convenient to paint.
5.
We create a frame. Gorodets frames are very elegant and multi-layered. Let's create a double frame. Along the top edge along the entire perimeter of the box we will draw a wide strip of brown color.
The next step is to draw an “arc” element along the brown stripe with a thin brush No. 1, also along the entire perimeter. To write it, slowly move the brush, with the tip on the surface to be painted, towards you, gradually turning it in. Then, helping to rotate the brush and moving it almost in a circle, complete the stroke, gradually lifting the brush from the surface.
The next stage is revitalization: draw a smaller “arc” with white paint inside each “arc” element, and draw a “droplet” stroke between the “arcs”. To create a “droplet” stroke, you need to place the tip of the brush on the surface, and then, moving the brush toward you, smoothly press it to the plane. Having completed the stroke of the required length, stop the brush and easily remove it from the surface.
Next to this frame we will draw another thin frame in which a wave and a straight line of orange color alternate.
6.
Using tracing paper we transfer the main elements of the drawing.
7.
We make underpaintings of the main elements of the drawing. First the body of the bird. Drawing Gorodets birds is a real pleasure. Because the universal traditional scheme allows you to turn essentially one underpainting into completely different birds.
We carry out underpainting of flowers, leaves and buds. To make a circle - underpainting, take a brush near the handle itself with three fingers and pick up paint. Place the handle perpendicular to the plane of the surface to be painted, resting your entire hand on your little finger or left hand.
Circle - underpainting is done by rotating the brush in your fingers. To do this, place the brush with the paint on it on the surface, slightly pressing it against it. Slowly turning the brush around its axis, roll it clockwise between your fingers. Depending on how much you press the brush to the plane of the surface being painted, a different size of the circle will be written - the underpainting. We draw “grass” in the free spaces. To make a “grass” stroke, place the tip of the brush on the surface and slowly move the brush towards you, gradually pressing it towards the plane. When finishing writing an element, move the brush in the direction where the stroke should go, gradually lift the brush from the plane.
To write the “leaf” element, draw the left and right parts of it with the “grass” element. If there is a gap between them. Write it down with the same paint.
8.
Now you can start “revitalizing” it with black and white paints. Using black paint we draw the main elements of the bird, bush and leaves. Using white paint, first draw decorations for the feathers, wings and tail. We use various elements: “droplets”, “curls”, “dots”, “brackets”.
9.
Next we do the shading for the flowers. Let's start with the kupavka - the main flower. Please note that when performing this operation, you must write the topmost and bottom element of the shadow in order for the element to be symmetrical in the future. To the finished painting, draw a central rounded petal at the bottom, and behind it, arrange smaller petals in a circle at the top - you can have a curly shape right up to the very core, which occupies the center of the upper part of the flower. After creating the silhouette, make it come to life.
Use the same principle to decorate the remaining buds and leaves.
10.
Let's add a few curls and spirals for beauty.
11.
Apply varnish to the drawing using a flat brush. To process products at home, it is better to use acrylic varnishes and liquid wax. It is better to cover large flat surfaces with a wide flat brush using quick movements in the shortest possible sections. First, brush along the ends, and then along the main surface. Pay special attention to the ends so that the varnish does not flow onto them.
When working with varnish, lay down a clean piece of oilcloth: if the product suddenly falls from your hands, it will not stick to the tablecloth or newspaper and will suffer almost no damage. Place the varnish on the right, place the rag on the left, and leave the space under the work empty. Recommendations for working with varnish: - the varnish will lie unevenly if the surface was poorly coated with primer or poorly painted; whoever saves time on priming loses it on the “varnish”; — the first layer of varnish is considered a primer; for a good varnish coating, 2-3 layers are required; — each layer needs to be dried twice as long as is usually indicated in the instructions, since the seemingly non-stick varnish inside can remain “alive,” which is clearly shown by the “nail test”; - The varnish should be applied in a thin layer. The rule “it’s better forty times once than once forty times” works here; — before the next coating, the previous layer of well-dried varnish is rubbed down with fine-grained sandpaper. If abrasions remain on the sandpaper, it means the varnish has not dried; - you need to work with varnish only in daylight and clean; - You need to work in a ventilated area. Our work is complete. We clean the workplace and admire our craft. You now have a gift option for any occasion.
We recommend watching:
DIY lantern lamp in Shabby chic style. Master class Master class with step by step photos. DIY postcard box DIY Easter souvenir. Chick. Master class with step-by-step photos Do-it-yourself soap. Master class with step-by-step photos
Similar articles:
DIY card for mom
DIY candy bouquet. Master Class
DIY heart made from coffee beans. Master Class
DIY birthday gift. Arrangement of roses
Basket of soap and ribbons. Master Class
Shabby chic style
A great solution would be to design the box in a shabby chic style. Decoupage in this decor is usually performed on a light background, and pictures with flowers in delicate shades are used as a design.
For work you need: a wooden box or blank, pictures with flowers, white and dark brown acrylic paints, glue (PVA or decoupage), sandpaper, wax candle, varnish, brushes.
Step-by-step instruction:
- Dilute brown paint with water to the consistency of liquid kefir, then paint the box;
- after the paint has dried, lightly sand the surface of the workpiece and rub the corners with wax;
- Dilute white paint in the same way as the previous one, then paint the entire surface of the product with it and leave to dry;
- rub the corners of the surface with sandpaper until a layer of dark paint appears;
- glue flowers in the right places on the box;
- apply 2-3 layers of acrylic varnish to the finished product;
- beautiful decoupage is ready.
In a similar way, you can make decoupage in a vintage style, only for the latter, old photos, magazine clippings, vintage postcards, etc. are usually used as pictures.
The shades for such decoration should be chosen very muted, so as to create the impression that the colors of the product have faded over time.
DIY wooden jewelry box
Making such a box is more labor-intensive than the previous version, but it will also last much longer than a paper one. To work you will need:
pencil, ruler; a long board 10 millimeters thick, 10 centimeters wide, made of soft wood: pine, alder, linden; a board for the bottom and lid, its width is equal to the width of the finished product; hand saw with fine teeth or jigsaw; knife; sandpaper; PVA glue (it’s better to use construction glue) or carpentry glue “Moment”.
Having decided on the size of the box, you need to cut two blanks from the board, equal to its length and width. At the end of each, you need to make a 45-degree bevel with a knife so that the walls fit together nicely. The depth of the bevel is equal to the width of the board.
Before gluing the side parts, you need to make sure that the bevels match tightly, without gaps. Otherwise, they need to be adjusted using coarse sandpaper. The sides are glued together gradually. After each subsequent gluing, it is necessary to check the internal angle between them. It should be equal to 90. Otherwise, the result can be any shape, but not an even rectangle.
There are two options for installing the bottom:
if the finished product will be pasted over with paper or fabric, then the blank for the bottom is taken equal to the size of the box and glued so that its side parts are visible;
Wooden box covered with paper
If a DIY jewelry box is covered only with varnish or paint, then it will look more beautiful when the bottom is hidden inside it. To do this, take a blank that is shorter in length and width than the size of the box by two board thicknesses. For example: if the box dimensions are 10x10 cm and the wall thickness is 1 cm, the bottom needs to be 8x8 cm.
Varnished wooden box
The manufacture of the lid can also be made in two versions:
cut the workpiece and install it on the hinges. The best option for attaching the lid is a piece of piano hinge, the length of which is a couple of centimeters shorter than the length of the box. All ends of the boards visible on the finished product must be carefully sanded;
Glue the lid to the box and after drying, carefully cut it off with a jigsaw, moving down the body by one and a half to two centimeters.
A wooden jewelry box is decorated using all known methods: varnishing, painting, decoupage, oracle, fabric, leather.