0
10524
You can breathe new life into any product or simply make it original and unique thanks to various decoupage techniques. Nowadays, few people can afford to recklessly part with an old piece of furniture. Any stool that seems outdated at first glance can be turned into a source of pride. Old chests of drawers are held in special esteem. In order to decoupage a chest of drawers with your own hands, you first need to familiarize yourself with the basics of this creativity.
Technique options
The biggest advantage of working in this technique is the highly artistic result, even in the absence of an art education. This is achieved thanks to the main feature of decoupage - applying the finished image to the product. For these purposes, there are an incredible variety of options with a ready-made, impeccable design:
- decoupage cards;
- napkins;
- textile;
- wallpaper;
- stencils;
- photos;
- scrapbooking paper;
- postcards;
- magazine and newspaper clippings;
- pictures printed on regular office paper.
Scrapbooking paper
Decoupage cards
Stencils
Every year, decoupage is gaining more and more popularity, the selection of special cards is impressive with its images, and new devices, styles and effects are being added. Thanks to this development, this decoration technique will remain relevant and in demand for a long time.
You can make decoupage on absolutely everything, from your home t-shirt to the furniture in your home. The only thing that needs to be taken into account is that each specific type of decoupage has its own technique, style and, accordingly, devices.
| Name of the technique | Short description |
| Craquelure | Decorative cracking of the surface to create the effect of antiquity. |
| Decoupage with fabric | The easiest way to decorate large solid surfaces. |
| painting | The artistic painting technique is suitable for those who are familiar with the basics of fine art. No less interesting is painting using stencils. |
| Gilding | This technique involves working with the most delicate gold leaf. |
| Restoration | Transforming an old product (with chips, cracks and other defects) into a new one by masking them. |
| Aging | Adding wear and tear to an item to achieve that special charm of yesteryear. |
| Decoupage lace | In this technique, lace acts as a stencil. |
| Traditional decoupage | A more familiar technique of execution using paper pictures (decoupage napkins, special cards). |
Materials and tools
To start the magical transformation of an old chest of drawers you need to have on hand:
- two types of sandpaper - coarse and zero;
- putty (it will be useful if the product has defects that need to be hidden);
- white acrylic primer;
- PVA glue or special glue for decoupage;
- white acrylic paint (other colors may also be needed);
- watercolor for tinting (optional);
- wide flat brush for applying primer, paint, varnish.
Decoupage of an IKEA chest of drawers Pirates of the Caribbean))) I liked the idea with the texture)))
Author - Samokhvalova Anna Igorevna
I want to share with you my experience in creating a voluminous textured wooden surface using a mini-chest as an example.
It all started when a nice woman, Tatyana, whose originality is beyond doubt, ordered a mini-dresser from me on the theme of... Johnny Depp in the role of Jack Sparrow.
I was thinking about how to play with this pirate-romantic theme...
look what happened. If my idea is useful to someone, I will be glad.
https://dcpg.ru/mclasses/fira4/?search=%F1%EB%EE%E6%ED%FB%E9+%F4%EE%ED
We will need:
cabinet from Ikea, wood putty (water-based), acrylic paints, spatula, shaped rubber spatula (can be replaced with what you have on hand. A comb, for example), brushes, sponge, medical syringe printed on Johnny's printer (Ah, what a man!), decoupage glue (PVA will do).
On the chest of drawers we mark the places where the decoupage will be.
Apply a layer of putty with a spatula (2-3 mm)
I recommend precautions: firstly, water-based putty - we used this for repairs - everything holds very firmly (pah-pah), secondly, do not sand the box itself, thirdly, the layer is thin enough - only to give texture, in -fourth, there are several layers of coating on top, and fifthly, do not throw it against the wall when using)))
In general, putty can really behave cunningly. So it’s better to experiment on different surfaces with “test work”, and replace the putty itself with structural paste.
Then we take a rubber spatula and create the necessary texture
We frame the places where the decoupage will be using a syringe with an improvised frame.
Since I had a sea-pirate theme, I use the same syringe to make additional volumetric details
This is how we design all the surfaces that interest us.
While the putty dries (2-3 hours), paint the “insides”. I usually do this with a sponge - it turns out faster, smoother and uses less paint.
When the three-dimensional pattern of putty has dried, apply the main color with a brush.
To make the texture more interesting, use a brush across the “waves and stripes” to make several strokes of contrasting paint (in my case, two shades similar to the main one and the color of the “interior of the cabinet”). On a relief basis it turns out interesting. Since we have a masculine theme, but for a woman, I don’t care about being “super neat” in the lines, but I try to maintain color compatibility, overall brightness and expressiveness.
Next, we make decoupage with a pre-prepared and cut out pattern.
This is what happened to me. All that remains is to varnish and add a few details.
Good man!
Preparatory stage
First of all, you need to get rid of the old varnish. To do this, you need to remove the handles and all removable decorative elements, and clean the surface of the chest of drawers using coarse sandpaper. If there are places where there are chips, they need to be masked with putty. After drying, white acrylic primer is applied. In some situations, black primer is required, but in other cases, white has much more advantages.
After the soil has completely dried (at least three hours), all roughness and irregularities are rubbed down with fine-grained sandpaper. All dust generated during the grouting process is blown off the surface of the product. Now the chest of drawers can be painted. Most often, white acrylic paint is used - on it any image looks bright and clear, the colors of the picture are not distorted. If desired, the area around the drawing can be tinted with watercolors. Tinting with acrylic (even diluted with water) turns out to be denser, which does not allow achieving the desired effect of a light veil. This option is not suitable for Provence style.
It is important to remember that to decoupage a chest of drawers in the Provence style, all tones should be muted and discreet. Even white should not be bright, but rather faded. This style is very similar to the shabby chic style. The only fundamental difference is that Provence is the lavender lightness of the French countryside, delicate flowers and herbs, while shabby chic is a frankly chic shabby look of antiquity. The tonality, color scheme and execution technique are the same in both styles. The preparation of the chest of drawers is completed, you can proceed directly to decoration.
Removing old paint
Sanding and putty
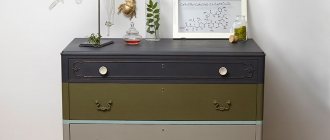
Dresser
An excellent basis for creativity are things from IKEA , be it a large or mini IKEA chest of drawers, a table or a shelf. After all, they are usually smooth, monochrome, light shades, and their decor will be simple. A few years ago, there were a huge number of master classes online for beginners on how to paint and decoupage step by step an Ikea mini-dresser, or a separate pine box, which was bought for jewelry and handicrafts. Let's say that the chest of drawers purchased from Ikea several years ago is tired or simply not suitable for the updated interior. But you shouldn’t throw away a piece of furniture, because you can make an original and stylish thing out of it - you just need to decorate it again. And here is a small master class on transforming an old or simply boring large or small chest of drawers from Ikea and more.
Process
Decoupage of a chest of drawers: master class
First you need to prepare all the tools that will be useful in your work.
- Directly chest of drawers
- White water-based latex or acrylic paint
- Waterproof clear varnish
- Napkins with a selected pattern (you can take both decoupage napkins and regular table napkins, if their pattern is beautiful)
- PVA glue
- Sponges
- Sandpaper
- Scissors
- Brushes
When everything you need is ready, you can start working, because decorating a chest of drawers is a very exciting activity.
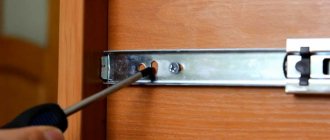
First, the fittings are removed , and the chest of drawers is inspected for chips, roughness and other flaws in the wood. To make the surface smooth, the surface is sanded; chips are filled with wood putty. When the putty has dried, you can begin to decorate the chest of drawers. First, white water-based waterproof paint is applied. The paint is applied either with a brush or a sponge. Over time, each craftsman chooses the application method; for some, a brush is more convenient, while for others it is easier to dip a sponge into the paint and apply it to the surface of the product. It is worth noting that when using a sponge, an unusual texture layer is obtained.
After the first layer is applied, you need to let it dry completely, then apply a second layer, drying again, then a third layer, drying again. Now you can proceed directly to gluing the pattern.
Decoupage of a wooden dining table with your own hands How to make simple decoupage with your own hands Decoupage technique: decorating a children's table with your own hands Volumetric decoupage is the art of creating beauty
Suppose you have chosen napkins with large flowers . Each flower must be cut out, leaving a background around it, or even better, just carefully tear the napkin around the flower with your hands, so the background will not have clear boundaries and will merge with the white paint on the main product, and the flower will look painted on the chest of drawers. All excess layers of napkin (usually two) are removed, leaving one thin layer with a pattern. The part of the chest of drawers on which the flower will be is smeared with PVA glue, and a napkin with a pattern is carefully placed on top. If the design wrinkles, you should very, very carefully, so as not to tear, straighten the flower on the surface.
In this way, the entire surface of the chest of drawers is decorated according to the intended decor. And now, the entire surface is ready, the decoupage of the mini chest of drawers is almost complete. Now you need to leave the item for a day for the glue to dry completely. After the allotted time, you can begin to coat the product with varnish. It can be applied, like paint, with a brush or sponge. After application, each layer must be allowed to dry; up to three layers can be applied in total. After the last layer has completely dried, the work is completed, the decor of the chest of drawers is completed. Now the craftsman’s apartment is decorated with an extraordinary and fashionable item.
In the same way, you can decoupage a table, a large or mini chest of drawers, a wardrobe, chairs and any other pieces of furniture, as well as unusual bottles, heating radiators and even plumbing items.
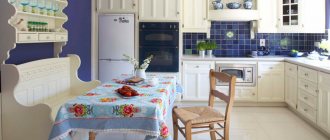
Provence
Furniture in the Provence style is trendy and stylish. Let's look at the technique of decoupage of an IKEA chest of drawers in this popular style. The main feature is the selection of colors. It includes:
- Light blue and blue
- White
- Yellow
- Olive
The design also needs to be chosen appropriately - olive branches, lavender flowers, sunflowers, cute houses. The process itself is the same as described above, you should only keep in mind that bright ornaments are inappropriate in this style, colors should only be in pastel tones.
You can use such a trick as applying splashes of purple or lilac shades to the product . To do this, you need to take a toothbrush with stiff bristles, dip it in the appropriate paint and, moving a couple of meters away, spray the paint from the brush onto the surface of the product. After the paint has dried, the selected designs are pasted onto the surface. The result is an extremely cute and original product.
Tip: for decoration you can use not only napkins, but even pictures from magazines. In this case, the drawing should be briefly immersed in warm water so that the paper is not too thick.
Aging and gilding
Aging adds sophistication to a piece and imitates antique value. Very often, craftsmen combine this technique with gilding to get an expensive antique piece of furniture at home. To age a chest of drawers, it is necessary to make abrasions on its protruding corners. To do this, at least two contrasting layers of acrylic paint are applied to the already prepared surface. After complete drying, the corners are carefully sanded with sandpaper.
To give the product a luxurious golden shine, gold leaf is used. This incredibly delicate and thin foil allows you to achieve the desired gilding effect, but in the aging technique it should only be used to place accents.
A small amount of glue is applied to the selected places, and gold leaf is laid out on top. After complete drying (it’s better not to rush, but wait about two hours), the excess gold is removed and the desired shape is given. At the end of the work, the chest of drawers should be coated with acrylic finishing varnish. The number of layers of varnish depends on its quality, as well as on the intensity of use of the chest of drawers. Usually 3-4 applications are sufficient, with an interval of two hours between each coat. Acrylic varnish can be replaced with good quality furniture varnish.
How to decoupage a chest of drawers
If you decide to update an old chest of drawers with your own hands, first decide on its future style. For example, if the furniture will be in a children's room, use drawings with cartoon characters to decorate it.
First, remove all the drawers and shelves of the old dresser. Wash it and dry it. Next, check if there are any unevenness on the facades. They need to be removed with sandpaper. Now you need to partially or completely paint the chest of drawers. After the paint has dried, go over the furniture with sandpaper and apply another layer of paint.
Cut out the necessary images with your own hands. Apply glue in the place where they will be located. Glue the pictures. The paper should not have wrinkles; they can be smoothed out with a roller or your hands. Then apply glue along the outline of the pictures. After the glue has dried, coat the chest of drawers with varnish. When the furniture is completely dry, you can assemble it and use it for its intended purpose.
Painting with a stencil
Using a stencil, you can very quickly and easily create intricate monograms and more. To decorate a chest of drawers in this way you will need a minimum of equipment:
- stencil;
- sponge;
- acrylic paints;
- finishing varnish;
- scotch.
The tape is needed to secure the stencil so that it does not move while working. The technique itself is quite simple - using a sponge, acrylic with the desired color is applied to a fixed stencil. When finished, the stencil should be carefully removed and washed. The finished work is varnished in three layers, allowing each layer to dry completely.
To make it easier to work, the stencil is attached with masking tape.
Paint is applied to the stencil using a regular sponge.
Decorated chest of drawers
Using napkins and cards
When planning to decorate a chest of drawers using decoupage cards, it is useful to know that they come in at least three types. The selected map will determine the technique for further work:
- map on high density rice paper. This is a dense card (more than 20g/m2) with an original, pronounced texture and a special arrangement of coarse rice fibers. Using PVA glue, the motif is glued to the product and coated with finishing varnish. When cutting out the motif, rather thick edges remain, which does not look very neat. The way out is to hide the edges by applying glue-based glitter along their contour, but this is not always appropriate. It is better to use a map without cutting out a point motif, but transferring the image holistically “joint to joint”;
- map on thin rice paper. Decoupage of a chest of drawers with rice card with a density of 5-15 g/m2 looks very neat and delicate. By working with such material you can achieve the most sophisticated work. The cut fragment is placed on a regular file with the reverse side facing out. The product itself is lubricated with glue, after which a file with an image is carefully applied to it, smoothly smoothing it out. Thanks to this method, you can avoid unaesthetic wrinkles and spreading of the motif. The paper is very thin, which causes some difficulties in working with it. Transfer the image through the file, do not use too much glue;
- decoupage card on plain paper. The most affordable at its price, but also more troublesome to use. Acrylic varnish is applied to the front side of the card. It is advisable to make 3 layers, with an hour between each. After the last layer has completely dried, the card should be placed in a container with water. When the paper gets wet, remove the card and carefully roll off the excess paper. Thus, only the image fixed with varnish will remain. The card is on thick office paper (80 g/m2), to thin out the motif, you will have to roll up the excess paper, this will take some time. While the paper is soaking, you can prepare the working surface of the chest of drawers to be decorated.
With decoupage napkins everything is much clearer. The most commonly used napkins are those with three layers. All you need to do is remove the extra two and cut out the fragment you like. The specifics of working with a napkin are the same as with a thin rice card.
To decoupage a chest of drawers in the traditional way, you must have:
- decoupage card or napkin;
- PVA glue or special glue for decoupage;
- acrylic finishing varnish;
- wide brush for applying varnish;
- watercolor paints for tinting;
- acrylic paints (for placing accents in the composition);
- thin round brush for drawing details (optional);
- sponge (sponge).
Depending on the type of card or napkin, we choose the method of applying it (all methods are described above). We transfer the motif to the already prepared surface of the chest of drawers. At this stage, you can shade the area around the image. To do this, you need to dilute the selected watercolor color with water and apply it with a sponge onto a primed chest of drawers painted with white acrylic. When the watercolor dries, you can bring the tinting to the desired result using a damp sponge (remove excess, shade, make the transition smoother).
To make the composition look more voluminous and clear, individual elements of the image should be painted with acrylic paint. This way you can get the effect of artistic painting.
When the work is completed, the chest of drawers must be coated with acrylic varnish in several layers. Each layer must dry well. You can use an acrylic finish in aerosol form, but this option is more suitable for working outdoors.
Choosing a theme for decoupage
The top layer of the napkin is applied to the surface of the chest of drawers
PVA glue is applied on top and gently smoothed with a brush.
All excess parts of the napkin are carefully removed
Textile
Preparation of the chest of drawers is the same as described above. The fundamental difference between this method of decoration is that the fabric covers the area from edge to edge to hide the cut scar. If you cut out individual fragments, then their edges will need to be enhanced (hide with glitter, braid, rhinestones).
Material required for work:
- thick cotton fabric;
- PVA glue;
- acrylic lacquer;
- wide flat brush.
Glue is applied to the surface of the chest of drawers prepared for work, after which the material is carefully laid. To proceed to the next stage, you need to wait until it dries completely (several hours). Then the fabric needs to be coated with PVA glue using a wide brush. After complete drying, the work can be opened with a finishing varnish (again, observing the time intervals between each layer). This technique differs from traditional decoupage and the finished product looks very unusual.
PVA glue is applied to the box
The required amount of fabric is pre-cut
The fabric must be pressed tightly against the furniture to avoid bubbles.
Corners are neatly folded
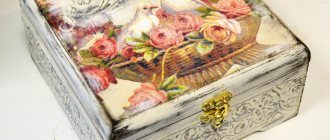
Master class on decoupage on wood: Chest of drawers for boudoir
Author: Inna Chornenkaya
Odnoklassniki page
We will need materials:
- plywood,
- finishing putty,
- PVA glue,
- water,
- decoupage card,
- construction color,
- oak color stain,
- bronze and metallic enamel,
- metal fittings,
- varnish
Tools used:
- jigsaw,
- screwdriver with grinding attachment,
- hammer,
- nails,
- pencil,
- brushes,
- sandpaper of different hardness,
- masking tape,
- ruler,
- cutter,
- scissors.
I'm laying out the plywood.
And I saw it with something dear to my heart - with a jigsaw.
I carefully grind the ends and knock together the body.
When the body was assembled, it was already evening and I stopped loud work for the day. But in order not to waste time, I decided to make a relief on the body for now.
Here's what I need for this: masking tape, scissors and a felt-tip pen cap.
I cover the area I need with tape.
I dilute the solution, a small portion (finishing putty + pva + water).
I apply the solution with a spatula.
I poke the solution with a felt-tip pen cap.
Carefully remove the tape immediately and this is what we get:
We do this on the side walls and on the lid.
When the relief is dry, I begin the second step. I continue to make relief.
I can easily remove the unnecessary part of the tape using a ruler and a cutter.
I removed the excess tape and applied the solution.
And the second step is over. The relief is ready!
Again, I do the same on the lid.
The next day I return to work and continue to assemble boxes for the future chest of drawers.
The top drawer is ready.
There are already a couple of boxes.
And now all the boxes are in place.
I also decided to make a relief on the middle drawer.
Then I sand the entire relief (after it has dried, of course).
Now I’ll start gluing the decoupage card.
Since the width of the card was narrower than the length of the front of the boxes, it was necessary to leave the same distance on all sides. Then I will hide it with paints.
I lubricate the wall of the box with PVA glue.
I begin to glue the card, carefully expelling all the air so that there are no bubbles later.
Next, I cover the map with PVA.
I decided to make the color of the chest of drawers green, but the question arose of what to paint it with so that the structure of the plywood would not be lost. I didn't find any green stain. Therefore, I decided to mix the “Emerald” color with the “Oak” stain, let’s see what happens.
I immediately mixed more. I will say this: it is quite possible to paint with such a “liquid,” but the consistency of the color is heavier than stain, so every time I dipped the brush, I stirred this liquid.
In general, it turned out like this. Going a little further, I’ll immediately note. I was quite happy with this slurry, but when you varnished, the brush had a slightly greenish tint. Therefore, first varnish all the light areas, and only then varnish the main body.
I screw on the handles.
I dip a sponge into the “slurry” and begin to scratch the entire perimeter of each drawer to hide the transition between the card and the plywood.
Then I paint the relief with bronze enamel and also use a sponge to touch all the corners of the chest of drawers.
That's it, no need to paint it thoroughly, as if the paint had worn off over time.
With this golden outline, here and there I highlight a drawing on the map.
Like this.
Well, the penultimate one. I spray metallic enamel (using a brush) on the entire body. And the last thing is, of course, varnishing. And you're done!
I just made decor for a chest of drawers from threads. Now it's definitely ready!