Here you will find projects on how to make a home mini sauna in apartment rooms: on the balcony, in the bathroom and closet. All master classes will be accompanied by step-by-step photos (step by step) for making them yourself. We will provide reviews by the author and attach interesting videos of the construction of Finnish saunas indoors.
Advantages and disadvantages of using saunas and baths in an apartment
A mini-sauna in a modern apartment has several advantages:
- The steam room helps to improve the health of the entire body and relieve stress;
- you can take bath procedures without leaving home;
- Unlike an outdoor one, it is easier to warm up such a room;
- when placing a sauna near a bathroom or kitchen, the humidity in these rooms is significantly reduced;
- There are models of saunas with a built-in shower and hydromassage.
But there are also disadvantages:
- in a cramped apartment you can only place a very small steam room;
- a special permit will be required to arrange a bathhouse;
- To create it you will need a substantial investment of money.
You can purchase a ready-made sauna, order a prefabricated one according to your project, or make it yourself
Fire safety requirements for saunas
SP 54.13330.2016 Residential multi-apartment buildings
7.3.14 When designing saunas in apartments of multi-apartment buildings (except for blocked ones), the following should be provided:
- steam room volume - ranging from 8 to 24 m3;
- a special factory-made oven for heating with automatic shutdown when the temperature reaches 130 °C, as well as after 8 hours of continuous operation;
- placing this stove at a distance of at least 0.2 m from the walls of the steam room;
- installation of a fireproof heat-insulating shield over the stove;
- equipping the ventilation duct with a fire damper in accordance with SP 60.13330, SP 7.13130;
- equipment with a deluge or dry pipe connected outside the steam room to the internal water supply.
The diameter of the dry pipe is determined based on the irrigation intensity of at least 0.06 l/s per 1 m2 of wall surface, the angle of inclination of the water jet to the surface of the partitions of 20°-30° and the presence in the dry pipe of holes with a diameter of 3-5 mm, located in increments of 150- 200 mm.
It is recommended that the fire safety requirements outlined above also be followed for saunas located in a private home.
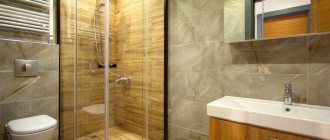
How to make a sauna floor
Diagram of the drain into the sewer and the floor of the sauna bath in the bathroom.
Waterproofing layer made of built-up roofing material. In a sauna, it is best to make a concrete floating floor over a layer of extruded polystyrene foam insulation. Ceramic tiles are laid on top of the concrete floor screed.
The sauna floor in the passages is covered with removable wooden gratings. This floor design is not afraid of water and allows for convenient cleaning in the sauna. It will be even more convenient if you install a drain in the floor - a receiving grid with a siphon for draining water into the sewer.
Door to the sauna
The door to the sauna is usually made of wood. Bath doors made of tempered glass are also available for sale. For safety reasons, the door to the sauna should open outward and not have locks, but only latches.
Sliding doors are convenient - they take up little space when opened, or swing doors that open in both directions. The height of the doors is usually 180-190 cm. The width of the doors varies. The door should not be too narrow - less than 60 cm.
The handles on the door and the handrails inside the sauna are made of wood so that they do not burn your hands.
Shelves and benches in the sauna
Shelves and benches in the sauna are made from wood that does not contain resin - aspen, linden, or from various exotic species that are commercially available. Experts say that products made from these rocks in the sauna are less hot to the touch.
The width of benches and shelves is made in the range of 31 - 55 cm. Benches and shelves are usually arranged in two tiers in height. The vertical distance from the floor to the first tier and between the shelves should be about 40 cm. From the ceiling to the top shelf there should be a distance of 1.2 m. It is recommended to make the top shelf at least 50 cm wide. Shelves and benches should be made of slats, leaving There is a gap of 5-10 mm between adjacent slats. for free air circulation in the mini sauna.
The length of the shelves, for comfortable procedures while lying down, is about 2 m. For ease of cleaning in the sauna, it is better to make the benches and shelves movable - lifting or removable.
It will be more comfortable to sit and the walls of the sauna will remain clean if you install backrests along the shelves and benches on the walls.
Sauna interior design options
The most common layout options for domestic saunas for use inside an apartment are:
Thus, a mini steam room with a sauna, hammam, bathhouse mode can be assembled on a balcony, in a pantry or bathroom on your own, or you can order the installation of a factory model, taking into account the shape and size of the room.
Advice! If you need bathroom renovation specialists, there is a very convenient service for selecting specialists from PROFI.RU. Just fill out the order details, the experts will respond and you can choose who to collaborate with. Each specialist in the system has a rating, reviews and examples of work, which will help with the choice. Looks like a mini tender. Placing an application is FREE and does not oblige you to anything. Works in almost all cities of Russia.
If you are a master, follow this link, register in the system and be able to accept orders.
Lighting in a mini-sauna
In the sauna bath it is necessary to install special waterproof sealed lamps with incandescent lamps. Lights are usually placed high up on the wall in the corners or on the ceiling of the booth.
Sometimes the lamps are installed under the shelves or behind the backrests at a safe distance from the wooden flammable parts of the cabin. It should be borne in mind that this option requires the installation of lamps that are more resistant to water.
Modern energy-saving and LED lamps are not suitable for installation inside a sauna cabin. They are not designed to operate in high ambient temperatures. Such lamps can be installed outside, directing the light inside the booth through the glazing.