A shower provides free space and comfort in the bathroom. In recent years, it has been very fashionable to purchase shower cabins. Someone throws out the bathtub and replaces it with a fashionable device with a bunch of functions, someone equips themselves with a bathroom and installs a stall there right away.
But now a new feature has appeared - a shower stall without a tray on the floor. A sort of small room in the bathroom where you can go and wash yourself. Not a bulky cabin with a pallet that you need to step over, but a small room, like in foreign films. The best option for a standing room for washing.
As simple as everything is when assessed visually (it would seem that there are four walls, a drain and a watering can), everything is so complicated when it comes to installation. Before you make the difficult decision to install such a shower stall, you need to consider all the positive and negative aspects, evaluate the scale of the work and your bathroom.
Advantages and disadvantages of a shower on the floor
A modern solution is a stylish shower cabin without a tray on the floor.
Any new trend has its advantages, otherwise why was it created?
- Safety. An important parameter, since accidents often occur in the bathroom. Here you won’t have to step over the high side of the pallet. It simply doesn't exist. Very convenient for children and elderly people, most of whom have problems with their feet. And a healthy person can easily slip when leaving the cabin.
- Save time. When you buy a shower with a tray, you have to additionally purchase various accessories and components. In some models, for example, the tray comes separately. And if it is not available, you need to go shopping and look for it. Or order, which is also not fast. In this case, everything you need for installation can be found in any hardware store. The only components are identical walls and doors. Everything else is easy to pick up.
- Space saving. Not many bathrooms can boast of large footage. Having thrown out the bathtub, on the contrary, you want to save space, and not clutter it from floor to ceiling. Here, in addition to taking up minimal space, you can also visualize free space with the help of glass shower walls. The effect of transparency seems to enlarge the room and “lighten” the glass shower cabin without a tray.
- Easy transportation. It is easy to load thin walls and doors into the car, as well as a separate kit. That's all. There are no modules with unnecessary programs, no pallets, no roofs. If delivery is to your home, then it will not be difficult for the movers or the owner himself to bring everything to any floor. This saves money on delivery and additional inconvenience for workers.
- No tray or roof. It is very convenient for tall people, who, when entering the shower, hit the ceiling with their heads, or even rested against it when they washed. In addition, it is easier to wash the structure later due to the minimum of parts.
- Long lasting service. Tile is a fairly durable material and is difficult to break. While an acrylic tray can easily be damaged by, for example, a shampoo bottle that falls out of your hands. Yes, and additional shower stall options may gradually fail, which will lead to the repair of the module, and this is an extra waste of money.
- A unified bathroom style from which the shower can stand out. The floor tray may not match the color scheme, etc. At the same time, a cabin without a pallet can be easily installed in a room to match if its walls are transparent. Or tinted, which also will not stand out from the uniform design.
A shower cabin without a tray is a convenient and beautiful solution, but it also has its drawbacks.
Nothing can be ideal, and a shower cabin without a tray has its disadvantages:
- Serious preparation of the room before installing the shower. In order for the drainage system to work smoothly and the water to drain downhill, you need to prepare the floor in the room. Ideally, it needs to be “drowned” a few centimeters. This makes it difficult to install a cabin in an apartment - but everything is possible with special skills.
- Lacks all the convenient features found in tray booths. For example, the same hydromassage or sauna. But they can also be installed separately in the booth, if desired.
- To avoid sewer odor, you will need to install a siphon. And this is additional work.
- In old apartments, the tiles were not laid particularly evenly, so the floor will have to be redone so that water does not stagnate in puddles in curved areas and it is dry.
The same goes for the walls in the bathroom. Everything must be perfectly level initially or leveled before installation work. Otherwise, the cabin will not be airtight. If blockages form in the pipes, water can seep into the bathroom area and flood the apartment.
There are, of course, more advantages than disadvantages, but the latter are quite noticeable and require labor-intensive work. If specialists get down to business, they will install everything from preparatory work to launch.
Installing a shower cabin without a tray requires effort, but the result of high-quality work will certainly please you.
It is worth understanding in more detail what are the significant differences between a stationary shower cabin and a cabin with a tray:
- Installation. When installing cabins with a pallet, you will have to work hard, but if you follow the instructions, you can install it in a couple of hours in any convenient place. While stationary cabins without a pallet require lengthy installation and preparatory work.
- Options for sauna, hydromassage, radio, etc. built-in only in a booth with a tray. When purchasing, you can choose the desired set of functions of the shower module and purchase everything ready-made and complete. But in a cabin without a pallet, everything will have to be built in separately (if desired).
- Care and cleaning. A cabin with a tray is more difficult to wash due to its design and additional parts. And in a regular cabin it is enough to wipe the walls and floor.
During the installation of a cabin without a pallet, it is imperative to treat all surfaces and hard-to-reach places against the occurrence of fungus and mold, so as not to experience discomfort with their appearance in the future. It is better to work in advance than to remove bacteria later.
Shower cabins in the interior
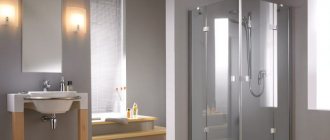
Fashionable modern interiors are distinguished by ergonomics, lightness and free space. For this reason, designers have developed compact and stylish shower designs without a tray.
Thin, often transparent, enclosures of the cabin are mounted on the floor of the bathroom, where a drain is immediately installed, thanks to which the practical shower box plays the role of an integral element of the interior.
A shower box without a tray is used to organize a small bathroom and a spacious room. The variety of models allows you to embody creative design ideas in interior design.
Since the walls of the shower cabin are usually made of the thinnest transparent plastic, the design looks airy and light. An important advantage of a shower box without a tray is that its installation requires minimal space.
A shower without a tray will not only successfully cope with its intended purpose, but will also stylishly transform the interior of the bathroom
Manufacturers often use transparent or organic frosted glass as shower partitions. After taking a shower, no traces of water drops remain on the glass surface.
The nuances of choosing and installing glass for a shower are discussed in our other article.
Depending on the features of the bathroom interior, you can equip the shower stall with plastic panels, block walls, glass blocks, etc.
A shower box with partitions made of double durable glass, inside of which LEDs or lighting are mounted, will create an original interior.
A shower cabin with lighting is often used by modern designers. The original design can play the role of an accent element in the bathroom design
To make a shower stall look stylish, you need to choose the right materials, so it makes sense to turn to designers to create a project.
A non-standard floor covering will significantly improve the design of a shower box. The floor of the cabin is covered with ceramic tiles, which do not necessarily have to match the style of the walls and other surfaces of the bathroom.
The ceramic floor of the shower box, lined with contrasting mosaics, is an excellent solution for decorating a modern interior. Before starting facing work, it is necessary to perfectly level the surface
The floor looks original in the form of a mosaic, decorated with drawings or additional decorative elements.
Requirements for covering a shower area without a tray
The requirements for the coating of the shower area are great, since in this room, due to the slippery floor, there is a high probability of an accident.
An important safety condition is the choice of high-quality non-slip flooring.
The tile must be non-slip and treated with a special coating. If desired and possible, you can lay the floor with tiles made of natural or artificial stone. But the problem is that it is thin - 3-4 mm. This leads to the following requirement - the thickness of the laid tiles in the shower should be 8-10 mm, and the adhesive coating should be 4-9 mm.
Tiles are often used for durable flooring.
Style and color of shower without tray
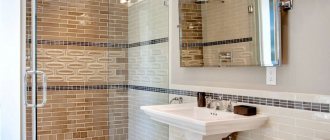
Most often, all plumbing fixtures in the bathroom are selected in the same color and style. The room itself is decorated in the same tone, using a maximum of three colors.
A bathroom with a shower cabin without a tray in a three-color design looks original.
It is also better to finish the shower room to match the bathroom itself, unless the design suggests otherwise. Moreover, if the walls of the cabin are made of transparent materials, then the shower room will become a continuation of the room, it will seem transparent, creating the effect of absence, despite the fact that the floor there will be made flush with the entire room.
The ideal solution is a shower cabin, designed to match the color of the bathroom.
As for the mirror, what bathroom functions without this attribute? Even the smallest mirrors are installed in such rooms. The larger the mirror, the wider the bathroom appears. And if the mirror is without a frame, then the effect of increased space is even greater.
A mirror is a must for a bathroom with a shower.
Lighting in the bathroom and shower should be full, without dimming. Therefore, one light bulb is definitely not enough. Several light sources are required, the light must be diffused.
The unusual lighting will add a special charm.
Finishing materials are also selected taking into account the size of the room. For example, small elements do not look good in a small room. Mosaics and small tiles are undesirable here. This finish is good in spacious bathrooms. And in a small one you need large tiles and preferably one-color ones.
Dark large tiles look good if the room is not very large.
If you need to create the effect of increased space, then in addition to a large mirror and large tiles, the shower itself will do a great job. It can be installed in the corner of the cabin, making it more inconspicuous and saving space behind the glass doors.
A shower cabin without a tray is perfect even for a small room.
Materials for installing a shower cabin without a tray
Before starting work, in addition to the project, you need to draw up an approximate estimate for the purchase of materials. What you may need:
- built-up roofing felt or rubber membrane;
- expanded polystyrene in sheets 50 mm thick;
- siphon;
- waterproofing mastic (consumption – 3 kg per 1 sq.m.);
- plastic pipes with connectors for installing sewer drains;
- waterproofing tape (10 cm wide);
- a mixture of cement and sand (consumption - 5 kg per 1 sq.m.);
- silicone sealant;
- fugue (special mass for grouting);
- tile adhesive (consumption – 5 kg per 1 sq.m.)
Installation of a shower cabin with a drain
Before you begin work on installing a shower box, you should draw up a design design. To install a shower drain and determine where to attach the walls of the cabin, you need to select a water drainage area.
Before installing a shower without a tray, you need to decide in advance on its type and design, and choose a construction scheme. To eliminate errors, you need at least a simple project
To install the ladder, it is necessary to raise it 15 cm from the concrete screed to the floor surface. This makes it difficult to install a shower box without a tray in a city apartment, since you will need to raise the floor level around the perimeter of the room.
If you decide to raise the floor exclusively inside the cabin, you will end up with an inconvenient step when entering the box. Raising the floor throughout the room will result in level floors, but will reduce the height of the bathroom.
Installation work for arranging a modern shower stall without a tray includes several stages.
The following photo gallery will introduce you to the principle of constructing a pallet from building materials:
Image gallery
Photo from
Stage 1: Installation of drain and connection to sewer outlet
Stage 2: Construction of the walls of the shower box
Stage 3: Pouring the screed with a slope towards the drain
Stage 4: Finishing
Stage #1 – preparation of the floor and communications
A guarantee of successful operation of a cabin without a pallet is the correct installation of the floor. To effectively drain water, the base of the floor should be sloped several degrees towards the drain.
A round or square shower drain can be installed in the center of the shower stall. In this case, the floor should have a slight slope on different sides from the corners of the perimeter to its center. If you have chosen an elongated ladder-tray design, then a slope of the floor towards the tray is created.
After installing the drain under the shower stall, you need to install the pipes. It should be noted that sewer pipes must also be located at a slope. Since the floor slope should be 1-2 degrees, it is necessary to ensure the same slope of the sewer pipes.
The floor in the shower is a complex plumbing structure that must be airtight and hide communications. To improve the outflow of water, it is necessary to slope the floor towards the drainage receiver
The concrete base should be thoroughly cleaned of dirt, then treated with a special mastic with high waterproofing properties. It is applied to the floor and walls around the shower stall (25 cm from the floor). This will protect the concrete screed from moisture.
Stage #2 - installing a shower drain
Separately from the shower cabin, you must mount the shower tray and its supports, following the attached instructions. It is necessary to connect all structural elements - siphon, supporting parts, drain and tray pipes.
After assembly, you need to check the quality of installation of the liquid drainage system by pouring water into the drain. If everything is in order, you can install the shower tray on the subfloor.
Before starting work, you need to seal the ladder grating with construction tape. This will prevent various construction debris from entering the sewer system.
The shower drain structure is installed at the first stage separately from the cabin. To do this, all structural elements are connected and the product is checked for functionality.
After installing the shower drain on the subfloor, all exposed areas must be filled with foam or polystyrene blocks.
Their thickness should be from 5 cm, while taking into account the slope of the floor (you can test it using a building level) and the slope of the pipe through which the water drains.
The gaps and cracks on the floor of the structure are filled with a mixture of water, cement and sand. The base of the shower stall is carefully compacted, and the level must be constantly monitored.
After completing the work, you must wait at least 3-4 days until the base of the shower stall floor hardens completely.
Stage #3 – waterproofing the cabin base
The next stage includes additional waterproofing of the base of the shower box. It is permissible to use both coating and pasting materials in the work. Waterproofing is done in 5 – 8 layers.
You may also find information about waterproofing your bathroom useful if your shower is not designed to have walls.
It is advisable to cover not only the base of the booth with a powerful waterproofing layer, but also the adjacent walls to a height of 35–50 cm, and the floor in the hygienic room in case of leakage
High-quality construction work will prevent flooding of neighbors on the lower floors. At this stage, mastic is used, which acts as a sealant. It is applied to the lower part of the walls and to the base made of foam blocks.
A single continuous sheet of roofing felt or fiberglass is then laid over the subfloor to serve as waterproofing. During the installation process there should be no cuts or cracks, since damaged areas may cause leaks and damage to the integrity of the structure.
Waterproofing the walls and floor of a compact shower stall must be carried out especially carefully before the final finishing stage.
The edges of the sheet should be located on the wall surface at a height of 25 cm from the floor level. The material is folded at the corners, pressed against the wall and secured with glue.
Stage #4 - installation of concrete screed
The next stage of installing a shower without a tray is to install a concrete screed on top of the hardened floor covering. In this case, the thickness of the concrete screed must be at least 4 centimeters.
This will ensure the strength and reliability of the structure. During screeding, you should control the degree of slope of the floor towards the drain.
It is recommended to think in advance about exactly how the ceramic tiles will be laid on the subfloor and to place the strips on the screed. Due to this, the concrete floor will be reliably protected from cracking due to temperature changes during the operation of the shower cabin.
The concrete screed is covered with mastic, which acts as a waterproofing material. Coat the base of the shower floor and the lower surface of the walls to a level of 25 cm.
The screed is poured into a pre-constructed formwork. The solution should be poured without interruption in one step; it is advisable to use a vibrator to remove air bubbles from the pouring body
Stage #5 – finishing and decoration
At the next stage, they move on to finishing the structure. The floor and walls of the shower box are laid out with ceramic tiles or decorative mosaics.
During the finishing process, you must first tile the floor of the structure, and then the walls. Due to this, the vertical wall tiles will cover the horizontal ones below. After laying the tiles, the wall joint and all joints should be carefully treated with waterproofing film or silicone.
The concrete base is covered with tiles on top, which are laid at a certain angle to the drain. The seams between the tiles are covered with waterproofing film.
The last stage is the final design. The boundaries of the shower box can be in the form of a reliable partition, which is built on the basis of cinder blocks, finished with ceramic tiles or mosaics. Most consumers install glass doors.
If the base of the shower stall is made in the shape of a circle, round doors are used. When constructing a rectangular or square base of the box, the doors of the structure are placed perpendicular to each other.
To install a structure without a pallet, guards must be installed. To do this, you can use brick partitions, cinder block fences, plastic or glass doors.
The most popular material used for the manufacture of sashes is durable glass. When washing in the shower, no smudges or stains remain on it. The thickness of the glass sashes varies from 6 to 12 mm, and the material can be transparent, matte or a combination.
Shower enclosures are often made of glass. Convenient sliding design does not clutter the room and makes the space light and weightless
At the last stage, you need to install a shower head.
Optimal shower sizes
The size of the shower depends on two factors: the size of the room in which the cabin will be installed and the height/weight of its visitors.
If the size of the room allows, the cabin can be fenced off by more than a meter in length and width. You can install two shower heads or a shower plus a sink there. It all depends on the needs and wishes.
For a large bathroom, you can install a shower cabin with several shower heads.
If the bathroom is small and the cabin is planned to be installed in place of the former bathtub, then there is not much choice here; they even install a glass corner cabin in order to save space.
A standard shower stall takes up little space.
In addition, in order to install a stack, you need to raise the floor in the shower area by at least 10 cm. At the same time, the cabin itself will rise, which is difficult in apartments with low ceilings.
The height of the cabin can be different - up to the ceiling or covering a person’s head.
The shower stall does not have to be up to the ceiling.
Material of walls and doors
There is not much choice in cabin wall materials. It is either glass or plastic.
The priority is glass, which can be frosted, transparent or a combination. Also, modern cabin doors can be tinted or any desired color, in accordance with the design of the entire bathroom.
For the shower stall, you can choose translucent matte doors.
Glass walls are installed framed and frameless. The frame is made of steel or aluminum and looks stylish and modern.
The frame shower cabin in gold color looks gorgeous.
Frameless cabins fit perfectly into any bathroom interior. Metal corners look stylish and modern.
Plastic is also not ignored; it gives an aesthetic appearance, transparency and lightness to the structure. In addition, it is easy to use and maintain, relatively inexpensive and durable.
In addition to the walls, if there is space in the bathroom, fences in the form of a niche are also installed, finishing them with tiles or stone. There is also a fence on the floor about 10 cm high from the same material. Such podiums with sides are relevant in the bathrooms of apartment buildings, where such a cabin is installed already during the process of living there. In a private house, fencing may not be required if the floor is sloped for such purposes.
A good solution would be to make a small side.
As for the doors, they are installed from the same material as the shower walls - glass or plastic.
Types of doors:
- Glass blocks. Allows you to separate the space of the shower stall in the bathroom.
- PVC curtains. The advantage of them is that they are relatively inexpensive and can be changed periodically depending on wear or mood. They are quite dense and do not allow water to pass through. The average size of such a curtain is 90*90 cm.
If there are no fences, you can put a special circular frame and hang a curtain on it; during the procedures, everything is tightly covered with it, and after that it simply moves, leaving one pallet.
An economical and unusual solution is a circular curtain.
There are options without fences at all, but the downside is that during the washing process the entire bathroom will be flooded and everything will be covered in soapy spray.
Types of shower cabins
There are three fundamentally different types of hydroboxes, which differ in design features, installation method and price.
Open
Devices of this group represent a space built into the room. In this case, the walls are mounted only on the unprotected part of the wet area, and the role of the side and rear partitions is performed by the walls of the bathroom itself.
The configuration and dimensions of the structure are selected taking into account the characteristics of the room and the wishes of the customer. Installation parts are purchased separately, and this allows for significant savings. In this case, the bottom may be completely absent: its role is played by a floor lined with tiles or mosaics with a drain hole.
Just make sure to maintain the sewer level, otherwise you will most likely encounter a situation where water stagnates in the pan.
As for me, such varieties look very beautiful and fit well into the interior.
Disadvantage: limited functionality. Here you will not find additional benefits such as hydromassage or aromatherapy.
More careful and lengthy preparation for installation will also be required, and the installation process itself will take longer.
Closed
This is a free-standing equipment that has a completely enclosed capsule with its own walls, floor and roof. It is the closed specimens that are equipped with “bells and whistles” to turn ordinary bathing into a complex healing and rejuvenating procedure.
One of the positive aspects is that the connection is quite simple: you only need to connect the water supply and sewerage. Also, if necessary, the equipment can be easily dismantled and reinstalled in another location.
If you decide on such a sample, keep in mind that during installation such a booth “eats” 5–10 cm of space on each side.
You should be aware that a good quality device will cost a pretty penny.
Combined
This is a solution for those who are not ready to give up a shower or bath in favor of just one thing. Of course, the structure is not as compact as a shower corner, but it takes up less space than two separate devices. An ideal option in a spacious bathroom for a private home.
Along the perimeter of the bathroom there are walls that provide protection while bathing in the shower. Such products are distinguished by an expanded range of capabilities: they combine the delights of both advanced fonts and boxes. But the price for all this pleasure is appropriate.
There is a special type of shower that is designed specifically for a summer house or country house. A summer option, which is placed outside, and the water in it is heated in the tank from solar heat. These are the simplest and cheapest installations, which differ significantly in their characteristics from home ones.
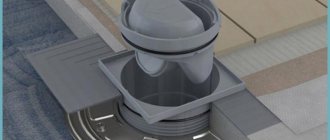
Drain ladder
This is a device in a hole in the shower floor that serves to drain water from the surface. Performs a number of functions:
- Drains water into the drain channel.
- Does not allow debris, hair, etc. into the drain, thereby protecting the drain system from blockages.
- If a blockage does occur, then through it there is access to the system for cleaning.
- Performs the function of emergency drains in cases where there is too much water on the floor, for example, during flooding.
- Eliminates sewer odors in the room.
The most important thing when installing a shower cabin without a tray is the correct installation of the drain ladder.
According to their design, there are three types: angular, linear and point.
The corner drain is quite difficult to install, since it is located at the junction of the floor and wall. It is invisible and its capacity is up to 40 liters. Due to this, it is more expensive than other ladders.
It is convenient to use a corner drain for a shower stall without a tray.
Linear ladder, or slotted. It looks like a rectangular tray. Install it in a corner, at the exit, along the wall or on the sides of the walls. Processes up to 60 liters of water. Makes installation easier, since here the floor slope should only be in one direction. The most reliable and installed in the shower, where there is a lot of water consumption.
The linear drain is easy to use.
Point ladder. Compact. Thanks to this, it is easy to install anywhere in the shower. Basically, they place a shower in the middle of the floor, but at the same time provide it with a slope on all sides. Despite its small size, it admits about 25 liters of liquid.
The design of such ladders is the same:
- Decorative lattice.
- Grate that collects hair and debris.
- Funnel for water.
- Siphon against unpleasant sewer odors.
- Funnel-shaped body.
- The pipe through which water goes into the sewer. Its diameter and the diameter of the drain pipe must match up to a millimeter. Can be in vertical or horizontal position. In an apartment building it can only be horizontal.
The drainage ladder is closed at the top with a decorative grille.
Preparing the base
In order to install a drain, make drainage and get to the drain, you need to completely remove the floor covering. All unnecessary items such as fittings are removed and cleaned of dirt. The base must be perfectly flat, treated together with the walls with special mastic.
Drainage channels are installed according to all the rules, after which layers of the floor are applied, taking into account the installed drain and shower drain in the floor without a tray: first there is concrete, then polystyrene foam, plus waterproofing on top and again a layer of concrete. The last layer is covered and is the final stage of laying the floor. We should not forget that the floor must slope towards the drain, which is installed in any convenient place.
When tiling occurs, they start from the drain, because if you start from the wall and go to the drain, there may not be enough space and the tiles will have to be cut. An unevenly lined drain looks unprofessionally made.
It is not without reason that shower stalls are most often faced with tiles. It's reliable and safe.
If the base is not prepared according to the required technologies, then water will accumulate in puddles near the drain, which will lead to fungus, etc.
Waterproofing
To protect the room from mold and mildew and extend its service life, it is necessary to waterproof it.
This procedure can be either in the form of pasting or putty. The result should be 6 to 8 layers. Those areas that come into direct contact with water are treated first. As a rule, these are the joints between the floor and the wall. In these places, without proper treatment, everything quickly becomes moldy and destroys the wall and floor.
In order to avoid problems associated with leaks when operating a shower stall, it is important to pay special attention to waterproofing.
Waterproofing on the walls is carried out with an overlap of 20 cm, and it is advisable to make it 20 cm higher than the shower. This is minimal processing, because... It is recommended to completely treat all walls due to constant contact with moisture.
Material for waterproofing is found in the following form:
- Coating material. Liquid and most common.
- Roll self-adhesive or weld-on. The latter is difficult to work with, it needs to be melted using a torch, and the surface for such waterproofing must be perfectly flat. Otherwise, either coating or repair.
Possible installation errors
- The drain is not installed correctly. No slope. This will lead to water spilling around the room or stagnation. The most important work for installing a shower cabin without a tray is the preparatory work, which includes pouring the base, installing a drain and a drain. The further operation of the shower depends on these details. It is better to carry out all this work during the construction stage.
- The base of the shower was not waterproofed. When it comes to water, it is important to follow all the rules for installing structures for a long time. Humidity not only damages appliances, but also destroys everything around you. A fungus will appear, which is very difficult to remove and which eats up the entire fill, floor and walls.
Competent installation and thoughtful design are the necessary conditions for installing a comfortable shower stall in the bathroom.
It is very important to carry out all installation work according to the rules, because a shower made by hand without observing technology can flood the apartment of the neighbors below. This is in an easy case. In severe cases - if there is a “warm floor” system, if water gets past the drain under the tiles, a short circuit will occur, which is also fraught with consequences for health and life.
Don't skimp on components. It is better to purchase them from trusted manufacturers. If, for example, a low-quality siphon is installed, then the sewer smell will constantly penetrate into the apartment.
Dimensions, shapes and materials for manufacturing shower trays
Sizes and shapes
When choosing a shower stall, special attention should be paid to each of its structural elements. Start with the pallet and its dimensions, which can vary within very wide limits - from modest 800x800 mm to spacious 1.5x1.5 m and even more. When trying to determine the most optimal option, pay attention, firstly, to the area of available space in the room allocated for installing the cabin, and secondly, to your personal preferences.
Shower cubicle dimensions
In the case of open and closed showers, the most popular are the following dimensional variations:
- 800x800 mm;
- 900x900 mm;
- 1000x1000 mm.
Shapes and sizes of standard shower cabins
Combined boxes are more spacious:
- 800x1200 mm;
- 900x1200 mm;
- 900x1600 mm;
- 1250x1250 mm;
- 1500x1500 mm.
The given overall dimensions are relevant for cabins whose pallets have the correct geometry. In a room with limited space, a more rational solution would be to use a pallet with an irregular shape, for example, a semicircular one. Also, a model with a corner tray, for example, in the form of a quarter circle, will fit well into the interior of a small room.
Semicircular shower tray Semicircular shower tray
The most popular pallet shapes are presented in the following table.
Table. Popular shapes of shower trays
| Pallets with the correct geometry | Pallets with irregular geometry / corner pallets |
| Rectangular shower tray | Square corner tray |
| Square shower tray | Rectangular corner tray |
| Round shower tray | Quarter circle shower tray |
| Semicircular shower tray | Shower tray in the form of a quarter ellipse |
In addition to the shape and size, when choosing a pallet you need to pay attention to its depth. The assortment is impressive: both completely flat products, installed flush with the floor of the room, and very tall structures, rising 30-40 cm or even more above the floor, are available on the market.
Shower tray with high sides
Scheme of shower cabin Borneo Comfort Lodi 90 high tray
In addition to personal preferences and ease of use, when choosing the height of the pallet, you need to take into account the placement of the sewer pipe. So, for example, buying a tray built into the floor or just a very low one can cause a number of inconveniences, which will have to be solved either by installing the structure on a special pedestal, or by raising the general level of the floor.
Shower cabin connected to the sewer
Shower cabin arrangement
More convenient, but also correspondingly increasing the final cost of the work, is the option of connecting the shower tray via a sololift. This product is a special compact sewage pump, the main function of which is to pump out wastewater.
Sololift for sewerage
Sololift installation
If you don’t want to spend time, effort and money on implementing the solutions listed above, buy a deep tray with a height of about 30-40 cm. To make it more convenient to overcome the high side, you need to attach an external step to it, if the presence of one is not provided for by the design features initially.
Prices for Sololift for sewerage
Sololift for sewerage
Manufacturing materials
The production of modern shower trays is carried out using different materials, each of which has both a number of strengths and its own individual weaknesses. Information regarding this is given in the following table.
Table. Materials for making shower trays
| Materials | Basic information |
Acrylic | A popular material for making shower trays. Production technology using acrylic makes it possible to produce shower trays of a wide variety of shapes and sizes, effectively integrating various additional mechanisms and elements into the products. Acrylic is extremely easy to care for and lasts on average about 10-15 years. Acrylic products can be repaired - minor mechanical damage can be repaired without much difficulty with a special paste or sanded. Important! When purchasing an acrylic pallet, be sure to check whether its design contains an internal reinforcing layer. If this is not available, the pallet must be installed on a metal frame, otherwise the pallet will sag and eventually simply break under the weight of the users. |
Cast iron | The material is characterized by impressive strength and durability indicators - on average, shower trays made of cast iron last 2 times longer compared to their acrylic counterparts. Cast iron heats up more slowly than acrylic, but retains heat much longer. The subjective disadvantages of cast iron shower trays include impressive weight and a limited range of shapes. |
Ceramics | Ceramic pallets have an excellent appearance and fit perfectly into any interior. Plumbing products made from this material do not cause any difficulties or inconveniences during use, they last quite a long time, but they heat up slowly and require careful handling. The subjective disadvantages of ceramic shower trays include their rather high price. |
Kvaril | The material is an improved form of the previously discussed acrylic. The main difference is the presence of quartz dust in quartz, due to which the finished product is characterized by higher strength and durability. |
A natural stone | An expensive option, characterized by excellent aesthetics, strength and durability. Most stone shower trays have a marble base. A more budget option is porcelain stoneware. The strength of porcelain stoneware is also quite high, and modern production technologies make it possible to stylize it like marble and other types of stone. |