The typical layout is implemented in several options:
- Standard.
- Corner apartment with windows.
- Apartment with niche(s).
- Non-standard architecture.
- Studio.
The area can be different: from 30-38 m2 to 40-45 m2 or more.
When arranging an apartment with a standard layout, construction, repair and design problems such as:
- Finishing of all internal surfaces, including walls, ceilings, partitions, floors.
- Arrangement of furniture and consumer electronics.
- Transforming all the negative aspects of the layout into the advantages of the room.
The typical layout of a one-room apartment is designed in such a way that it is comfortable for 1-3 people, but more often families with several children or elderly parents live in cramped conditions. If there are a large number of people, the zoning of the area is carried out more carefully, and for this purpose an architectural and design plan is drawn up.
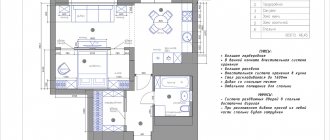
An example of redevelopment of a large apartment with one main room
The design project consists of the following items:
- Floor plan of the apartment, taking into account the architecture (presence of niches, ventilation ducts, etc.).
- Scheme of engineering communications.
- Arrangement of furniture and other interior items.
- Evaluation of building materials for redevelopment and renovation of premises.
- Estimation of the cost of labor costs - your own or a hired team.
The prepared design plan involves the start of repair and redevelopment work. This may include replacing windows and doors, thermal insulation of internal surfaces, replacing communications and plumbing fixtures, preparing walls, ceilings, and floors for repairs. In addition, such a plan involves choosing the style in which the entire apartment will be decorated, and for this purpose building materials, furniture and interior decor elements are selected.
Layout features
Disadvantages of the layout of a 1-room apartment:
- Small living area.
- Very often there is a low ceiling.
- Small toilet, bathroom and kitchen.
- Small corridor or hallway.
- There are no mezzanines.
- Often there is no balcony or loggia.
Using partitions during redevelopment
The main advantage of an apartment located not on the corner of the house, but inside, is its much better heat retention. In addition, there are several immutable rules that apply when planning:
- An old design trick - you need to visually show as much free space in the room as possible.
- Abundant artificial lighting even when there is sufficient natural light.
- Using color combinations. For example, the ceiling should always be lighter than other surfaces, but it does not have to be white - it can be any color. A lighter ceiling will visually rise and make the room more spacious.
- Mirrors and glossy reflective surfaces in the interior will also visually enlarge the room.
- In a one-room apartment, it is preferable to use a minimalist design style - it will make the room more spacious and preserve its functional features.
- Built-in or mobile furniture.
- Instead of a stationary internal partition between rooms, it is recommended to install furniture - a closet, a shelving unit. It will perform not only the role of a partition, but also its direct functions.
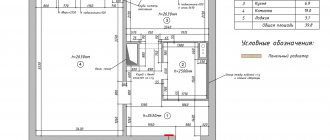
An example of redevelopment of a corner apartment with one room of 50 m2
Why do an apartment wiring project?
To ensure safety, the wires are additionally laid in a corrugated PVC hose, which takes up much more space.
Laying 10-15 cables correctly in a row and spreading them around the apartment is an art. And only a professional electrician acting according to the diagram can cope with the task.
Someone will say that the electrician is a perfectionist, but we will answer that the work was carried out according to the project
The second point is the need to decorate and disguise communications. After this, it will be impossible to figure out the location of a large number of conductors without partially damaging the repair.
When the developer keeps the plan, problems of this kind do not arise.
Apartment wiring plan - example
The electrician takes into account the client’s wishes regarding the location of household and heating appliances in the premises, after which he begins drawing up a diagram.
Its task is to divide the cables into groups so that they do not intersect or interfere with each other, and it is also possible to distribute the load in the network evenly.
He thinks over a protection system (some devices require grounding and the presence of separate RCDs) so that the wiring meets safety requirements.
The electrical wiring diagram includes the following elements:
- Distribution panel, which can be intra-apartment or common.
- Electric meter to control electricity consumption.
- Automatic protection devices responsible for stopping the power supply in the event of leaks, human electric shocks, or short circuits.
- Cables and wires with which wiring to electrical points is carried out.
- Switches and sockets for controlling lighting and connecting household appliances.
Corner
A mandatory rule that must be reflected is the implementation of a light design. This does not mean that all objects and surfaces must be white - tones and shades can be combined and even contrast with each other, but the predominant color is light. Bright colors in small quantities will also perfectly complement the design of a small apartment. Glossy, mirror and glass surfaces will visually increase the area of the room, as they reflect the interior, expanding the boundaries of the apartment.
Glass and plastic transparent furniture will make the space airy and uncluttered, so designers strongly recommend it for use. Tall cabinets with mezzanines will increase functionality and save space in the apartment, and also serve as an element of zoning the room, separating, for example, the bedroom from the daytime recreation area. Shelves or racks with shelves without back walls are a godsend for a corner apartment, because they zone the space while maintaining overall functionality.
Scheme of a corner one-room apartment
Why do you need a preliminary wiring diagram?
At the moment, it is already quite difficult to carry out wiring on your own without special skills. Therefore, it is recommended to hire a specialist for the job. In case you need to create an electrical wiring layout in a new apartment, it is advisable to build a plan that will indicate important details regarding the wiring.
Wiring diagram for a one-room apartment with an electric stove
It is quite practical to do this before starting installation. Main elements associated with the network:
- sockets;
- switches;
- lighting group;
- RCD.
You might be interested in How to connect a doorbell
The electrician is obliged to build a circuit taking into account all the features of the room and the client’s fantasies. The main task of the electrician is to divide the wire into different lines that will work correctly. This goal requires proper load distribution, as well as the organization of an RCD.
Before building a wiring plan, it is advisable to study the nuances and instructions of all the details in the electrical network. The surge fuses found in the electrical panel will be the most important part of the wiring. The power supply of the entire network depends on their correct connection.
Cables that supply electrical current to various places must be chosen wisely. Their cross-sections vary. Below are the rules for which groups you can divide the wiring in an apartment into. They cannot be neglected; the performance of the devices depends on the grouping.
Grouping of wires
Rectangular
Apartments with an open design are an ideal option for living by one person or a family without children. To ensure maximum convenience, it is necessary to draw up a plan for the location of furniture, lighting fixtures and the laying of utilities. Studios are most in demand on the real estate market, as they have many advantages.
One-room rectangular apartments are:
- Free architecture.
- Standard layout.
- Studio apartment.
Advantages and disadvantages of studios:
| Advantages | Flaws |
| Abundant natural light | Small area |
| No internal partitions | No balcony |
| Monospace | Sophisticated design and architecture |
| Suitable acoustic characteristics | Suitable acoustic characteristics |
| Easier room cleaning | The presence of drafts, which requires the installation of additional ventilation |
| Favorable room rental |
To ensure that the studio apartment not only serves as housing, but is also comfortable, the most modern technologies are used in its design. First of all, this is zoning, which will allow you to divide one room into several without isolation - a work area, a relaxation area, eating and preparing food, etc.
The relaxation area is traditionally located next to the window, the dining area is located near the wall, the bedroom can be isolated with an incomplete partition, like the bathroom. The hallway is marked with a hanger, a table, a chest of drawers for shoes, and a small closet for outerwear.
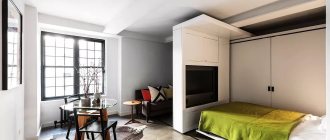
3-D visualization of a one-room rectangular studio apartment
How to properly distribute wiring in apartments with access to the attic or attic?
The first step is to determine the number of outlets needed for the room. The plan is drawn up depending on the current needs of the residents. Separate connection on separate wires is recommended for the following devices:
- Boilers.
- Heaters.
- Electric stoves.
One appliance requires one main socket and at least two spare sockets. Six sockets and ten points for lighting fixtures are a standard design when arranging attics.
The cable route should be located at a distance of 10 to 30 cm from the floor. The main thing is that the cable can be disguised.
Square
A square apartment is housing in a Khrushchev-era building with a rectangular room of 16-18 m2, a kitchen, a corridor and a toilet combined with a bathroom. They usually undergo radical redevelopment. For example, the kitchen is combined with the main room, the bathroom with the toilet, if they are separated.
There is a very small corridor here, so the partition between it and the room is often removed to provide free access to the kitchen. The furniture is minimalist, preferably light.
A good design technique is to combine different types of surface finishes: plaster, tiles, wallpaper.
Important: Buy finishing and renovation building materials in a moisture-resistant version, because the close proximity of a bathroom and toilet (rooms with high humidity) can cause deformation of other building materials and even furniture.
Standard square one-room apartment
One-room apartment with an area of 20 sq. m
Some of the planning methods:
- Combination of different zones in one room.
- Visual increase in space.
- Minimalism in everything.
- Use of transformable furniture.
Main premises:
- Entrance hall with built-in furniture.
- Combined bathroom.
- Kitchen-dining room.
- Living area with transformable sofa.
Layout options for an apartment of 20 m2 - renovation plan in a house p44k
Design of apartments by sq.m. m
Options on the primary and secondary real estate market:
- Stalinka - total area 32-50 m2 near one-room apartment. Ceiling height (3 m) and built-in wardrobes. Separate or combined bathroom.
- Khrushchevka is a small-sized housing with an uncomfortable layout. The ceiling is 2.5-2.7 m high, the bathroom combined with a bathtub, internal partitions with poor sound insulation. Total area – up to 33 m2.
- Brezhnevka has isolated rooms with windows on different sides of the house. There is space to build in a hallway. The odnushka usually has a combined bathroom, the walls of the house are reinforced concrete, the total area is up to 40 m2.
- A standard apartment has a comfortable layout, often with bay windows. Ceiling height 2.5-2.8 m, separate bathroom, large kitchen, loggia, built-in wardrobes and storage niches, total area - up to 50 m2.
- The apartment has an improved layout, a ceiling height of 2.5 m, isolated rooms, a separate bathroom, a loggia, built-in wardrobes and mezzanines, a total area of up to 50 m2.
- A modern apartment has spacious rooms in a panel house, regardless of their functional purpose. The ceiling is 2.8 m high, the bathroom is separate, the total area is up to 80 m2.
Modern one-room apartment with an unusual layout
List of further works
After the wiring diagram has been sketched out, we begin to calculate the network parameters and install it.
Selecting a cable and calculating its cross-section
To accurately calculate the cable cross-section based on the power of consumers, use the following relationship: I=P/U, where P is the total power of all consumers in the circuit for which the cross-sectional area of the conductor cores is selected, and U is the voltage of the apartment network. Most often, the wiring circuits are arranged in such a way that the electric current load in them does not exceed 25 A. In this case, the following sections are used:
- wire VVG-3*2.5 – two-core power cable with a cross-section of one conductor of 2.5 mm2. This is the most used wire for organizing the electrical network in the apartment. They connect the distribution board with the distribution boxes of the premises;
- wire VVG-3*1.5 - two-core power cable with a cross-section of one conductor of 1.5 mm2. Such conductors are used for installation from distribution boxes to sockets, automatic switches in the panel;
- wire VVG-3*4 – three-core power cable with a conductor cross-section of 4 mm2. Such conductors are separated into separate circuits for connecting powerful apartment consumers (furnace, heating tank, etc.).
Marking sockets and switches
The placement of sockets and switches in the apartment should ensure ease of use and cover the needs of residents in connecting equipment. A typical example of the layout of electrical equipment (connection points) is presented in Figure 6.
An example of placing connection points in an apartment
When marking the locations of sockets and switches, the following requirements of modern standards must be observed:
- sockets and switches are located to the left of the doors;
- switches are mounted at a height of 0.9 m from the floor;
- in living rooms, sockets are located at a height of 0.4 m from the floor, in the kitchen - 0.95 -1.15 m, in the bathroom the use of sockets is prohibited.
Wall chipping
After marking the locations of distribution boxes, sockets, switches, and installation points for lamps, they begin to arrange grooves (grooves) along the walls and on the ceiling for laying out the wiring. It is worth remembering that gating should be done in horizontal and vertical planes along straight lines. This will make it possible to more accurately determine the location of the wire in the future. The grooves are made using a grinder or a hammer drill. The depth of the groove must be at least 20 mm, and the width must be sufficient for laying all cables planned for laying in this location.
Cabling
The principles of laying cables for hidden and open wiring are the same. Installation starts from the connection points and leads to the distribution panel. Next, the line is inserted into the shield and moved to another circuit. If necessary, identification tags are hung on the end sections of the wiring for quick reference. After installation is completed, the cables are covered with boxes or putty in the wall.
Installation of socket boxes and junction boxes
The laid wiring is brought to the mounted junction boxes and electrical outlets, inserted into them, and the ends are driven out with a small margin. All wiring branches are arranged in boxes. The connection of the conductors of aluminum or copper wiring must be reliable. For connection, it is advisable to use special devices, as shown in Figure 7.
Connecting conductors in a junction box
Immediately before connecting the wires, they ring and make sure that the installation work is carried out correctly at this stage.
Installation and assembly of electrical panel
When all the cables of all electrical circuits are laid to the installation site of the electrical panel, they begin to organize the apartment's distribution panel. This part of the electrical network is characterized by a large number of conductors and protective devices, so it is very important to make all connections correctly. For the shield, you always choose mounting boxes with a certain supply of seats. This will allow you to upgrade the system or eliminate its malfunction in the future.
An example of an electrical panel diagram for a standard apartment is shown in Figure 8.
Figure 8. Example of electrical panel diagram
In the figure, the positions indicate: 1 - introductory machine; 2 - electric meter; 3 - zero bus; 4 — protective grounding bus; 5–9 — automatic machines; 10 - separate automatic switch for lighting
Installation of sockets and switches
Sockets and light switches are installed in pre-installed boxes with wire ends removed. The process is not difficult and will require a minimum set of tools: pliers, wire cutters, and a screwdriver. This is the final stage of installation work on the apartment’s electrical network.
Checking the quality of work
The quality of the work performed is checked by turning on the wiring circuits and checking the presence of voltage and the correct phase distribution in the network. This procedure is carried out using voltage indicators. Incorrect installation can also immediately show a disconnected circuit breaker against short circuits.
Planning electricians in the apartment
Housing 20 sq. m
Zoning:
- The hall can serve as a bedroom.
- The living room is combined with a kitchen, study or bedroom.
- There is a seating area in the kitchen, living room and dining room.
- The office can be equipped on the balcony.
Interior of a living space with an area of 20 m2
Apartments 25 sq. m
Functional areas: living room, kitchen, hallway and bedroom. Combined bathroom. In such small rooms, it is impossible to separate the bedroom from the living room, so a transforming sofa is most often used. A good trick is to place a mirror or other reflective surface in front of the window, even a large TV or glass coffee table.
Apartment 25 m2
Living area 31 sq. m
The main task in small apartments is to divide the space into zones. For preliminary visualization there is a special program, for example, AutoCAD or 3D MAX. On an area of 31 m2 you can place a living room, a kitchen with an electric stove, and a dining area. Large tiles can be placed in the bathroom, on the floor and on individual walls. Existing niches are used for a dressing room and storage area.
Transition from the kitchen to the living room in an apartment of 31 m2
Room 32 sq. m
You can increase the space by combining the kitchen area and living space. For the layout of an apartment of 32 sq. m need:
- Designate the locations of functional areas.
- Choose a design concept to develop an interior line.
Mono-space in a one-room apartment
Project 33 sq. m
As in the previous options, it is preferable to make a studio apartment. Design techniques allow you to combine both individual pieces of furniture and rooms. There is a solution for transforming walls, folding beds that rise up, TVs that stow away in cabinets, and furniture is used to store a variety of items.
Transformable walls in a small room
Living area 35 sq. m
Visual expansion involves some redevelopment: demolition of partitions and doors, excluding the toilet. If you have a balcony or loggia, you can insulate them, remove part of the wall and install heating. You will get a comfortable office, children's room or storage room.
Expansion of the apartment due to the loggia
Apartment 36 sq. m
Small interior elements can be selected later, but the main style is considered to be minimalism or hi-tech. These are simple and laconic forms, a small area of employment, versatility and strict lines. For the kitchen area, furniture is made to order so as not to waste a single centimeter of space. There will still be plenty of space in the apartment for a comfortable stay.
Mirror surfaces in a minimalist interior
Living space 38 sq. m
In apartments with an area of 38 sq. m you can get a small bedroom and a large kitchen or living room, or vice versa. This option is more suitable for one person or a family without children. If there is a balcony or loggia, then combining them with the kitchen will give more space, and you can make a children's room. With this solution, household appliances and work surfaces are placed in the loggia area, and the dining or living area can be separated by a bar counter.
Zoning with a bar counter
Area 39 sq. m
This design often uses sliding doors (hidden pencil case), which significantly save space. Niches in the walls allow you to arrange built-in storage systems. If there is a loggia, transformable furniture is installed to save space, and the same is done in the kitchen. The bathroom is usually combined, so compact furniture and plumbing are used. All electrical wiring is hidden; a separate electrical panel is installed in the kitchen for household appliances.
Sliding doors in the interior of a one-room apartment
Project 40 sq. m
To make the room look more spacious, all individual zones must be connected to each other. The kitchen is combined with the living room, a transparent door is installed in the bathroom, and the sleeping area is fenced off with vertical translucent blinds. Here you can also put a baby crib and equip a bedroom for parents.
Arrangement of premises in a large one-room apartment
Standard apartment
If redevelopment is not possible, it is important to correctly zone the space, use tricks to visually expand it, and use highly functional furniture.
In old apartments - Khrushchev, Brezhnevka, Czech - the kitchen can be very small, as well as the bathroom and the corridor, and a room of 16-18 square meters even allows you to divide it with a partition, making a separate bedroom and living room.
If possible, some of the storage systems should be placed in the hallway in order to free up the only room and not overly clutter it.
If there is a balcony, a storage room, a niche - all this must be used to the maximum, building in storage systems even where at first glance this is impossible.
Studio for one person
In all one-room apartments, where the total and usable area is limited, it is recommended to make custom-made furniture. Irrational arrangement of standard furniture will only waste your square meters.
Even if only one person lives, it is better to use transformable furniture and use the extra space at your own discretion.
Transformable sofa in the interior of the apartment
Photo of a beautiful layout of a one-room apartment
Interior design of an apartment of 40 sq. m. - the best projects and ideas for modern apartment design (85 photos)The best layout of a 3-room apartment: 85 photos of current design ideas and a review of non-standard solutions
Kitchen interior design 9 sq. m.: 120 real photos of modern successful solutions and design combinations
Look here: Interior design of an apartment of 40 sq. m. - the best projects and ideas for modern apartment design (85 photos)
Did you like the article?
1+
2
Apartment for a married couple
Light colors and shades in the design of rooms allow you to create complete comfort in a small area, as well as visually enlarge the space. In a living space of 20 m2, you can comfortably arrange multifunctional areas. For example, transform a relaxation area into a bedroom at night, and a transformable chair and a bookcase into a work corner.
Semi-partitions in the apartment
Housing for a family with one child
Even if there is a shortage of usable space, the design of a 1-room apartment for a couple with a child needs to be organized as comfortably as possible. A sleeping area for parents is just as necessary as a place for a child to sleep, so it is necessary to ensure the placement of two separate sleeping places. This can be done by installing not a double bed, but a convertible folding sofa, which turns into a small sofa during the day.
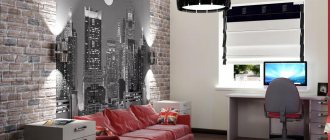
Design of a small apartment for a family with one child - one room with an area of 17 m2
Selecting Tools
Before starting installation, you need to purchase the most important tools. First of all, you need to purchase a hammer drill. It is used to drill walls. You also need to purchase the following attachments for the hammer drill:
- drill for concrete surfaces (17–20 mm);
- core drill (100 mm);
- chisel for concrete surfaces (25–30 mm);
- drill set
You may be interested in this Connection rn 113
It is also advisable to have a grinder equipped with a circle that allows installation on stone. You also need to buy a soldering iron and a universal multimeter.
Chasing walls for wiring
Recommendations for choosing the style and functionality of housing
The most effective recommendations for creating a comfortable interior of a 1-room apartment:
- Minimalism. Buying multifunctional furniture and interior items is the main technique for getting maximum space. This could be a sofa with a retractable tabletop, a folding table, etc. This furniture is made to order.
- Unobtrusive interior. To visually expand the space, mirror or glossy surfaces are used, the room is zoned with light fabric or glass partitions. You can also use partitions up to 1 m high - the main thing is to choose the right building material. Floors in different areas should also be different, for example, tiles in the kitchen and linoleum in the living room. In the bedroom, a carpet or carpet would be appropriate. A separate electric lamp is installed in each zone, the wiring is hidden.
- Emphasis and contrast. It is not recommended to use one tone - it is better to highlight a couple of main ones and correctly distribute the shades over the surfaces. A lot of dark color will visually compress the space, while light colors will expand it.
- Redevelopment. Internal partitions (if any) in a small room are reduced or removed altogether, replacing them with Japanese-style partitions - paper or fabric.
- Multifunctional pantry. In old apartments (Stalin-era, Khrushchev-era apartments) a storage room was always built, and it can be used functionally. For example, as a built-in wardrobe or dressing room.
- A three-meter ceiling will allow you to place a so-called loft bed installed on a podium. There is a closet for storing things under the bed. This technique will combine two pieces of furniture into one.
- Proper use of decorative elements and textiles. Do not load a small apartment with small interior items - toys, boxes, vases, figurines. Hang fabric blinds or light translucent curtains, such as roller blinds, on the windows.
Minimalist style in the design of a one-room apartment
How to arrange furniture indoors
Each zone in the room has its own purpose, location of doors and windows, dimensions and lighting. Therefore, it is recommended to adhere to generally accepted rules for arranging furniture in each zone:
- You should first find out the dimensions of each zone and furniture. You can use graph paper to draw out the area of the apartment on the selected scale. Then cut out interior figures from cardboard in the correct proportions and place them on the drawing.
- For the proper organization of space, the main element is determined. In the living room this could be a TV or a closet. In the bedroom there is a bed or sofa, in the kitchen there is a table.
- The estimated distance between furniture is 1.8-2.4 m.
- The corners in the room are filled with objects that do not attract attention.
- A distance of 60-80 cm is maintained between the table, chairs, and sofa.
- In a room with two windows spaced apart, mirrors are hung to visually enlarge the space.
- If the room is narrow and long, then you need light, compact furniture. It is recommended to cover the windows with thick curtains and use artificial lighting. Shelves and other horizontal surfaces should not be filled with small objects and decorations.
Light furniture in a narrow and long room
How to Group Electrical Wiring
Wiring is divided into groups so that devices can be used more safely.
Grouping helps to separately control the electricity of individual devices or groups of consumers. This is practical when carrying out installation work; you can de-energize one group for work, and the other group will be in working order. Also in a state of emergency: only the group with problems will be disconnected.
Instrument separation:
- large household appliances and powerful devices are grouped into a single line with a separate fuse connected to the electrical panel. These are stoves or hobs, electric ovens, dishwashers, boilers, split systems, etc.;
TV socket group
- socket groups - each room should have its own group. Living room separately, bedroom, children's room separately, office and so on;
- kitchen - this is where there are the most appliances, so the sockets in this room should be separated from everyone else;
- light - one general group is performed for it;
- Bathrooms will be particularly important areas from a safety point of view because they have high humidity.
Stationary household appliances
Powerful household appliances are mainly located in the kitchen or toilet area. A separate connection for the kitchen group is required for installation. If one of the devices shorts, replacement is necessary. In order not to de-energize the network throughout the entire room, you can disable one protection system, which is responsible for stationary equipment.
Placement on the kitchen line
Kitchen line
According to the rules, the kitchen is considered the most powerful. About 5-6 devices are always connected to the network, even if they are not working. These are mainly machines for various purposes, refrigerators, stoves, microwaves, etc. Some have mini-grills, meat grinders, blenders, multi-cookers and other devices. In this case, even with one powerful wire it will not be possible to use all devices.
You may be interested in this Digital electronic electricity meter
If lighting groups or a boiler are also connected along the entire wiring, then when connecting another equipment, the network simply will not withstand such changes and will simply turn off.
Lighting groups
Lighting groups must be separated from sockets. They are divided by type of use, power, etc. Depending on the number of chandeliers desired in the apartment, there may be two or three lighting groups.
Electrical diagram of a one-room apartment
Installation of electrical wiring in a damp room
Important rules apply to household appliances and wiring in the bathroom, since moisture is always a risk. In order for the network to be safe and work properly, a number of guidelines must be taken into account when constructing a plan and repairing the wiring:
- Note 1 – connection of the distribution box.
- Instructions 2 – installation of sockets for appliances.
- Note 3 – location of installation of the switch.