Where to begin?
First of all, make sure that all parts of the headset are at the assembly site, nothing is lost. You can check the list, which indicates the composition of the kit. Inspect the packaging: not torn anywhere, corners not damaged. Instructions for assembling the kitchen may be in one of the boxes, or may be included separately.
In addition to a list of all parts and fasteners, it contains a kitchen assembly diagram and a recommended assembly sequence. It would be a good idea to take care of safety precautions: gloves, glasses, good lighting, enough free space.
Kitchen zoning
Typically the kitchen is divided into three zones:
- the first is the working zone,
- the second is the dining room,
- the third is the passage zone.
The furniture in the kitchen also depends on the size; if the kitchen is small, then the household appliances can be built-in.
Kitchen furniture must be arranged taking into account all zones. The first (working) zone includes a sink, stove, refrigerator, and cooking table. The second (dining) area includes a dining table with chairs. The passage area should not be forced too much; it is better to leave the passage free.
In the work area, plastic wall panels are best suited, and in the dining area, washable wallpaper. When thinking about zoning the kitchen, you immediately need to decide on the color scheme. If the kitchen is in warm colors, it will visually increase the space.
What tools are needed?
Special hex keys, bent at right angles, are often found in bags with fasteners. They are designed to connect parts manually. Assembling a kitchen professionally involves the use of fixtures and power tools:
- screwdriver;
- drill or hammer drill with a set of drills;
- jigsaw or wood saw;
- level, square, hammer and tape measure.
Assembly tools
Any furniture, as a rule, comes to the client in disassembled form. You can hire furniture makers to assemble it, or you can do it yourself.
Required tools:
Drill and drill bits. High-quality furniture, however, does not require any drilling - everything is done at the factory precisely and correctly, but in some cases this still happens.- Screwdrivers (screwdriver). If you don’t have this power tool, then you can get by with screwdrivers, although this will slow down the work.
- Hammer. It is difficult to hammer reinforced concrete walls manually, and an electric drill is a weak assistant in this matter. Holes in the walls will be needed to secure the upper elements of the kitchen.
- Hacksaw or pendulum saw (jigsaw). This tool is needed to cut a window in the countertop under the sink.
- Hex key. They use it to tighten special furniture euroscrews - confirmats. However, very often these keys come with furniture.
- Level. Ensures that upper cabinets are hung correctly.
- Ruler.
- Square.
- Hammer.
Assembly sequence
The procedure for assembling cabinets and sections is described in the instructions. It also depends on what kind of cuisine is chosen. Assembling an IKEA kitchen occurs a little differently than assembling a Leroy Merlin kitchen, although in many ways the processes are similar.
When unpacked, the set is a set of boards of various lengths and sizes, packages with fittings and fasteners. One shipping box contains a complete set to assemble one cabinet or shelf.
There is no need to unpack all the boxes in a row, otherwise everything will get mixed up and then it will take a lot of time to find a way out. Assembling a kitchen with your own hands is a leisurely and lengthy process. If difficulties arise, you can watch a video that not only describes in detail, but also shows the assembly of individual components.
Details
Sink installation locations
Sink in the corner of the kitchen
Such placement is suitable for a room of any size and layout, and at the same time the kitchen set itself can be corner, standard linear, or L-shaped. On the market you can buy special sinks for corner placement, and this gives you the chance to choose a sink for every type of interior and layout.
The main advantages of placing the sink in the corner are the following:
- Great savings in free space, on which additional furniture or even household appliances will be installed.
- Thanks to the corner, the cabinets under the sink will be deep, and you can place all the kitchen utensils there.
- The corner behind the bowl is perfect for storing detergents, and in addition, they will not interfere with the washing process.
- A variety of colors, shapes, and sizes of the sink can diversify the design of the kitchen and harmoniously fit the sink into the overall composition.
When selecting a corner sink, experts recommend deciding on the diameter of the bowl, as well as the insertion method. There should be enough space to perform all the usual duties. If before this you doubted exactly how to position the sink in a corner kitchen, now all doubts will be over, because for maximum ergonomics of the room it will be enough to fill the corner.
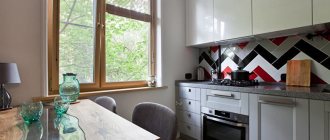
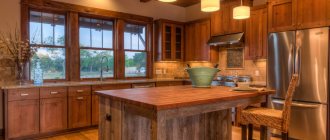
Installing a sink near a window
Washing near a window is impressive, but most people choose this location for rational reasons - a lot of natural light will make it possible to better control the cleanliness of food and dishes, while saving on electricity.
There are other advantages that are also important to mention:
- View from the window - naturally, not every person will have a luxurious view of flowering gardens and lakes outside the window, but such a view when washing dishes will help train your eyesight, watch a child play on the street, or even look out for the bus so as not to be late to work.
- Additional workspace - to place a sink, you will need a tabletop near the window, and this way you will have much more free space. The tabletop can be moved slightly under the window sill, or even combined with it.
But keep in mind that this placement method also has its drawbacks. The main ones will be the need to spend additional funds on installation work, because according to the classical layout, the water supply and disposal of used water are located exactly not under the window, and another disadvantage will be the private washing of windows, because splashes from the mixer will very often fall on the glass surface. Whether or not to place a sink near the window is an individual decision, and although it is very beautiful, it will not be appropriate for every family.
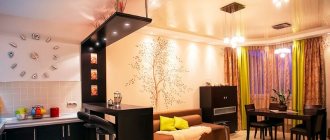
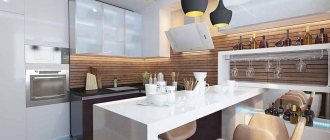
Exotic kitchen islands
Pieces of furniture, including the sink, can be placed in the middle of the room only in spacious rooms or even in the kitchen, which is part of the studio. Most often, the island in the center is both a dining table and a built-in sink, which makes it possible to communicate with household members when preparing food, peeling vegetables or washing dishes. This arrangement of the sink in the kitchen will resemble a modern restaurant in which the chef cooks right in front of the guests.
When choosing this option, you should definitely be aware of certain nuances:
- Communications will need to be carried out under the floor surface, or rather, to remove the covering, perform installation work, and put everything back as it was. This is a waste of money, time, and there will also be a lot of dust in the kitchen. It is best to design a different arrangement during the rough renovation in order to reduce the inconvenience of alterations to a minimum.
- It will also be necessary to extend the countertops on the other side of the sink (or rather, behind the faucet). This will help add space to the table and will not interfere with the rest of the family members who will be in the kitchen.
The only reason people usually give up on cleaning a kitchen island is because there are piles of dishes. It doesn’t really matter whether it is clean or dirty, whether it dries after washing or anything else - the utensils will clutter up the spaces, but if you have a separate drying facility, the problem will disappear by itself.
Built-in option (in a furniture set)
This arrangement is most often used for linear kitchen units, when the stove, sink and dishwasher are located under a single countertop panel. But most people are concerned about the question: what is the most convenient way to place a built-in sink in a corner kitchen? You can choose from a free corner or install it in the countertop between the stove and refrigerators that stand in one line. Often it is necessary to purchase a separate cabinet with a built-in sink.
With this option, you can use bowls of different shapes, and a round bowl with small sides looks advantageous, as well as universal sinks with side “petals” for drying dishes after washing.
Dimensions of corner sink
Choosing a sink of the required size is not so simple, although at first glance there may not be any problems with this. Firstly, it must correspond to the size of the room, and also meet all the requirements of the owner. Alas, it is not always possible to combine both requirements, because kitchens built during the Soviet era do not have a large area. In this case, it is worth starting from the size of the room, because a very large sink on a small kitchen will be inappropriate, and it will also take up a lot of space so that it will not be possible to work with food on the countertop.
Do not forget to pay attention to the depth of the sink, and the optimal depth will be considered from about 15 to 18 cm, and if this figure reaches 20 cm, then along with the large capacity you will receive a lot of inconvenience as a gift - you will need to bend over more, and if you often wash dishes , then you will soon begin to feel pain in your back. Sinks with a depth of less than 15 cm are not particularly spacious, but if you have a dishwasher in the kitchen, then this option will be enough for you.
Sink material
We invite you to consider the range of materials from which kitchen sinks are made, and also learn about all their pros and cons.
- Granite. Such models are made of a material that is made artificially and is 80% quartz and 20% granite chips. They are resistant to chemicals, and a definite advantage will be a large range of colors, which makes it possible to choose products for each interior.
- Ceramics. The most common are earthenware models, and porcelain ones are much less common. Ceramic sinks are spectacular and will help show guests that you have chic taste. The material is also resistant to chemicals, but they also have disadvantages - heavy weight and a high degree of fragility.
- Stainless steel. Stainless steel models are in incredible demand because the list of advantages is very large. Such products are inexpensive, can come in a variety of shapes and sizes, so you can choose a kitchen option with different dimensions and design in different styles. The downside is that the surface gets dirty easily, so you will need to regularly clean it to remove fingerprints, water drops, etc.
Sometimes the choice of product material will depend on the location of the sink in the kitchen - in a corner, or near a window.
Installing shelf holders
To install shelves, special holes are made in the side walls. They are not end-to-end, they have a certain depth. The height of the holes is evenly spaced every 10-15 cm. This is done so that the shelf can be installed at different heights for a more convenient arrangement of high and low vessels.
Wooden or plastic pins are inserted into the holes. They have a cylindrical shape and a corrugated surface. Metal stops are installed in the same way; they are more preferable as they can withstand greater loads.
Basic rules for kitchen-dining room design
First of all, it is important to take care of a high-quality and properly organized ventilation system. This will prevent the smell from spreading throughout the entire area.
Therefore, install a high power hood.
The design of the zones should be different. This will separate the work segment from the lunch segment. For the first, choose materials that are resistant to moisture and high temperatures. Suitable tiles, washable wallpaper, artificial stone. It is necessary that maintenance of the finish is as simple as possible. For the dining room, you can choose vinyl flooring or cork. Parquet and laminate are suitable for the floor. You can separate zones by organizing lighting.
Door fastening
Wall cabinets for the kitchen can be either open or closed. Combined ones are common: the side sections have doors, and the middle ones are open. The material for the shelves is sheets of chipboard or thick glass.
To fasten doors, overhead and mortise hinges are produced. Before installation, place the cabinet on a flat surface with the side to which the door is attached facing down.
Note!
- Kitchen with gas stove: design features, photos of the finished renovation
How to make a kitchen with your own hands - examples of beautiful and modern renovations
How to choose a kitchen - reviews of stylish kitchen design, interior styles, new designs (photo + video)
We install the hinges in the prepared holes and secure them with screws. We place the door close to the side of the cabinet and pad it a little. We also attach the second half of the hinges to it with screws.
After installing the hinges, you need to check how the door fits against the ends along the entire perimeter and, if necessary, adjust with the screws specially provided in the hinges for this purpose.
To prevent the door from opening spontaneously, magnetic holders are attached to the sides, and a steel strip is attached to the door. Lastly, handles are attached for easy opening.
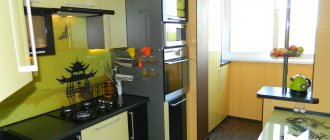
No. 8. How to place furniture in a small kitchen?
Many apartments, unfortunately, cannot boast of spacious kitchens, so the owners have to calculate everything down to the centimeter in order to place the necessary items. Designers have accumulated vast experience in arranging such spaces. Their main advice is as follows:
- use L-shaped arrangement of furniture to place a maximum of useful items in a minimum area. A corner set is perfect for this purpose, and the cabinets can be equipped with sliding doors;
- An alternative to corner furniture and wall cabinets in a small kitchen is high pencil cases. The interior will be laconic if you use two such pencil cases in different corners of the room;
- if the kitchen is very tiny, then the dining table can be folding , or it can even be folded against the wall for a while. Even a bar counter can play the role of a dining table;
- In drawers and tables, to optimize storage, you can use multi-tiered trays: they can fit much more necessary things, they will always be neatly folded and easy to find;
- microwave It’s better to place it in the corner of the countertop: it’s not very convenient to use, but this place is ideal for placing equipment. It is recommended to mount the mixer and blender on special shelves directly above the countertop - this way they do not take up space and are always at hand;
- a refrigerator that is narrow and tall, and if the family is small and you do not need a huge supply of food, then a low refrigerator is also suitable, on top of which you can install a microwave;
- Analyze the need for some equipment , for example, an oven. Not everyone actively uses it, so in some cases it makes sense to organize a regular cabinet for storing kitchen utensils in its place.
It is worth noting that in the desire to place as many things as possible in the kitchen, the main thing is not to overdo it and not clutter it. Wall space, incl. above the work area, it can be used, but very thoughtfully, so as not to visually reduce the kitchen area.
What types of awnings are there?
Functionally, there are only two types of them - adjustable and non-adjustable canopies. Non-adjustable mounts are the most common. They are cheap and simple in design. Some movement of sections can still be accomplished using pads of different thicknesses.
Structurally non-adjustable canopies are metal plates of various shapes with holes. Several small holes for attaching the canopy to the back wall of the cabinet and one large one for hooking onto the head or nail of a screw in the wall. Many craftsmen independently make more reliable and powerful fastening devices from a metal strip.
Note!
Kitchen designer: purpose of the program, operating rules, pros and cons, secrets of arranging objects in the kitchen
- Bar counter height: types of counters, calculation of dimensions, standard sizes, reviews of modern solutions (photo + video)
Gas pipe in the kitchen: instructions on how to beautifully and safely hide a gas pipe in the kitchen
Canopies in the form of a corner can withstand heavy loads. Structurally, these are the same metal plate with holes, bent at a right angle. May consist of two parts connected by welding.
The corner canopies are attached to the top sheet of the cabinet using through bolts and nuts. Their advantage is that they can be installed not only on the ends, but also in larger quantities anywhere on the top sheet.
More functional and expensive adjustable awnings. The basis is a plastic housing, a metal canopy and an adjustment system. They are attached to the side walls from the inside.
There is a hole cut in the back plate through which the bar passes. One end of the plank is attached to the canopy, and at the other end part of the cabinet can move in all directions.
Styles in kitchen interior design
The atmosphere in the kitchen and its overall concept depend on which interior design is chosen. Let's look at the most common styles of modern kitchens today.
Kitchen decoration in modern style
Modern kitchens combine the sophistication of a classic style and some restraint. This style is characterized by rounded shapes and floral motifs. Characterized by simple straight shapes and lines. For modernism, bright colors are suitable.
Furniture in the Art Nouveau style is made from modern materials. It also allows for the combination of various materials, for example, glass and wood, stone and metal.
Classic
This style implies some conservatism in interpretation. Facades must be made of wood or its equivalent, fittings must be made of metal. The technique is hidden behind the panels; complex shaped shapes and carvings can be used.
More: Choosing furniture for a modern kitchen interior
A classic style kitchen means comfort, coziness and a feeling of warmth. It is better to choose a calm, light color scheme for a classic design.
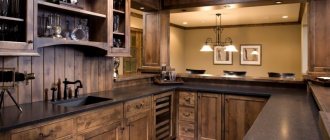
Kitchen design in country style
The epitome of simple country life, this style is much less demanding in terms of form. To recreate country style in your kitchen, you need to opt for furniture made of rough wood, possibly leather. Rocking chairs will look especially good there.
Techno
This style is based on human achievements and is very far from nature, so the best materials for it are glass, metal and plastic. Well, the devices become a full-fledged element of the interior.
High tech
High-tech design is equally far from nature and reality. The bet is on future technologies, some kind of fantastic. The use of bright contrasting colors and a large number of light sources is typical.
Eclecticism
Kitchen design is increasingly incorporating an eclectic style. It includes furniture from different directions. There are no restrictions in an eclectic interior.
Installation of a wall cabinet
First you need to decide where exactly on the wall it will be located. Since there are several lockers, installation should begin from the most inconvenient, hard-to-reach place or from a corner. In this case, there is more space to work.
Using a level, draw a horizontal line on the wall. On it we mark the installation locations of fasteners: screws, screws, hooks. We drill holes in the wall with a hammer drill; the depth should be slightly greater than the length of the fastener.
Plastic dowels are inserted into the holes. Screws or bolts are screwed into their hole. Their thickened part should protrude 5-7 mm above the wall surface.
An important task after hanging several cabinets is alignment. It is necessary to ensure that all upper planes are at the same level. To do this, the fastening elements are bent and gaskets are used.
To ensure that there are no gaps between the individual sections, they are fastened with ties. The coupler is a bolt or tube with internal threads. Available in different lengths and thicknesses for different types of particle boards. For one section, two ties are enough.
Assembly of kitchen cabinets
The disassembled kitchen set is a set of boards of different sizes, a certain amount of fittings and a set of fasteners. From all this you need to assemble cabinets. Usually there are wall-mounted and floor-mounted ones. How to assemble a kitchen set, in what order - the choice is yours. Some craftsmen find it more convenient to assemble them in pairs - the top one, then the bottom one, and install it that way. But there are two other ways: first collect all the top ones, hang them on the wall, then all the bottom ones. They do the opposite - assemble and install the lower ones, then the upper ones. In general, any method is correct, do what is convenient for you.
The correct installation of the confirmat is in the middle of the chipboard
Assembly of wall cabinets
In any case, let's start assembling the cabinets. A typical wall cabinet consists of two side panels, a top, a bottom, a back wall made of HDF and two doors - the facade. The assembly order is as follows:
Installing hinges
The facades (doors) are finally hung after everything is assembled and put in place, but the hinges are installed from the very beginning. They come in mortise (considered more reliable) and overhead.
Types of hinges - mortise overhead
The mounting points are marked on the sidewall and door with holes. Place the side panel and the door on a flat surface (table or floor) close to each other, aligning the marks. We put the hinges in place (included in the kit). Screw it first to the side, then to the facade. In this case, the door turns out to be slightly lower in level than the side panel. Place a block of suitable size or a rolled-up rag under it so that it is at the same level, then screw the loop.
We disassemble the hinge itself (it consists of two detachable hinges that are connected by a screw. We unscrew this screw, put the doors aside, and continue working with the sides.
Assembling the body
We attach the top and bottom to the sides. They are attached to confirmations - special furniture fasteners that come with a hex head. If there is an appropriate bit, we put it on the screwdriver; if not, we work with a hand wrench.
How to assemble a kitchen set: assembling the cabinet body
The installation locations of the confirmations are marked on the outer part of the sidewalls. We fold the side panel and the top part, install the fasteners, then the bottom, and then the second side panel.
We turn it face down, lay and align the sheet of laminated fiberboard, which serves as the back wall. It is nailed down with small nails or staples from a construction stapler. First they nail it in the corners, carefully aligning the edges, then in the middle of each side and then, dividing each section in half. As a result, the installation frequency is 1 nail/staple per approximately 10 cm.
Installation of corners or hinges, shelf holders
The hinges on which wall-mounted kitchen cabinets are hung are different, and they are installed in different ways. We'll talk about them in more detail below. Shelf holders also come in different materials and shapes, but they are mounted basically the same way - into holes in the wall. Holes are drilled in the sides for them. Sometimes we install plastic choppers (small hollow plastic cylinders) in them, hammer them in by lightly tapping them with a furniture hammer, then place stops for shelves in them. But most metal stops (which are probably what you need in kitchen cabinets) simply fit into the hole.
Shelf holders
Actually, you know everything about how to assemble a wall kitchen cabinet. For a visual demonstration, watch the video. Floor cabinets with shelves without drawers are assembled in the same way, only first the legs are installed on the bottom and the top part is the countertop, which is common to all cabinets and is installed after all the floor cabinets are installed and fastened.
Assembling a cabinet with drawers
We continue to assemble the kitchen set with our own hands. Now the most difficult moment is the cabinets with drawers. The general procedure is as follows: install the hinges, bottom and back wall. The top-table top is installed after all the cabinets are assembled and fastened together with ties. There are also features - drawer guides need to be attached to the sides. Go.
Installing the feet
Before assembling the kitchen set, legs are installed further on the bottom. You can install the legs after the frame is assembled, but rotating a heavy bedside table is not very easy. In any case, it is best if they are adjustable - the floor is not always perfectly level. With adjustable legs, it is possible to set them so that the load is redistributed across all legs. For small cabinets - up to 80 cm in length - 4 stops are installed; for cabinets over 80 cm, 6 support points are needed.
Shelf holders
If there is a partition in the closet, we place the legs under it. If there is no partition - in the middle. 5-8 cm are removed from the edges, screwed onto self-tapping screws 15 mm long (with a chipboard thickness of 18 mm). Most finished furniture also has countersinks for the legs—small-diameter holes. Align the slots in the legs with the holes and install the screws.
Installation of guides and assembly for drawers
On the sides of the lower cabinets there are markings for installing guides (they are included in the kit). For their fastening, an M6*13 euroscrew is used. We install the required number of guides on both sidewalls.
Installing guides in a cabinet with drawers
The boxes are assembled using 4*45 screws. First, the guides are installed. Depending on the design, they can be mounted on the walls of the box or on the bottom edge of the sidewall. If there are markings (holes) on the wall, then they are placed on the sides. If not, go to the end. To be sure, check the assembly instructions. There should be pictures of the installation process.
How to assemble a kitchen set: assembly diagram for drawers
After the guides are connected, the sides are connected to the back wall, then the front wall is installed, followed by the bottom. Before installing the bottom, check the diagonals. They must match down to the millimeter. The bottom is secured with nails or staples.
Assembling the body
The assembly of the case is already familiar: we attach the lid to the sides, then the lower part with the legs. We put the cabinet in place, tighten the legs so that the top lid is at the desired height and is horizontal. We check the horizon using a bubble or laser level. Then we install the covers.
Features of assembling a corner cabinet
The main feature is that in budget kitchen sets the bottom consists of two parts (to reduce costs). If a sink is installed in this cabinet, the back wall is almost absent, but there are several collet ties that add rigidity to the structure. Otherwise, everything is the same as when assembling a regular cabinet with doors.
Assembling a floor cabinet
This type of cabinet, unlike a wall cabinet, has a more complex design. Instead of fixed shelves, they use drawers.
Assembly of the housing begins with the bottom plate. It is better to immediately install the support legs so as not to overturn the assembled cabinet later. If the size is up to 80 cm, 4 support points are enough, if larger, 6 supports.
Guides are attached to the side walls along which the drawers will slide out. The holes for the fasteners are already prepared; there is no need to mark or drill anything. Drawers are assembled according to the same principle and in the same sequence as large cabinets.
After attaching the side walls and the back sheet on top, we install the tabletop last. It is thicker, with a protruding front part.
One of the mounting methods is on wooden or plastic pins; At the same time, it is easy to install and remove. The second way is on the corners. One plane of the corner is attached to the side, and the other to the bottom surface of the tabletop.
Sink installation
Before installing the sink, you need to accurately determine its location. The sink cuts into the countertop based on the exact location of the cabinet.
Step-by-step instruction:
- We turn the sink upside down, place it on the countertop and outline the perimeter with a pencil.
- Now we make internal markings, based on the fact that the sink should fit on the countertop with some margin after cutting through the window, and its flanging will close the gaps . The latter must be done carefully, without being distracted by anything, so as not to spoil the expensive countertop.
- We drill holes in the countertop around the perimeter of the future window for the sink. It is enough to drill 4 of them in the corners. The diameter of the holes should be such that the blade of the pendulum saw (jigsaw) fits freely into them.
- We cut out the window with a jigsaw. After cutting it out, the cut area must be treated with silicone to prevent moisture from entering the cut. Otherwise, the countertop may swell and become unusable quite quickly. You also need to make a bead around the perimeter of the window with silicone so that the edges of the sink are hermetically glued to the countertop.
- We secure the sink using the supplied fasteners.
Features of the corner cabinet
This cabinet is designed to fill the space in the corner and harmoniously connect the sections of the corner kitchen. It can be either wall-mounted or floor-mounted. The lower and upper plates are not solid, but consist of two trapezoid-shaped parts connected at right angles. The back wall is also made of two parts, and the front door is one.
The shelves are solid, but not rectangular, but of a more complex shape. If the floor-standing design provides for the installation of a sink, then instead of a solid back wall, several transverse slats are used.
Assembling a corner kitchen is no different from assembling all other elements of the set: the same tools, the same fasteners. The installation of the assembled parts of the kitchen should begin with the corner cabinet.
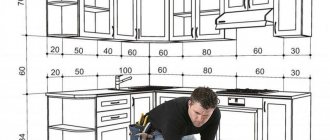
Deciding on the layout of the kitchen area
Developing the interior of the kitchen-dining room should begin with determining the layout. Possible options are shown in the table.
Many people believe that it is much more convenient to install a dining group in the kitchen so as not to carry food from room to room.
| Layout | Description |
| Linear | It consists of placing the headset along the wall. This saves usable space. You can comfortably place a table and chairs, even in a medium-sized room. The system for storing and placing kitchen utensils can be organized up to the ceiling. This allows you to fit more items using the entire space. |
| L-shaped | The set is installed in the corner. The layout is suitable for medium-sized kitchens. Thanks to the useful use of the corner, space is freed up for the dining group. The L-shaped option eliminates the need to zone the space using improvised means. The layout itself divides the room into segments. |
Completing the installation
To reduce the number of complaints about their products, manufacturers put a slightly larger amount of fasteners, fittings and blanks into each set of furniture. If everything is done correctly and carefully, then they remain. What to do with them? You can keep it just in case for possible future repairs, or you can take it to the store.
There is no guarantee for assembling furniture yourself. Even if you order kitchen assembly, individual craftsmen or companies are very reluctant to sign an official paper guarantee. Valuing their reputation, assembly specialists try to correct mistakes or deficiencies quickly and without unnecessary publicity.
You can calculate the cost of assembling a kitchen yourself. On the websites of companies providing such services, there is a list of works with an indication of cost. You can find out both the cost of individual work (for example, assembling a drawer, installing a sink), and the cost of assembling and installing a turnkey kitchen.
U-shaped and parallel layout of the kitchen-dining room
The layout can be organized in the form of the letter U or in parallel. The first option looks very impressive. Not suitable for a small room. It is often chosen for country houses where there is enough space. The U-shaped layout includes placing equipment and furniture near three walls, leaving only one free.
The most popular options for organizing a dining area in a kitchen are linear (in one row) and corner (L-shaped) layouts.
If the room has a large window opening, you should think about a parallel layout. The equipment and storage system are installed opposite each other. There is a table in the middle.
It is when storage systems are located along one wall or with a small perpendicular branch that the maximum amount of usable space remains for installing a dining group.
Photo of the kitchen
Fastening wall cabinets
Attaching the kitchen to the wall begins with determining the height of the working area in the kitchen - it depends on the dimensions of the drawers and the level of the ceilings. The standard height of the kitchen from floor to top is 50-60 mm.
Advice. If the housewife is not tall, and also if the upper cabinets of the set open with closers to the top, it is better to install the upper shelves 45 cm from the level of the tabletop, but no less.
There are two ways to hang kitchen drawers with your own hands:
- Using a mounting rail: one part of it is attached to the wall cabinet, and the second part is attached to the wall. The result is a hook-and-groove system that is easy to use and provides a secure fit. You can hang the cabinet this way yourself.
- Upper cabinets can be attached to the wall or by conventional fastening - on furniture hinges. This leaves no gaps between the wall and the back of the cabinet.
The work must be done by two people , since the structure will be too heavy for one. Since modern fastening strips are quite expensive, budget hinges are used in classic furniture sets.
Fastening sequence:
- mark the line for attaching the cabinets at a distance convenient for the housewife from the countertop;
- make holes and secure the rail for adjustable hangers. It is more reliable to use fastening with anchors than with dowel-nails;
- hang the cabinet on the rail, hooking the hooks onto it, adjust the two bolts on the hangers so that the cabinet hangs level;
- start installation from a corner, use a false panel to hide the unevenness of the wall;
- After installation, if necessary, fasten the cabinets with ties.
Don't forget to make holes in the sides of the cabinets for pipe drainage if ventilation is to be installed.
How to hang a kitchen on drywall
You cannot screw a self-tapping screw into a plasterboard base, sincerely believing that it will hold . Gypsum is a fairly loose material, so you need to approach the installation of kitchen furniture on it wisely.
Important! Never use nails or regular screws to attach furniture directly to drywall.
The space formed between the wall and the plaster will not allow ordinary dowels to hold tightly. But there is still a solution! Depending on the chosen installation method, different tools and accessories may be required :
- roll-up dowels for drywall (for example, Driva);
- expansion anchors (for example, “Molly”);
- umbrella dowel;
- embedded timber;
- special tire.
Explore possible mounting options to choose the most suitable one.
Dowel "butterfly"
A butterfly dowel is a fairly simple device that is used for attaching cornices, baseboards, brackets, wall cabinets or lamps to a sheet of drywall.
It is a self-tapping screw, complemented by a plastic element that looks like butterfly wings. This is how the fastener got its name. When the dowel is twisted, the “wings” are straightened and pressed tightly against the back surface of the drywall sheet. Due to this, the load on the sheet is distributed more evenly, which significantly reduces the risk of damage to the material during installation work.
It is rarely used for mounting wall cabinets , however, if this happens, a metal profile is used to add rigidity to the structure.
Important! It is necessary to calculate in advance where the profile should be located in order to use it later for attaching cabinets.
You can find where the profile goes using a magnet . They move it along the wall until they find a guide. This way you can accurately determine the location of the profile and not miss when drilling a hole.
Metal dowel “Molly”
It resembles an umbrella in its principle of operation. Withstands significant loads - up to 35 kg. The step-by-step installation process is as follows :
- The diameter of the dowel (usually 8 mm) is drilled into the wall or ceiling.
- The sleeve is inserted into the hole so that the teeth located on the head cut into the surface - this will prevent the fastener from turning.
- Screw in the screw until the opening triangles dig into the drywall on the back side of the sheet, ensuring a secure fixation.
Important! “Molly” cannot be dismantled: to remove it you will have to break the wall.
The advantages of Molly dowels are obvious : due to the formation of a cone-shaped structure on the back of the gypsum board, they increase the support area and prevent the sheet from breaking under load. Disadvantages include high cost and the need for free space behind the plasterboard.
Installation using metal anchors
Such anchors are most often used when you need to attach something to the ceiling , so they can handle an ordinary cabinet.
Special extended anchors are used to reach the load-bearing wall . They go through the drywall and are attached to the main wall. This is reminiscent of fastening with regular dowels without using gypsum board. However, with this method, everything must be clearly calculated in advance so that along the way such anchors do not rest against the fastening used to create the frame for the drywall.
Reference. The advantage of such anchors is the ability to use screws with different heads: it can be a regular clamping screw, or instead of a standard head, a hook, ring or other element is used, which is best suited for installing cabinets.
First, markings are made and holes of a given diameter are drilled . Anchors can only be attached to a concrete or brick wall, the thickness of which should be 8 cm or more. The depth of the hole should be 5 cm. To this minimum depth, you need to recess the anchor into the main wall.
Before hanging a cabinet on a plasterboard wall, you need to install the anchor correctly . The studs are inserted into the prepared holes so that the anchor goes in first and the nut remains outside. If it's tight, you can hammer it in with a hammer.
The anchor screw is screwed in with a wrench . We listen carefully: during this clamping, the petals will open and rest against concrete or brick, this will be accompanied by a characteristic creaking sound. You need to do everything carefully so as not to damage the sheet of drywall. When the anchor is firmly fixed, you need to tighten the nut.
Wall cabinets are hung on protruding studs and then fixed.
Mortgage beam
Hanging kitchen cabinets using embedded timber is a fairly old technique . It is usually used in the kitchen, when they know in advance exactly where the furniture will be placed. The beam is installed in a frame made of metal profiles during its assembly, and is provided at the time of planning. The fact is that it is best to drive the wooden beam into the profile and install them at the same time.
Reference. The width of the beam for greater reliability of installation should be within 8-10 cm.
This method is very reliable , because the block is not only well attached to the frame (with the profile itself, nails or screws), but also is a reliable basis for fastening the cabinet.
Before hanging a cabinet on a plasterboard wall using embedded timber, you need to find it under a layer of finishing . You can look for a horizontal profile using a magnet, but it is advisable to think about everything earlier. After assembling the frame, it is necessary to measure at what height from the floor (ceiling) the center of the beam is located. Then this data will be used for high-quality installation.
There are several options for attaching to a wooden beam:
- we use ordinary wood screws to fix wall cabinets;
- we drill holes for the dowels, onto which we will then attach everything;
- We use special dowels with hooks for more convenient hanging.
Remember that you will need two such beams, since the cabinet is attached not only at the top, but also at the bottom . It's more reliable. One mortgage is needed if you are hanging a bookshelf or something similar.
Installing the mounting rail for the hitch bracket
It is not always possible to think in advance where everything will be in the room before the renovation work . Often the thought of hanging cabinets comes after the walls have been covered with plasterboard and the finishing touches have been completed. So the question arises, how to hang a cabinet on drywall in such a situation.
You can use special dowels , but not everyone will be able to carry out the correct marking so that each fastener is in a clearly designated place. Then it is necessary to use a horizontal bus. The essence of the method is simple: two rails are mounted on the wall, on which all the cabinets will then be hung.
The tire is a narrow metal profile of a special shape with many holes for self-tapping screws. Using these holes and self-tapping screws, the tire is attached to the drywall. You can buy several of these two-meter profiles, which is quite enough for your purposes.
Reference. In order to be able to fasten cabinets using this technology, they must be equipped with special brackets that can be hooked onto the tire.
The installation technology itself is quite simple:
- Markers are installed at specified heights on both edges of the wall. They will then connect into horizontal lines.
- Don't forget to double-check all distances between brackets and lines. The cabinet will be attached with upper and lower brackets to two rails at once.
- The level checks the horizontality of the lines.
- The total width of all kitchen cabinets is measured, after which the tire is cut to the specified size. It may be necessary to use two or three tires in one row. It all depends on the selected furniture.
- The tires are attached to the drywall with self-tapping screws.
- Now you can hang your kitchen cabinets on drywall. The brackets have adjusting screws so that the cabinets can always be adjusted to the desired position.
Although everything is attached to simple self-tapping screws, there are a lot of them and the pressure is evenly distributed over the tire . Moreover, the locker will be supported by two tires at once.
Sink location in the kitchen: principles and options
The sink is a functional element of the kitchen interior, which is constantly used for washing dishes and processing food. It must be strong, durable and aesthetically attractive, which is why many people prefer products made from artificial stone. Together with the refrigerator and the stove or hob, the sink forms a triangle, which is usually moved around during cooking. In order for culinary experiences to delight your household and not leave you feeling tired, you need to choose its location wisely.
Installation of skirting boards
To ensure an attractive appearance for your new kitchen , you need to close the space between the new countertop and the wall.
Before deciding how to install a plinth on a kitchen countertop, you need to know that there are two installation methods : with glue (you can use silicone or liquid nails) and with self-tapping screws.
Installation with glue is easier and simpler, but has some disadvantages . The disadvantage of this method is that the baseboard is tightly attached. Therefore, if in the future you want to remove it, the planks will most likely break during dismantling, and marks will remain at the attachment site, which will not be so easy to remove. In addition, when installed in this way, there will be no niche to hide electrical wires, because the baseboard will fit tightly to the wall.
Reference. As a rule, the adhesive installation method is used for plastic, ceramic and stone products.
It is better to prefer installation on self-tapping screws if you need to quickly and carefully disassemble the baguette.
On glue
Installation of the plinth to the tabletop is as follows::
- The surface on which the baguette will be attached is thoroughly cleaned and degreased with an alcohol-containing product.
- Apply a layer of adhesive-sealant to those parts of the plank that will come into contact with the wall and countertop.
- We apply the plank to the wall and tabletop, carefully pressing and waiting time according to the instructions for the glue.
- Installing the corner element.
- We cut off the decorative strip, taking into account the fact that it should extend slightly into the corner.
- Place the edge of the panel under the corner insert and snap it into the grooves along the entire length of the guide.
- After installing the decorative trim, we install the end caps, inserting them into the mechanism.
Using self-tapping screws
In this case, the installation process involves the use of a screwdriver . Most often, the plinth is attached to the tabletop (if it is attached to an apron, it can become deformed at the slightest movement of the table).
To avoid installation difficulties, you must perform the work in the following order:
- We take measurements of the tabletop and cut a piece of baguette to the appropriate length using a hacksaw with fine teeth. We clean the cut edges with abrasive.
- To better seal and prevent moisture ingress, we treat the place where the baseboard will be located with silicone.
- We attach the base part (profile) to the installation site.
- Using a screwdriver, screw the screws into the plank and tabletop at a distance of about 30 cm.
- We install the front cover by inserting it into the groove of the base until it clicks.
- We close the corners with corner covers, and attach end caps to the edges of the baguette.
- We treat the joints of the connecting elements with silicone sealant.
Hidden wiring can be built into the baseboard.
Posting rules
When looking for the correct location of a kitchen sink made of artificial stone, in addition to the laws of ergonomics, you need to take into account the overall dimensions and design features of the room. In this case, it is advisable to observe the following rules:
- With an L-shaped or linear arrangement of furniture, the sink is placed between the stove and the refrigerator.
- A bowl made of artificial composite material is not installed close to the wall, otherwise its surface will be constantly exposed to moisture due to splashes during food processing or washing dishes.
- The distance to the stove and refrigerator when installing a kitchen sink made of artificial stone should be at least 50-60 cm. If the area of the room is limited, then it is safer to place the sink closer to the place where food is stored.
An important factor is also the placement of a kitchen sink made of artificial stone in relation to utilities. The further the outlets of the water supply and sewerage network pipes are located from the sink, the greater the likelihood of leaks and the higher the costs of eliminating the consequences.