What is comfort in the home? This is when it’s warm in winter and cool in summer, walking on a pleasant-to-touch, non-icy floor covering, comfortable furniture and a cozy bed for you and your children. Children fall asleep faster and sleep better when it is warm and comfortable to sleep on soft, children's mattresses https://mebelsait.dp.ua/detskie-matrasy.
When you think about building your own home, you have a desire to make it warm and cozy. Modern gas and electric boilers, converters, etc. cope with heating the house, but they cannot create a cozy atmosphere. That is why stove heating is being actively used again.
The stove is a highlight of the design and an economical heating device. It is much easier to find an experienced stove maker to lay a stove. But this long-forgotten craft has only just begun to gain popularity, and there are very few experienced stove makers.
Therefore, a reasonable question arises: “How to build a brick oven with your own hands?”
Laying out a stove correctly requires a lot of effort, and you will also have to study a lot of instructions for laying brick stoves.
Types of stoves
The first step is to choose a stove that is right for you. The most popular are:
- Dutch;
- Russian;
- Swede.
Russian stove
Large-sized and multifunctional oven. But its size is justified by the presence of free space where you can relax. There is a firebox under the bed where you can cook food. Next to the firebox there is a stove, and just below there is a vent that keeps the fire going. There is also a niche for freshly prepared food.
A Russian stove can easily heat a room larger than 40 square meters. But a full-fledged robot will require a lot of raw materials.
Swede
Refer to compact options. Length and width – 1 meter. The main function is to heat the room, but you can also cook food on it. The unusual thing about such a stove is that the stove is built in the kitchen, and the rest of the stove will be in another part of the house.
This design is fire hazardous. But the risk of fire is reduced with the help of dampers.
Installation location
A stove in a private home should primarily be used to heat the room; if the owners wish, it can be used instead of a stove. In order for the structure to effectively cope with its tasks and not take up extra space, it must be positioned correctly.
When deciding how to arrange a kitchen with a stove, designers advise following the following rules:
- if there is one room in the house, the structure must be installed between the living room and the kitchen so that heat passes into the room and the cooking surface is in the kitchen;
- in small houses the stove is usually placed between the rooms so that they are all heated;
- If the house is built of brick and will be heated by a stove, you need to think about a chimney system or install a steam boiler into the structure, assembling a heating system that passes through all the rooms, otherwise the home will not warm up well.
Many designers also advise placing the stove in the hallway in front of the kitchen. In this case, you need to decide in advance where the fuel will be stored.
On a note! If the kitchen is small in size, the stove is most often placed in a corner that borders the next room.
Construction rules
A homemade stove must meet fire safety requirements. Therefore, special attention must be paid to preparation for construction.
- Decide on the location of the oven.
- Prepare the correct drawing.
- Buy quality materials for construction.
- Purchase of tools.
- Create a cost estimate.
Correctly drawn up drawings will become your main assistants, since it is the drawings of a homemade brick oven that help you avoid many mistakes. Ready-made plans can be found on the Internet.
When choosing an installation location, you need to take into account the area of the room and the type of oven. It’s difficult to calculate everything yourself, so it’s easier to use a reduced model of a brick oven, a photo of which is available on the Internet.
Basic concepts for making your own brick kiln
To lay the furnace, you can contact specialists. But to save money, you can make a brick oven with your own hands. This will not be difficult even for a beginner, as it does not require special knowledge.
Note!
Insulate the foundation with your own hands - a step-by-step description of the use of the best materials and technologies (90 photos)
Laying laminate flooring with your own hands: a detailed description of how to lay laminate flooring. Laminate calculation, step-by-step description and installation secrets (105 photos and videos)
Do-it-yourself chimney - a detailed description of how and what to build an effective chimney from (110 photos)
First you need to choose the type of stove, then find a masonry diagram. There are many DIY brick oven designs on the Internet for every taste.
After the scheme has been found, it is necessary to make a foundation. It should be slightly larger than the oven itself on each side.
The chimney is also made of brick. After completing the laying of the stove, you can line it with finishing materials to give it a beautiful look.It is also very important to choose the correct installation location. If the stove has a cooking function, it is better to install it so that the cooking part is in the kitchen and the heating part in the living room.
Selection of working tools
Compliance with the technology and the quality of the work performed will also directly depend on the auxiliary measuring instruments and tools that must be used during the work on laying the furnace.
When laying a furnace, measuring, construction and many other auxiliary tools are used:
- Jointing - pours the mortar into the seams and gives the joints an aesthetic appearance. It will come in handy if the stove is left without lining or plaster.
- Trowel.
- Hammer-pick.
- Shovel for mortar.
- Plumb.
- Stove line.
Furnace decoration
Today, different materials are used to decorate a Russian stove. They are selected depending on whether the stove is new or an old stove needs repair, as well as how the room looks. In the case of an old stove, work is first carried out to prepare the surfaces, including eliminating cracks and removing old plaster, as well as dismantling old structures in order to replace them with new ones.
Once all surfaces are in working order, they can be decorated using a variety of modern or classic materials, as well as various design styles depending on the overall style in which the house is decorated.
Tiles
Traditional decorations for Russian stoves are tiles. They give the product a colorful and incredibly beautiful appearance, and are also reliable and of high quality, and are made from refractory types of clay. They are attached to the oven wall using a gun, and their front part is covered with glaze and ornamentation to achieve maximum decorative effect.
Among the features of such decorative materials are:
- tiles are permissible only when decorating options with brickwork;
- the cladding is laid from bottom to top, constantly wetting the tiles with water;
- For grouting joints, gypsum dough with a special composition is used.
There are a huge number of tile patterns, and for their implementation, both relief and flat tiles with different color designs are used. Tiles can be plain or painted, and can also be made in several colors. The colors of the tiles should be selected taking into account the general style of the premises of the private house where the Russian stove is installed.
Plaster and paint
A budget option for facing materials would be decorative plaster or modern types of decorative paint. This is the cheapest option, but no less beautiful. A relevant option for modern interiors in a minimalist style that do not have unnecessary decorative elements.
Among the features of this finish we can highlight:
- the need to heat the stove and wet the walls with water before starting work;
- the plaster is applied in at least two layers, and the second should be thicker;
- After plastering, a layer of paint or decorative plaster is applied.
Materials
The heat transfer and durability of the stove will depend on the material used in construction. Therefore this stage is very important.
For cladding, ceramic bricks are used - grade M-500. It is insensitive to temperature changes. And the combustion chamber needs to be laid out only from refractory bricks.
In addition to bricks, the following is used:
- Sifted sand.
- Clay – normal fat content.
Features of kitchens in a private house
The kitchen in a house differs from kitchens in apartment buildings not only in the size of the room. There are several points that significantly distinguish a kitchen in a private home from an ordinary one:
- the ability to create a work area in a non-standard place, for example, in the middle of the room;
- a kitchen in a private house can be a walk-through room;
- the shape of the room may differ from the standard due to the specific layout of the house;
- in the kitchen of a private house there may be a heating stove or fireplace.
The abundance of windows creates natural, bright lighting in the room.
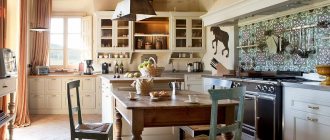
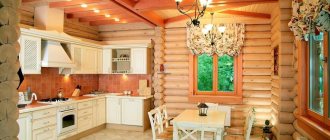
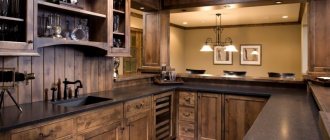
With a rustic stove
An important element of most kitchens in a private home is the stove, which heats not only this room, but the entire house. The presence of a stove in the kitchen dictates its own design conditions for the space, namely, when arranging the room, certain building materials should be used.
The stove in the house does not necessarily dictate the rural style; you can turn this place into a medieval castle.
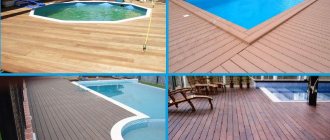
For example, it is advisable to leave the ceiling in a room with a stove made of wood, giving the frame a protective coating of varnish. Plastic ceilings or wallpaper are not suitable for finishing, since due to the operating stove the room temperature will be high, and hot air tends to rise and adversely affects artificial materials. It is also better to leave the walls wooden or use special tiles that are resistant to high temperatures to cover them. The floor in a kitchen with a stove in the work area is best made of ceramic tiles. The large kitchen area will allow you to use parquet or laminate flooring in the dining area, away from the working stove. How to decorate the walls in the kitchen, read about the advantages and disadvantages of different materials in our article.
The style of a room with a stove does not have to be rustic; with proper design, the stove can fit into both modern design and high-tech. A stove lined with brick will look stylish in any interior.
With fireplace
You can add special coziness to the kitchen in a private home with the help of a fireplace. It can not only serve as a heater, but also serve as an interior decoration. The fireplace portal can be finished with either stone or polymer.
If the kitchen design includes a natural finish for individual elements, you can decorate the fireplace using masonry, brick or river stone. The classic interior can be complemented with a tiled fireplace.
To decorate fireplaces in a private home, high-quality fireproof materials are always used, which make this decorative element safe. Since the fireplace in the kitchen will most likely be used for gatherings in front of it, it is advisable to equip comfortable seating areas opposite it.
The fireplace in the kitchen will become the personification of the hearth, which every housewife carefully maintains
It is necessary to install a fireplace in the kitchen of a private house in accordance with all safety regulations, ensuring an air supply to it and observing all fire safety standards when laying the fireplace.
With gas boiler
When designing a kitchen that is equipped with a gas boiler, it is important to organically fit the heater into the design of the room.
You can either hide the gas boiler or try to make it match the kitchen set as best as possible and not be conspicuous.
For example, a boiler can be hidden in an ordinary kitchen cabinet, then it will only be visible if the cabinet doors are open. To do this, when ordering a kitchen set, you need to take into account that you will need a separate place to disguise the gas boiler. There are certain requirements for installing furniture that will come into contact with heating devices. For most wall cabinets, there should be at least a 3cm gap on both sides of the boiler, and there should also be no back wall or bottom. These details must be discussed with furniture installers so that the use of furniture masking for a gas boiler is as safe as possible.
If you do not want to hide the boiler in the furniture, then choose a unit so that it harmonizes as much as possible with the color finish of the kitchen.
The correctly selected color of a gas boiler will make it almost invisible in the kitchen space.
With windows, bay window or exit
Windows are an excellent source of lighting and decorative element.
Daylighting in the kitchen of a private house makes the room bright and spacious. Window decoration plays an important role in the interior. It depends on the size of the room, the location of the window and personal preferences. Instead of a window sill, you can make a tabletop, continuing the work area. Often in the kitchen of a private house a sink is placed under the window. Read about sinks made of artificial stone that are fashionable today here.
Doing household chores in the kitchen is not so boring if you have a wonderful view from the window.
If you want to use the kitchen window for decoration, you can place live plants on the windowsill, which will receive a sufficient amount of sunlight in this place. In modern architecture, a bay window is often used in the kitchen - these are large windows that protrude beyond the walls of the building.
The bay window can also be equipped as a relaxation area.
Bay windows look impressive, especially if they are designed correctly. For example, equip a dining area with a sofa and pillows or decorate a bay window with stylish curtains or drapes. If the kitchen in the house has access to the street, then you need to carefully consider the arrangement of furniture.
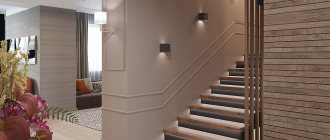
A glass door in the form of a French window will fill your kitchen with sunlight and warmth.
A glazed door will expand the space, but it is better if it is located away from the work area. The door should be well insulated so that during the cold season the temperature in the kitchen is not below normal.
Do you know how to choose a mixer for the kitchen?
Find out all the pros and cons of painting the ceiling in the kitchen here.How to choose an electric stove with glass ceramics, you will find advice on choosing at
Foundation for the stove
The basis for a homemade stove is made at the time of construction, since a brick stove requires a strong foundation
First, they dig a hole. It is necessary to take into account that the width and length of the pit must exceed the size of the foundation by 20 cm
Afterwards, the pit is leveled and half filled with sifted sand, compacted well and leveled. Waterproofing is laid on top of the sand, and formwork is installed.
Next, all free space is filled with concrete mortar, bringing it to ground level. Be sure to check the surface for horizontalness using a building level.
After 5-6 days the concrete should harden. After that, the formwork is dismantled, waterproofing is laid and the foundation is brought to the floor. There are two ways to bring the foundation to the floor:
- lay out of brick;
- re-build the formwork, filling it with concrete up to the beginning of the floor. All voids are covered with sand, compacting it.
Concrete mortar recipe - one part of cement contains 2.5 parts of sand and four parts of gravel.
Brick stove for a bath
You can make a brick stove for a bathhouse with your own hands.
Before you start laying a sauna stove with your own hands, you need to take measurements: the area of the sauna, the number of rooms, the location and dimensions of the future stove. Then it will be easier to calculate the cost, and installation will not be difficult.Masonry process
The masonry mixture is prepared from sifted sand and clay. The clay is left in water for a couple of hours, after which it is sifted through a sieve. Currently, there is no need to prepare this mixture yourself. A number of companies offer ready-made masonry mixtures in various packaging. Using such masonry mixtures is preferable to making them yourself.
Industrial sieves sift a finer fraction of sand and clay, which makes it possible to obtain a more plastic and homogeneous mixture. This mixture will eliminate the formation of voids and air bubbles in the seams during laying.
First, the outer layer, which consists of bricks, is assembled, and then the middle. There should be no voids in the seams, so fill them with a clay mixture.
The first rows are built using solid bricks. The first row of stitches requires dressing. After the first rows are ready, the brick will have to be cut.
The chopped side of the brick should be inside the masonry. This rule is also used when constructing smoke ducts. The chimney is built from red burnt brick. And the opening of the firebox is created using a metal corner, a “lock” layout.
Before the first fire, it is recommended to wait 3 weeks.