Differences in two-level design
Previously, complex multi-level ceilings could only be made from plasterboard. But this option had its drawbacks: lengthy installation, significant height and volume, costs for plastering and painting.
Two-level stretch ceilings have become a good alternative. They look stylish, fashionable and impressive. And most importantly, they are cheaper than similar alternatives, and this is with complete uniqueness.
Installation of a two-level plasterboard ceiling with lighting
For the first experience in arranging plasterboard suspended structures, it is best to choose a scheme with a lower level in the form of a box laid around the perimeter. This version of two-level plasterboard cladding is noticeably simpler and does not require the manufacture of complex transition sections, as is often the case when forming curved surfaces.
The assembly order is as follows:
- The ceiling is marked, a guide profile is nailed to the walls, and strip or spoke hangers are attached to the ceiling;
- The main or supporting profile PP 60 is mounted, connecting crabs and jumpers are installed, the entire structure is fixed on hangers;
- Drywall is laid on the sheathing of the upper level of the ceiling, a support profile for the frame of the lower level is attached to the embedded elements or to additional hangers installed in advance;
- Wiring is laid, sheets of drywall are installed, lamps and strip lighting are installed on the lower level;
- The minor parts of the two-level ceiling are being installed.
It is clear that the cracks and joints between the sheets will need to be sealed with paint mesh and puttied. Before painting, the surface of the plasterboard must be primed, and if there are areas on the rough ceiling that are not covered with plasterboard, then they are plastered with gypsum putty, leveled and adjusted to the design of the two-level ceiling.
Preparing the ceiling for installation of a two-level structure
The first step is to clean the concrete floor slab from accumulated whitewash or wallpaper, clean off the old glue, seal the gaps and cracks with putty, you don’t need to prime it.
The second step is to measure the height over the entire area of the ceiling; you need to find the lowest point. Another 5-7 cm is added to the height of the ceiling in this place. This will be the height of the upper tier of the two-level ceiling. Through it, a projection is made onto all the walls around the perimeter of the room.
Next, installation lines for the supporting profile are applied to the ceiling, and points are also marked along them into which dowels with hooks for knitting needles or for strip hangers will be driven. As a rule, the suspension system is installed immediately after marking is completed.
How to make the first level of a two-tier ceiling from plasterboard
The next step is to install the wall profile; it is sewn with dowels along the projection line obtained when measuring the ceiling. Dowels are hammered in increments of 40-50 cm. Next, you will need to mount the supporting profile. The ceiling surface already has marking lines with nailed hangers, so all you need to do is install a laser level or stretch a marking cord, and lay the profile directly under the ceiling fasteners.
We align the profile with our hands so that it exactly matches the cord or laser beam, and fix it on the fastening strips using self-tapping screws with a regular screwdriver. To make the sheathing sufficiently rigid, spacers are mounted between the profiles, which are connected with cross fasteners or crabs.
The supporting profile under the first tier of a two-level ceiling can be placed perpendicular to the walls or at an angle of 45°. The second method is used if the lower tier has a complex shape. The beveled version is made in order to avoid a large number of screws on a small area of drywall, otherwise the cladding sheets may simply crack under load.
How to make the second level of a two-level plasterboard ceiling
In practice, the lower level frame is most often attached to one profile hidden behind a sheet of drywall. To form a box located along the perimeter of a two-level ceiling, you will need:
- Additionally, lay another horizontal row of the guide profile on the wall;
- Another row of guide strips will need to be laid parallel to the wall profile. They are attached in vertical and horizontal sections to the upper tier of a two-level ceiling and a new guide profile;
- The vertical part of the frame is covered with plasterboard to increase the rigidity of the added structure. In this case, the width of the sheet is chosen to be 5-10 cm larger for laying the lighting on a two-level ceiling; this is the simplest and cheapest way to illuminate the upper tier.
One of these options is shown in the photo below.
If it is necessary to form a box with an additional niche, then an additional guide profile is hemmed to the embedded element hidden behind the top-level drywall. The lower part of the box is formed using horizontal and vertical jumpers assembled with a T-intersection.
After covering the plasterboard frame in the lower part of the two-tier ceiling, you will get a very rigid and low niche in which you can install any type of lamp, except halogen lamps.
A two-level ceiling can also be formed according to the so-called independent scheme, when the upper tier is designed as an independent square fixed to the ceiling, and the lower level is assembled in the form of a regular frame from a supporting and guide profile. Similar schemes are often used in new apartments and houses built using a frame method.
For your information! The biggest problem is the procedure for leveling the lower tier of a two-level ceiling strictly along the horizon line.
If a system for attaching the lower tier to one element is used, all errors and inaccuracies made during the formation of the upper-level frame are automatically inherited. The situation is even worse if the dimensions of the two-level ceiling are large enough, and it is impossible to compensate for the accumulated error. While the two-level ceiling is a frame made of a metal profile, errors are not visible, but as soon as the drywall is laid, the errors will become clearly visible.
Therefore, very often large two-level ceilings are assembled using special or adjustable hangers. Before the drywall is laid, the frame is carefully selected and adjusted in the horizontal plane. The procedure is repeated several times as the drywall is laid on the metal profile sheathing.
For large structures, spoke hangers are used, each level has its own set of fastenings to the rough ceiling
How to make lighting in a two-level ceiling
To organize the illumination of the upper tier of the ceiling cladding, you can use LED strips or ready-made luminous cords such as duralight. The strip light is placed in a niche immediately after installing the drywall on the lower tier, connected to the control unit and the installed electrical wiring. Cable routing and performance testing must be completed before completing the assembly of the two-level ceiling cladding.
Spot lights or even directional lights are usually installed on the horizontal plane of the lower tier. In addition, each system must have its own control panel or switch. This scheme turns out to be more flexible and convenient to use. And although plasterboard ceilings, especially two-level designs, are designed for modern ceiling lights, many customers are happy to install chandeliers and pendant lanterns.
DIY two-level plasterboard ceiling: video
The video will help you understand the details and understand the nuances of how to make a frame correctly:
Many do-it-yourselfers are developing their own unique design for two-level ceilings with plasterboard cladding. Interesting ideas can be borrowed from the video:
Installation subtleties
At their core, two-level ceilings are several canvases at different heights. Together they create a complete composition.
First, a rigid frame made of plywood, chipboard or similar materials is installed. Use plastic or aluminum profiles, drywall, plywood veneer, depending on the specifics and preferences.
Installation starts from the second level. Now there is a gapless technology that allows you to do without obvious gaps and seams. Professionals can easily cope with this task.
There are three ways to fix the film:
- Klinova. The canvas is fixed with wedges. It can be changed, but a limited number of times;
- Harpoon. The classic modern method using a hook and spatula. They clamp the canvas together, and it is easy to change it as needed;
- Beading. The film is clamped in the cracks, but such a ceiling can only be replaced together with the frame.
Advice from experts on installing two-tier structures
Before you start installing a suspended ceiling yourself, it’s worth considering a few tips from experts in this matter:
- Fastening frequency . If you use plasterboard for your construction, then the profile for two-level stretch ceilings with lighting should be attached more often than usual. Basically, the fastenings are placed at a distance of no more than 20cm. Only with reinforced concrete walls can the distance between fastenings be increased.
- All elements of the ceiling structure must be fastened to each other in all areas; be especially careful when choosing fasteners at corner joints, which bear the maximum load.
- Depending on how far the suspended structure is from the main ceiling, different types of profiles are used. If the distance is quite large, then additional slopes can be made. In this case, it is best to use a triangular type of profile; it is less susceptible to deformation than a rectangular one.
- Thin plasterboard for two-tier ceilings is used, but it is mounted in two layers crosswise to the seams.
- It is important to align all elements of the suspended structure horizontally, so be sure to use a level.
Advantages of two-level stretch ceilings
Compared to plasterboard, two-level stretch ceilings have a number of advantages:
— Hundreds of variations of ready-made designs, textures and shades. These are matte, glossy and satin ceilings, photo printing, textile fabrics. You can safely combine different colors, including contrasting ones;
— Moisture resistance. The film is not only not afraid of water, but is also capable of retaining it in the event of flooding from above;
- Practicality. Stretch ceilings are much easier to maintain for functional rooms, such as a kitchen or bathroom;
- Disguise. Two-level stretch ceilings can easily hide even serious foundation defects, significant unevenness and height differences;
- Installation. A two-level decorative stretch ceiling can be completely installed within one day;
- Purity. Stretch ceilings do not require wet and dusty work. They can be installed even in a room with ready-made cosmetic repairs without damaging it;
— Dismantling. The canvas can be partially removed. For example, for repair work, replacing wiring, installing a lamp;
- Uniqueness. There are practically no two completely identical multi-level structures. Each project is calculated and developed individually.
Interesting design options
Original ceiling with a black triangle in the middle
Two-color
Two-color ceilings are an original solution that allows you to combine two colors at once. Installation of this type requires more time and, accordingly, financial costs.
A two-color ceiling with a contrasting combination of white and black looks interesting and stylish.
Combining two colors allows you to choose a solution for any interior; it harmoniously combines with classics, modern style and other trends. If you choose the right shades, you can achieve the desired visual size of the room. For example, lengthen the walls, expand the hall, etc.
Photo printing
Beautiful patterns and paintings can diversify the interior and add zest to it. There are white canvases on which 3D images look good. These can be various exotic butterflies or flowers.
Photo printing technology allows you to apply almost any image to the ceiling
3D printing is great for creating original effects that are impressive in their realism
When choosing a design, pay attention to the quality; if it is low, the design may deteriorate and fade over time. Do not overload the rooms with paintings and patterns; it is best if the remaining items are monochromatic. If you choose too many designs, the interior will look ridiculous.
Combined
These are combinations of shape and color. You can make a rainbow or colored stripes. A popular combination is to make a whole tier of gypsum sheets, and cover the rest with stretched film. Two-level stretch ceilings allow you to show your imagination and create different combinations. Options for combining shapes can be a circle in a rectangle or square, or you can add two circles. If you choose photo printing with a starry sky, then with the correct distribution of garlands or small lamps, you can achieve the shine of the stars and use this design as a night light.
A stretch ceiling depicting a starry sky attracts with its originality and magic
Small galaxy on the ceiling in the hall
Choosing two-level suspended ceilings for the hall is an interesting and exciting experience. Its advantages are that under the tension fabric you can hide various communications that will not be noticeable. If you like a lot of light, then spotlights, various lamps and garlands will look advantageous against such a background.
A two-level ceiling can be used to divide a room into functional areas
Ceilings are made of PVC film or fabric. Fabric is always more expensive, but it looks good and is durable because they are difficult to pierce with a sharp object and are also resistant to cold. But the film material is waterproof, which makes it possible to choose it also due to its low price. A seam is always a minus. It’s good when it’s practically invisible, but if it’s very noticeable, it can ruin the appearance of the room. Focus on the price and design of the room, and then you will never go wrong, and the selected color will delight you for a long time.
Lighting and ceiling lighting
The only limitation when installing lamps on suspended ceilings is temperature. A hot open lamp should not be placed close to the film. But with all the variety of modern lamps, this is not a problem.
Spotlights
This is a classic for zonal and multi-level lighting. Small round, square or shaped lamps have small LEDs built into them.
The structure is completely ready for installation; it is built into the canvas or protrudes slightly above its surface. For installation, each device is equipped with simple mechanical fasteners, which you can handle yourself.
Surface-mounted lamps
These are overhead lampshades that differ in size, number of lamps and other parameters. The base of the lamp is mounted before installing the canvas. Then the lampshade is simply fixed with clamps or other fasteners.
For suspended ceilings, choose collections with LED lamps and effective heat dissipation. Then they can be installed almost closely.
Suspensions
Pendant lamps are not only classic chandeliers, but also stylish modern rectangular, cylindrical or conical models for modern interiors. There are collections for luxurious baroque, futuristic high-tech, and industrial loft.
Hidden backlight
Two-level systems make it possible to make entire segments “luminous”. This is the so-called film backlight, when the LED strip is placed in uniform stripes behind a translucent film. As a result, the entire level burns brightly and evenly. This is not possible with drywall.
Illumination options for two-level ceilings
When decorating rooms in a modern style, they refuse to use chandeliers. Let's see what designers offer instead.
Spotlights and spots
These are small devices, usually round, less often square or rectangular in shape. The spots have a built-in rotating mechanism that allows you to direct the light in the desired direction. The beams of conventional instruments are directed only downwards.
Both options can be built into the ceiling surface or overhead. Spots are sometimes placed on a bus or combined on a common base. They are made from metal, plastic, glass, crystal, etc. In stores you can find both simple budget models and expensive designer items.
The type of light bulbs also differs. There are:
- incandescent lamps;
- halogen;
- luminescent (energy saving);
- LED
More often they stop at the last two options. Halogen and incandescent lamps in suspended ceilings are used with caution, only low-power ones (no more than 35 W).
Both spots and point devices provide a luminous flux directed to a point. Single models are used as accent lighting. And for the main one you need to install several devices at a short distance from each other (about 1.5-2 meters).
A certain amount of space is required for installation. Therefore, spotlights are usually placed in the lower tier. Before installing the ceiling, mounting platforms for lamps are installed. And after stretching the canvas, holes are cut, having previously strengthened the film with a thermal ring.
The devices are connected in parallel so that one burnt-out light bulb does not damage the entire chain. Often, spot lighting is divided into groups so that you can turn on the lighting only in the desired part of the interior.
LED panels and ultra-thin LED luminaires
They have a flat shape, rectangular or square. These panels operate on diodes, but provide a wider angle of light distribution. Therefore, the devices are used as the main source of lighting (in small rooms, such as bathrooms) or central, in combination with other types of lighting (in larger rooms - halls, bedrooms, kitchens). They suit modern interiors better than traditional chandeliers.
Peculiarities! LED panels are sometimes called raster panels, but this is incorrect. The name came from fluorescent lamps that used a lattice reflector. In diode devices they are optional and often absent.
They are installed in a suspended ceiling in the same way as spotlights - through embedded parts. They use ready-made platforms of standard sizes or make platforms themselves.
Soaring ceilings and perimeter lighting
This option also uses diodes, but connected into a strip. The strip is laid around the perimeter of the room or between tiers. The backlight can be not only white, but also colored, and also with the ability to change the tone and brightness. Usually they control it from the remote control.
Attention! The LED strip must be looped. Otherwise, as you move away from the power supply, it will glow dimmer and dimmer.
The soaring ceilings look interesting. For this effect, they take a special profile that leaves a small gap near the wall. A strip of diodes is placed in it. As a result, it seems that the ceiling is not attached to the partitions, but is suspended in the air and light is streaming from under it.
Read more: How to make a floating stretch ceiling
In the case of two-tier structures, a floating niche is often made - the upper level. This technique visually increases the gap between the tiers and adds height to the room as a whole. With a fully tensioned structure, take a profile for niches with space for laying the tape. And for combined ones, they make a small side in the plasterboard part, behind which the lighting is hidden.
Advice! If you choose a glossy film texture, it is better to bend the edge - then there will be no glare.
Floating structures and niches increase space. They are suitable for living rooms, children's rooms and bedrooms.
Glowing ceilings
In this case, no lamps are visible. The source of lighting becomes the surface itself, and for a 2-level ceiling - one of the tiers. This is not only an effective technique, but also an opportunity to correct poor proportions. For example, a narrow corridor with glowing diamonds looks wider.
This method requires more careful preparation of the base base. A white sheet is often stretched to level the surface and provide a more even dispersion of light. Then the LED strip is fixed, laid over a short distance into modules, grids or cells.
And below they stretch a canvas that transmits light. Here you can use films of different textures (glossy, matte, satin) or fabric.
Peculiarities! Photo printing is sometimes applied to the lower canvas, which then produces a three-dimensional effect. Select appropriate motifs: the sky, rising buildings, windows, etc.
Light lines
This is another method using LED strip. A special profile is placed on the ceiling, which provides space for LEDs. A regular wall molding is also attached to it at the same level. After installing the tape, a film is stretched: translucent over the diodes, in other places - regular, of any color and texture.
Such lines are placed on the lower tier, upper or both. They work bright enough to serve as the main light source.
Light patterns
Here, too, a fabric with increased transmittance is used. But it is not the large plane or wide lines that glow, but the patterns on the ceiling. To make them, a special profile is laid on the slab, limiting the spread of the rays to the side. If necessary, the baguettes are bent and connected to each other. LED strip is placed in them.
This option is more suitable for accent lighting, drawing attention to a certain area of a 2-level ceiling. If you choose it as the main one, you need to make sure that the lines are evenly spaced.
Starry sky
This method does not provide full illumination, but it looks very beautiful. 2-tier ceilings allow you to create an imitation of a spaceship porthole or a window into the night sky.
On the top tier they stretch a film with a photo print in the form of a galaxy or just a dark one (usually black). There are two technologies to create the star effect:
- Using fiber optics.
- Using Starpins pins.
In the first case, you will need a projector and fiber optic threads coming out of it. Usually they take different diameters (0.5 - 3 mm), so the space will turn out to be more realistic. Micro-holes are made in the fabric into which the free ends of the threads are threaded. The optical fiber is cut a millimeter from the ceiling. And the projector is hidden behind the surface; there is enough space above the lower tier for this. This backlight can be controlled to flicker or shine continuously.
To recreate particularly large stars, Swarovski crystals are installed at the ends of the threads. They give a beautiful play of reflections on the surface of the canvas.
This ceiling looks impressive, but is expensive. A more budget-friendly option is Starpins light-conducting needles.
When choosing this technology, LED strips are laid on the base floor, and then an opaque fabric is stretched. Punctures are made in the right places with a needle and pins are inserted there. The minimum distance between “Starpins” is 1 cm.
The pins come in different sizes and colors: clear, red, blue, green and yellow. When they are combined, the picture looks more realistic.
Peculiarities! When the backlight is turned off, holes will be visible on a monochromatic film. This is typical for both methods. Photo printing will help disguise punctures.
Starry sky ceilings are often installed in bedrooms. But it is suitable for living rooms and nurseries for older children.
Openings for lamps
To create openings for lamps or decorative elements in suspended ceilings, there are two technologies:
A plastic thermal ring is a little-known but practical solution. The ring is glued to the location of the future hole. And when the glue completely sets, the film is simply cut along the inner diameter.
Melting is literally burning a hole with heated fittings of a suitable diameter. To heat, use a heat gun or hair dryer. Make sure that all edges are evenly melted.
Construction of a two-level plasterboard ceiling with lighting
It would seem that the use of ceiling cladding, consisting of two tiers, should provide enormous space for imagination, searching for new structures and forms in design and style. In general, this is how it is; for professional cladding masters and designers, a two-level plasterboard ceiling can take on the most complex and incredibly interesting forms.
Plasterboard structures in two levels can be very complex in design
But this is the level of professionals. In practice, for those who plan to take on making a two-tier ceiling from plasterboard with their own hands for the first time, and even with mandatory lighting, all the variety of designs comes down to two schemes:
- Arrangement of the second tier of a two-level ceiling in the form of a caisson or box around the perimeter, with built-in hidden or open lighting;
- Reverse option. The second tier is designed as a suspended part located in the center of the ceiling.
Option with a decorative element in the center
In both cases, the first tier of a two-level ceiling serves as a background or screen covering the rough surface of the ceiling. The plasterboard of the first tier also serves as a reflective screen for the built-in strip lighting.
Important! The point of making ceiling cladding in the form of a two-level structure is the possibility of using a specific method of lighting the ceiling.
Without lighting, the decorative two-level structure hanging overhead looks unfinished. Therefore, before choosing a project or scheme for installing a plasterboard ceiling, the first step is to plan the lighting.
Schemes of two-level plasterboard ceilings with lighting: photos
Projects and diagrams with a central location of the lower tier are considered the most difficult to make with your own hands. It is clear that thanks to a properly constructed lighting system, such structures look much more impressive and expressive.
The central part of a two-level ceiling can be combined with side caissons
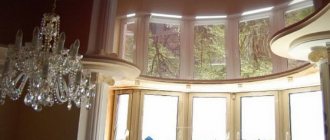
Sometimes the center of the ceiling is rounded, this gives the structure a more elegant look, but the complexity of the work increases by an order of magnitude.
Carved contours and rounded shapes make the decor more impressive, but also add several times more work
For the first experience, it is better to choose the simplest designs with lighting and decorative niches laid around the perimeter of the ceiling. Such schemes do not require special planning skills, but with the right design selection they can look very interesting and attractive.
Rectangular frames - boxes can be no less impressive
You can complicate the diagram by using curved transitions instead of straight lines. But for this you will need, at a minimum, to master with your own hands the technique of assembling rounded surfaces from cut plasterboard.
Two-level ceilings for zoning
Two-level stretch ceilings are a powerful tool for zoning. They allow you to visually divide the room without additional partitions, shelving and curtains. It is also more convenient to integrate multi-level general and local lighting and hidden lighting into them.
Complex ceiling solutions allow you to adjust the geometry of the room. Elongated rooms seem more symmetrical, square ones seem more complex and interesting, polygonal ones seem more practical and functional.
The shape of the segments itself can also be any. These are not necessarily rectangles. Create steps, ovals, circles and semicircles, clouds and waves - whatever you want. Up to volumetric 3D structures.
Advantages and disadvantages of suspended two-level ceilings with lighting
A two-level stretch ceiling can not only mask the unevenness of the base, but also completely transform the room. The stepped design changes the geometry of the room, visually increases the height, creates a division into zones, and lighting around the perimeter or spotlights the ceiling covering, adding spectacularity to the interior.
Advantages of tensile structures:
- the ability to hide cracks, noticeable joints of slabs, drips, unevenness and other defects of the ceiling;
- additional sound insulation;
- no need to finish the ceiling (putty, primer, paint), as in the case of building a two-level structure made of plasterboard;
- the total cost of the work is comparable, or even lower, than the cost of a plasterboard structure;
- the ability to easily rip off the wiring and fasteners for lighting (no need to tap concrete slabs to disguise the wires);
- installation of a stretch ceiling does not require preparatory work (in the case of plasterboard, you will need to clear the room of furniture or cover everything valuable from dirt and dust);
- after completion of the work there is no construction waste left.
A properly installed stretch ceiling gives the impression of a solid surface. Over time, folds, sagging and other unsightly defects do not form on it. Typically, the warranty period for stretch ceilings is 15 years. Two-level structures made of PVC or fabric do not have to be tinted or repaired. All you need is wet cleaning with a soft cloth. If there is heavy soiling, you can use any detergent that does not contain alcohol.
There are PVC and fabric panels for suspended ceilings. PVC film can be installed even in the bathroom; it is not afraid of dampness, unlike drywall or whitewash. Even if the neighbors flood the apartment, the film will withstand several buckets of water and protect the property from damage. Unfortunately, a fabric ceiling is not capable of such feats.
Important! Two-level ceilings look most impressive in rooms with a ceiling height of 2.8-3 m and higher.
A two-level ceiling does not require special conditions; it can be installed even in a room of low height. According to the installation requirements, the minimum distance from the ceiling slab to the tension structure is 3-7 cm. A specialist or a DIYer with “golden hands” can install an impressive canvas literally within one day. True, it may take a little more time to install the lighting, but it is still faster than making a bulky and complex two-level plasterboard ceiling.
Unfortunately, two-level tension structures also have disadvantages:
- Film or fabric is very easy to damage. You will have to carefully move tall objects (furniture, stepladder, Christmas tree, etc.);
- The film tightly seals the space between the ceiling and the floor slab. If moisture accumulates in this gap, it will not dry out very soon. Fabric ceilings do not have this drawback, but they are not able to retain water if the neighbors above cause a “flood”.
- The width of the fabric panel is approximately 5 m. This means that a seamless ceiling can be stretched in a room up to 5 m wide. PVC film has a width of no more than 3.5 m, i.e., depending on the size of the room, you may have to make seams. The configuration of two-level ceilings, as a rule, is calculated taking into account the characteristics of tension panels in order to minimize the appearance of unwanted seams.
- PVC film may emit a slight chemical odor during the first time after installation. The fabric does not initially smell, but can absorb odors (tobacco, smoke) and become deformed when exposed to moisture.
You should not install this option without the necessary equipment and experience. If installed incorrectly, irreparable defects may occur.
Decorative effects
The possibilities for decorative design of two-level stretch ceilings are almost limitless. You can combine similar shades for easy zoning. Or feel free to combine contrasting colors, because the line between them will always be clear, even and neat.
You can combine a neutral base background with a bright textile accent, a fragment of a starry or cloudy sky, or individual photo printing. No other ceiling design technology provides such variety.
Two-level stretch ceilings in the hallway
The hallway and hallway often lack space and light. Therefore, any solutions that allow you to visually increase the space are good here. For example, two light glossy canvases of different shades with built-in spotlights.
A difference in levels is a simple way to visually separate the hallway from the corridor and get rid of unnecessary doors and arches. And in spacious houses, a monochromatic design with a transition from a matte surface to a glossy one looks interesting.
Two-level stretch ceilings in the living room
The living room is the most multitasking room. Here they relax, study, work, meet guests, play sports, and spend family evenings. Therefore, the living room most often needs to be zoned.
There is not always room for partitions, screens and curtains, then visual techniques come into play. In particular, two-level suspended ceilings with independent lighting for each section.
The repetition of the outlines of the ceiling structure when decorating the walls looks fresh. Or her reflection in a low podium on the floor. In spacious rooms, you can create several such zones at once: for example, highlight a soft corner and a work desk.
Forms of suspended ceilings
Various shapes give the room originality and create interesting visual effects.
Square
The most popular form used to decorate the ceiling. Square tension structures enliven the interior and make it very expressive.
Rectangular
Strict rectangular shape, looks modern and stylish. This ceiling model unites all the elements of the room with each other and gives it a complete and solid look.
The photo shows a two-level rectangular suspended ceiling in the living room.
Oval
An oval, ellipse or semicircle shape will raise the ceiling, smooth out the corners in the room and allow you to create unusual lighting in it.
L-shaped
A podium wavy ledge or an L-shaped drop is a fairly traditional and sought-after design solution for aesthetic interior design.
Complex curved structures
Complex forms always remain at the peak of popularity.
Wave
It will add individuality and originality to the interior. A curvilinear tension pattern like one or two waves will undoubtedly attract all the attention.
Flower
It will be a wonderful addition and decorative element to the room. A flower-shaped design, combined with or without a chandelier, will never go unnoticed.
Two-level stretch ceilings in the bedroom
In the bedroom, two-level ceilings are the easiest way to create a romantic atmosphere. Use delicate shades and textures, graceful shapes, fragments of the starry sky. Textile inserts look interesting.
Hidden lighting will create muted evening light instead of everyday diffused light. Such night lighting not only creates a mood, but also allows you to relax, which is very important before bed in the modern rhythm of life.
Two-level stretch ceilings in the bathroom
In the design of bathrooms, moisture-resistant stretch ceilings have no equal. They are unpretentious, hygienic and easy to care for. Select a separate area above the bathtub or near the mirror - and create an unusual, stylish interior with minimal effort.
Think carefully about your choice of texture. For a small bathroom, gloss is better, but it may still stain from water splashes. Therefore, such a ceiling will often have to be wiped. But with a satin texture such a problem will not arise.
Photographic ceilings
The design is applied to the ceiling surface using safe, odorless paints. This decor will make the interior of the bedroom very original, filling it with sophistication and an elegant look.
A photo of a two-level ceiling in the bedroom can depict photographs that are intimate to you, warming your soul and immersing you in warm memories. They embody limitless fantasy.
Photographic ceilings are also perfect for small bedrooms, creating a lively feel. Limitless drawing ideas, which can be made even in 3D format, can immerse you in dreams and create a flight of the soul.
Two-level suspended ceilings in the kitchen
Stretch ceilings in the kitchen are as practical as possible. They do not absorb odors, stains and grease are easily washed off, and they do not fade or fade.
Two-level systems allow you to carefully highlight the dining area or work space. If the kitchen is combined with a living room or balcony, combine suspended ceilings with partitions and other techniques.
Photos of suspended two-level ceilings with lighting
Designers offer a huge selection of design options for two-level tension structures. Various colors, textures, combinations of colors and shapes, diluted with all kinds of lighting, are sometimes confusing.
Design options include an imitation of the night sky, an almost mirror-like glossy surface, noble silky satin, exquisite marble, daring metallic, and cozy suede. Finding the right combination of color, texture and shape for a specific room is not always easy.
A multi-level stretch ceiling with lighting may look great in the photo, but it will not suit the existing interior at all. Experts advise using the services of a designer so as not to make a mistake with the choice of colors and placement of lamps.
Two-level stretch ceilings in the nursery
You always want to make a children's room colorful and interesting - and two-level stretch ceilings will help with this. With their help you can create real planets, flowers, clouds, abstract polygons and complex shapes. This is an invaluable technique for themed rooms.
Zoning in the nursery is no less important than in the living room. From the first years to adolescence, a child needs a sleeping area, a workplace and space for games, rest and leisure. Forcing a room with partitions is not always convenient or practical, but zoning with a colored two-tier ceiling will cope with the task.
Ideas in the interior of rooms
Ceiling models should fit organically into the design and create a mood.
Living room
Two-level suspended ceilings in the living room are a fairly practical solution - they allow you to work out several lighting options and often solve technical issues related to the incorrect geometry of the room.
They allow you to bring to life the most daring design ideas and create a modern living room design. And for a small room, for example in a Khrushchev-era building, it can easily expand the space due to a glossy texture or photo print.
The photo shows a two-level design with a photo print of the sky in the interior of a living room combined with a kitchen.
The photo shows a vivid example of how a glossy stretch fabric expands the space and raises the visual height in the living room.
Kitchen
Such designs allow you to visually divide the kitchen into functional zones and focus attention on certain details of the room.
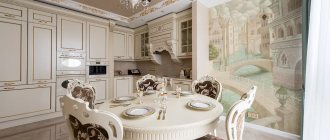
The photo shows a small kitchen and a two-level white-green ceiling.
Bedroom
This type of stretch fabric can diversify the design of the bedroom and decorate it with unusual decorative lighting.
Children's room
Canvases decorated with various photo prints or drawings will not only set the mood for the nursery, but will also help to visually delimit the space and divide it into a study area, a relaxation area or a play area.
The photo shows a two-level stretch ceiling that divides the children's room into two parts.
Bathroom
Gloss is an ideal option for bathroom decor. It creates the impression of additional space and highlights the shiny chrome surfaces of the sanitary ware.
Hallway and corridor
Matte or glossy canvases with a curve, with all kinds of steps and transitions, will allow the hallway or corridor to sparkle with new colors.
The photo shows a two-level stretch white-brown ceiling in the hallway with a staircase.
Toilet
Glossy or matte textures in light beige, blue, white or pink shades are perfect for the bathroom, which will increase the space.