The day before yesterday I saw an interesting way to hang a swing. In general, this seems like such a simple question, but in reality it turned out to be many difficulties.
That is, there is already a swing. You just need to decide where to hang them. Well, there are two options: either in the child’s room, or in some doorway. In both cases, it is desirable that everything can be easily hung and removed when needed.
Although there is still an option to hang it on the horizontal bar at the sports complex. In the doors, too, in principle, you can hang them on a horizontal bar. But here’s the thing: you need to calculate everything in advance. Because there are telescopic horizontal bars that simply move apart and stay in the box due to this. So, if desired, if you pull to the side, such a horizontal bar can be pulled out. They pull themselves up, of course, from the bottom up, but the swing may well collapse. So here we need to consider some options for reliable fastening.
And you should not try to replace the horizontal bar with a pipe that furniture makers use; it is not designed for such loads and will bend instantly.
Therefore, the option of direct fastening remains. If in the passage, then to the box, if in the room, then to the ceiling. But in both cases the principle is the same. For concrete use anchor hooks, for wood - hooks with self-tapping screws.
You can take it not with a hook, but with a ring, but with a carabiner in the ring, there’s already a swing attached to it. The option is, in general, reliable, but there is a danger that the hook may break off from the screw due to constant rocking and tugging. Unlikely, but maybe. Children after all.
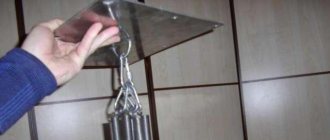
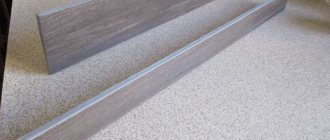
Therefore, I propose this option, exactly the one I saw. A plate is screwed to the door frame. It is attached with 2-3 self-tapping screws, and a carabiner is already suspended from the plate, and a swing is attached to it. It turns out to be much more reliable, the only problem is that the carbine creaks against the plate.
By the way, if you hang a swing in the doorway, you can adjust the amplitude. If you go to the top, you can swing a lot. If in the side parts, then there will be less swing. For kids a year and a half old, that's it.
We will show you two ways to tie a rope swing to the top frame of a sports complex.
METHOD No. 1
Advantages of method 1:
- does not reduce the length of the ropes
- The loop is very easy to tighten
4. As you can see, it’s easy to tie such a loop.
5. You can hang a swing with such a loop on a frame that has one free end. For example, on a horizontal bar like in the picture below. If the sports complex has not yet been assembled, you can hang it on the upper frame, perpendicular to the wall. If the sports complex is already assembled, and you want to hang it on a frame perpendicular to the wall: - remove the horizontal bar (usually you need to unscrew 2 bolts for this), - install the swing: - screw the horizontal bar back.
To hang a swing on the upper frame without removing the horizontal bar, you can pull the end of the rope out of the swing, tie it on the frame, and then pull it back. The last method is less preferable, as it can get confusing.
Chair swing
What do you need
- Chair;
- rope;
- dye;
- brush;
- hacksaw;
- drill;
- drill;
- sanding paper.
How to do
1. Saw off the chair legs with a hacksaw near the seat.
YouTube channel deco dino
2. Using a drill, make one hole in each corner of the seat.
YouTube channel deco dino
3. Sand the surface of the chair with sandpaper.
YouTube channel deco dino
4. Coat the resulting swing seat with fresh paint and let it dry.
YouTube channel deco dino
5. Divide the rope into four equal parts. Thread each piece through the hole and tie a couple of knots.
YouTube channel deco dino
6. Using the free ends, hang the structure from a thick tree branch.
YouTube channel deco dino
What can be changed
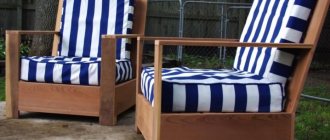
- The swing can be hung on the terrace or in the gazebo. It will be especially cool to build several of these structures and relax with friends.
METHOD No. 2
Advantages of the 2nd method:
- The noose becomes tighter due to the weight of the child
- If desired, you can easily untie, remove, rehang.
In a rope swing you will need to tie 2 such knots.
1. Throw a loop over the frame of the sports complex
2. Tie a regular knot.
3. Now we will tie a loop
4. Use your fingers to create a loop into which we will later thread the upper part of the rope
5. We wrap the upper part of the rope (we have it in the form of a loop) several times
6. We thread the upper part of the rope through the loop that we held with our fingers
8. Tighten harder. On one side it's ready.
This way you can reliably attach varnished rope swings to country and home sports complexes
Of course, it’s much faster and easier to go to the store and buy a ready-made wooden or plastic children’s swing. However, some parents, namely fathers of families, or grandfathers, decide to make a swing with their own hands. It's not that difficult if you have the right tools and materials. In this article I will share my experience of making a children's wooden swing for a summer house from scratch. If you have been looking on the Internet for drawings of children's swings, a list of necessary tools and materials, then please sit back and sit comfortably. I will share my own experience with you. I hope you find it useful.
Skateboard swing
What do you need
- Old skateboard;
- rope;
- shovel handle;
- roulette;
- pencil;
- drill;
- drill;
- dye;
- screwdriver.
How to do
1. Remove the wheels and everything unnecessary from the board.
YouTube channel DIY Network
2. Step back 5 cm from the edges and place marks for four holes for the ropes: two on each side.
YouTube channel DIY Network
3. Drill through these places. Select the diameter so that the rope holds as tightly as possible.
YouTube channel DIY Network
4. Cut two pieces of 30–40 cm long from the cutting and drill one hole in them on each side. Step back 3-5 cm from the edge to prevent the wood from cracking. These will be the hand rests.
YouTube channel DIY Network
5. Paint the bars the same color as the skateboard.
YouTube channel DIY Network
6. Divide the rope into two equal pieces and fold in half. Tie a knot at each end, but don't pull it too tight yet.
YouTube channel DIY Network
7. Thread the rope through the bars, make another knot, and then pass the rope through the holes in the skateboard. Tie knots at the free ends at the bottom of the board.
YouTube channel DIY Network
8. Hang the structure on a suitable tree branch and use the knots to adjust the handles to a comfortable position.
YouTube channel DIY Network
What can be changed
- If you make thicker single hangers with a split on the skateboard, you can easily do without handles.
What materials are needed to make a swing?
In this article we will not discuss issues such as installing pillars, concreting their bases, or adjusting the crossbar. There are many different variations here. Some use nearby trees, others just a thick branch. All this is strictly individual. In addition, we are not talking about a simple plank that hangs on a rope. Our goal will be to make a wooden swing that a child aged 1-3 years cannot fall out of. For older children, a simpler design is also suitable, but we will be making a product for kids.
Let's see what needs to be prepared.
Wooden swing seat
Use two boards (125 x 22 mm) 450 mm long for each swing seat. Connect them together using the same 250mm long boards, attaching them across the boards and on the underside at the ends of the seat. As a result, the seat size will be 250 x 450 mm. Drill four holes through the seats for the ropes. Thread the ropes in a large loop through the snap hooks and through the holes in the seats and tie secure knots under the seats. Make sure the knots at the ends of the ropes are large enough to support the weight of the seats and children swinging on them. Snap hooks make the process of installing and removing ropes (if necessary) much easier.
Let's start making a swing
Step 1. Assembling the seat
If we are dealing with simple plywood, the task becomes much easier.
If the seat is a prefabricated structure made of slats, you need to assemble the following from them:
The main thing is that the blocks do not crack. Therefore, before tightening the screws, it is advisable to drill thin holes for them. This way you will solve two problems at once - the blocks will not crack and it will be easier to screw in the screws. Please note: the corner screws must be screwed in offset, since there will be large holes for the rope in the corners of the structure. You can go even further and glue the outermost of the five cross bars.
Step 2. Drill holes for the rope
This will seem strange, but all the other parts of our future swing will not be rigidly attached to each other. The design will be very flexible. When removed, such a swing can be easily folded so that it does not take up much space and put away until next season.
First, we will make longitudinal holes in the blocks - the uprights of the crossbars:
The work requires accuracy. It is advisable to make the holes exactly in the center. If you have a vice, then it is worth securing the parts in them while drilling. After all 10 blocks have been drilled, you need to sand them down with sandpaper. While swinging, the child can grasp them with his hands; it is important that no splinters or flakes remain on the surface.
Next, carefully drill holes in the corners of the seat and in the top slats:
As a result, we should have the following construction:
All pictures for this review were prepared in a 3D modeling program and were originally intended for the website www.mark.kashkanov.com
Now that the seat is assembled and all the technological holes are drilled, you can glue foam rubber onto it and cover it with fabric.
It is necessary to sand the edges, glue foam rubber and tighten it all with a piece of cloth, which we have already talked about. The material must be secured properly so that during the swing, or when the child slides from the seat to get off the swing, he does not tear off the fabric.
It is best to use the leg of old jeans, which you have long worn out in a certain place and put in a long drawer “until better times.” With a slight movement of the hand, jeans can be turned into elegant shorts, as they said in the famous film, and the freed lower parts of the legs can be used for swings. If the size of your trousers allows, you can even pull the trouser leg over the seat like a sleeve, and then secure the edges on the bottom side with small nails or staples.
It is probably not worth mentioning that the length of the nails should be such that they do not come out on the other side with their points up. Foam rubber, of course, is a good thing, but over time it becomes thinner and at one point. Well, then you understand. So be careful with carnations. If something happens, take thicker plywood for greater guarantee.
At this point I would like to explain why two short bars were used between the post and the crossbars instead of one long one. There are two reasons for this.
- in short blocks it is much easier to make longitudinal holes and not deviate from the central axis,
- if we have two short blocks, the swing folds more compactly, which is much more convenient for storing it.
Step 3. Secure the rope
This is the final part of the work, but it should be treated with great attention. Mistakes here can be very costly.
We measure out two pieces of rope. Its length depends on where you will hang the finished swing. You need to try them on in place and cut off two identical pieces. Keep in mind that part of the length of the rope will go to knots, so feel free to add another twenty centimeters to the expected length.
Swing made from a disc and one rope
What do you need
- 4–5 boards 30–50 mm thick and 400–500 mm long;
- thick rope;
- hammer;
- nails;
- brush;
- paint or varnish;
- clamps;
- glue;
- drill;
- wood drill;
- roulette;
- thread;
- pencil;
- jigsaw;
- sanding machine or sandpaper;
- file.
How to do
1. Build a platform from boards. To do this, coat the side ends with glue, connect them together and tighten them with clamps. A simpler option: nail two bars across the boards, stepping back 10 cm from the edge.
YouTube channel Mitch Deitrich
2. Sand the top of the pad by hand with sandpaper or using a machine.
YouTube channel Mitch Deitrich
3. Using a tape measure, find and mark the center of the site with a pencil. Also put a line at a distance of 10 mm from the edge of one of the sides.
YouTube channel Mitch Deitrich
4. Drive a nail into the center, tie a pencil to it with a thread and draw a circle with a radius length along the mark at the edge of the area. Pull out the nail: you won't need it anymore.
YouTube channel Mitch Deitrich
5. Cut out a circle with a jigsaw and smooth out the sharp edges with a file or sandpaper.
YouTube channel Mitch Deitrich
6. Using a drill, make a hole in the center with a diameter 2–3 mm larger than the thickness of the rope of the future swing.
YouTube channel Mitch Deitrich
7. Using a file, grind off the resulting sharp edges in the center so that the rope does not fray when swinging.
YouTube channel Mitch Deitrich
8. Paint or varnish the resulting seat and wait until everything dries.
YouTube channel Mitch Deitrich
9. Thread the rope through the hole and tie a couple of knots so that it does not fall through.
YouTube channel Mitch Deitrich
10. Secure the free end of the rope to the tree.
YouTube channel Mitch Deitrich
What can be changed
- The round seat can be easily replaced with a fairly strong rectangular board. This will not make your riding any worse.
- In order not to bother with splicing boards, you can take a piece of plywood that is suitable in size.
How to properly hang a children's swing in a doorway
I would like to draw your attention to the peculiarity of hanging a swing at home. To do this, you can purchase special hook screws:
The fact that the hook is screwed not into the top strip of the door frame, but into the side one, has a special meaning.
Firstly, the top strip of the door frame may not be securely fastened and will simply fly out of its place during swinging. Again, I don’t even want to think about the consequences. Not only will the baby fall to the floor, but a heavy piece of wood may hit him on the head.
Secondly, even if the top bar of the door frame is securely fastened, the side fastening of the hooks eliminates the possibility of lateral swinging and injury to the baby’s hands on the door jamb. The swing hangs, as it were, on a tripwire in the doorway, and during the swing it “shuffles” against the jamb - for this you need to make a special effort. In a normal situation this will not happen:
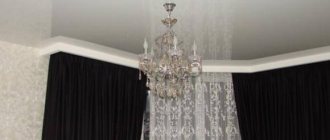
And one more important point. To prevent the rope from moving back and forth on the hooks while swinging, it is worth tying knots on it not far from the hooks:
This way you fix the length of the “front” and “back” ropes. This prevents unauthorized and unexpected tilting of the seat forward and backward for the baby.
How to make a rope swing with your own hands
The complexity of making a rope ride depends on the type of design chosen. Hanging a simple board will take 1-2 hours, while patterned weaving of a cocoon or a mesh for a circle will take a couple of days.
The video shows an example of making a swing:
How to attach a rope to a swing
The assembly of any type of swing begins with making a seat and attaching ropes to it. The technology is based on the following actions:
- A seat is made from two pieces of round timber 70 cm long and 8-10 cm thick. Stepping back 10 cm from the edge, the rope is passed between two logs, each wrapped with one turn and tied with three knots. A similar action is performed at the second end of the seat. There should be a distance of 50 cm between the two tied ropes.
- The flexible swing seat is cut out with your own hands from tarpaulin, rubberized fabric or other durable material. The length of the piece is 50-60 cm, the width is about 20 cm. Holes are made at both ends of the seat and carabiners are put on.
- To tie a wooden rope swing with your own hands, you will need to drill two holes in the board. They are placed strictly opposite each other, 5 cm away from the edge. Eye bolts or ordinary threaded rods with an eye are used as fastening elements. The bolts are inserted into the hole so that the loop is located on the working side of the seat. Fasteners are firmly tightened with nuts, placing washers under them. The ends of the ropes are tied with three knots to carabiners. Now all that remains is to connect the collapsible unit. Carabiners are used to hook the swing seat to the bolt ears.
- You can simply tie a seat in the shape of a circle with your own hands to a hoop in four places. The inconvenience of such fastening is explained by the fact that the ropes will slide along the ring during intense skiing. The ropes will quickly wear out due to friction. It is optimal to weld small loops in the form of ears to the steel hoop at the same distance from each other. The ring is braided with a net of rope. The hoop itself is wrapped in soft material. Each eye of the seat is hooked with a carabiner with a rope tied with three knots.
- Factory-made plastic seats have holes in the body. Usually there are two of them on each side. To secure the seat, just pull the ends of the ropes through the holes and tie three knots. Sometimes the manufacturer provides special clamps. They look nicer, plus there is no need to tie knots.
Each method of attaching a rope to a seat is simple and will not cause difficulties for any person.
How to hang a swing on ropes
After we managed to secure the rope on the homemade swing, it was time to hang the attraction on the support. It is optimal to make it yourself from a pipe, timber or logs. However, such support requires additional funds. Assembly will take a long time. Accurate drawings will be required.
In the case of rope swings, the ideal support was always a tall tree. A branch about 25 cm thick was chosen at a height of 2-3 m from the ground level. The swing was tied with a rope so that you could push off the ground to swing, but not catch your feet on it while rolling.
Important! The branch on the tree must be chosen so that there are no other branches growing below that would interfere with the swinging.
The problem with fastening is that a suitable branch is not always available. If it is not there, make an artificial support on the tree with your own hands. The principle of fastening is shown in a photo of a swing on a rope, where the homemade branch is a beam or log 3 m long and 13 cm thick.
To secure the support with your own hands, select suitable forks in the crown on the tree. They should be located at the same level, but with a small gap from each other. The normal height of the forks is 2.6 m from the ground surface. The support is placed so that there is a projection of at least 1 m beyond the tree trunk. Most of the support, which is on average 2 m, rests on forks. Fixation to the tree is carried out with ropes. Wire, nails, and self-tapping screws cannot be used, otherwise the crown will be damaged.
It remains to tie the swing on ropes to the resulting overhang, stepping back 10 cm from the edge of the support. At this point, attach the first rope. The second fastening is placed at a distance of 50 cm. Since the support is artificial, eye bolts or other devices with eyes can be screwed into it to tie ropes.
Options for mounting a swing in a doorway
You can secure a swing or jumping jacks in a doorway provided that:
- The door frame is made of solid wood;
- The box is installed in a permanent partition.
If it is a light MDF door in a plasterboard partition without a reinforcing frame around the perimeter of the opening, the fastening will be unreliable and unsafe.
If you are sure that the materials that make up the opening are strong and reliable, you have three options for hanging a swing in it: to the top crossbar, to the side posts or to the horizontal bar.
Option with horizontal bar
A horizontal bar without a swing is a very useful device. And quite often it is installed just in the doorway. You can easily hang any swing on it, equipping it with rings or carabiners if necessary.
Note! Do not hang the swing on a telescopic sliding horizontal bar installed at random. When swinging, it can change its linear dimensions downward and fall.
For this purpose, choose horizontal bars with a stationary fastening or make them yourself using a durable crossbar and side fastenings.
For the crossbar, choose a metal pipe with a diameter of about 3 cm with thick walls (at least 3 mm).
Advice. Chrome-plated furniture pipes are not suitable for this purpose. They are thin-walled and may not withstand the load.
The crossbar can be installed in special rod holders screwed to the door frame. They can be closed or open, attached to a vertical or horizontal plane.
You can do without brackets and holders. Below are instructions on how to make a swing bar from steel water pipe. Its initial length should be 4-6 cm greater than the width of the opening.
Materials for production
Rattan and wicker are classic options. Light, comfortable, attractive, perfectly combined with classic and Mediterranean styles. Artificial rattan is resistant to moisture and is used for hanging garden furniture. Wood is used less frequently, as the structure is more massive. Forged metal – typically used for outdoor models. Knitwear is perfect for hammocks. These are options for rustic and ethnic interiors. Plastic – acrylic, plexiglass and the like. The clear favorite is transparent, which makes it indispensable for high-tech, techno and futurism styles.
Swing base
A swing starts with a base, which can be very diverse. The easiest option is to buy a ready-made swing, which you just need to secure. Another option is to make a wooden seat with your own hands. For older children, you can use just one board, which will act as a seat. For younger children, such a seat will be dangerous, so a frame is needed for the child to hold on to. To create a frame, you can use round wooden slats or timber 2-3 cm wide. It is important to sand the wood well so that the child does not injure himself.
Also, the swing can be made of fabric. Moreover, this can be either a model without a frame, similar to a hammock, or a model with a wooden square base on which a fabric basket for a child will be held. It is important to provide holes for the child’s legs in this model so that he can swing comfortably. Such swings are most often used for children under 5 years old.
Swing support bolts
Install the eye bolts to secure the swing to the top bar, evenly spaced, starting from the middle of the top bar, with about 50cm of clearance between them. Drill holes for four lug bolts. Secure the bolts with nuts and washers, and install additional locknuts by tightening them in the opposite direction to the nuts. Install the eye bolts in line and tighten them using a screwdriver inserted into the eye bolts.
Fastening
There are many options for attaching a swing. For example, ropes can be attached to hooks or anchor bolts built into the door frame. Another mounting option is the joker system. A pipe is hung in the doorway, which is secured to the frame on the sides with special fasteners. Essentially, this is the same horizontal bar in the doorway on which you can hang a swing.
When securing the swing, it is extremely important that the structure can withstand the child’s weight with a margin. If the design turns out to be weak, then there is a chance of injury, which will upset not only the child, but also the parents. Not all door frames are distinguished by their strength, so when attaching various hooks it is best to drill not only the frame, but also the concrete wall. For example, anchor bolts can support more than 100 kilograms if they are well secured. Also, some craftsmen advise mounting the swing not in the opening itself, but in the wall, as if above the opening on any side. This will not interfere with the baby's swing, but will be stronger and more durable.
When choosing a cable you should also be very careful. Construction stores always indicate the load capacity of each model, so you just need to check these characteristics when purchasing. It is also important to ensure that the cable is firmly attached to both the hooks and the base.
>
Form
Hammock - can be either a traditionally shaped wicker chair or a softer version that resembles a hammock. The backrest, as a rule, is formed high, but the usual design with a headrest is also possible.
Ball or bubble - most often made of transparent plastic and used in modern style interiors. It resembles a sphere with a segment removed, as shown in the photo.
Cocoon is a seat covered with walls on three sides. The most impressive look are the wicker ones, with a pattern of thin colored wicker.
Drop-shaped ones are the most closed models. They are shaped like a pear or a drop, in which a round hole is made for entry. The product is popular in nurseries, where a small child can use the chair as a cradle for naps.
Models can be mounted in different ways, and any of them allows you to install them yourself.
Ceiling mount - a hook is mounted on the base ceiling, from which the product is suspended. Installation on suspended and suspended ceilings is not possible. With this type of fastening, the chair can swing back and forth, sideways and even diagonally.
Mounting to a rack - manufacturers produce special racks on circular platforms on which the product is mounted. This option is more mobile; it can be moved around the room or taken out to the terrace. Axial - in this case, the chair needs to be attached to both the ceiling and the floor. This option is safer and is used in children's rooms.
Swing in the form of a bench or sofa with a metal frame
This type of swing is common among manufacturers - today on the market you will find a large number of ready-made models of this type. They are distinguished by practicality and relative cheapness. Such a swing is suitable for gathering together in the evening after a hard day or on weekends with children and loved ones.
Before you buy materials and start making your own iron swing, familiarize yourself with the design features:
- this type of metal swing for a summer house can be either portable or stationary;
- a foundation for a portable structure is not required - the support is a square at the base. If you decide to make a stationary swing, we recommend keeping in mind a columnar foundation;
- Such structures are often accompanied by a canopy - this can be either a polycarbonate roof or a stretched awning.
Materials and tools
To make a swing from a profile pipe with your own hands, you will need a whole list of tools and materials:
- Round profile pipe for the frame with a diameter of 20 mm, 14170 mm (take a meter or two more with a margin);
- 4 steel corners;
- 2 steel arcs, each 250 mm long and with a diameter of 15 mm;
- 2 wooden panels;
- cable, chain or any other suspension that can withstand a load of up to 250-300 kilograms;
- welding machine;
- pliers;
- hammer;
- vice;
- grinder or hacksaw;
- building level;
- roulette;
- special anti-corrosion paint for metal;
- eye screws 5x80mm, 4 pieces.
- rigging shackle M5, 6 pieces;
- bolt M6x30, 4 pieces;
- nut M6, 4 pieces;
- spring washer M6, 4 pieces.
Step-by-step instruction
| Cutting parts from profile pipes for iron outdoor swings. For the side posts you will need 2500 mm pieces, 4 pieces. The crossbar will require a piece of pipe 2100 mm long. |
| We cut the edge of the pipe at 30 degrees at the end, and then use a welding machine to weld them into an isosceles triangle. |
| We measure 2000 mm from the top of the posts and weld a horizontal crossbar 1035 mm long to strengthen the frame. See the drawing of a metal garden swing that we made for you with our own hands. |
| We weld the horizontal crossbar at the ends of the vertical posts. Afterwards the seat will be attached to it. The distance between the A-posts is 2000 mm, the crossbar protrudes 50 mm on each side. |
| Let's create a swing bench from a profile pipe with our own hands. We take several bars 30x30x6000 mm and shorten them. You should get 24 pieces of 1500 mm pieces. We clean them using sandpaper or a machine. Or you can take a 100x100 beam and adjust it to the required dimensions. It is not necessary to cut 30x30; you can use 20x50 and 30x70, etc. |
| We apply a paint coating to the surface to prevent wood rotting. |
| We make a frame from a pipe 15 mm in diameter. We weld the sections together and attach the bars with bolts. The distance between them is 20-25mm. We weld eye nuts along the edges to secure the chain (two on one side, two on the other). You can also experiment with the distance between the bars (it all depends on their size). More details on the drawing of a swing made from a profile pipe. |
| We attach the seat to the vertical posts of the metal swing frame. We drill through holes in the crossbar for bolts with eye nuts. We thread them through and twist them. We connect the carabiners with all the eye nuts and attach the chain. |
| We dig 4 holes 450mm deep. To do this, we use a hand-held iron drill. |
| Mixing concrete. Add cement, sand and water to the container in proportions 1:2:3. It is best to use cement labeled M400. |
| We fill the bottom with a 100mm sand cushion, then install the racks in the holes. We throw in several large stones to stabilize the structure, and then fill everything with concrete. We wait for 3-4 days until everything dries. The design is ready |
Types of swing mounting and classification
Before choosing a scheme according to which we will assemble a metal swing with our own hands, we need to decide on the methods of attaching them to the supporting structure.
There are two main types of mounting for hanging swings:
- on eye nuts;
- to nodes.
In the first case you do the following:
- Make through holes in the horizontal beam using a drill (~5 mm);
- Insert long bolts with washers, tighten the eye nuts;
- Attach carabiners and chains or ropes to them.
In the second case, the sequence is:
- Throw the ropes over the crossbar;
- Making a sea knot;
- Attach the other ends of the rope to the seat.
Hanging metal swing
Homemade metal swings for a summer house are often quite small in size. These are usually small seats for one person, mostly for children. They do not require a permanent base; all you need to hang them in your yard is a tree with thick enough branches or a supporting structure.
Hanging swings are most often hung on a chain or strong ropes - depending on desire and style. At the same time, you can secure them without damaging the branch itself: wrap a chain or rope with a sliding knot, which will provide a fairly strong grip. The main thing here is to correctly calculate the thickness of the suspension itself.
An example of chain mounting.
- Drill a large through hole along the width of the seat, 7-9 mm thick (along the red line in the picture);
- Pull the chain through the drilled hole;
- Screw in steel bolts along the edges of the seat to secure the chain.
Stationary metal swing
Do-it-yourself stationary garden swing from a profile pipe is a more complex option, but no less popular. Great if you need to install seats for two or three people.
For a stationary swing, in addition to the seat itself, it is necessary to make a frame from a profile pipe. This is the load-bearing element of the entire structure; the heaviest loads will fall on it, so it must be done with all the attention. Attachment to a stationary frame has several varieties.