Cornices for suspended ceilings are a small but very important element. Cornices for suspended ceilings have a number of nuances that you need to decide on before choosing. In particular, whether to choose a hidden cornice in a suspended ceiling or not, and whether the option of attaching it to the top is suitable - because then the fabric will have to be damaged.
Types of cornices for suspended ceilings
Ceiling baguettes for textiles are made from different materials. Depending on this they are:
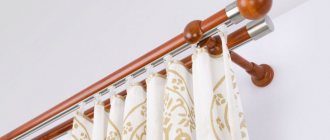
- wooden. Such a cornice for a suspended ceiling is represented by a massive and heavy structure. However, it looks very expensive and noble;
- steel. Baguettes made of steel can withstand heavy loads. During manufacture, they are decorated with patterns made of plastic or wood;
- aluminum. Lightweight, but at the same time quite durable structures can hold light tulle and thick curtains throughout their entire service life;
- plastic. The cheapest option for curtain rods that ensure free movement of textiles along the plane.
By number of rows:
- double row;
- three-row;
- four-row.
According to the methods of fastening there are:
- ceiling cornice for a suspended ceiling, fixed on brackets;
- baguettes, which are attached through special holes in them;
- cornices installed using hangers.
By type of construction, cornices are divided into:
- profile;
- baguette;
- strings;
- pipe;
- functional (under blinds, Roman blinds, etc.).
When choosing a cornice design, you need to be guided not only by its appearance, suitable for the direction and style of the interior, but also by the method of fastening and other parameters. Since the products can be installed on the ceiling or wall, you need to decide on a suitable option before starting renovations in the room.
Before choosing a cornice, you need to take measurements and decide what textiles will be used to decorate the room.
To avoid errors in measurements, take into account the following points:
- the wall cornice should not interfere with the opening of the window. To do this, it is placed at a distance of at least 5 cm from the window opening;
- if a ceiling curtain is installed, it must be moved away from the wall at such a distance that the curtains do not touch the window handles, radiators and window sill projections;
- As for the length of the curtain, it should be such that when the curtains are pulled apart, the windows can be opened freely. The optimal distance from the window openings to the ends of the baguette is 30-40 cm;
- consider the weight of the material that will be placed on the cornice. For thick curtains, preference should be given to metal or steel baguettes. For light tulles, you can use plastic types of curtains;
- the number of levels will depend on the number of layers of textiles. For complex compositions, three or four-row baguettes are suitable.
How to install a ceiling cornice: types of cornices and installation features
Installing a ceiling cornice depends on what kind of cornice you want to install. And what kind of cornice you will mount depends on what and how you will hang on it. The choice of curtain rod depends on the density of the fabric from which the curtains will be sewn, and on the number of rows of curtains.
- Tulle.
- Blackout curtains.
- Decorative curtains.
- Lambrequin.
The most common ceiling cornices currently exist in two types: string and plastic.
String curtains usually have two strings and are used for curtains made of light fabrics.
Plastic cornices are manufactured in one-, two-, three- and four-row forms. And they allow you to more freely decide on the choice of fabrics for curtains.
Cornices for suspended ceilings - technology for fastening ceiling cornices
To decorate rooms with tension structures, wall or ceiling types of curtains are used. Before installation, it is necessary to prepare the surface so as not to harm the suspension system, and securely fasten the product.
Visible method of fastening cornices for suspended ceilings
This method involves installing a baguette on a pre-mounted wooden beam, disguised with a decorative cloth. This option is very popular. It is widespread not only among masters, but also among clients. It assumes the following procedure:
- before installing the canvas, points are marked on the base surface indicating the places where the cornice is attached;
- a line is drawn where marks are placed in an amount corresponding to the number of dowels;
- Markings are applied to the walls, outlining the perimeter of the room. It will become the basis for attaching the profile into which the canvas will be tucked;
- then, using a puncher, make holes according to the marks and insert dowels;
- The wooden beam is fastened in such a way that after tensioning the canvas, it adheres to the coating, but does not damage it. Before screwing a wooden plank, it is coated with special protective impregnations or a hydrophobic primer, which will extend the life of the wood.
Adjust the height of the mortgage using mounting wedges. They are hammered between the base base of the ceiling and the timber;
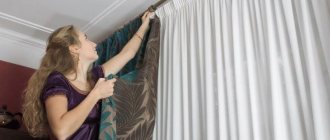
- stretch the fabric;
- Screw the curtain onto self-tapping screws through PVC film or fabric. The holes in the coating are first burned, not rolled. This reduces the likelihood of causing damage to the canvas. Special polymer rings are placed where the self-tapping screws pass through the vinyl.
If the technology for installing cornices was followed at all stages of the work, then the mortgage will remain invisible.
Mounting methods
Let's look at two main ways to hang curtains on a suspended ceiling. The first one is easier, but the tire will be visible. The second one is somewhat more difficult to implement, but the fastenings, rings and curtain tape are hidden.
Before starting work, preparations are carried out. Remains of old paint, whitewash or plaster are removed from the ceiling. Then the surface is impregnated with a deep penetration primer (preferably antiseptic).
For installation you will need:
- ladder;
- level;
- tape measure and pencil;
- drill or hammer drill;
- screwdriver;
- wood hacksaw;
- hammer;
- fastener
Open installation
With this option, it is assumed that the cornice will be located on a suspended ceiling. But the canvas cannot withstand the weight, so they use this method:
- Mortgages are screwed to the solid subfloor.
- Then the film or fabric is stretched.
- The cornice is attached through the canvas to the mortgages.
- Cover the cracks with masking tape.
Let's look at each stage in more detail. There are different approaches to choosing a support. As mortgages in a suspended ceiling, one large beam the size of the cornice or several small platforms are used at the locations of the attachment points. In the latter case, it is convenient to use purchased plastic mortgages. But you can make them yourself, for example, from plywood.
Installing a cornice on a suspended ceiling goes like this:
- Markings are applied. Mortgage platforms should be located in the places where the cornice is attached every 50-60 cm.
- A hammer drill drills holes in the ceiling.
- Plastic dowels are inserted into them.
- Aluminum hangers are screwed to the platforms.
- Fasten the mortgages with self-tapping screws into the prepared holes. The platforms should be located flush with the suspended ceiling.
Advice! To set the level in the area where the mortgages are attached, stretch a rope, securing it to the baguettes on opposite walls. The platforms are installed flush with the cord.
The beam is mounted according to the same principle, but with some differences:
- Reinforced metal corners are more suitable for fastening.
- The wood must be sanded so as not to damage the canvas.
- Then they are impregnated with an antiseptic to protect against fungus.
The next stage is the installation of a stretch ceiling. When the surface is ready, hang the cornice:
- If necessary, cut the plank to fit the size of the room.
- Mark the installation locations of the embeds on the canvas.
- They make holes.
- Screw the cornice.
Attention! All holes in the film must first be reinforced with plastic protector rings. Otherwise, the material will tear in this place under the force of tension.
Protectors are sold in different sizes. They are fixed to the ceiling with superglue that does not destroy PVC. Instead of rings, you can use aluminum reinforced tape. The adhesive tape is glued to the film at the fastening points and screws are screwed through it. This is not required for a fabric ceiling.
Creating a niche for the cornice
This method is more difficult to implement, but has certain advantages. It seems that the curtain flows from the ceiling itself. The room takes on a more sophisticated look and appears taller. In addition, there is no risk of damaging the PVC film, since there is no need to make punctures in it.
The general scheme is this:
- Decide where the cornice will be located.
- A “side” of timber is placed at a short distance.
- A frame for a stretch ceiling is attached to it and to the walls.
- Curtains are placed in the resulting niche, and the cornice is screwed to the rough ceiling.
When determining the size of a hidden pocket, take into account the width of the window sill and the heating radiator. In most cases, 20-25 cm is enough. And the depth is selected so that the cornice is not visible from the room. You shouldn’t make a niche that is too deep: it’s so inconvenient to hang curtains. You also need to take into account that the ceiling will drop significantly.
Once the dimensions are determined, installation begins:
- Apply markings to the walls and ceiling.
- A wooden beam is fastened (the same as with the open method of installing a cornice).
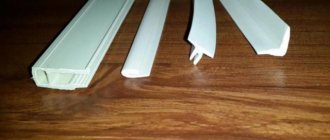
- A profile for the tension fabric is screwed to the bottom.
- The joints are taped with reinforced tape.
- The gaps in the profile are covered with F-shaped masking tape.
With this method, the mortgage and fastening system will be visible from the side of the window. If this is not satisfactory, the beam is covered with a tension cloth. This method is more difficult:
- First, a profile for the film is attached to the ceiling (focusing on the edge of the future niche).
- Lower the frame down to the depth of the pocket.
- A beam is mounted on the ceiling with a minimum distance from the baguette.
- A fender profile is screwed to the bottom edge of the beam. At this point, the PVC film is bent and tucked into the ceiling molding. The result is a niche that looks aesthetically pleasing from all sides.
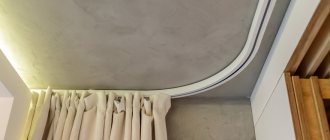
Peculiarities! Additionally, you can install hidden lighting, which creates the impression of floating curtains. To do this, an LED strip is glued to the corner of the niche on the side of the room.
Read more: Ways to create a hidden niche in a suspended ceiling
Cornices for suspended ceilings - invisible fastening of cornices to suspended ceilings
In this case, the baguettes are attached directly to the main ceiling, and the decorative PVC sheets are mounted on a special stand, which is fixed in front of the cornice. Thus, the slats remain invisible, and the curtains hang from under the canvas in a cascading flow. This method is more difficult to implement, but the effect is impressive.
You need to start working on installing the curtains in a hidden niche before measuring the decorative fabric. This is due to the fact that the size of the niche will depend on the dimensions of the baguette. If you ignore the installation technology, then after installing the canvases, material residues may form. Usually the niche is made 10 cm wide.
The algorithm of actions is as follows:
- first you need to secure the cornice to the base ceiling with dowels;
- a wooden beam is fixed at a short distance from the baguette (3-5 mm). Next, profiles for the tension fabric will be attached to it. The wood is pre-coated with a layer of antiseptic or primer;
- the profiles are mounted on the side of the baguette in such a way that, after tension, the canvas completely covers the beam.
How to attach a ceiling cornice to the ceiling in more detail for each type.
How to attach a ceiling cornice
Next, we will look at the technology for attaching cornices to:
- Concrete base;
- To the suspended ceiling;
- And also to plaster.
How to attach a ceiling cornice to a concrete ceiling
The best option for fastening would be to use a plastic or metal profile cornice.
Let's consider the process of consolidation:
- The first thing to do is to measure the required length of the cornice and cut it. A hacksaw works well for this. Next, assembly is carried out, during which all the necessary parts and plugs are attached and put on.
- The next step will be the immediate preparation of the cornice for installation. First you need to drill a hole in its central part. For this, either a double drill or several elements of wide diameter are used. Initially, a hole is made whose diameter corresponds to the diameter of the screw head. Once completed, drill holes on the other side with a slightly smaller drill.
- Next, with the selection of a certain fastening pitch, you will have to wait a little to fully calculate it; you need to clearly decide on the choice of curtains and their characteristics.
- Next, you should attach the cornice to the surface so that it takes the required position, and then make marks in the places where the fastening will be carried out.
- Initially, the cornice is fixed to the central hole. To do this, a hole is made in place of the mark.
- The next step is to insert the prepared dowel into the finished hole. Then the holes for the remaining fasteners are made.
- It remains to fully fix the cornice. The installation of all the dowels will help with this, which ensures that the frame as a whole is tightly secured. Also, instead of dowel-nails, it is possible to use ordinary self-tapping screws; they will be less expensive, but probably good.
The same scheme is used for mounting on wooden ceilings.
In addition, fastening ceiling cornices in this way is practically no different from fastening with hangers and brackets. Usually, holes for fastening are provided in advance in such elements; all you have to do is place the fastening point, and then provide for fastening to the ceiling
Fastening to stretch and gypsum cardboard ceilings.
If you do not plan to install rather heavy curtains, then the fastening can be carried out to a plasterboard ceiling, or even a suspended one. To do this, you will need to choose the right plastic cornice and secure it with self-tapping screws.
A more difficult case is the case of fastening to a suspended ceiling, and in the case of heavy curtains, problems may arise with plasterboard. But don’t think that you should abandon the cornice, this is far from the case. But still, if such a design is chosen, then it is necessary to think in advance about the place of its attachment, and to arrange supports for it, even before installing the ceiling.
Wooden beams are suitable for such support. This “liner” is fixed to the surface of the floor slab in the place where the cornice is planned to be installed, and the ceiling itself is built on top of it. Also, when choosing, you should take into account the required dimensions, which determines the preliminary purchase of the cornice. Among the factors that you should pay attention to are:
- The thickness of the beam should be slightly less than the distance from the ceiling surface to the plasterboard or film.
- In addition, the width and length of the beam must be greater than the expected dimensions of the cornice.
Now in more detail about fastening the ceiling cornice when installing a stretch ceiling structure.
First you need to install the embedded structures. This is done before calling a specialist and taking measurements for arranging the ceiling. This is done to mark on the plan the location of the cornice, since in this area additional strengthening of the structure is required, which is done using gluing.
Further, already during the installation of the ceiling, holes are created in the canvas at the insertion site, and rings are also inserted. This step helps prevent the film from tearing. It is through these holes that the fastening will be carried out.
There is also a slightly different way of attaching the ceiling cornice when installing a stretch ceiling. It involves arranging a niche, i.e. The necessary distance is left between the ceiling and the wall to secure the cornice.
Next, at the gap, the cornice is attached to the base ceiling. The technology was indicated above, so it is not worth repeating. With this option, the cornice itself will not be visible, and the curtains will seem to flow directly from the ceiling.
Wall mount
Quite often there are cases when the cornice has already been purchased, but they think about fixing it only after finishing the finishing work. In this case, you have to resort to an extreme option and consider the question of how to attach the ceiling cornice to the wall. There are not so many variations in performing the work, or rather only two:
- In the first case, you can use brackets, in this way it is possible to simulate fixing to the ceiling.
- And the second is attaching a wooden block to the wall under the ceiling. On which the cornice will actually be installed. It should be noted that it is necessary to take into account such factors as: the size of the timber, to ensure indentation, as well as additional decoration.
Another option, which is used in some cases, is to call workers who, for an additional fee, will dismantle the necessary part of the ceiling and then install it back.
Thus, we have figured out the question of how to fasten a ceiling cornice; the video presented below will help you become more clearly familiar with fastening technologies.
Technology for fastening wall cornices
Installation of wall moldings is usually used when the installation of the tension structure is completely completed, and it is no longer possible to screw on the hidden ceiling cornice. You can choose this method when you carry out renovations indoors with your own hands. It is not complicated, so the decorative coating on the ceiling will not be damaged. However, sometimes owners prefer to attach the cornice to the wall before installing the canvas, for several reasons:
- installation of wall products will be almost free, while installation of hidden cornices will cost 1,500-2,000 rubles;
- the film will not be damaged as a result of installation work. In this regard, it will be possible to completely maintain the waterproofness of the canvas;
- If you decide to replace the curtains with blinds, just remove the cornice from the wall and decorate the attachment points.
In construction markets, wall cornices are offered to customers in different variations. They can be, for example, stick-shaped. This is the simplest type, used for tension structures or ordinary painted ceilings. The baguette is installed against the wall, and the textiles are hung on special rings, which ensure easy movement of the curtains along the bar.
On a note! Before hanging the curtain, you need to correctly determine the distance from the ceiling to it. If you don't guess the size correctly, you will have to reweigh the product, and there will be unsightly holes on the wall.
Installing the cornice
To easily install a curtain rod alone, you need to start not from the outermost fastening, but from the second or third from the edge. Because, no matter how tightly the self-tapping screw and dowel sit in the outer socket, the weight of the cornice and the large shoulder create a load quite sufficient to tear the fastener out of the socket. By screwing the self-tapping screw into the second or third socket, you reduce the shoulders, and with them the load.
After this, you can safely tighten the remaining screws and admire the cornice installed in place.
It is important to know: if you are installing a four-row plastic cornice, then it is better to make nests for fasteners in pairs, under the outer rows. Otherwise, over time, the cornice may take on the appearance of an inverted U.
In the case of a string cornice, you need to drill two sockets on both sides of the window, screw the brackets, insert and tension the strings. If the span is large enough - three meters or more - then in the middle you need to mount the included W-shaped bracket to support the strings. Then they will not sag along the entire length.
What kind of roller
How to attach a cornice to illuminate a stretch ceiling
The method of installing cornices designed to mask decorative lighting requires knowledge of some nuances and subtleties. Installation is carried out in the following order:
- The attachment points are primed using a primer;
- Using a building level, apply markings along the curtain installation line;
- a wooden beam is screwed to the line;
- Using liquid nails, the curtain fastener is attached to the strip and wall. An alternative to liquid nails is acrylic putty;
- to make the corners neat, they are cut out with a miter box;
- install baguettes under the tension fabric. The distance from the profile to the cornice should be at least 7-10 cm;
- LEDs are prepared. The protective film is removed from the tape and the individual elements are soldered;
- contacts are protected with adhesive patches;
- after the glue has dried, remove the protective paper from the tape and attach the light source to the cornice in such a way as to ensure the shortest possible distance at the joints;
- At the final stage, the power wires are connected, LED amplifiers, power supplies, controllers are mounted, and the lighting functionality is checked.
If you wish, you can choose a tape with single-color or multi-colored backlight. Experts advise purchasing smooth switching mechanisms along with LEDs, which will provide an interesting lighting effect and extend the life of the devices.
It is not difficult to understand how to attach a cornice for suspended ceilings. The main difficulty is choosing an installation technique that is suitable for a specific type of cornice without damaging the tension fabric. Therefore, at all stages of installation work you need to act with maximum precision and accuracy. If you follow the above recommendations, you will be able to securely secure the cornice under the suspended ceiling.
Useful materials about ceiling curtains - choosing a product and installing it yourself.
At what height should I install it?
It happens that it is not possible to mount a ceiling structure directly on the ceiling. Then choose a wall mounting method. It is made using special brackets that allow you to mount the ceiling version on the wall.
Depending on why the curtain rod cannot be hung from the ceiling, the distance that must be retreated from the ceiling canvas varies. This distance also depends on the type of cornice.
When installing the tire, it is best to mount it directly under the ceiling itself so that the gap between the ceiling covering and the cornice is almost invisible. This will add height to the room, but it will be quite difficult to wipe such a cornice from dust.
When installing an open tubular curtain rod, calculate the distance to the ceiling so that there is at least a centimeter gap between the ceiling and the curtains.
This will simultaneously create the illusion of a ceiling mount and allow the curtains to “ride” freely under the ceiling without deforming the top edge.
When installing on a multi-tiered ceiling, it is best to install the cornice in a special niche equipped approximately at the level of the upper tier. The niche hides the cornice structure, and the curtains flow as if from nowhere. This way, the curtain mount will not distract attention from the beautiful and unusual ceiling covering, which is probably the main accent in the interior.
Cornices for suspended ceilings: photo ideas
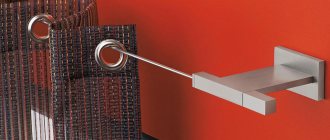
Cornices for suspended ceilings in a modern living room
Long curtains in several layers can be seen more often in classic interiors, but designers are gradually moving away from stereotypes. For example, in this living room they installed a hanging system with lighting and chose curtains in a modern style.
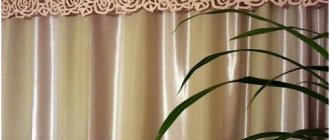
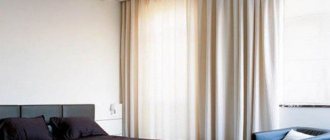
Cornices for suspended ceilings in the bedroom
Dark curtains against light walls look impressive, especially if their fastenings are not visible.
Advantages of ceiling-type cornices
Ceiling cornices differ from other structures in the following qualities:
- With their help, you can attach curtains at ceiling level, which is ideal for rooms with low ceilings.
- Ceiling cornices are characterized by relatively low cost and high quality.
- The ability to place up to 4 types of fabrics on them simultaneously opens up opportunities for those who like to experiment with tulle and lambrequins.
- Ceiling models may be equipped with rotating parts and baguette overlays.
- This product can be installed at any distance from the wall, which will make it possible to open windows freely.