Adding laminate to the ceiling is not a new technique in interior design, but there are not so many projects where it was successfully implemented. In this post, we will analyze in which cases a solution will fit organically into the environment, and when it is better to abandon it, how to choose the right material and what you need to know about design, choice of materials and installation features.
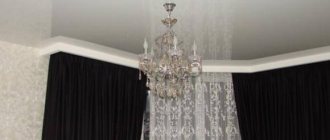
Design: Wilsonart
Design: Wilsonart
About the cons
1. The solution is not suitable for all interior areas. Laminate on the ceiling will organically complement furnishings in modern styles - loft, Scandinavian, minimalism, suitable for country and country house styles (chalets, Hamptons, rustic). But it won’t fit into the classics - standard painted or stretched options are more appropriate here. 2. Such a ceiling does not tolerate moisture and will definitely not survive a flood . The essence of moisture-resistant laminate protection against exposure to liquids is the special impregnation of the surface of the planks and the tightness of their adhesion. But since the material was originally intended for flooring, this protection acts mainly on the front side of the planks. If moisture gets on the seams or strips from the inside, the coating will swell and become deformed.
Instagram: @k_metr
Instagram: @k_metr
Design: Svetlana Gerasimova
Design: Svetlana Gerasimova
3. Laminate is afraid of temperature changes, so it has no place on a cold balcony or loggia.
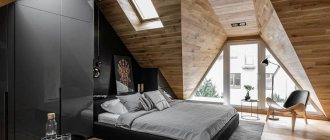
4. This is a controversial solution for rooms with a small height: an active wood pattern will visually “eat up” part of the deficit height. The exception is attic rooms and spaces where a height difference is planned, as in the interior (photo): the laminate ceiling goes into the floor and walls only in the corridor area.
Design: Nika Vorotyntseva design & architecture bureau
Design: Nika Vorotyntseva design & architecture bureau
Advantages and disadvantages of covering the ceiling with laminate
Laminate is made by gluing wood fibers with a special resin. The blanks are then passed through a press and panels of the required size and thickness are formed. This creates a laminate. This material was originally developed for laying on the floor, but due to the designer’s imagination it is used in the interior on walls and even on the ceiling.
The obvious advantages of this finish are:
- high level of wear resistance;
- environmental friendliness;
- does not burn on its own;
- dense;
- excellent sound insulation;
- rigidity;
- ease of installation and cleaning.
However, in addition to its advantages, finishing also has limitations that should be taken into account when planning renovations. So, the disadvantages of the material are:
- Low resistance to high humidity levels. Therefore, the coating is not used in bathrooms, incl. and for ceiling decoration. This is due to the fact that moisture accumulates on the tree and rot forms.
- Couples released at first. If the laminate is installed next to a bathtub, then under the influence of strong humidity, there is a risk of damage to the coating.
To date, no special types of laminate for walls or ceilings have been developed. For this reason, classic floor coverings are used.
How to choose the right material: 6 important points
There is no special ceiling laminate
The main purpose of this material is flooring.
And soundproofing too
If the decision to cover the ceiling in a non-standard way arose because of noisy neighbors above, without installing special soundproofing material it will not become noticeably quieter.
Design: Uglova Design
Design: Uglova Design
The abrasion class of the material can be safely ignored
Obviously, no one will walk on it. But resistance to moisture is an important parameter, especially in the kitchen, insulated loggia, and bathrooms. Always choose moisture-resistant material.
Need fewer joints? Take long planks.
In this case, it is important to take into account the proportionality of the slats and the ceiling: for example, narrow slats will fit better in a narrow corridor, and wider slats will look more appropriate on the ceiling of a spacious square living room.
Instagram: @kasm_interni
Instagram: @kasm_interni
Carefully check the shades and sizes of the planks, eliminating chips and mismatches.
It is clear that for floor coverings it is important to carefully check the purchase, but in the case of flooring, a defective plank can be hidden under a cabinet or sofa. You won’t be able to do this with the ceiling: every “jamb” will be visible.
Take some material in reserve.
Experts advise taking 13-15% of the calculated volume.
Design: Meridith Baer Home
Design: Meridith Baer Home
How to choose the “right” laminate for the ceiling
Is there such a building material on the market as ceiling laminate? No, they haven’t come up with a special laminate yet. All that is available in stores is floor covering.
If you are planning to use it for other purposes, then you do not need to choose the best of the best for all the performance properties needed for floors.
That is, you should not worry about how wear-resistant the laminate is and how scratch-resistant it is. No one intends to walk on it (we hope).
This means that you can easily look for cheaper options and not have to chase the industrial class.
So what kind of laminate should be for the ceiling?
The main thing you need to pay attention to is the appearance and quality of the locking system. On the ceiling, the protruding joint will be visible much more clearly than on the floor, due to the lighting.
The second important parameter is moisture resistance. Now there is a special laminate that can be laid in rooms with high moisture, for example, kitchens and bathrooms.
Why is this option needed for the ceiling? But because moisture and heat always collect under the ceiling, no matter what room it is in.
If you take a moisture-resistant coating, this will guarantee a longer service life of the laminate, or more precisely, its joints.
Basically, you can solve this problem in a different way. There is no need to take a moisture-resistant laminate in order to keep the seams in their original form. Just take laminate with curved joints. They never turn out, even after a flood.
Which of these two options will be more profitable in price - you need to look right on the spot.
What else should you pay attention to when choosing laminate?
I would like to say about environmental friendliness and the manufacturer. But... You understand, if you live in a house with concrete walls and the air entering your windows consists entirely of car exhaust, then advising you to be vigilant about laminate flooring is somewhat ridiculous on our part.
Moreover, laminate is such a thing that whether it is Chinese or truly European, there is not much difference, since it does not evaporate phenol and other nasty things contained in wood shavings around the clock. Because its top coating is made of durable, waterproof film.
What do you need to know about installation?
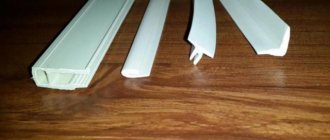
There are several ways, but there are two main ones:
- installation directly on the ceiling, on a previously leveled and prepared surface, using glue. This method is usually used if the ceilings are low, 2.5-2.6 m, and when the coating serves only a decorative function.
Design: Simagina Olga
Design: Simagina Olga
Design: GraniStudio
Design: GraniStudio
- installation on a frame made of wooden bars or galvanized profiles. In this case, there is no need to prepare the ceiling, and the space that will appear thanks to the frame will help hide the communications of the lamps, as well as supplement the structure with noise and waterproofing materials. The frame will take up 5-10 centimeters of height.
Design: Alexandra Fedorova Bureau
Design: Alexandra Fedorova Bureau
Design: Alena Nikolaeva Design Studio
Design: Alena Nikolaeva Design Studio
In any case, the choice of the optimal fastening method depends on the design objectives and layout features.
Making your own frame
Laminate ceiling finishing
The most reasonable and, in my opinion, correct solution is to create a frame. Laminate for the ceiling, laid in this way, will hide various communications, lamp fittings, wires and other unpleasant things. In addition, installing an auxiliary frame will facilitate the installation process and save you from lengthy ceiling leveling.
Before fixing the planks to the ceiling, remove all plaster, whitewash and paint . Otherwise, all this will crumble during the work process.
Laminate ceiling in the interior: 5 ready-made solutions
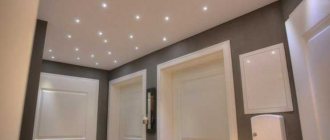
1. As an accent. They resort to it if it is necessary to emphasize the features of the geometry of the ceiling (for example, to highlight a fragment of a pitched roof), or to visually divide the space into zones. The rest of the surface is usually kept white.
Design: Alena Pautova
Design: Alena Pautova
Design: Ze Workroom Studio
Design: Ze Workroom Studio
2. L-shaped. A common way to use laminate in the interior somewhere other than the floor is to place it on a fragment of the wall and continue to the ceiling. The solution will be effective if the L-shaped cladding area highlights one small area - for example, a bed area or a TV area in the living room, and contrasts with the color of the rest of the walls.
Design: Hagan Architects
Design: Hagan Architects
Design: Alena Nikolaeva Design Studio
Design: Alena Nikolaeva Design Studio
3. As part of a space covered entirely with laminate, usually a niche or recess. Another technique for zoning space effectively and simply.
Design: Daria Nazarenko
Design: Daria Nazarenko
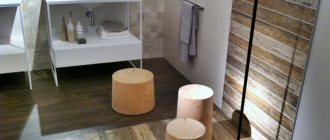
4. In combination with brickwork, porcelain stoneware and other brutal materials. The technique works on the contrast of textures - relatively smooth (laminate) and rough, heterogeneous (ceramic granite, brick).
Design: AB.arch.vision
Design: AB.arch.vision
5. Repeating on the floor. This is a harmonious, calm combination. However, this floor covering option is not the only one possible. For the floor, you can take a laminate darker than on the ceiling, or vice versa, much lighter, use natural stone, porcelain stoneware or self-leveling flooring. Follow the rule: the more active the ceiling design, the calmer and more neutral the floor should be.
Design: Pavel Martynov
Design: Pavel Martynov
Laminate on a sloping ceiling
The mgm has a ceiling with a slope of 22.5⁰, a maximum height of approximately 3.5 meters, everything is perfectly held on by clamps, the edging is a corner made of MDF with “liquid nails”.
If you don’t have a router, and it’s expensive to buy one specifically for one operation, you can use a drill.
nikolai_77FORUMHOUSE Member
Instead of a router, I took a drill and a 13mm drill bit and drilled out (of course, not all the way through) the places for the screw head.
As practice has shown, rigid fastening is also an option; it was tested not only by Patriott (with nails in a spike).
BaAlexForumHouse Member
I wanted to put laminate under “bleached” oak, the bars were already ready and painted. After being fed “breakfast” for a month, when my order was already on the way, I freaked out and bought what was in stock. It doesn’t quite match the color of the bars, but for many years it has been just lying on the bars with quarters and hasn’t fallen off or faded.
Laminate ceiling in a wooden house: design features
When choosing a laminate in a wooden house, you should start from the pattern and tone of the predominant wood in the room, and look for planks with a similar pattern, but several tones darker or lighter. It’s good if the artificial turf and natural wood differ in the width of the planks and the direction of installation - then the interior will turn out expressive and multi-layered.
Design: Raca Architekci
Design: Raca Architekci
Design: ITAL Design Studio
Design: ITAL Design Studio
Instagram: @kasm_interni
Instagram: @kasm_interni
How the coating is assembled
When finishing the attic, it doesn’t matter which surface you will decorate with laminate - the same technology for attaching the planks is used for the ceiling and walls. In principle, everything is simple: the sheathing is attached to the wall and the covering strips are fixed to it. You just need to follow a couple of rules:
- Fasten the dies across the direction of the sheathing bars. It turns out much better this way and there is no need to experiment here.
- In those places where the assembled surface adjoins the floor or other perpendicular planes, it is necessary to leave small gaps to compensate for the deformation of the dies due to changes in moisture content in the air and temperature fluctuations.
- When using parts with locks, you must always ensure that the locks are fully latched, otherwise the surface may subsequently warp. Below is how it all happens.
The surface elements themselves are attached to the bars using glue - a simple option, or using clamps - a more complicated option. The interesting thing is that the second method is much better than the first. Despite the fact that you will have to spend more time and effort on installation, you will get a surface. Which can be disassembled, but in the case of glue you cannot do this.
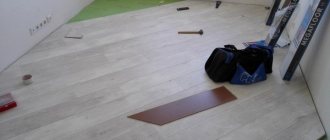
We attach the laminate with glue - step-by-step instructions
- We are preparing the foundation - there is no point in describing the whole process here, this is a separate article. It is important that it is perfectly even - even 1-2 mm plays a role. If you have never encountered plastering work, you still won’t be able to do it yourself. It's better to entrust this to specialists. You can use drywall as a base, but then you will still have to install a frame, which will entail a reduction in the height of the room.
- The finished and primed base needs to be puttied 2-3 times. Before starting work on attaching the laminate to the ceiling, the finishing layer of putty must be completely dry - this is important.
- We begin installation from the corner farthest from the entrance, to the left of the door. We apply the glue first to the ceiling, and then to the panel itself. Don’t forget to treat the lock with “liquid nails” or other sealant - this will make the coating better. Let the panel dry quietly. You can substitute a support or use double-sided tape. It's convenient to work together.
- In a small room, you can assemble the panels directly on the floor. And then mount the entire ceiling.
Laminate sizes and their features
When using laminate for cladding, size plays a primary role. The material has individual parameters for length, width, thickness. Square panels with dimensions of 40x40 cm will look very interesting on the ceiling.
There are also volumetric parts of 40x120 cm, as well as 20x200 cm. Each size has its own peculiarity. For example, the longest options are more suitable for wide but small rooms. They are able to visually compensate for the excess width in the room. Square panels have a place in halls and hallways.
Interesting laminate flooring in the bedroom ceiling Source dekor.expert
Thickness is an equally important factor. There are models from 6 to 12 mm. It is better to choose medium ones for the ceiling. Since they will be durable and moderately light. In addition, they will save free space under the ceiling.
Ceiling cladding with light brown laminate panels Source sdelaipotolok.com