When laying laminate diagonally, the eye focuses on the corner part of the room, in the direction of the coating lines. Thanks to the alternation of light and dark shades, the floors gain expressiveness. In the corner part of the room you can place various compositions, since it is this area of the room that receives attention. This installation is used for rooms with an unusual layout, as well as narrow rooms.
Preparing the surface and tools for laying laminate
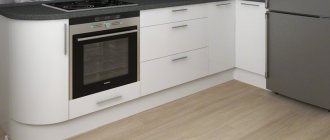
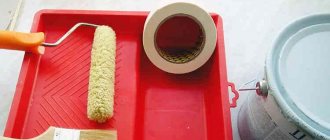
The surface must be flat; first, the old material is removed from the floor and a new screed is made, if necessary. The floor must be vacuumed to remove small debris. For minor defects, the coating is repaired, small holes and cracks are covered with a solution, then the surface is primed and left to dry.
Before laying the laminate, you need to spread a special underlay on the floor, and then begin the main work, then the material will not sag and make noise when walking.
To lay the base material you will need:
- level for construction;
- tape measure and pencil;
- electric jigsaw for cutting laminate;
- hammer and block.
If you don't have the necessary tools, you can purchase a laminate installation kit that includes everything you need.
Laying laminate diagonally
Unlike the usual method, diagonal laying begins not from the longest wall, but from the far corner. The actions are performed in the following order:
- First, the first main row is made from whole material
- Then you need to make a corner template that connects the first row to the walls. The laminate is cut out and laid according to the sample; for this, special pegs are placed in the gap formed between the wall and the material.
- The second row is assembled and connected to the first along the entire length. Post-installation is also carried out.
- If the row is too long, it creates difficulties when snapping, so it is better to do the installation together. If this is not possible, you can use a load that is placed on the part where the connection occurred.
- At the end, a plinth is installed that will hide the distance between the walls and the main flooring material.
Laying can also be done starting from the center of the room; to do this, you need to pull the rope between opposite corners and work along it.
When laying, it is necessary to maintain an angle close to 45 degrees from the walls; if this indicator is significantly deviated, then the surface takes on an ugly and dishonest appearance.
templates must be made for each individual separately. The laminate is connected using special locks by snapping them into place; if they are missing, then hammer the tenons into the grooves using a wooden mallet or a hammer, placing a block of wood.
Laying is done in a checkerboard pattern, retreating 15 millimeters from the wall, then over time the coating will not deform under load. Where the laminate meets the walls, the panels are cut at the desired angle; the work must be done efficiently to avoid uneven installation.
Pros and cons of laying laminate flooring diagonally
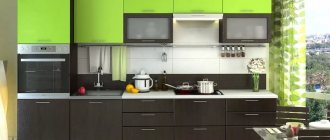
- The lines of the floor covering visually expand or narrow the room; when laying the laminate diagonally, attention goes to the corner part, in the direction of the floor. Due to this, the corners are distant from each other, and the room takes on a spacious appearance in all directions. Light-colored material allows you to visually enlarge the space, and dark colors can be alternated in saturation, then the floor will be expressive.
- Laying laminate flooring diagonally can be done in narrow spaces and rooms with an unusual layout, then the tiles will not focus attention on the walls, as with a standard coating.
- This floor arrangement highlights the corner parts, so in the final place where the eye stops, you can place a composition, mirror, table, cabinet, aquarium or fireplace.
- When using diagonal laying, laminate flooring can be placed equally in all rooms, without seams or thresholds. In this case, all rooms will have the same covering and have an original appearance.
- You can do the installation yourself, without the help of specialists, this will help save costs.
- Thanks to the variety of shades, this coating can be used in any interior.
- The material is resistant to various loads, so it can be installed not only in bedrooms, but in the kitchen, living room or office.
- You can make an original coating from one laminate by laying it diagonally.
- Wall irregularities become invisible, dark and narrow rooms become more spacious.
- The affordability of the material allows you to create an original floor covering for any room design.
When laying laminate diagonally, a lot of waste remains, so the coating is more expensive than with a conventional arrangement, this is the main disadvantage. Thanks to the angle of inclination, the coating has an original and special look, but the main work is labor-intensive and wasteful. Covering the floor with laminate diagonally needs to be approached seriously, everything must first be calculated down to the smallest details in order to correctly purchase the required amount of material.
How to calculate the amount of material?
To avoid a shortage of material, it is necessary to calculate the required amount in advance, since diagonal laying costs more. First, they draw up a detailed drawing with minimal consumption, then calculate individually how much material is needed, adding up to 4 pieces to this quantity in case of an unforeseen situation.
If a detailed drawing is not possible, 10% is added to the area of the room! and (MISSING) is divided by the area of one laminate board. The resulting figure is divided by the number of dies in the package.
Basic rules for laying material diagonally
After purchasing a laminate, you need to give it the opportunity to lie in the room and get used to the temperature conditions.
Laminate does not require rigid fixation; the material cannot be glued or screwed, otherwise cracks or deformation of the coating may appear.
The material should be placed freely on the surface, so a distance of up to 15 millimeters is made from the walls, since the wood included in the composition can expand with temperature changes. At the end of the work, the indentations are covered with a plinth.
The plinth is fixed only to the wall; if it is also fixed to the floor, this will not allow the laminate to expand; as a result, deformation of the coating may occur.
You cannot make direct blows with a hammer to connect the dies; you must use a wooden block, otherwise the locks may be damaged.
Trimming the material must be done efficiently, especially in hard-to-reach places, so that subsequently all the dies lie smoothly, and all the work is not labor-intensive.
A substrate is laid under the laminate, otherwise the material will sag under load, make sounds, and this will lead to rapid wear of the coating.
After finishing the installation work, the coating is left for a day without subjecting it to loads; after this time, the baseboard is screwed on and the furniture is installed.
We recommend: Panels for finishing the walls of the kitchen, bathroom, corridor, living room
The rough surface under the laminate must be clean and smooth, without cracks or sharp changes, so that the material does not sag.
If there is high humidity in the room, then you cannot lay laminate flooring on an old wooden flooring, as it will deteriorate over time and this will lead to deformation of the floor.
If the tilt angle is 45 degrees, the cutting will be standard and there will be less waste. If there is a large deviation from this indicator, the floors will look ugly.
The backing sheets are laid out end-to-end and the seams are connected with tape, otherwise it will bunch up when laying the laminate.
The laminate locks are connected at an angle of 45 degrees, lowered and latched. The purchased type of material must be suitable for laying in the center, otherwise work begins from the corner.
The material must be purchased immediately in the required quantity, since laminate of the same type can have different shades. Also, in the future you may not find the desired type and color of laminate, as stores are constantly replenished with new products.
If you are unsure about laying laminate diagonally yourself, it is better to seek the help of specialists so as not to spoil the material.
Laying laminate diagonally is more difficult than the usual method, it takes more time and effort, requires precise calculations, and more material is wasted. At the points of contact with the walls, the laminate is cut at the desired angle. But work done correctly has advantages:
- the room has a spacious appearance, which is important for small rooms;
- the irregularity of the walls is hidden, attention goes to the floor;
- This type of flooring has an original and beautiful appearance and fits into any interior;
- diagonal covering is performed in rooms where the window is not in the center, while the room becomes lighter and seems freer.
Thanks to this coating, you can create an original look in all rooms, without using thresholds and restrictions, while the installation will be the same throughout the house. A variety of colors and patterns will help you make the right choice for any room design, and doing the work yourself will help you save on costs.
Source: superarch.ru
Diagonal laying of laminate
Despite the fact that installing a laminate floor is a technology that requires compliance with technical recommendations, it is quite possible to do it yourself. Let's take a closer look at how laminate flooring can be laid diagonally, what are the advantages and disadvantages of this process, and also compare different methods of laying flooring.
It's no secret that today laminate flooring is at the peak of popularity, so for most people there is a question of installation - and some prefer to do the work themselves, customizing the finished result to their needs and requests, as well as making quite significant savings.
Most often, those who do not have experience in laying floors do it in the usual direct way and lay out the panels in a straight line, along the walls in the room.
Installing laminate flooring is easy to do manually, following the recommendations
This solution is good only for those rooms that have the correct shape - if there are features such as an unconventional shape or rounded walls, the diagonal laying method will help.
While the standard technique places laminate panels so that they are parallel to one wall and perpendicular to the other, otherwise they are laid diagonally at an angle of about 45 degrees. As a rule, it is this angle that allows you to achieve optimal results.
Features of diagonal laying without thresholds
For a neat floor design, it is best to use laying technology without thresholds and joints. To do this, it is necessary to change the flooring in two adjacent rooms. The absence of thresholds will allow you to erase the boundaries of rooms and create an overall design.
The combination of two types of finishing materials looks very nice. For example, a conditional boundary can be drawn by laying ceramic tiles in an adjacent room. This division is typical for the design of the hallway, kitchen and bathroom.
If, after finishing the work, you notice small gaps, they can be sealed with artificial cork. In terms of technical characteristics, it is similar to polyurethane foam, but the effect of its use is more attractive to the eye. Use a special gun to fill gaps. After treating the surface, take a break from working until the composition dries completely. After this, cut off the excess material.
Advantages and disadvantages of the method
One of the main advantages that I would like to highlight is the interesting and original appearance of the room, a good design solution that visually adds volume to the space while maintaining the usual length and width. Coverings laid out in this way look neat in narrow rooms that are very elongated in length. If the room has a hexagon shape, has niches or curves, then with the direct installation method most of the flaws will be noticeable immediately.
The diagonal method of laying laminate allows you to give an unusual look to the room
List of advantages:
- hiding wall imperfections - with a large number of corners or the absence of parallel walls, any imperfections will be much less noticeable;
- expanding the space visually in small rooms (especially if there is not a lot of furniture in the room);
- the coating looks much more natural;
- if the windows are located asymmetrically, the light enters the room more effectively;
- for standard-shaped rooms, diagonal laying will give an additional external effect if you choose several coating options that match each other in color;
Diagonal laying allows you to hide flaws such as uneven walls, asymmetry of windows - the effect of the floor transition between two adjacent rooms is also much less noticeable;
- Particular effectiveness can be achieved with a skillful combination of direct and diagonal methods.
Unfortunately, there are also disadvantages:
- first of all, the amount of unspent material and scraps is much higher than with the standard method - overconsumption is approximately ¼ of the total amount of materials;
- the process of drawing up a plan is quite labor-intensive and requires much more time for counting and drawing up drawings;
If you lay the laminate diagonally, you will have to purchase more material than would be needed with the “standard” method - can cause difficulties, especially when installed in a room where the walls are completely unsymmetrical;
- you need to carefully monitor the humidity of the room where the work is being carried out - not all types of laminate flooring can withstand serious changes in humidity.
In general, with a competent approach, this method has many more advantages than disadvantages.
laminate
How to prepare
Every careful and careful owner should know that the foundation is extremely important when performing preparatory work. Having analyzed what material the base is made of, it will be possible to choose the right type of preparatory work. Usually we are talking about two different types of lower base.
Concrete
Usually we are talking about a concrete base if repairs are carried out in an apartment building with a large number of floors. In this case, preparation will begin with pouring a screed of cement and concrete - this is simple and accessible to everyone. There will be no need to attract external forces and employees.
It is necessary to properly prepare the base and, if necessary, fill the screed
Here's what you should pay attention to if you have a concrete base:
- the screed will dry for at least 3 weeks;
- to cope with drying faster, add plasticizers to the prepared solution;
- be sure to make sure that the screed is neat, without cracks or depressions - such parts can cause significant damage and cause problems in the future. To avoid this, it’s easier to simply replace the screed with a new one.
Remember that the screed dries completely only after 3 weeks, so it will not be possible to lay the laminate right away
If you take into account all these nuances, the result will be of higher quality and faster.
floor screed
Wood base
Of course, wood is a much less durable and stable material, despite the abundance of all kinds of impregnations and compositions. That is why, before laying the laminate, try to perform a few simple steps that will allow the floors to last longer:
- first of all, get rid of all floor elements that are affected by rot or mold - this kind of bacteria tends to multiply;
- if there are elements that do not hold well, be sure to additionally strengthen them with nails or self-tapping screws - this will allow the floors to last longer and prevent unsightly creaking;
- if you notice any major deformation, then it is best to re-lay the wooden covering of the base completely, rather than waste energy on a tedious and lengthy restoration;
If you are laying laminate flooring on a wooden base, you need to carefully inspect the subfloor for deformations and weak fixation of floor elements - If the working surface becomes uneven, you can use sheets of chipboard or plywood.
Correct implementation of all prescribed recommendations will help extend the life of wooden flooring by almost a quarter of a century!
Preparing the floor for laying laminate
A properly prepared floor base is the key to a long service life of the floor covering, as well as the absence of squeaks and cracks. Depressions and convexities on the floor surface lead to sagging of the slats, which can cause damage to the locking joints. The subfloor for laying laminate must be perfectly flat (deviation can reach no more than 2 mm per meter), dry and clean.
The concrete floor must be monolithic. All chipped and crumbling parts must be removed. Small cracks, chips or holes can be covered with cement mortar. If the unevenness is significant, a new screed is needed. A self-leveling mixture is best. You can easily install it yourself. For this:
- prepare a container of the required size;
- the dry mixture is poured into a container with water;
- mix thoroughly, achieving homogeneity of the solution;
- bring the solution to the desired thickness (it will not be possible to dilute it later);
- leave the mixture to ripen for the time specified in the instructions;
- pour the solution onto the prepared clean surface;
- spread to the desired thickness with a spatula;
- roll out air bubbles with a special plastic roller with spikes;
- until the first portion has frozen, prepare and pour the next one;
- repeat the steps, covering the entire floor in the room.
The screed must be completely dry before you begin laying the laminate. You can check its readiness by covering the floor with plastic wrap overnight. If condensation is found on it in the morning, the floor is not dry enough.
If the floor base is wooden, pay special attention to its strength. In old houses, it is advisable to check the condition of the joists. If the floorboards sag, you need to reduce the distance between the joists. All boards must be intact and strong.
Rotten and damaged parts must be replaced. For wood, special impregnations are used that protect against rotting and fire. To make the surface as smooth as possible, lay sheets of plywood 10 mm thick.
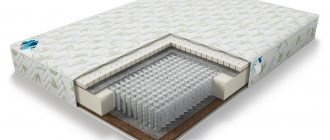
Underlay for laminate
When laying laminate flooring, a special underlay must be used. It performs several functions, these are:
- protection of the bottom layer of lamellas from friction against the base of the floor;
- uniform load distribution and lock protection;
- absorption of noise when walking;
- thermal insulation.
The duration of use of the floor covering and its comfort depend on the quality of the selected substrate material. There are different types, differing both in their characteristics and price. Among them are foamed polyethylene, extruded polystyrene foam, cork, coniferous tiles and others. All types are easy to install with your own hands.
Advice! As a rule, the service life of the substrate depends on its cost. If you have purchased an expensive laminate that is designed to last for a long time, you should choose a durable cork backing. Cheap types lose their properties after 2-3 years.
List of tools
First of all, we will need a saw with fine teeth; a special machine, jigsaw or circular saw will also work well. However, remember that hacksaws for working with metal and hand saws will not work.
Additionally, purchase a hammer, measuring tape, bars and wedges, as well as pencils and rulers for taking measurements.
You need to prepare the necessary materials in advance
How much laminate will it take?
It is very simple to accurately calculate the number of boards required for work using the classical method - just find out the ratio of the total area of the entire room and the area of a single board.
In this case, large panels are first laid out and finally trimmed to the desired size, then, in the second row, you will need to lay out whole panels, in addition to the last one - it is carefully trimmed until the desired size is achieved. The same is done with the third and any subsequent step.
In general, the installation principle will practically not differ from that of direct installation - the only difference is that the trimmings will be triangular, and initially the amount of material must be prepared in greater quantities. So, the amount is calculated from the area of the room, but it will be necessary to add approximately 15 percent of the amount of material for additional waste. For particularly experienced installers, this number can be reduced to 5 percent; average values will be around 10 percent.
Interesting! This amount of reserve will be required when laying at an angle of 45 degrees; if the angle increases, then there will be more waste. It is better not to deviate from gold standards.
How much laminate is needed for laying diagonally
Diagonal laying instructions
By following the recommendations below step by step, you will get a perfectly smooth flooring surface.
- Start work in the middle of the day. In the afternoon, the sun's rays slowly change directions, which helps determine the direction of the slats.
- If you start laying from a corner, measure the angle at 30-45 degrees. This is exactly how the laminate boards will be positioned.
- Place spacer wedges along the wall. The distance between the wall and the floor covering should be 10 mm.
- The first few rows of diagonal laying must be adjusted to two opposite angles.
When laying out the tiles, you must maintain the order of the chessboard. In this case, the shape and size of the final edge must correspond to the beginning of the next board.
What rules should you follow?
It is better to learn these recommendations before you begin the actual installation - this way you will achieve the best result.
- First of all, let the laminate sit at room temperature - it should adjust to the microclimate of the room for about two days.
- Then carry out an inspection after unpacking the material - it must be intact and not damaged. All boards with facial defects must be discarded; only those with minor defects on the rear will be suitable.
- The air temperature in the room where installation takes place should be about 20-25 degrees, the maximum range can be from 13 to 30 degrees, but these conditions will already be quite extreme.
Laying laminate flooring should be done in a room where the temperature is at least 13 degrees (optimally 20) - The main thing is humidity! It should not be too high (more than 70%) or low (less than 45%). Also keep an eye on the surface roughness indicator; it can be no more than 3 millimeters per square meter.
- The backing is required.
Its material depends entirely on your desire and possibility. The most budget option is a regular polyethylene film; for a high-quality coating, you should not skimp and purchase a good cork backing. underlay for laminate - Be sure to factor in the 10-15 percent laminate waste difference.
- Take care in advance of a diagram that will help you lay out the laminate correctly and avoid additional consumption of materials.
Be sure to lay a backing under the laminate - it will help extend its “life” and soundproof the floor
A little trick from the owner: the pieces of laminate that remain from the first laid row can be an excellent start to the next one.
It is best to stick to an angle of up to 45 degrees (about 30 is acceptable). This installation method is good for rooms with a width of up to 6 and a length of up to 8 meters.
We recommend that you first familiarize yourself with interesting design projects in order to develop your own beautiful and neat option. Show your imagination and rely on other people’s experience.
It is better to lay the laminate diagonally at an angle of about 45 degrees
Sawing laminate
To create the edges of the required shape, you must use an electric jigsaw. Only with its help can you achieve high-quality cutting and, accordingly, a smooth surface of the floor covering.
- Considering the existence of a gap between the wall and the floor, measure the distance from the penultimate bowl to the wall.
- Place marks on the board. Use a simple graphite pencil; it can be easily erased from the surface of the plank.
- Make a similar measurement on another board that will connect to this plank. Do not forget that the measurement should be carried out on the opposite side of the second board.
- Connect the marking points and saw the laminate along the contour indicated with a pencil.
To prevent chips and cracks from appearing on the outer coating, saw the products from the reverse side.
When choosing a laminate, pay attention to the length of the planks. You should not purchase boards that are too long, as during installation you can disrupt the geometry of the space. Much depends on the type of connection. Laminate with locks can be used immediately, but you cannot walk on the planks glued together until the composition dries completely.
Laminate diagonally in the interior looks very unusual. Such originality, it must be said, can serve well in the matter of visually expanding the boundaries of cramped spaces. You can do the installation yourself, which will help significantly reduce repair costs. The result of this work will be an excellent floor covering, which, if all operating rules are followed, will serve you for decades.
In what cases is laminate not installed?
Laminate will not always be a good option for flooring. There are conditions that make this type of coverage impossible or impose certain restrictions on use.
First of all, you should not lay a laminate flooring with glue (or any similar method) - not only does it look terrible, it also reduces the durability of use. Shrinkage of the building or temperature changes will cause the coating to simply move.
Interesting! Laminate is not a suitable option for those rooms where the natural air humidity is higher (this applies to saunas or baths, showers, open spaces, balconies and terraces).
If the humidity in the room is high, it is better to avoid using laminate flooring.
If the room requires high traffic or the constant presence of a large number of people, then it is better to give preference to another material that is more resistant to wear.
Laying technology: making the right choice
Remember that choosing the technology by which installation will be performed is a very important task that cannot be neglected. Here are the basic techniques.
| Method | Description |
| Adhesive installation | With it, laminate boards are secured using adhesive mixtures specially selected at the end. This method is good because it allows for good sealing of the joint areas, good waterproofing, lack of deformation and resistance to changes in temperature conditions. This installation is quite easy and simple. However, the disadvantages include the impossibility of replacing individual elements if they are damaged - only through complete dismantling. |
| Castle Click | This method is considered one of the most popular - the laminate is installed quite easily, the method is accessible even to beginners, and the boards using this system are attached at an angle, which allows you to quickly and conveniently dismantle the coating partially if damage or other deformation of the board occurs. |
| Castle Lock | The Lock method is similar to the “Click” method, however, the parts will be attached precisely in the horizontal plane - for example, when installing boards between walls or making a second row along the length, if the distance between the rows of boards is small. The boards are knocked down using a block and a hammer between two rows. All rows will subsequently be mounted in the same way, without changes. |
There are several ways to install laminate flooring
Installation features
It would be a good idea to pay special attention to how best to design the places where the panels come into contact with the heating pipes.
The first method is to drill a hole in the panel that will be about one and a half centimeters larger than the diameter of the pipe. This gap can be made on two joint boards by drilling a separate semicircle on each. Or, if you want, drill a hole in the board, and after that, divide the laminate sheet into two halves.
You need to drill a hole in the laminate board for the heating pipe
To seal the area where the panel meets cutouts and central heating pipes (or other elements that cannot be removed), use sealants.
As you can see, everything is very simple - laying a laminate flooring in a diagonal manner does not present much difficulty; it only requires accuracy and precision in drawing up estimates and counting the material. It is better not to start this method without planning. As a result, you will have a neat and beautiful floor with an unusual coating effect that you were able to create with your own hands.
The room looks more spacious, there is more visually defined space - this will be a huge advantage for apartments with small living space.
Laying laminate diagonally allows you to visually expand the room
During installation, please note that difficulties may arise when purchasing products from brands such as Cronotex, Berry Flour, Tarkett, Vitex and Pergo. The fact is that each of these companies has a number of developments that can affect how the panels move, what type of lock and its size. If you find that you have difficulty connecting blocks, then create rows with alternating short and long locks.
Interesting! The most accurate way to cut the material is with an electric jigsaw from the reverse side - this way you will protect the surface from chipping.
Laying laminate over a cement screed is usually done no earlier than a week after application. In winter, it is better to wait three weeks or even a month. To level wooden floors, use OSB boards, isolon or underlay.
It is better to cut laminate using a jigsaw
jigsaw
Two diagonal laying patterns
There are two ways to lay laminate diagonally: from the central axis of the room sequentially in both directions to the corners or from the far corner of the room through the center of the room to the opposite corner.
To work you will need:
- Jigsaw or hacksaw.
- Knife for opening packages.
- A steel bracket that allows you to fit the end of the last panel in a row. Without a bracket this will be very difficult.
- Plastic wedges. They are needed to maintain the distance between the panels and the walls.
- Roulette.
- Square.
- Mallet and die (for Lock locks).
- Pencil.
Choosing a laying angle
For diagonal laying, it is customary to start from an angle of 45° - this angle will allow you to use almost all sawn-off pieces of laminate during installation. There will be much less waste. However, there are times when the configuration of the room will dictate a different angle. Please note that an angle less than 30° will look bad. Acceptable angle sizes range from 30 to 45°.
Advice. Laying the laminate diagonally must be done with an assistant; it will be very difficult to do it alone.
From the center
With any installation method, work begins with installing plastic wedges around the perimeter of the room, which will remind you of the required distance between the flooring and the walls.
First, the first row of entire panels is assembled along the central diagonal axis of the room. The length of the last two pieces of laminate that will adjoin opposite walls in this row is measured from the end of the last intact panel to the plastic wedge. Save the remaining sections - they will fit on the other side of the row, and you will not need to saw the whole panel.
When the central row is laid, installation continues from it, first towards one corner, then the other. With an assistant, you can work in two directions simultaneously.
To install laminate in outer corners, you will need to mark three or more points on the panel. It’s more convenient to make a template and use it to saw off the panel to size. A piece of laminate cardboard packaging is perfect for a template. Or you can lay the coating tangentially to this outer corner.
Important! Laminate panels with a Click connection are inserted into the laid panels at a 45° angle, lowered and clicked into place. Before starting work, carefully check the possibility of laying the purchased model according to the “from the center” pattern. If the model you choose can only be laid in one direction, work will have to start from the corner.
After installation is completed, the plastic wedges are removed and the plinth is attached to the wall. Remember that laminate flooring is a “floating floor” and cannot be rigidly fixed. One more tip. Lay out the pieces remaining after cutting and try to use them in your work. Then even 10%!z(MISSING)apas will seem unnecessary to you.
We recommend: The best way to glue foam together is to choose a reliable product
From the corner
It is recommended to start laying from the corner with one whole panel. Both end sides are cut to the selected angle. The first whole panel (we consider it whole, it only has the ends trimmed) will set the direction for the entire floor.
Next, the installation continues towards the center of the room. We’ll leave the remaining corner for now; we’ll return to it later, using the remaining pieces of laminate.
To lay the laminate around the pipes, the panel is cut at an angle where the pipes pass, and cutouts are made in it using a drill to fit the pipes. It's even easier to make cutouts at the junction of two panels.
Laying the next row begins alternately with a whole panel or with half a panel if the floor covering is laid in a checkerboard pattern. When laying with an offset of a third of the board, the row begins with a whole board, the next one with a board 2/3 of the length, then a row with a panel 1/3 of the length. Then again the row starts with the whole panel. Both methods will not only make the coating neat and beautiful, but also increase its strength.
Important! Entire panels of one row are fastened at the ends. The length of the last two pieces of laminate that will adjoin opposite walls in this row is measured from the end of the last intact panel to the plastic wedge. Save the remaining sections - they will fit on the other side of the row, and you will not need to saw the whole panel.
You should be very careful to follow the direction of the tenon and groove in the row and in the panel you are going to cut. As the famous character of everyone’s favorite comedy movie said: “There’s no need to rush!” True, there they were talking about the return of a full-fledged member to society, and here - about the “fate” of one panel.
When the outer pieces for the next row are cut off, the entire already assembled row is removed from the connection with the adjacent one, completely assembled and only then finally fixed in the lock. It is for laying a long row that you will need the help of an assistant.
To cut panels intended for laying in the inner corners of the room, you will need to mark three points of the triangle. It’s more convenient to make a template and saw off the panel using it. A piece of laminate cardboard packaging is perfect for a template.
General Tips
Under no circumstances should you lay laminate flooring all over the entire apartment, especially if the flooring is installed in several rooms at once, in the hallway and in the kitchen. Try to ensure that each room has its own individual direction for laying the panels.
If parquet is used as a base, be sure to repair it so that it does not creak.
If you are still not sure that you will be able to lay laminate flooring yourself, it is better not to risk it and enlist the help of specialists. The overpayment for high-quality installation will more than pay for itself with long-term operation and no need for repair work.
Remember that laminate flooring is sensitive to water, so do not use water-based adhesives. Also avoid sand or fine gravel, which could scratch the finish. Once installation is complete, wipe the floor with a microfiber cloth.
You cannot use water-based glue, as most of the laminate does not “like” water
Laminate floors look noble, neat, they are durable and of high quality. Be sure to take into account the temperature and humidity in the room.
When laying, sort the scraps and try to use them as much as possible during installation.
Small-sized panels are well suited for diagonal laying.
Diagonally laid laminate: interior solutions
Try to experiment: for example, panels of colors that contrast with each other or just shades that are slightly different look good - this gives the flooring expressiveness.
You can use several types of laminate at once, alternating dies with each other - it looks unusual and stylish
There should be a slight difference in color from the walls - this is a general rule for room design. Try not to overload the room with dark or light colors in the interior.
If you are using light-colored laminate, it is best to opt for panels with a noticeably expressed pattern - this option is considered the most advantageous.
How to choose laminate flooring for your home
Light laminate laid diagonally helps make the room visually more spacious.
This coating also looks good in small spaces.
Diagonally laid laminate flooring looks great in the bedroom
Designers recommend choosing light-colored coatings if you want to make the room more comfortable.
You can lay laminate flooring diagonally in the kitchen - this is especially “useful” for small spaces
For rooms decorated in a modern style, laying laminate flooring diagonally is ideal.
Of course, dark laminate can also be laid diagonally - it will look good in offices and bedrooms
Laying laminate diagonally with your own hands
You can install laminate flooring yourself using this method. The technique is practically no different from the usual laying of laminate, but requires compliance with certain features. By following them, you can save money by doing all the work yourself.
Material stock
Before you begin preparation and installation, you need to make sure there is a sufficient amount of laminate. The principle of laying using the diagonal method is similar to the horizontal one, but the outer panels will be trimmed on both sides of the row, and the cuts will be triangular.
Due to geometric features, the diagonal laying method requires increased laminate consumption. The required amount is calculated in a fairly simple way - take the area of the room for standard installation and add 15% additional material.
For those new to styling, it is recommended to use this surcharge, although for experienced professionals it can be as little as 5%.
If you plan to use an angle of less than 45°, then there will be even more waste, which means increased material consumption. For this reason, 45° is the optimal laying angle.
Surface preparation
The preparation process for laying laminate diagonally is normal. The most important thing is a perfectly leveled floor. It is mandatory to use a substrate under the laminate, which performs many important functions, including smoothing out height differences, sound and heat insulation.
Important! The substrate allows you to smooth out mini-differences. Its presence does not mean refusal to level the floor and fill the screed.
The surface must be thoroughly cleaned of debris and moisture is not allowed. Otherwise, there is a high chance that the laminate will deform in the very near future.
Laying from the corner
This is the most commonly used installation method. It is best to place the long side of the lamella in the direction of the sun's rays falling through the window. In this case, the joints become less noticeable. The cuts behind the walls are covered with plinths.
The initial rows will consist of a trimmed trapezoidal board, the upper side of which is equal to the side of the trapezoid of the previous lamella in the row.
There are a number of tricks to keep in mind when using this method:
- To create a uniform cutting angle, you should make a single template according to which the lamellas will be cut;
- If there is more than one lamella in a row, it is necessary to cut off a small triangle at the first lamella on the left;
- Assembly is carried out along the short ends, after which the row is connected to the already laid laminate;
- During the installation process, you need to tap on the short ends to compact it, but this must be done carefully - they are much more fragile than the long side;
- The last row with this type of installation is formed by cutting the lamella to the format of a small triangle.
The rest of the installation process is standard.
Let's sum it up
In the article, we outlined the basic rules for installing and laying laminate flooring made in a diagonal manner. Despite the fact that this is a rather labor-intensive and sometimes more complex process than installation using the traditional direct method, the result is usually much more advantageous and creates room for creativity and imagination. The room will look much more beautiful and original, often the appearance of the room is truly transformed. Use different colors and feel free to find your own solutions.
We examined the main advantages and disadvantages of this method, as well as the features of its self-installation. If you want your flooring to look good and harmonious, then we recommend that you choose this method.
Feel free to experiment, learn new things and get acquainted with interesting design solutions - and good luck in transforming your home!
Laying laminate diagonally
If you follow the instructions, the laminate is laid strictly vertically or horizontally. This is a standardized approach, which in geometrically complex rooms can even create additional difficulties.
You can add sophistication to the design by laying the laminate diagonally. This method does not in any way affect the service life of the coating or its reliability, but the room acquires a certain style, and in a situation where the room has rounded walls, protrusions and other geometric elements, the diagonal type of installation is much better suited.
Important! With the horizontal/vertical installation method, the coating lies parallel to the wall. Diagonal laying requires an angle of 30-45°. It is determined depending on the wishes of the owner and the geometric specifics of the room.
This installation method allows you to create the effect of increasing space. An interesting solution from a design point of view would be to use lamellas of different shades, which will visually increase the coverage area, focusing attention on the corner parts - for this, lamellas of a darker color are selected in the corners.