OBI is the largest network of Do-It-Yourself (DIY) hypermarkets and the leader in the number of services for customers in Russia. For more than 15 years, we have been trying to help you change your living space for the better: build a house, start renovating an apartment, express yourself in interior design or arrange a personal plot. Every idea of yours can be realized using materials, equipment, tools, furniture and accessories from the OBI catalog.
Today, the OBI online store and hypermarkets offer more than 45,000 products from the world's leading brands, reliable products from Russian manufacturers and OBI's own brands, which can only be purchased from us. Each of the 28 hypermarkets has everything for home, cottage and garden. We offer not only high-quality products, but also detailed instructions, advice and recommendations from specialists who will help implement any of your projects.
Beautiful furniture for dolls made of plywood: drawings and manufacturing methods
From plywood you can make almost any furniture for a toy house: beds, tables, chairs, cabinets, sofas, shelves. The furniture made according to the drawings turns out to be quite large, so it is suitable for both Barbie dolls and baby dolls.
Furniture parts can be glued or connected with self-tapping screws and furniture nails. Basically, plywood is taken, about 4 mm thick.
Plywood is an excellent material that is suitable for making beautiful furniture for dolls
What you need to make furniture:
Pencil and paper; Hand jigsaw; Fine sandpaper; Liquid nails or wood glue; Paints and varnish.
When assembling small furniture, it is better to use glue, because fasteners can damage the parts.
For all furniture parts, you first need to draw and cut out a template. Then trace it on the plywood and cut out the structural elements with a jigsaw. The edges are sanded. The parts must be connected to each other, and then painted and varnished or covered with fabric using a stapler.
Construction Features
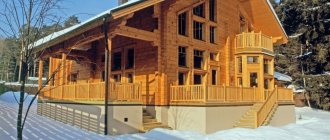
SIP panels (Structural Insulated Panel) are used as external wall structures. This is an environmentally friendly material with a base made of polystyrene foam 150 mm thick. Under high pressure, it is covered on both sides with sheets of moisture-resistant OSB-3 (class E1).
Standard-sized panels are factory-fabricated and then cut to fit the needs of a specific project. The power frame is made from chamber-dried planed boards (humidity 14-18%), all lumber is additionally coated with an antiseptic composition.
SIP houses are assembled “turnkey” on a pile-screw or strip foundation in 1.5-2 months. They have high sound and heat insulation properties, are not susceptible to insects, and are resistant to longitudinal and transverse mechanical loads. House construction technology allows you to hide internal communications in the walls and does not impose restrictions on the choice of materials for facade cladding and interior decoration.
The catalog presents projects of houses of various sizes, number of storeys and architecture. Any of them can be adapted to the specific wishes of the customer. We publish detailed drawings, descriptions of materials, equipment, and photos of finished objects.
Our advantages:
- Large selection of ready-made projects
- Internal redevelopment - free of charge
- Staged payment - 1% - 14% - 20% - 20% - 20% - 20% - 5%
- More than 2500 completed projects
- Own production of lumber
- Technical supervision during construction
- Warranty for SIP house - 7 years
For an additional fee, specialists are ready to lay in-house communications, carry out interior and exterior finishing work, install interior doors, mount gutters, and line the roof with soffits. You can separately buy a ready-made house project made from SIP panels from us or order the development of an individual architectural and planning solution.
Delivery of materials within Moscow and the Moscow region (within 100 km from the Moscow Ring Road) is free. For advice on choosing a project, please call: +7 (499) 650–50–18.
October 1, 2013
Most people don't have as much contact with any other part of the house as they do with their floors. From this point of view, surface finishing and the floor structure itself are very important. What should the floor be like? Not only beautiful, but also pleasant for the feet (preferably warm, comfortable and smooth), easy to clean, smooth, durable, not spoiled by dampness, protecting both from cold (if it is the first floor) and from noise (if there is another floor below). room). A chipboard floor satisfies many of these criteria, especially if it is a highly water-resistant laminated material. They turn out to be quite strong and even, but they are relatively rarely arranged independently.
Choosing material
The content of the article
1 Selecting the material2 Features of working with plywood3 Dollhouse design4 Features of finishing5 Design of windows and doors6 Let there be light!7 How to make a roof8 Photo options for different doll houses
You can make a doll house with your own hands from any sheet building material. The thickness of the material for a house about a meter high (on two floors) is 9-15 mm, for one-story houses it can be thinner. Let's look at the most common materials used in the construction of a dollhouse:
Plywood. An excellent choice, as it is durable, holds its shape well, can be glued, connected using nails and self-tapping screws. Cut plywood with a metal saw (with a fine tooth) or a jigsaw (manual or electric). The ends will need to be sanded well so that there is no possibility of driving in a splinter. Upon completion of the work, you can varnish or stain, paint, wallpaper, etc. Houses for dolls are most often made from plywood and drywall. After the repair, there are scraps left that can be used. To fasten the sheets together you will need tin corners (you can use a perforated corner). You will have to attach it with special screws, but they will stick out from the back, so this is not the best option. You can try to “plant” it with glue, but you will have to align the cut lines to reduce glue consumption. A dollhouse made of plasterboard is one of the possible options for OSB. The properties of the material are similar to plywood, the only difference being that it is moisture resistant and made from wood chips. Working with it is approximately the same as with plywood. OSB is also a good material Cardboard. The most inexpensive and most delicate material that does not hold loads very well. The situation is better with cardboard for scrapbooking (you can buy it in craft stores). It is denser and more durable; it can be made into one-story houses or used for roofing. Connect using glue or staples from a stapler. To make the dollhouse more reliable, it is better to assemble a frame from planks and then cover it with cardboard. A house for Barbie or other not very large dolls can be made from regular chipboard or laminated chipboard (LDSP). The advantage of this material is that it can already be finished. If you wish, you can order sawing of the entire “box” of the house with gluing of the edges from some furniture company. Then all that remains is to assemble. Moreover, it will be possible to use screws or furniture fittings. There are three disadvantages - the material is too thick, which increases weight, formaldehyde emissions and fragility under lateral loads. If you can put up with the thickness and weight, then the release of formaldehyde should not be ignored. You need to look for ones with emission class E0-E1. Unfortunately, there is nothing you can do about fragility. Unless you use corners to connect parts, and this is not very beautiful. A chipboard house can support the weight of a child. Furniture panels. They are made from wooden planks glued together using wood glue. An ideal option for making a dollhouse: environmentally friendly, durable, easy to process. But furniture panels cannot be called cheap, although they are not as expensive as solid wood. In any case, it can be used to make a box - the bottom, side walls and ceiling. The roof and back wall can be made from other materials (for example, fiberboard, plastic, etc.). Furniture board is an environmentally friendly and beautiful material
We recommend: Do-it-yourself foundation: stages of work and step-by-step instructions
There are also such options as laminate, wooden lining, thin planed board. But they don't work with them that often. In any case, the minimum thickness of materials is 6-7 mm. Then the dollhouse will be reliable and will even support your child.
Features of working with plywood
Most often, plywood is used to make a dollhouse. As you probably know, it can come in different brands. It is better to make a dollhouse with your own hands from sanded furniture plywood. You can use them from coniferous trees, but preferably from birch. It’s better not to take a construction one, even though it costs twice as much.
In general, working with plywood is not difficult. If you have a jigsaw and a jigsaw, cutting and preparing the parts will take a couple of hours. The only difficulty that may arise when making a two-story plywood doll house is the installation of the second floor ceiling. T-fastening plywood is not the easiest task.
The glue is not very reliable, and trying to install screw-type fasteners into the end with a thickness of 6 mm is difficult - the material can split, even with pre-drilled holes (the thinnest self-tapping screw is 1.8 mm). There are several options:
- do it on nails (not very reliable, unless you coat it with additional glue);
- install corners at the bottom (not very nice);
- install a glazing bead around the perimeter, which will both support the floor and “work” as a ceiling plinth (the best option).
After cutting out the parts, all joints must be sanded well. First, use medium-grain wood sandpaper and gradually move on to fine sandpaper. Once the edge is smooth, you can begin assembly.
Cardboard houses
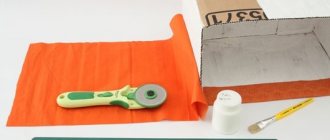
For this design we will need:
Note!
Do-it-yourself pom-poms: little tricks and elegant uses (55 photo ideas) DIY basket for all occasions: how different types of baskets are made + 63 photo ideas We weave flowers from ribbons with our own hands: 97 photos and videos of creating original crafts
cardboard; house detail templates; scissors and stationery knife; gouache or watercolor paints.
We are building a house:
If you have a large piece of cardboard, then do not cut it, but bend it in places according to the diagram, and then glue its component parts. we install interior partitions made of cardboard; they will serve not only to delimit space, but also to hold together the frame structure. Let's get started with renovations and furnishings!
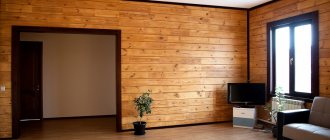
Finishing features
Decorating a dollhouse with your own hands raises no less questions than building it. In principle, you can use the same finishing methods as in apartments or houses. For example, in doll rooms, walls can be decorated in the following ways:
If you have chosen the option to “hang wallpaper”, it is easier to do this before the assembly stage. Even if there are several floors, the blanks are drawn out and wallpaper is glued. This is much easier than trying to cover the corners later.
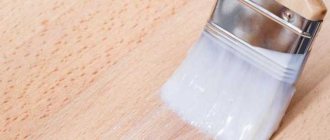
The exterior decoration is not much different. Painting is most often used. This is the best option in terms of practicality and labor costs. If you want, you can make something similar to decorative plaster. It can be imitated using gray toilet paper. You just need to choose thicker. It is torn into pieces, glued with PVA diluted with water (1 to 1), laid out on the walls, forming the desired relief. After drying, you can paint using acrylic paints. This and it can be used with colored or regular napkins.
What to cook
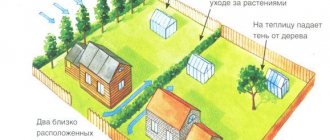
In fact, such buildings belong to the frame type. With good strength, they are light, warm, easy to install, and most importantly, their price is low. First of all, you will need to decide on the size of the building.
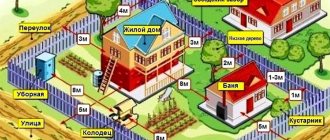
Note! Since the house will be small, it will only accommodate the necessary minimum of premises: a bedroom, which at the same time plays the role of a living room, a kitchen and a bathroom. For them, a building with sides of 5x5 meters or 6x4 is quite enough. On these 24-25 square meters it will be possible to comfortably accommodate all the necessary rooms.
Materials you will need
This material is needed for external wall cladding.
Based on the size of the building, purchase the required amount of material:
8 FBS blocks (solid foundation block); cement and sand; 20 linear meters of beams, section 15×15 centimeters; boards for arranging the frame, rafters and floors, with a cross-section of 5×15 centimeters; sheets of moisture-resistant plywood (FSF brand), its thickness should be 1-1.5 centimeters and the usual FK brand; PVA glue, with mandatory marking “for woodworking”; roofing felt or similar rolled waterproofing material; moisture-protective composition and antiseptic; bitumen shingles for roofing; heat insulator, preferably mineral wool; fasteners - self-tapping screws, nails.
Tools to prepare
Prepare the following tools:
drill and screwdriver; carpenter's hammer; chainsaw, electric jigsaw, wood saw; plumb line, angle, tape measure, laser and bubble level; tassels; container and shovel for mixing the solution.
1
Advantages and disadvantages of plywood for construction
Plywood is a fairly versatile material. It is applicable for finishing premises (internal and external), creating furniture, in the production of ships, for making children's houses for Barbie dolls and other toys.
Over the past decades, the material has undergone significant changes and improvements. There are fewer disadvantages, and the list of advantages has increased:
We recommend: DIY iron door: making and installing an iron door yourself
1. High strength indicators. It is not so easy to choose a material that will last a long time both in children’s hands, and as a house for a cat, and when building a dog house in the yard.2. Ease of processing. Plywood sheets are easy to paint, drill, saw, and are easy to fasten with simple nails, furniture glue, and self-tapping screws. Even a beginner can work with the material. They cut plywood in all directions and from any point.3. Good appearance.4. Thermal conductivity. Plywood products are always warm to the touch, this is important if the structure is intended for a child or pet.5. Price. Wood-laminated material is budget-friendly, since expensive pieces of wood are not used in production. The time required to produce plywood is minimal and there is virtually no waste. All this allows you to significantly reduce its cost.6. Wear resistance. Initially, the material was conceived as a more durable and wear-resistant replacement for wood. All layers are assembled and pressed in such a way as to eliminate the shortcomings of the previous layer.7. Versatility of use. Plywood tolerates shape changes and bending well. There are no cracks or deforming bends on it.
But there are also some disadvantages:
1. Specific sizes. Plywood has clearly established parameters of 1 m 525 cm by 1 m 525 cm. But it is still possible to make the sheets thicker by gluing them together. But it won’t be possible to reduce it.2. Exposure to bad weather. Plywood does not tolerate high humidity. But it all depends on the type of material (moisture-resistant, fiberboard, laminated, construction). If the finished product is intended as a yard building, carefully select the type of plywood.3. Instability to moisture. Since plywood is glued layers of thin wood, it has the ability to absorb large amounts of liquid and swell. The glue is also susceptible to destruction when left in water for a long time.
Plywood is a universal material that does not require complex practical training when using it. It is enough to have some skills in handling common household tools.
We recommend
Do-it-yourself children's house - how to design and build for the joy of your baby? Laying plywood on a wooden floor under linoleum without the help of specialists Laying plywood on a wooden floor under linoleum without the help of specialists
Completion: arrangement of roof and ceiling
To build a roof, timber is used as rafters.
Roofing diagram for a frame house.
It should be secured with staples to the top trim. For rigidity, you can use jibs. The rafters must be installed strictly level, otherwise the roof will be skewed. After they are installed, the sheathing is performed. It can be made with low quality boards. This lathing will give the required rigidity to the structure. After this, screw the plywood sheets onto the self-tapping screws. A waterproofing material is placed on top of it to protect it from moisture.
Such material could be roofing felt. It is laid in 2 layers, the joints between the layers do not intersect. This will provide additional protection. Light roofing material, for example, bitumen shingles, is laid on roofing felt. Its installation is quite simple with good performance characteristics. After this, the pediment of the house is sheathed.
The ceiling is made by covering the beams with plywood. The beams are located in the upper frame and secured with brackets. The distance between the beams is 60 cm. This allows you to use roll insulation and securely fasten the plywood sheets. Plywood is secured to the beams with self-tapping screws.
Insulation is rolled out onto it. A layer of waterproofing is placed on top of it. On top of it are plywood sheets. The sheets should be staggered so that the joints below and above do not coincide and gradual destruction of the insulating material does not occur.
How to make a dollhouse with your own hands from plywood: step-by-step guide
After cutting out the parts using a jigsaw or hacksaw, you need to carefully sand them with fine sandpaper, and then begin assembly. At this stage, windows of arbitrary sizes are cut out and also carefully processed with sandpaper.
In order to make a high-quality house, it is better to prepare the tools for work in advance and become familiar with all the nuances
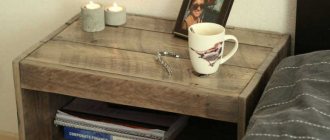
Making a house step by step:
The side walls are attached to the base using self-tapping screws and construction glue, and then the ceiling of the second floor and internal partitions. The roof is installed. Decorative tiles made of cardboard, colored paper or other materials are glued onto the roof. Next, the house is painted with paints (acrylic, gouache, watercolor); The rooms are covered with wallpaper, fabric, film. The floors are covered with pieces of linoleum, laminate, carpet, felt. Furniture and interior items are placed.
Near the house you can make a small garden, placed in a box, in which trees cut out of cardboard will grow.
If the parts were not cut too smoothly and a gap has formed between them, then it can be covered with wood putty and then painted over.
Continuing the process: practical recommendations
The process of insulating the walls of a country house.
After this, insulation is laid between the boards. It is secured with special nails with large heads. This prevents it from rolling down as a result of use. On top of the laid insulation mats, another layer of vapor barrier is attached, shooting it onto the staples with a construction stapler. Screw the plywood sheets on top using self-tapping screws using a screwdriver. Non-moisture-resistant 9 mm plywood is suitable for internal cladding.
The floor is laid on joists. They are fixed in the lower harness. Cross members are attached between the joists, which will prevent the floor from sagging and make it rigid. If the floor is planned to be warm, then its structure will differ little from the wall one. That is, sheets of plywood cut to size are laid on the floor sheathing between the joists.
The resulting structure is covered with a waterproofing film, which is overlapped and secured with staples using a construction stapler. After this, insulating mats are laid and cut to size. On top there is a layer of vapor barrier, secured with staples. Floor plywood is laid on it. This will be the finished floor. You can lay finishing flooring on it, for example, linoleum, laminate, parquet boards. To make the floor even stronger, you can lay plywood in 2 layers, and the joints of the plywood sheets should not intersect.
Related article: Using curtains instead of doors
How to make a roof
If the roof is planned to be ordinary - gable, the layout of the attic space or attic floor must be done so that there is a partition in the center that will support the roof at the junction of the two halves of the roof. This is the easiest way. There are also more complex ones.
The roof on a dollhouse can be made in different ways can be made in different ways
If you need a roof of a complex shape, we cut out several rafters from plywood that will define the shape. We attach them to the walls and cover them with some flexible material. It can be cardboard, fiberboard. The ends of the rafters are coated with glue (preferably carpentry glue), after which the material is laid. If the bend is too steep, additional fasteners may be needed. Usually thin small nails, like shoe nails, are used.
Photo of a dollhouse with your own hands
Sources:
- https://rubankom.com/stroeniya/doma/1896-dom-iz-fanery
- https://obustroen.ru/stroitelystvo/koncepcii-domov/tipy-domov/dom-iz-fanery.html
- https://kitchenremont.ru/komnaty/detskaya/kukolnyj-domik-svoimi-rukami-iz-fanery-skhema
- https://stroychik.ru/raznoe/kukolnyj-domik-svoimi-rukami
- https://sdelajrukami.ru/kukolnyj-domik-svoimi-rukami/