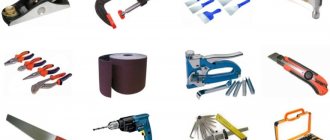
Necessary tools and materials for work
To make a basket from newspaper tubes with your own hands, you will need the following materials:
- old newspapers, magazines or advertising leaflets;
- scissors;
- universal glue or glue stick;
- stationery knife;
- water-based brush and stain;
- cardboard or thick paper for making the bottom;
- scotch;
- an oblong knitting needle with a diameter of 2.5 mm or a thin kebab skewer;
- clamps for strong fixation;
- container for diluting paint;
- ruler;
- pencil;
- varnish;
- heaviness for oppression.
Basket weaving methods
The widespread popularity of making beautiful baskets from newspaper tubes has provoked the development of new techniques. If previously it was possible to weave a basket only using the method indicated above, then modern craftswomen do not sit still.
They come up with new ways to weave blanks, as well as various schematic patterns. To learn more about each type of weaving, we suggest looking at a summary table describing the methods.
Suitable as a gift
| Technique | Description | Where is it used? |
| Spiral twisting | The technique is considered one of the simplest; judging by the reviews of needlewomen, even a schoolchild can cope with it. The essence of the method is to gradually increase the height of the product due to the circular interweaving of the tubes. Each new workpiece is superimposed on the previous one in a spiral. | Used to create tall baskets for decorative purposes, as well as attractive vases of unusual shape. Using this technique it is easy to make a stylish piece of interior decor. |
| Layer-by-layer | The technique involves making a basket from several tubes at once. To make weaving easier, first perform several rows using the rope technique, insert additional tubes into the support holes and begin to braid the walls in a circle with each tube at the same time. | It is used to create baskets of various shapes, as well as to design patterns on the surface of products. It is worth noting that the racks should be an order of magnitude stronger than the braiding blanks themselves. |
| Rope | This weaving method was discussed in the master class above, where a step-by-step guide to creating an original but simple basket for beginners was discussed. | The weaving technique is used to create simple round and square products. This method is suitable for training beginning craftswomen. |
| Spiral weaving | The technique should not be confused with spiral twisting - they are fundamentally different. This method involves weaving at an angle | Spiral weaving is suitable for making small and tall items, such as narrow baskets, glasses, vases. |
| Pigtail | There are 2 types of this method - edge and overhead. The first option is used to weave the stand counterclockwise, with the tubes leading outwards and inwards. The overhead technique involves the use of several twists at once, braided with the edge. | Baskets made with this weaving look more elegant. The texture of the pattern resembles a real willow basket. |
| Openwork | It is not difficult to recognize this weaving - it looks like lace. It consists of holes and patterns. The technique is a synthesis of simple and complex techniques. | Original baskets made of openwork weaving can be open or closed. They are well suited for presenting a birthday gift as a packaging box. |
The weaving methods discussed will help you better understand how to properly make a basket with your own hands. For beginners, it is better to use the rope technique or spiral twisting; more detailed descriptions of these techniques will be presented as the material progresses.
How to make newspaper tubes
Paper vine can be made as follows:
- cut strips of 7-10 by 30 cm from the starting material with a stationery knife;
- lay the strip vertically and begin to twist it diagonally using a knitting needle located at the bottom left at an angle of 30 degrees. Having reached the end, you need to glue the corner to the base of the workpiece;
- pull out the knitting needle and leave the tubes to dry for 15-25 minutes;
- When folding strands, it is advisable to make one end slightly wider than the other to lengthen them during the working process.
There is an even simpler option for making newspaper vines without twisting. It is necessary to cut strips, as for forming tubes. And fold them several times lengthwise to form edges of equal width. They can become material for ordinary wicker, which will serve as the bottom of the basket.
New fashion
Baskets fit very nicely into the interior. They are also made from tubes.
Make a lot of paper blanks. We take the same arsenal of tools as for the vase.
- Let's measure equal sections on the newspaper, cut them and make tubes.
- We weave the bottom according to the pattern above, using tubes.
- Now we weave the bottom in a circle, monitoring the number of flagella.
- If suddenly the size of the tube is not enough, then take another one. Insert it into another, having previously coated the tip with glue. Do not press the material too close! The paper may tear or fall apart, and you will have to redo the whole job.
- For the base, it is best to take a box on which we make marks, as in the photo.
Article on the topic: Knitting on a fork: patterns for connecting stripes with photos and video master class
Here the box is the base, which does not need to be removed. Essentially, we weave it around. The upper tube-stands need to be secured with clothespins so that they do not move out.
- If desired, leave a space for a ribbon or accessory.
- Handles can be made as follows: we twist several blanks, glue them to the craft, and then go through ribbons and blanks.
Staining the tubes
You can easily paint a basket made from newspaper tubes with your own hands. You can paint both the finished product and paper blanks.
For strength, the created craft must be thoroughly soaked in PVA glue and allowed to dry.
It is better to dilute it with a small amount of water and apply with a brush. Then they paint with acrylic paint or stain in several layers for an even shade. If desired, you can add different dyes or colors - paste. To get an even tone, you must first coat it with any product that has a coloring pigment: brilliant green, iodine, food coloring, gouache, tonic.
It is better to paint newspaper blanks before starting work, since unpainted gaps will not be visible. A special fabric dye, water-based acrylic polymers, stain and food coloring agents are used. The stain is suitable for painting white tubes; they look like natural vines. The main shades are oak, coffee, mahogany and walnut.
To paint long workpieces, you need to make a device from a piece of large-diameter polypropylene pipe.
Both ends must be cut off and a plug (plastic jar) glued to one of them with PVA glue, which will prevent liquid from leaking out.
Then you need to pour the coloring agent into the pipe, not reaching the top a little, and place it on a special stand.
Next, you need to take several tubes and lower them into the solution. After impregnation, they should be pulled out and immersed in the coloring liquid with the other side. During the dyeing process, it is advisable to add emulsion to the container for good dyeing of the source material. At the end, all the workpieces are laid out on a level place and dried in the shade in the air.
Short strands are painted in a bottle with a spacious neck. It is necessary not to completely fill the container with dye. Then lower several tubes there and shake them for uniform painting, then turn them over and repeat the maneuver. Place on a smooth surface, dry and paint a second time to achieve a rich color.
To prevent the workpieces from becoming wrinkled, you should lay a piece of thick paper around the circumference of the bottle or pipe.
Progress
MK: Let's try to make the first straws. Craftsmen say that it is better to use office paper or parchment for work. But such material is expensive, it’s better to take several packs of unnecessary newspapers - an excellent recycling option for beginning needlewomen.
Progress. We will take:
- old newspapers;
- bottle;
- brush and good glue;
- knitting needle with scissors;
- cardboard;
- pencil and ruler.
- Using a ruler, divide the newspaper into 10 cm strips.
- We take a knitting needle. We will wrap the stripes with it. Place the knitting needle at an angle to the newspaper.
- Apply glue to the ends, secure - we get a tube.
Advice - make as many preparations as possible. After all, the types of weaving are varied. And in the process of work it is better not to be distracted, because the vine can unravel. Another important rule is to take a box, fold the blanks, placing them vertically. This is necessary so that the tubes do not stick together.
Vases made from this material are very beautiful. Firstly, making it yourself is cheaper. Secondly, such a product will last longer than a purchased one and will be pleasing to the eye.
Let's take:
- tubes;
- glue;
- scissors;
- skewer or knitting needles;
- napkins;
- varnish;
- brush.
- We weave the bottom of the product. For it we use 12 tubes. We put it crosswise. Watch the distance between the tubes.
- In weaving we use two working tubes. We fold one in half and braid 3 tubes with rope. We hold them so that nothing is broken.
Related article: How to wash pillows filled with holofiber
- In this way we weave 4-5 rows.
- We increase the distance during twisting. Now we braid 2 tubes each. After the 4th row we use only one tube.
- In total we get 12 rows - the end of the weaving. Bend the ends using a stick or knitting needle. Now let's take scissors, trim the ends, and secure them with glue. The flagella need to be raised.
- The flagella are raised up.
- Take the base form. The success of the product depends on it. The ends must be secured. To do this, use an elastic band and secure it at the top. This is necessary to make the work easier.
- We gradually braid the flagella.
- We get 20 rows to the middle.
- Craftsmen always advise deciding on the size of the product before starting work. You can stop at this size (pot), or you can continue to the size of a tall product. For the base, take a pipe, but even without it you can make a weave. Just make sure the size is even.
- This is the height we get.
- Make a simple fold inward, it turns out beautiful and interesting.
- Now you can paint the product. Take glue and water. Add water to the glue and coat the piece. Make sure there are no bubbles. Dry for 30-40 minutes. Cover the product with acrylic paint of any color.
- Cover the top with varnish. Advice - when purchasing paint, consult with the seller. Don't assume that cheap paint will be better. If you want to preserve the shape and color, spend money on high-quality varnish.
- You can decorate with interesting designs - decoupage.
Methods of weaving from newspaper tubes
A do-it-yourself basket from newspaper tubes can be woven in two ways: solid and openwork.
In addition, there are different types of weaving, the main ones of which are:
- Simple weaving. Consists of making a frame of rigid paper tubes.
First, the narrow tip of the workpiece is fixed to one of the twigs of the frame and braided with a newspaper vine through one around the remaining parts of the frame at the back and front. You can use several lines and alternate twisting through 1-3 warp rods. - Layer weaving . Allows you to create a dense and reliable craft. It is necessary to wrap the cord around the first four supports and leave it sticking out to the side. Place another rope near the last braided post and braid the next 4 parts of the frame with it. It is necessary to add new tubes until the place where the wrapping began is reached.
- Openwork weaving . The technique is selected based on the intended pattern: columns, diamonds, stars. Most often, this type of twisting serves as a decoration for other types of work, forming carved holes.
- Rope weaving (spiral) . The principle is to wrap the vines not only around the supports, but also to intertwine them with each other. For a simple design, you need to take two tubes and braid the first post at the back, and the second at the front. The next support should be done in reverse, and the third one the same as the first. Then alternate in the same sequence.
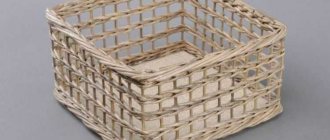
How to make a square basket
Attached below will be a photo of the finished baskets made from newspaper tubes so that you have an idea of how the product should turn out.
Let's start from the bottom. Cut out a square of cardboard slightly larger than you plan to make the bottom of the basket.
Draw it into small squares measuring ~2x2 cm. On one side of the cardboard, make holes at the points of intersection of the lines, i.e. in the corners of the square. There should be one row of holes.
Please note that there must be an odd number of holes. Pass a tube into each hole so that its long edge sticks out from above and the short edge lies under the cardboard. These will be the foundations of our bottom. Weaving will go from bottom to top and from left to right.
Take a new tube and place it perpendicularly on top of the leftmost tube sticking out of the cardboard base. Then pass this tube under the second one sticking out of the base, then put it again on the third one, and so on.
If your working tube runs out, but the ones sticking out from the base remain, glue a new one to the end of the working tube and continue weaving.
When you finish the row, leave the edge of the working tube sticking out. Take a new one and do the same steps, only this time start under the tube.
When the two rows are woven, insert between the horizontally protruding edges one more tube on the right and left, parallel to those protruding from the cardboard. Push them firmly towards the middle. During the weaving process, this action will not need to be repeated.
Start the next row from the top and grab the first two, then one from the bottom, one from the top, and so on. The last two must also be captured together.
When you reach the end of the row, fold the edge sticking out horizontally under the two outermost vertical tubes and continue weaving in the opposite direction.
Make two rows with twists, and then take a new tube. Repeat all steps until you reach the end.
The last tube should stick out to the right. Take two tubes and weave two rows on top without bending. Leave the ends sticking out on both sides.
Now you need to make the bottom rim. To do this, we will use rope weaving. From the upper right corner we take the end of the outermost cord sticking out to the right. If it sticks out from above, we bend it down under two tubes, if from below - into two.
We also bend the next cord, which has now become the outermost one, down under or above the tube, depending on its original position. We continue weaving with rope.
If any ends protruding from the base are not long enough, glue an extension to them. It is better to weave the headband in 2 rows to make the structure stronger.
When finished, cut the ends of the cord that we used to weave the headband and glue them inside.
When the base is tightly fastened, you can begin weaving the basket itself. For convenience, place a box or arc press on the bottom that matches the shape of our future basket.
Bend the tubes protruding from the base upward. These will be the racks on which we will weave the walls. At first, of course, they will not all stay upright. The main thing is that the stands you are working with are in place.
Take the cord and glue its edge to one of the posts, but not to the corner one. Start weaving the same way you wove the bottom. The corner posts will be double, always go around them together.
Continue weaving until the basket is the height you want.
You can use a different type or weaving technique, or even alternate. They are described above. A rectangular basket is made in the same way, only make a rectangle at the base instead of a square.
Soak the finished product well with glue and leave to dry.
Weaving baskets of different shapes
Baskets made from newspaper tubes have different shapes. Even beginners can weave various configurations with their own hands.
Square basket
Sequence of making a square basket:
- You should start by forming the bottom. To do this, take a cardboard strip and bend it in half. Punch holes in the cardboard at a distance of no more than 2 cm. Insert an extended “work cord” into the resulting holes.
- A long vine should be woven near the cardboard. Having reached the edge, turn and weave in the opposite direction. To extend the “working cord” it is necessary to re-glue the paper blanks. The bottom width may become narrower and should be adjusted to the desired size.
- Then the side walls of the braid are formed. An oblong newspaper rope is required, which is bent in half and both ends are threaded into the bottom. The tails that appear from the bottom of the bottom must be bent upward and secured. The “working cord” must be made to the desired size depending on the required height.
- To fix the sides, you need to place a heavy thing in the center , similar to the shape of the future basket. Then attach the frame tubes to it using an elastic band.
- Start weaving from the bottom of the craft. Using a long piece, weave it into one side, alternating the placement of vertical strands, placing them at the back and in front.
- At the beginning of work, the tip of the “working cord” remains, which can later be used as one of the components of the frame . It allows you to form an odd number of vertical blanks. After the next row, the unoccupied edge should be braided. The procedure of weaving the sides is carried out in a circle until a basket of the required size is obtained.
Rectangular basket
To form the bottom of a rectangular basket, you need to cut out a template of the intended size from cardboard, place it along the edge of a twisted tube, and secure the structure with clothespins. Then lay newspaper blanks across the base so that each bundle in turn goes from below or above the base, and adheres to the desired grouping of weaving.
For some period, the craft should be covered with another paper cord and secured with clips. The bottom will become like a comb, and then you need to weave in new pieces, observing a checkerboard pattern and forming the desired density. If the bottom becomes strong enough, you can remove the clothespins because it can hold its shape on its own.
When the base is woven, ray-like strips remain, which in the future will be used as the basis of the frame, and with their help you can form frame walls. If the tube runs out, you need to add a new one. When decorating the edges, unnecessary ends are cut off and glued inside.
Punnet
To create a round-shaped product using the rope method, you need to follow the following steps:
- Take six strips of newspaper and use clothespins to make a solid surface.
- Repeat this manipulation again and fold both parts crosswise.
- Then put the paper vine into the work. Bend the workpiece in half and place its tip in the place where the cross is formed.
- Next, a circular bottom is woven. The work cord must be bent with each turn, which is made at an angle of 90 degrees. This maneuver, which forms a ring, should be repeated 4 times, and then fixed with clamps.
- The sides are woven in pairs. Place an oblong double paper vine exactly under the created bottom. The ends of the paired strands should be secured to the basket.
Oval basket
An easy way to create a basket:
- to create the bottom you need to take several newspaper blanks and weave them together in the form of an oval.
- fasten them by tying them together
- Having formed the base, you need to weave it according to the usual method.
- Having made the desired diameter of the bottom, wrap it and lift the tubes up.
- Secure the strands with clamps and continue weaving.
- After finishing the work, secure the edges in the usual way.
Corner basket
When weaving corner crafts from newspaper bundles, it is advisable to follow these rules:
- To make stands, it is advisable to use a vine from a whole sheet of paper for printing or use magazine source material. Soft blanks will not be able to withstand the braid.
- When designing a basket, to form a uniform bottom, you should place a weight on it, paying special attention to the corners of the product.
- For painting, it is necessary to accurately calculate the required amount of acrylic coating, because if you add another shade, the color will be far from ideal.
How to make a round basket
Take 6 tubes and secure them with a clamp. Take the second 6 tubes and also secure them with a clamp. Fold the sixes crosswise so that the protruding ends are the same size, and glue them together. This is the basis for the bottom.
Let the top six lie horizontally. Take a new tube, we will call it “working”, place it under the bottom six on the side farthest from you and bend one edge to the right so that the working tube seems to take the six into a loop. There will already be 8 ends sticking out on the right.
We bend the lower end of the working tube toward ourselves from above the six, and the upper end from below. Now 8 ends are looking at you. Fold the bottom edge again from above, and the top edge from below, as before. Repeat 6 more times.
Now we bend the edge of the working tube sticking out from above not under the entire six, but only under two tubes, then two, then two.
We repeat the same with the bottom edge. We complete the circle in this way and add a few more to it. The number of circles depends on what size basket you want.
Then we begin to braid not every two tubes, but every first one. We weave according to the same principle until we reach the desired bottom size.
We cut off the protruding ends of the working cord and glue them inside. The ends sticking out from the base will be the supports for the walls of our basket.
We weave the walls using the same principle. Also, do not forget to soak the finished product with glue.
Master class: a simple basket made from newspaper tubes
A simple model of a basket made from newspaper tubes is created with your own hands in this way:
- Use a knitting needle to twist 30 strands of newspaper strips, 10 cm wide.
- Using a jar, cut out 2 circles from cardboard. Flatten the tubes for the frame on one edge by 3 cm and glue them to one of the circles with the flattened side.
- Glue the second circle on top of the first so that the ends of the paper cords are between them. Raise the blanks up and secure with an elastic band.
- Next, you should take the newspaper edge flattened on one side and pass it behind the tube located next to the right, pulling the edge further and bringing it in front of the next paper strip. To form the bottom row, you need to alternate the workpieces in this way, putting others into the hole when they are finished.
- Weave to the desired level, then trim off the excess ends and treat the basket with glue.
Checkerboard basket - weaving pattern
To obtain an original and stylish product from newspaper tubes, various weaving patterns are used. One of the simple but effective schemes is the “chess” method. This pattern can be achieved using rope weaving in two colors, as well as by making a basket with holes, where gaps alternate with filled squares.
The pattern shown in the photo is woven very simply:
- First, a rectangular bottom is made - it can be made according to the master classes above.
- After switching to raising the sides, another 5-10 rows are woven, and then checkerboard weaving begins.
- For each two supports, one newspaper tube is used, which interweaves them alternately in layers.
Tip Using this pattern you can weave not only an original basket, but also an organizer for storing magazines, as well as a decorative flower vase made of corrugated paper.
The “checkerboard” pattern can be used in a single color or two-color design. Some craftswomen skillfully intertwine more than two colors in one product: the result is a stylish and bright basket for needlework. It can be used for thematic photo shoots and filming.
A complex basket made of newspapers. Step-by-step instruction
A low, practical basket is made as follows:
- For the bottom you will need 13 newspaper tubes. 5 of them need to be placed side by side, and the remaining 8 should be laid out crosswise on top.
- Next, we braid the top in the form of a braid with one piece of paper.
- When the paper rope runs out, it should be extended.
- Weave the bottom in this way to the required size.
- Having completed forming the base, you should bend the tubes upward and braid them again.
- Having created 4 rows of walls of the future product, fix the main strips on the sides with clothespins and then form the basket. The entire craft is braided in two pieces.
- At the end, the edge is made with a figured volumetric weave.
- Hide and glue the excess ends.
- Pull out the clothespins, paint and varnish the basket.
What and how to paint newspaper tubes for weaving a basket?
It is better to paint newspaper tubes after the product is completely completed. If you dye them in advance, you risk ruining their good flexibility, making them unyielding, which will completely ruin the weave.
The finished product should be opened using acrylic or machine paints. Such paints are moisture resistant and do not flow when in contact with water. The paint can be applied in any way: with a brush, sponge, spray gun, spray gun, airbrush. Acrylic paints mix well and you can always choose the desired shade and color from them.
IMPORTANT: After the paint has dried, the product should be opened with a layer (or two layers) of varnish. This will allow the product to gain a glossy shine and become much stronger.
Photos of finished products:
Bright baskets for storing things
Products painted in natural vine color
Product painted with paint and decorated with ribbon
Multi-colored storage box
Bright bread box made from newspaper tubes
Edge decoration
When the basket is the desired height, it is advisable to hide the ends of the tubes that form the frame, secure and hide the workpiece. To do this you will need an extended knitting needle. It should be threaded through the hole near the stand in the middle for 3 rows. Repeat the same action in the other direction, then throw the stand over it and thread it down.
This will ensure that all the posts can bend. After finishing the work, you can get the finished edge. Lubricate the places where the racks hit with glue and let dry, then cut off all the excess ends of the workpieces. Carefully hide the sections among newspaper strips.
LiveInternetLiveInternet
Masters of weaving from newspaper tubes (and not only) create charming little things: baskets, boxes. vases and much more.
Types of weaving from newspaper tubes.
Simple weaving
Simple weaving - single tubes of newspaper are woven across one post in a continuous ribbon, layering one row on top of the other. For a continuous weave, there must be an odd number of posts, since an even number will not result in weave.
They begin to weave from the thickened part of the newspaper tube, laying it either on one or the opposite side of the racks. In closed products, the extension is carried out clockwise; in open products, after finishing one row, they go around the outer stand and weave in the opposite direction (Fig. 1, b). Simple weaving is often carried out with double and triple newspaper tubes (Fig. 1, c). A variation of simple weaving is weaving with single, double or more newspaper tubes and weaving them to the risers at a certain angle (Fig. 1, Ms). Author Andrey
Layer weaving
Layer weaving - through one stand with several newspaper tubes. In this case, newspaper tubes of the same length and thickness are required. Begin weaving with the thickened end of a newspaper tube, braid four posts and leave the end on the outside. There is no need to press the newspaper tube; it should be slightly raised. Starting the weaving of each subsequent newspaper tube from a new post on the left side, successively braiding four posts on the right, they reach the first, original post. Author: Elena Tishchenko
Weaving in rows
Weaving in rows. They are woven as follows: the thickened end of the first newspaper tube is placed under the posts and the weaving is carried out through one post to its end; the second newspaper tube is placed under the next stand and woven in exactly the same way as the first; then, starting from the third stand, weave with a third newspaper tube. This weaving order is continued until the row is completely woven; then weave the second row, and if necessary, the third. You can weave with one or two newspaper tubes.
The overlay of thin ends of newspaper tubes on thick ones gives a slender diagonal line due to the difference in their thickness, the result is a beautiful strip that spirally envelops the braid.
Square weaving from newspapers.
This type of weaving begins with the thickened end of a newspaper tube and is carried out from left to right through two posts (including the corner one) until about 10 cm remains from the top end of the newspaper tube on the outer side. The second newspaper tube begins to be weaved on the right side of the second post, They also weave through two posts, bringing its ends out two posts further.
Subsequent newspaper tubes are woven in the same way until a square is formed, that is, the height of the woven row will be equal to the distance between the two posts.
At the end of weaving the first row of squares, they begin to weave the second, but weave from the next stand and the top ends of the newspaper tube. The subsequent rows of squares are woven in the same way to the required height. Particular attention should be paid to sealing the weave where the newspaper tube goes around the posts.
Weaving with a rope Weaving with a rope is used to strengthen the upper and lower ends of the side walls and the racks of the base of the bottom, connecting individual elements during openwork weaving. Rope weaving means that newspaper tubes not only weave around the racks, but also intertwine with each other, tightly fitting the racks.
Openwork weaving from newspapers
Openwork weaving from newspapers - with open cells. The types of openwork weaving from newspapers are extremely diverse. It can be simple and complex. Complex openwork can reproduce patterns of lace, fabrics and various shapes.
As a rule, openwork is combined with other types of weaving from newspapers. Openwork weaving from newspapers gives the wicker elegance of form and decorativeness.
The photo shows examples of openwork weaving: a - with an asterisk, b-column, c - diamond, d - finishing in two newspaper tubes, d - half-diamond (wedge). Braiding a twist braid
Braiding a twist braid. There are two types of such weaving - overhead and edge braids. They usually complete the weaving of the walls.
False braids are woven separately from three, four or five pairs of newspaper tubes by simply weaving them together and then attaching them to the edges of the braids.
Edge braids are woven from the ends of the posts from left to right (Fig., a). Take one of the posts and, placing an awl under it, bend it outward. The second post is bent in the same way (Fig., b). The first post is passed under the second post with an awl and, braiding the next post, is brought inside (Fig., c). In this place, having removed the awl, leave a wedge and mark the beginning of weaving the bend.
The third post is bent under the first and left outside, and the second under the third and left inside (Fig., d, e). Then the first stand is braided around the fourth and taken out (Fig. 8, f, g), thereby obtaining the first three newspaper tubes.
The second stand goes around the fifth stand, goes out and gets the second three newspaper tubes (Fig., h). In the same way, the third trio of newspaper tubes is obtained.
Of the three newspaper tubes bent together, the outermost one is left on the right side, and the other two newspaper tubes pass in the same way under the bent second trio of newspaper tubes and the next stand and go out (Fig. 8, i).
They do the same with the next threes of newspaper tubes, always leaving the outermost newspaper tube on the right. Having reached the end of the weaving, the remaining ends of three pairs of newspaper tubes are hidden in a braid, and the rest are carefully cut off (Fig. 8, j, l).
Based on materials from E. Antonov’s book “Weaving”
PHOTO MASTER CLASS ON BRAIDING FROM NEWSPAPER TUBES
Source
How to make a pen
The easiest way to make a handle for a basket:
- You will need 4 long flexible ropes. For elasticity, it is worth spraying them with a spray bottle.
- Use clothespins to mark the places on the basket where the handle will be attached.
- Pass the tubes through the rows already made so that they are of equal length.
- Having obtained two rows of four strands, you should cross the parts. As a result, an even braid-curl should form.
- Make spirals until you get a handle of the desired length.
- Thread the braid through the braided model.
Newspaper basket lid
The lid for the craft is made similar to the bottom, and should be slightly larger than the size of the top of the original.
To make it you need:
- in the side surface of strong and even cardboard you need to make small indentations with a knife;
- thread a piece of paper through the holes on each side;
- wrap around the edges of the product, bending one element after another;
- Finally, hide the free edges under the lid;
- for handles, insert 2 pairs of tubes along the two upper edges;
- stretch them to the middle, bend them and intertwine them with each other;
- coat the edges with glue and fasten with clothespins;
- for a neat appearance, they should be lubricated with PVA again and rewound with paper.
How to make tubes from newspapers for weaving?
The size of paper tubes depends on the size of the weaving. If the item is large, such as a basket or vase, you need to use thick knitting needles and wide sheets of 10 cm. For small-sized crafts, a 6 cm strip and a thin knitting needle (1.5 mm) are suitable.
To prepare material for weaving, you will need:
- paper (newspaper is best for this job, since it is the easiest to roll into tubes and can also be painted quickly);
- You need to take glue for paper, the main thing is that it glues everything securely and is not very liquid;
- scissors or stationery knife;
- clothespins, used for fixing products;
- to paint products, you can take a stain or a mixture of color and construction primer;
- medium size brush;
- knitting needles of different sizes or wooden skewers are suitable for creating tube shapes.
It is also recommended to prepare a work surface, cover the table with oilcloth and take the necessary utensils.
The creation of tubes is carried out in several stages:
- Cut the newspaper sheet lengthwise into pieces, each about 10 cm wide.
- Place the prepared part of the sheet in front of you and place a knitting needle on its edge, so that an angle of 30 degrees appears.
- The corner of the newspaper must be wrapped tightly and pressed with your fingers;
- You should gradually turn the knitting needle, slightly holding the newspaper itself.
- Having reached almost the very end, you need to apply a small amount of glue to the corner of the paper and roll the products to the end.
- Carefully remove the knitting needle, clamp the edges with clothespins and let the glue dry.
To color newspaper tubes, place them in a small container and fill them with dye. The material should be dried on a lattice structure. It will be more difficult to paint a finished product; for such purposes, it is better to use a spray bottle instead of a brush.
Decorating a newspaper basket
You can beautifully decorate a basket of newspaper tubes with your own hands in the following ways::
- Through repainting . It is advisable to use moisture-resistant acrylic paints. The best option is to cover it in two layers, and the color saturation can be controlled by covering the craft with additional layers. You can decorate a multi-colored basket with several shades, or apply any thematic images to the surface of the basket.
- Using multi-colored satin ribbons . To do this, you need to leave room for them during the weaving process. It is advisable not to braid the craft at a level that corresponds to the width of the decorative components. After completing the formation of the basket, you just need to lay a ribbon between the paper blanks and secure it with glue or thread. A basket made from newspaper tubes with your own hands can be made in any shape, decorated with various ribbons, flowers and other interesting details.
- Pasta in the form of various figures . Before gluing, they must be treated with an aerosol of a golden or metallic hue.
- Leather flowers . To make them, you need to take artificial material and cut out drop-shaped parts for the petals and oval, sharp-angled parts for the leaves. To bend the components of the flower, it is advisable to hold them over the fire using tweezers.
- decorated using the decoupage technique will look like a real masterpiece. To fix the image, varnish is used.
A DIY basket made from newspaper tubes will be an excellent decor for any room, be it a bathroom, living room or dining room. The main thing is to create with positive thoughts and love. The creative process of making newspaper crafts helps relieve stress after everyday life and redirect attention, and the created models will decorate any interior.
We weave a basket
There are many different weaving techniques, simple and complex. The basket can be round, square, triangular, or almost any shape, at the discretion of the master.
Below we will look at several weaving options, and then we will provide detailed instructions on how to make a basket from newspaper tubes for beginners.