What do we need?
The list may seem long, but all of its components, as a rule, are found in almost any home.
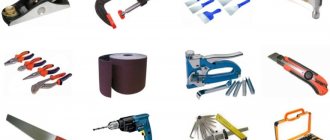
To weave an original basket from newspaper tubes, you must have:
- Actually, newspapers. In principle, any waste paper will do - magazines, leaflets, whatever you find;
- Scissors and stationery knife;
- PVA or glue stick (although you can use a glue gun, “Moment” or any other, at your discretion);
- Cardboard, thick paper for the bottom of our basket;
- Scotch tape, ruler;
- Simple pencil;
- Varnish;
- Any heavy object will be needed as a press;
- Knitting needle 2.5 mm in diameter (You can use narrow kebab skewers)
- Clamps, several pieces;
- Container for diluting paint;
- Stain on water;
- Brush.
That's all. We stock up on everything we need and we can get started.
Making newspaper tubes
These will serve as vines for our basket. To make a tube you need:
Cut a strip measuring 10 x 30 cm from a sheet of newspaper (or magazine, depending on what you are using).
Then place a knitting needle or skewer on the lower left corner of the paper strip at an angle of ~30 degrees, and using the knitting needle, begin to twist the strip into a tube.
Try to roll it tightly so that the tube does not fall apart, and make one edge slightly wider than the other. This will be convenient for us later.
We recommend reading:
- DIY polymer clay jewelry: review of the best master class with step-by-step instructions for beginners (150 photos of original ideas)
DIY polymer clay flowers (120 photos of the best ideas) - simple instructions with full description + master class and video tutorials
Quilling for beginners (200 photos) - step-by-step instructions with description. The best master class on creating quilling crafts with your own hands
Having reached the end, glue the protruding edge to the body of the tube. Pull out the knitting needle and leave the glue to dry for 15-25 minutes.
Make more of these tubes so that during the weaving process you don’t suddenly find that you don’t have enough material. On average, there are about 50 tubes per basket, for example, with a diameter of 15 cm.
If you get tired of constantly twisting, then the vine for the bottom can be made differently, in a simpler way: to do this, simply fold the same strips lengthwise to form narrow long edgings equal in width.
Basket weaving patterns
There is a huge variety of patterns for weaving such baskets, from the simplest to quite complex and requiring great care, as well as the skill of the needlewoman. For a girl, this is not just a way to decorate her home with unusual household items, but also a good way to earn money while on maternity leave.
The secret of weaving itself is very simple - for such baskets made of paper tubes you do not need any expensive material - any paper or even ordinary newspapers will work perfectly.
All this splendor is held together with regular varnish and then covered with spray paint, which allows you to create a truly beautiful and unusual piece of furniture.
There is even a whole master class that allows you to learn how to weave a variety of baskets yourself at home absolutely free of charge.
Detailed instructions combined with a variety of photos provide not only a good basis, but also wide scope for the needlewoman’s imagination. Thanks to this, even the simplest things have their own charm.
We paint the blanks
In principle, it is not so important whether you paint each tube individually or a ready-made basket. It is, of course, easier to decorate the finished product, but in this case there will be white gaps. Here the choice is yours.
Before painting, it is better to protect all surrounding surfaces - lay newspaper or unnecessary cloth on the floor or table, depending on where you are working, to avoid long and labor-intensive cleaning.
We recommend reading:
- DIY paper orchid - a review of the best ideas and tips from craftswomen. Step-by-step instructions + master class (photo + video lessons)
DIY paper hyacinth: the best master class for beginners with step-by-step instructions and diagrams from A to Z (130 photos)
- Paper stars - instructions on how to quickly and easily learn how to make beautiful stars with your own hands (100 photos of finished works)
In the list above, stain is listed as a paint. It is well suited for white tubes - the color will be as natural as possible, close to the color of real wood, from oak to walnut. You can also use any other coloring material - batik, acrylic or even food coloring.
Since our tubes are long, you can use any non-metallic tall vessel, preferably with a large diameter, as a container for painting.
If you don’t have something like this lying around the house, you can make it yourself: take a polypropylene pipe, cut it off at both ends and glue a plastic cap on one end - a jar lid or something similar. Ready. You can start painting.
Pour dye into the container. Make sure that the liquid level is below the height of the tubes so that they don't sink headlong, and you don't have to fumble around in the paint looking for those unfortunate tubes.
Dip several blanks into the paint, wait a little, then pull them out by the unpainted edge, turn them over and lower them the other way. Wait again, then remove and lay out to dry on a flat surface.
We recommend reading:
A paper crown is a simple instruction for creating original jewelry with your own hands. Templates, diagrams, master class, exclusive design (110 photos)Weaving from newspaper tubes for beginners: the best free master class, with step-by-step instructions. Photos, diagrams, unusual ideas, videos
- Paper rose - how to make it yourself? Step-by-step instructions, original ideas, photos, videos, master class
Keep them away from sunlight. If the color seems insufficiently saturated to you, do not be lazy and repeat the procedure again.
Ready! You can move on to the next step.
We weave a basket
There are many different weaving techniques, simple and complex. The basket can be round, square, triangular, or almost any shape, at the discretion of the master.
Below we will look at several weaving options, and then we will provide detailed instructions on how to make a basket from newspaper tubes for beginners.
How to make straws - master class
To make tubes you need:
- Cut into strips (optimal size 10×30 cm).
- You should twist a tube from each workpiece; a knitting needle, which is placed on an acute angle, will help with this; you need to screw the cut paper onto it.
- The tip of the workpiece must be lubricated with glue, so it will not unwind.
During the manufacturing process, you should pay attention to the following: one end should be wider than the other. This promotes proper tube formation.
Important! The tighter the tube is twisted, the longer the product will last.
A simplified version does not involve twisting the tubes, but folding them. The result is thick ribbons of the same width. Products made from such blanks do not look so original, so it is better to stick with the first option.
How to paint tubes
Painting begins after all work is completed . It is recommended to paint the tubes with acrylic or machine paints. They are moisture resistant and will not leak when in contact with water.
After the paint has dried, the top of the basket is varnished. You can apply one or two layers. Thanks to this, the product will acquire a glossy shine and become much stronger.
Interesting things on the site:
Weaving a bread box from newspaper tubes
Weaving boxes from newspaper tubes
Types of weaving
The most suitable option for beginners would be simple weaving. The basket will turn out to be minimalistic, without patterns or delicacy, but more durable and reliable.
The point is to draw the tube in turn from the front side, then from the back side.
The interval can be different - braid every second post, every two second ones, or, for example, skip 2 and braid the third.
You can even alternate intervals in one basket, but it’s better to start simple. You can weave obliquely, that is, place the tubes at an angle to the frame.
A slightly more complicated version of the simple one is layer weaving. When weaving layer by layer, the tubes should be as uniform in size as possible so that the product comes out neat.
The cord wraps around the first 4 posts and remains sticking out. The last braided post becomes the first for a new cord, which braids the next 4 posts. And so on, weaving from left to right until we return to the place where weaving began.
The openwork type of weaving suggests that different patterns will be obtained on the basket. The pattern depends on the weaving technique. Such baskets turn out to be more decorative, since they are less strong due to large gaps in the woven figures.
Rope is a simple and at the same time beautiful type of weaving. The principle is to braid both the racks and the cords themselves together.
For example, take two tubes. One weaves the stand from the face, the other from the inside, the next one - on the contrary, the next one - like the first one. In the spaces between the posts, the tubes cross each other.
Preparing material for a newspaper basket
To weave baskets from newspapers, you need to prepare tubes. For this, in addition to newspapers, we will need PVA glue and knitting needles.
The process is as follows:
- We tear a double sheet of newspaper across into four even pieces.
- Place the knitting needle on the edge at an angle of 20 degrees and grease the edge of the paper with glue. The thickness of the tube depends on the thickness of the knitting needle.
- We wind the paper onto a knitting needle. We try to pull it as tight as possible, but make sure not to tear it.
- We wind it to the tip of the knitting needle and continue winding without it.
- At the end, glue the tip of the paper with the tube.
In a few minutes it will be ready for use. In this process, it is important to “train” your hand in order to understand with what force to tighten the newspaper and how to twist the knitting needle.
How to make a square basket
Attached below will be a photo of the finished baskets made from newspaper tubes so that you have an idea of how the product should turn out.
Let's start from the bottom. Cut out a square of cardboard slightly larger than you plan to make the bottom of the basket.
Draw it into small squares measuring ~2x2 cm. On one side of the cardboard, make holes at the points of intersection of the lines, i.e. in the corners of the square. There should be one row of holes.
Please note that there must be an odd number of holes. Pass a tube into each hole so that its long edge sticks out from above and the short edge lies under the cardboard. These will be the foundations of our bottom. Weaving will go from bottom to top and from left to right.
Take a new tube and place it perpendicularly on top of the leftmost tube sticking out of the cardboard base. Then pass this tube under the second one sticking out of the base, then put it again on the third one, and so on.
If your working tube runs out, but the ones sticking out from the base remain, glue a new one to the end of the working tube and continue weaving.
When you finish the row, leave the edge of the working tube sticking out. Take a new one and do the same steps, only this time start under the tube.
When the two rows are woven, insert between the horizontally protruding edges one more tube on the right and left, parallel to those protruding from the cardboard. Push them firmly towards the middle. During the weaving process, this action will not need to be repeated.
Start the next row from the top and grab the first two, then one from the bottom, one from the top, and so on. The last two must also be captured together.
When you reach the end of the row, fold the edge sticking out horizontally under the two outermost vertical tubes and continue weaving in the opposite direction.
Make two rows with twists, and then take a new tube. Repeat all steps until you reach the end.
The last tube should stick out to the right. Take two tubes and weave two rows on top without bending. Leave the ends sticking out on both sides.
Now you need to make the bottom rim. To do this, we will use rope weaving. From the upper right corner we take the end of the outermost cord sticking out to the right. If it sticks out from above, we bend it down under two tubes, if from below - into two.
We also bend the next cord, which has now become the outermost one, down under or above the tube, depending on its original position. We continue weaving with rope.
If any ends protruding from the base are not long enough, glue an extension to them. It is better to weave the headband in 2 rows to make the structure stronger.
When finished, cut the ends of the cord that we used to weave the headband and glue them inside.
When the base is tightly fastened, you can begin weaving the basket itself. For convenience, place a box or arc press on the bottom that matches the shape of our future basket.
Bend the tubes protruding from the base upward. These will be the racks on which we will weave the walls. At first, of course, they will not all stay upright. The main thing is that the stands you are working with are in place.
Take the cord and glue its edge to one of the posts, but not to the corner one. Start weaving the same way you wove the bottom. The corner posts will be double, always go around them together.
Continue weaving until the basket is the height you want.
You can use a different type or weaving technique, or even alternate. They are described above. A rectangular basket is made in the same way, only make a rectangle at the base instead of a square.
Soak the finished product well with glue and leave to dry.
Master class on weaving a square laundry basket with photos
A basket made of newspaper tubes can take round, oval, rectangular and square shapes. Depending on the volume of material, the size changes: the needlewoman will be able to create both cute little baskets for storing memorabilia and toys, and large wickerwork that will become indispensable at home. Below is a master class on weaving a square laundry basket, where it will be convenient to store things before washing or drying. This product, complemented by a lid and functional handles, will help you use your apartment space more efficiently.
How to make newspaper tubes
The first thing you need to prepare before weaving a basket is newspaper tubes, which are analogues of classic vines. To do this you will need: the required number of double sheets of newspaper, knitting needles of the required size, scissors and glue. How to make a newspaper “vine” for weaving a basket:
- To create four tubes, take a double sheet of newspaper and divide it horizontally into four equal parts (cut with scissors or tear).
- Place the knitting needle on the lower right edge, at an angle of 20 degrees. Lightly treat the tip of the paper strip with glue, and then begin to tightly twist the newspaper sheet onto the knitting needle.
- When the surface of the knitting needle is finished, continue to roll the newspaper with your fingers. Apply a little glue to the free end and press it onto the tube with your fingers.
- What is a lump in the throat
- Vitamin salad: recipes
- Back exercises in the gym photos and videos. The best exercises to strengthen a girl's back
- Repeat the same with the remaining newspaper strips.
Helpful tip: Practice making newspaper tubes in advance. As a rule, the first time the initial materials for weaving may not turn out to be very neat and even, but their beauty will come with experience. After some practice, you will be able to intuitively feel how tightly to pull the newspaper and twist the knitting needle, everything will work out by itself.
How to weave the bottom of a basket
- Lubricate the edge of the element with glue and attach it to another newspaper tube (in the picture the length of the material is 25 cm). Fasten with a clothespin for better fixation. Attach two more corner tubes with glue.
- Make the required number of strips with four tubes: as many as needed for the bottom of the basket.
- Glue together two larger tubes (51 centimeters in the photo). Prepare more newspaper strips (75 cm in the photo).
- Lay out the paired strips as shown in the photo.
- Take single newspaper tubes and begin to braid paired strips with them: bend the lower one from the bottom, the upper one from the outside. Place the next 25 cm long element and do the same procedure until all the strips with four tubes are used.
- When the bottom is ready, cut off the edges of the four-piece strips to make the bottom even. The protruding free edges of the remaining tubes must be used in the side parts of the basket to weave the walls.
Basket wall weaving
- To make the walls of the basket, take a square box that is the right size. Prepare glue with newspaper tubes and clothespins. On the sides of the cardboard container, glue two tubes side by side at a distance of about 5-7 centimeters. Also mark the perimeter with newspaper tubes.
- Start weaving: take a couple of paper tubes, glue their ends, as shown in the second photo, they should be located perpendicular to the paired newspaper elements. First, insert a couple of tubes of newspaper under the side materials, then put them on top, and thread them again at the bottom. Hide the ends behind the previous row and secure with glue.
- The next pair of tubes will be attached in a mirror way: first they are placed on top, then threaded through from below, etc.
- After you have braided the box from all sides and the desired height of the product has been achieved, you need to trim the end of one element in the pair, which was originally attached to the sides. Insert a newspaper tube with a long edge under each next one so as to hide the “chopped off” tip.
- When all the free ends of the side elements are pulled out, continue to braid them around the edge of the basket. Hide the short free edges of the newspaper tubes under the previous row, fixing them with a small amount of glue. Secure the result with clothespins so that the glue adheres better. When the edges of the basket are ready, attach the bottom, make a lid, and handles.
Making pens
- On both sides, at the top edge of the basket, at an equal distance from the sides, thread two newspaper tubes. Throw those that remain inside over the wall to the outer end of the elements and go around the strips from above. Repeat similarly with the second pair of tubes.
- Generously coat the edges of the twisted materials with glue and fasten them together with a clothespin. Wait for the adhesive base to dry.
- To hide a sloppy joint, apply a fresh layer of glue and wrap another strip of paper around it. Handles are ready!
Making a lid
- Take flat cardboard of the required size, using a stationery knife or other tool, make small holes on the side, as shown in the photo. Insert tubes into the holes on all sides.
- Start braiding the edge of the lid, bending one end of the paper element after the other, as seen in the photo: this is how you need to weave the desired number of rows. When finished, the free edges of the tubes are hidden under the lid.
- Decorate the finished lid as desired: with leftover French braided newspapers, ribbons, decoupage or other decorative elements.
What and how to paint the finished product
You need to finish making the braid by painting, although some people prefer to process the newspaper strips in advance. If you don’t know how to paint baskets made from newspaper tubes, think about what color you want to achieve. If you want a natural wooden shade, you need to use stain or stain. For brighter colors, acrylic paints are suitable, and they also give a beautiful shine. It is acceptable to use gouache or watercolor, but the latter will look faded on the finished chest.
How to make a round basket
Take 6 tubes and secure them with a clamp. Take the second 6 tubes and also secure them with a clamp. Fold the sixes crosswise so that the protruding ends are the same size, and glue them together. This is the basis for the bottom.
Let the top six lie horizontally. Take a new tube, we will call it “working”, place it under the bottom six on the side farthest from you and bend one edge to the right so that the working tube seems to take the six into a loop. There will already be 8 ends sticking out on the right.
We bend the lower end of the working tube toward ourselves from above the six, and the upper end from below. Now 8 ends are looking at you. Fold the bottom edge again from above, and the top edge from below, as before. Repeat 6 more times.
Now we bend the edge of the working tube sticking out from above not under the entire six, but only under two tubes, then two, then two.
We repeat the same with the bottom edge. We complete the circle in this way and add a few more to it. The number of circles depends on what size basket you want.
Then we begin to braid not every two tubes, but every first one. We weave according to the same principle until we reach the desired bottom size.
We cut off the protruding ends of the working cord and glue them inside. The ends sticking out from the base will be the supports for the walls of our basket.
We weave the walls using the same principle. Also, do not forget to soak the finished product with glue.
How to make an oval basket
To properly make an oval basket from newspaper tubes, you must first also take 5-6 tubes. We'll take 5 as an example.
Take a new working tube and pass it under the first tube of the five, then over the second of the five, then under the third, over the fourth and under the fifth.
Take the second working tube and pass it next to the first working one, over the first of the five, then under the second, over the third, under the fourth and over the fifth.
Thread 3 more working cords in this way. This created the basis for our bottom. It should be rectangular in shape.
Take a new working tube. We wrap it around one of the protruding ends. We twist the frame with rope weaving, as when weaving a round basket, until we reach the desired size.
We weave the walls as usual. Ready.
Handle weaving
One of the main parts of the basket is a high-quality handle, because it is useful for moving items from place to place. The handle should be dense and durable, it can be decorated as desired: braid it with ribbon, stick artificial stones and rhinestones, or simply decorate it with colored acrylic. You can make a handle in several ways:
- openwork weaving;
- braid;
- rope way.
Handle weaving technique
This master class will discuss how to make a reliable and beautiful handle for a basket using the braiding technique. At first glance, it seems that the technique is complex and cannot be explained, but after following the step-by-step steps, after just 1 hour you can enjoy the finished wicker handle.
Weaving a strong handle
Detailed master class
To work, you will need 6 long newspaper tubes along the length of the handle, colored blanks for braiding the frame, as well as twists for weaving the braid itself.
Let's get started step by step:
- We put 6 newspaper bundles next to each other and wrap them with colored tube blanks. This is easy to do: just start from the edge of the blanks, gradually wrapping them around the entire perimeter into one tight bundle.
- When the base of the handle is ready, we proceed to attaching additional 4 tubes to decorate the braid. To do this, at the very base of the handle we apply 4 tubes of different or the same color and wrap them a little to the workpiece using a roll.
- We begin to weave a pigtail: first we bend the two side sticks to the sides, and bend the two middle sticks towards ourselves. After this, we carry out weaving according to the figure in the photo below.
- When the tube runs out, insert a new one into it, wetting the connection with glue. We continue weaving until the braid covers the entire base of the handle. The finished handle can be attached to the basket in any way: it is best to do this using a rope technique.
The handle must be of high quality
How to weave a handle and a lid
For the simplest version of the handle, we will need no more than 10 tubes. To make them bend better, you can sprinkle them with water.
Take one of the tubes, bend it in half and thread both ends into the holes along the edge of the basket. We do the same with the second tube, but insert it at the opposite point.
We glue the protruding ends of the tubes together to form an arch over the basket. This will be the template for our handle. If you want to make the handle higher, you can add more reeds.
If you want your basket to have 2 handles, then insert 2 tubes into the edges of the basket at a distance of about 5-7 cm from each other and glue them together. Do the same on the opposite side.
Take a long cord. Also insert it into the hole in the edge of the basket between the two tubes of the handle blank. It's better to glue it from the inside.
Wrap it around the right tube, then insert it back into the edge of the basket. Wrap it around the left one, thread it into the space between the tubes of the workpiece.
Wrap around the right one again, thread it through the middle and wrap around the left one. Repeat until you have braided the entire handle. Secure the end of the working tube in the same way as you did at the beginning.
The lid is woven in the same way as the bottom. Make it slightly larger than the bottom.
Weaving baskets of different shapes
Baskets of various shapes are used for different needs. For example, a rectangular high basket is useful for storing linen, a square or round one is suitable for storing sewing accessories, and an oval design would be appropriate for decorating a room for the holidays. Detailed master classes on making each form are presented below.
Square model
Square basket
This type of product is perfect as a tabletop bread bin. All you need to do is place a fabric insert inside and a beautiful bread box to serve to your guests – it’s ready. The work will be based on the use of a special device to help weave the base of the product faster.
Weaving a square basket
Detailed master class
To make such an auxiliary device, just take a sheet of cardboard, bend it in half lengthwise and use a hole punch to make holes for the tubes 2 cm from the fold. You also need to prepare a large number of paper or newspaper bundles.
To make the basket more like a straw one, make the twists flat.
- We insert the sticks for the base into the holes of the cardboard so that most of them are closer to the work.
- We begin to braid the bottom: take a long tube and insert it next to the cardboard, then we work using the rope weaving technique. When we reach the desired perimeter of the square, we finish the bottom.
- To form and lift the walls, we insert new splinters around the perimeter of the square: bend the twist in half and thread it into the hole, grabbing the nearest tube. We fix the fastening points with tape and clothespins.
- We begin to braid the walls until we get the height. For ease of work, we put the structure on a square box.
Can be used as a bread box
When the work is finished, you can attach a handle to it or weave an additional cover. Such a basket will not only serve as a bread bin, but will also be a good option for a packaging box.
Oval basket
The oval type product is considered the second most popular after the round basket . This form is more spacious and can be used as a box, packaging box, or simply for storing handy items. The product itself is decorated:
- flowers;
- ribbons;
- threads;
- various textiles.
All the same materials are needed for work:
- newspaper tubes made from strips measuring 11x28 cm;
- knitting needle;
- glue;
- stain;
- varnish;
- decor
The first stage is traditionally considered to be the manufacture of a cross: in a rectangular design it looks and is made differently. Since weaving the rope into 2 tubes is used, it is necessary to thread double twists across it.
One of the most popular forms
The first two rows are woven one and two tubes at a time, the remaining nine rows are woven one at a time. In the middle of the work, it is necessary to add additional racks in an amount equal to the number of main racks. After this, the transition is made to the sides. Next, the sides are woven, after 5 rows you need to make holes for the tape - you can omit them if you wish.
To ensure that the holes are even, they are leveled using thick cardboard. The remaining part of the product is braided using the usual method.
The finished basket will be an ideal gift for a woman who does needlework. It is also convenient to put handkerchiefs or any other textiles into the product for storage. Once completed, it will become a good gift for the younger generation.
Fits into the kitchen interior
Photo of baskets made from newspaper tubes
Did you like the article?
0