Features of the Provence style
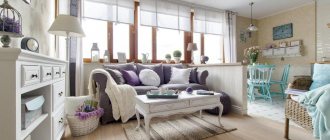
Provence is a more sophisticated analogue of American country. The style of the French countryside is distinguished by both simplicity and sophistication, elegance and modesty, an affinity for vintage furniture, naivety and idyllic tranquility. It is sincere and cozy, like a grandmother’s village house from childhood memories. It is especially common in kitchens, but can also decorate other rooms: living rooms, dining rooms, bedrooms.
Rare or antique furniture is very elegant and beautiful, but not everyone can afford this pleasure.
Style Features:
- Antique or artificially aged furniture.
- Natural flowers.
- Decoration with floral and rustic ornaments.
- An abundance of things from the “good old days,” from grandma’s box to antique trinkets bought at a flea market.
- Decoupage, sewing, ruffles and other handmade decor, made with your own hands.
- Softness, naturalness and variety of materials.
Slightly “faded” and dull colors, rustic but practical and high-quality things, rough plaster and natural textiles - this is interior design in the spirit of “French country”. There is no place for pomp, deliberate pretentiousness and arrogant luxury. The cold shine of metal, polished surfaces and modern furniture “monsters”-transformers are inappropriate. Everything is homely, cozy and modest, but at the same time subtly elegant.
Before you start aging furniture on your own, it is necessary to thoroughly prepare all wooden surfaces that will be processed.
Solid pine coated with white wax
Pine is the most common material in door making. Almost all doors have either a solid pine frame or a filling. But let's figure out what doors made entirely of solid pine are, i.e. when the pine is both inside and on the surface.
All wooden doors, including pine, are made using laminated solid wood technology. This means that dried blanks of a certain size are glued together and structural parts are made from them. Pine doors have a paneled structure; the frame of the desired shape is assembled and glued separately, and the filling – the panels – is separately assembled and glued together. Then it’s all painted and assembled into the finished product.
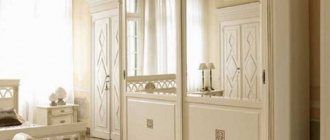
Double door with transom made of pine with White wax coating
Pine has a beautiful natural pattern; under a translucent coating such as “White Wax” , such a door looks very natural and fits perfectly into the Provence style. However, it is important for the buyer to understand what he is paying money for, so pay attention to the following things:
- The cheapest solid wood doors are made from small, cheap blanks. If they are very short, then they are sewn together with a microspike. Therefore, take a closer look at the surface, evaluate what the surface is made of. If there is a microspike, then the door belongs to the lowest price segment.
Pine door with glass inserts coated with white wax - Pine has very interesting natural properties. Its wood is impregnated with natural resins. This causes many problems when drying raw materials. If something goes wrong, problems will appear after the finished product is assembled. This is expressed in warping, i.e. when the tree begins to twist, bend, etc. In the finished product this will manifest itself in an increase in internal stresses, and as a result, cracks on the surface, changes in size, and bending of the door leaf with a screw. Therefore, be sure to evaluate these parameters before purchasing.
- The same resinousness and Improper drying can lead to the appearance of unsightly yellow spots on the surface of the door leaf. They may appear 6 months after installation. Therefore, before purchasing, be sure to check what warranty is on the door. A year is enough for all the jambs to come out.
Pine door installed in the bathroom - Sometimes you can find panel pine doors. This means the structure is not paneled, but solid. The panels here are only milled imitation. Such doors are the cheapest; the internal stresses in them are not completely relieved. They are sometimes sold untreated for installation in saunas and baths. Here the natural resin content plays a plus, but it’s better not to use them for an apartment.
- The price of the material will also be higher if knots are cut from pine. Do not buy doors with knots at the price of knot-free solid wood.
Not many factories make high-quality pine doors, especially those with a White Wax coating. Belarusian doors, which have an excellent price-quality ratio, enjoy well-deserved popularity on the Russian and European markets.
Door with four panels made of solid pine
Doors with unusual platbands and cornices look very interesting. Such framing, instead of standard semicircular platbands, increases the cost of the product. But it is simply necessary to create a complete image of the interior in the Provence style.
Framing a doorway with a capital and carved platbands
Pine doors have one drawback - it is a soft surface . Even a small impact leaves marks on the surface of pine doors. Over time, these dents accumulate and the doors begin to look less than perfect. This is why many buyers are switching to veneered doors.
Thumbs Up The materials for this article, including photographs of doors, were prepared by employees of the interior doors store “V Dom”. If you need to choose doors for rooms , follow the link, there you will definitely find what you need.
The advantages of doing it yourself
Before we figure out how to paint furniture in the Provence style, how and in what ways to decorate it, let’s decide why this is needed at all. So, what are the advantages of restoring furniture and decorating a room in the spirit of the French countryside:
- Saving. Provence is much cheaper than classic, high-tech and most other styles.
- You don't even have to buy furniture. An existing one, artificially aged and restored, will do.
- Possibility of using old interior elements.
- Moral satisfaction, pride in what you have done with your own hands.
To make your furniture look shabby and worn, you can use the painting technique.
Restoration of old furniture
Often, after completing a renovation, we purchase new furniture. What if you “breathe” new life into old interior items? How to paint furniture in the Provence style so that it creates comfort and at the same time emphasizes the “refined taste” of the owners?
Restoring wooden products at home can be done using patination. To do this you will need:
- sandpaper;
- dye;
- brush;
- preparation for patination of wood;
- varnish;
- steel wool.
Here are step-by-step instructions for restoring an old chair:
- Take an old wooden chair and use sandpaper (150-200 grit) to remove the paint. Thoroughly clean the product from dust.
- Now you can paint the furniture with a light shade of paint.
- When the chair is dry, coat the entire surface with varnish. After drying, sand the surface with sandpaper (240 grit).
- Let's continue decorating the furniture, the final stage will be spraying the patina. When the product is completely dry, wipe it with steel wool. In this case, the patina will remain only in the recesses of the wood.
- Secure the result with a layer of waterproof varnish.
Using this technology, you can restore a shelving unit in the Provence style, smooth out the broken corners of a cabinet or chest of drawers, and remove scratches on the cabinet. To acquire the necessary skills for painting furniture in the Provence style, first practice on old items that you don’t mind throwing away.
DIY furniture aging techniques
You can “age” a chest of drawers or sideboard in different ways. Let's look at the basic techniques.
Regular painting
- Preparatory stage: remove the old varnish with coarse-grain sandpaper, sand the surface with fine-grain paper.
- Painting. Pastel colors predominate in Provence. We choose the paint accordingly.
- Use iron wool (an abrasive material sold in hardware stores) to dry the surface until dark lines and spots appear.
- Paint the fittings with the same paint, dry, then clean with a wire brush.
New elements of fittings also need to be aged - after all, they can give away your trick with furniture.
Paint and paraffin
The aging effect can be achieved with ordinary paraffin. To do this, the coating is removed in some places with sandpaper. Then the working areas are rubbed with paraffin, and paint is sprayed on top using an aerosol can. It’s not scary if the coating is uneven - such negligence is quite consistent with the spirit of Provence.
The combination of a rich base and a light second layer will create the effect of faded paint.
Cleaning and bleaching
Whitening can be done either with a special whitening paste or by grinding. The paste is only suitable for porous wood. For example, oak or ash.
To consolidate the effect for a long time, coat the finished furniture with clear varnish.
Whitening:
- Thorough surface cleaning. Removing the varnish and sanding first with coarse sandpaper, then with finer-grain paper.
- The “aging” areas are covered with blue or brown paint, dried, and rubbed with paraffin.
- Paint the furniture by applying several layers of white paint.
If the base paint or wood is dark in color, use nitrocellulose varnish. For light breeds, a water-based varnish is suitable.
Patination at home
Patination can be carried out in dozens of ways and materials. At home, the easiest way is to purchase a patination composition. You can find it in any construction supermarket. First, the surface is prepared, painted, and varnished. We sand the dried furniture with 240-280 grit sandpaper. Then a patination preparation is sprayed onto the surface from a can. After this, the patina is removed with iron wool, remaining only in the recesses.
Patina appears on the surface as a result of many years of oxidation of paint, varnish or metal and is especially valued by connoisseurs.
Using craquelure varnish
Craquelure varnish is a varnish used to make craquelures. Unclear? It’s simple: craquelures are decorative cracks that create the effect of furniture cracked by time. The method is quite complicated and requires certain skills. Not for beginners.
Create an imitation spider web from cracks in an old protective coating on a dresser.
How to make a cabinet with your own hands
Before you begin, you will need to decide on the shape and size of the piece of furniture and its location in the room.
draw up a drawing
Next, the entire invented design will need to be mentally divided into components and each resulting detail drawn.
If you have no experience in such work, you can use special computer programs, for example, Basis Furniture Maker. When making a drawing, you should take into account that the cabinet will stand near the wall, i.e. about 5 cm of wall space will be occupied by the baseboard. If you do not plan to remove it, then the solution will be legs that will exceed the height of the baseboard. If you make a cabinet without legs, you will need to bevel the vertical ribs on the baseboard side.
It is very important to calculate the dimensions of the cabinet and calculate the distance between the shelves. The recommended shelf thickness is from 2.5 cm, with a length of 1 m. There is no need to doubt the color of the product - the ideal option, which will naturally fit into a Provence style living room, would be a cabinet painted white.
we prepare product parts
If it is possible to use a professional machine for sawing materials, then you can do all the work yourself. It is irrational to buy a woodworking machine specifically for making a cabinet; it will be easier to turn to specialists for help. When cutting wood or chipboard with a jigsaw at home, it is unlikely that you will be able to achieve the desired result - the smallest error will ultimately be noticeable, in addition, wood materials tend to chip when cut by hand. It is more realistic to perform the work using a hand-held circular saw, with a rip fence or along a guide rail.
Since the cabinet is a rectangular structure, you will need to initially prepare slats that will cover the ends of the panels from which the side walls are made. In the future, they will need to be given a rounded shape. Having received the desired length of the slats, it is adjusted to size; here you will need a sawing machine. The work uses a guide and a template according to which the boards will be aligned. When sawing, the template is located under the board.
After preparing the required number of slats, they are processed with an electric planer or planer. The work should be carried out with special care, because both sides of the cabinet must be parallel to each other and perfectly level. To make the slats smooth, they will need to be sanded - this will help remove surface undulations that usually remain after a surface planer, which can create problems when milling.
The treated slats are glued to the ends of the wall panel. To work you will need a clamp. To avoid pressing the surface of the workpiece, you will need to place pieces of plywood. If glue appears during the clamping process, it can be removed immediately using a rag. The connection of the slats at the joining points should be made at an angle of 45 degrees.
How is end milling done?
Although this process is not complex and lengthy, its quality cannot be underestimated - carelessness can lead to zero results in all efforts. Cutters for reliefs must be chosen correctly, and the overhang must be clearly set.
The workpieces should be fed into the milling machine smoothly; their deviation to the sides is unacceptable. Before starting work, you should practice on unnecessary cutting of the slats, and at the same time check the functionality of the cutter. Having set the necessary parameters, you can begin processing the slats. If after milling the slightest irregularities are found on the surface, be sure to eliminate them using sandpaper (150 grit); if this is not done, after painting they will become even more noticeable.
how to install the back wall of a cabinet
This detail is the least noticeable, but very important - it has a significant impact on the strength of the entire structure, because the back wall is one of the connecting elements of the entire cabinet. You need to pay special attention to the finishing of its interior - it will be visible, against its background there will be objects that you will place for viewing in the display cabinet. Plywood would be a completely suitable material - it is easy to process, you can easily cut it with your own hands using a jigsaw, if you have a sawing machine, you can use it. After sawing, you will need to sand the edges of the workpiece with sandpaper.
To make the back wall, you can also use particle board, but its weight is more significant, and the methods of its fastening are more complex.
To get an ideal-looking cabinet, you can resort to purchasing ready-made components, in particular, fronts for cabinets, both solid and glazed, these are exactly what we will need in our case, you can order or buy them ready-made in a specialized store. If you have carpentry skills, you can try to cope with the task yourself.
let's start assembling the cabinet
Assembly should be performed on a flat surface - otherwise distortions may occur. Work begins by attaching the side walls to the top wall. To prevent the occurrence of irregularities at the corners of the joints, use a special corner.
At the marked points you will need to drill holes whose diameter is smaller than the diameter of the fastener. Then, using these same elements, the parts are pulled together. Experts say that one of the most convenient practical fasteners is the confirmat; to simplify the clamping process, you should use the included key.
After assembling the upper part of the product, you can move on to the lower part. Don't forget to use a corner joint - the corner joints should be perfectly even. The base part of the cabinet is assembled from three, sawed-off fragments, and they are fastened with screws from below. The bottom is attached to the side support bars, from above.
For more information about the principle of assembling a cabinet with your own hands, watch the video:
shelves
Having assembled the top and bottom of the cabinet, i.e. its frame, you will need to figure out how to install the shelves. If the installation is carried out after installing the rear wall, the task will become very complicated. The shelves can be removable, this is acceptable if they are not expected to be heavily loaded. In this case, it will be enough to drill several holes at the required level and attach the shelf holders to them.
If the objects with which they will be filled differ in considerable weight, then it is best to attach the shelves using the same confirmation, preferably at 3-4 points of the side wall on each side. The shelves assembled in this way will add strength and durability to the entire cabinet.
Next, we proceed to install the back wall. For its manufacture, plywood with a thickness of 10 mm is quite suitable; nails, screws, self-tapping screws or a construction stapler can be used as fasteners. Before fixing the back wall, it is inserted into the fold on the base.
case cover
You can also use screws or self-tapping screws to secure the housing cover. Holes for fasteners are drilled strictly at the marked points, in the middle of the edges of the internal plates, on the side walls.
cornice
To make a decorative decoration for a display cabinet, you can use cornices; to assemble them, you use scraps of wood slabs connected at an angle of 90 degrees and moldings purchased ready-made from natural wood. The structure is fastened through support blocks using screws and glue. The moldings chosen for finishing the base of the cabinet are attached in the same way.
doors
In the event that the facade for the cabinet is not purchased ready-made, the doors are made from the same wood slab that was used for the walls, the edging of the doors around the perimeter is made with blocks of natural wood, connecting them to the panel using dowels. Furniture hinges are used to install doors. You can see how to install the door in the video:
What tools and materials will be needed
We will combine several techniques in one master class. To decorate furniture in the Provence style with your own hands, we will need the following tools and materials:
- Brushes, wide and narrower for “spot” painting.
- Acrylic water-based paint.
- Patination composition (in our case – bitumen varnish).
- Paraffin.
- Putty.
- Hairdryer (to speed up drying).
The set will depend on what kind of item is being aged and what method is used.
Interior use
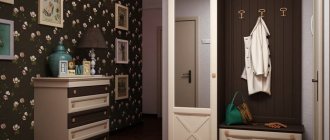
Many people decide to paint their doors in Provence style. Often, this design is used specifically for interior models. They look attractive and elegant, refresh and decorate your home. An excellent solution would be canvases with and without windows. If it is necessary to arrange only one room in the house in this direction, you can use a sliding wardrobe door in the Provence style in the interior. At the same time, the entrance design should be more restrained. The design of the entire room will completely change, but there will be no sharp contrast with other rooms.
If Provence in the interior is used for the interior furnishings of the entire house, then in this case you cannot do without an entrance door suitable for the design. The result is a harmonious, thoughtful design that will not get boring over time. Let's look at what designs are selected for different rooms:
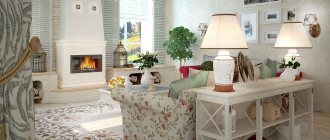
- Living room. A variety of door models are suitable: hinged, sliding, with one or two leaves. Handles must be glass or forged. A correctly selected design will harmonize with the interior of the room. The style allows for rather rough and at the same time elegant combinations of glass, metal and wood.
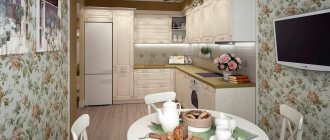
- Kitchen. White doors will be the best option. Products in which the texture of the material is clearly visible look interesting. An excellent decoration would be bunches of greenery, small bouquets of dried flowers and aromatic herbs. It is acceptable to use painting, in particular plant and floral patterns.
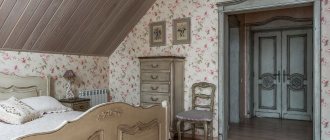
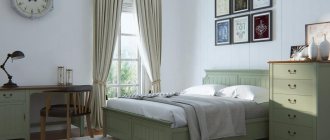
- Bedroom. This room is designed for relaxation and good sleep. It is for this reason that all design elements should be calm and peaceful. Suitable shades would be pale yellow, beige, lemon, light purple. Doors made of pine in the Provence style have an original texture that will bring coziness and warmth to the room. If the bedroom belongs to a child, use cheerful bright shades: lilac, blue, olive.
When choosing a suitable model, the furnishings of the room must be taken into account. Otherwise, it will not be possible to create a pleasant, harmonious interior.
Step-by-step master class on aging furniture
- Applying a base coat of paint.
- Drying. You can use a hair dryer to speed up the process.
- Treatment of aging areas with paraffin.
- Adding putty for relief and creating the effect of a multi-layer coating.
- Creating a worn effect. This is achieved by friction with sandpaper, a stiff brush or iron wool... or by applying paint with a sponge, then the previous layer will be perceived as abrasion.
- Painting in several layers.
- Sanding.
- Patination.
- Drying.
After complete drying, you can begin sanding the area to be treated, then begin decorating.
If you have decorating skills, you can additionally paint furniture in the Provence style with your own hands. Floral ornaments and images with rural motifs will look especially organic.
You can use decoupage napkins with designs in the Provence style, which are transferred to furniture.
Old chest of drawers in Provence style
Let's consider all the subtleties of transforming ordinary interior items into exclusive designer items. For example, let's create a chest of drawers in Provence style. To do this you will need the following tools:
- brushes;
- rags;
- sandpaper;
- steel wool;
- dye.
We paint the chest of drawers in several stages:
- First, you should sand the wooden surface with sandpaper. This must be done in order to remove old varnish or paint. To sand the surface, use coarse-grain paper first, then fine-grain paper.
- Now you can start painting the chest of drawers. When choosing paint, remember that the Provence style is characterized by warm pastel colors. Therefore, choose a paint that is beige or light gray in color. Using a brush, carefully paint the entire surface, as well as the inner walls.
- When the paint has dried, use charcoal-colored steel wool to cover the entire surface. After such manipulations, dark lines will appear on the chest of drawers. Wipe them with a wet cloth until the lines turn light gray. This technique will allow you to effectively age furniture in the Provence style with your own hands. Now you need to wipe the surface with a dry cloth.
- Paint all handles with the same paint as all the furniture. When dry, scrub them thoroughly with a steel brush and dry with a rag. Now the fittings match the main style of the chest of drawers.
- The bottom of the drawers can be decorated with fabric with a floral print. The main thing is that the textile color matches the main tone of the chest of drawers.
Advice! Place a vase with wildflowers or a small bedside lamp with a textile lampshade on the chest of drawers. Such little things will become the final accent in the design of a room in Provence style.
Ready-made examples of aging different furniture with your own hands
The chest of drawers “aged” using the reverse patination method looks good. In this case, abrasions are achieved not by rubbing off the patina, but by rubbing away the underlying layer of paint.
An old Soviet cabinet restored in Provence style with an attached additional storage system in the form of a bookcase.
If the work is done correctly and in compliance with the appropriate instructions, furniture made in this style will give the room a feeling of comfort and coziness.
Rack and shelf, aged with patina.
Provence creates a lovely homely coziness and a comfortable indoor environment.
In addition to aging furniture, the Provence style can always be complemented by decoration using decoupage techniques and other types of painting. Antique trinkets, handmade souvenirs, and fresh flowers will look great in this interior.
Any antique item can be restored, repainted and given a decorative role in the Provence style.
Model design
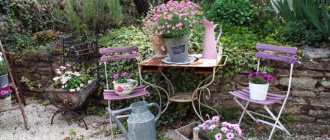
The style direction is based on the features of architecture, nature and interiors characteristic of the southern French province. Provence is associated with warm summer sun, blue skies, azure sea waves, endless fields of fragrant lavender and meadows with lush grass. Interior doors in this direction can be easily recognized by several design elements:
- White color. This solution is considered traditional, since it is this neutral color in combination with pastel colors that creates the basis of the style. White door panels are decorated with intricate carvings; decoupage techniques can be used. Antique products are extremely popular, bringing notes of vintage, comfort and antiquity to the room.
- Painting. Helps quickly change the appearance of the door, giving it newness and attractiveness. Suitable designs would be bouquets of lavender, traditional for Provence style, picturesque Mediterranean views, and olive branches. When purchasing a custom-made product, you can first discuss your wishes with the master. Specialists are able to age a new model and make a painting that will harmoniously fit into the interior of the home.
- Use of dark oak. This is a rather bold and new decision. The wood has an original, pleasant texture that does not require special tinting. Models with glass inserts are usually painted with light-colored compounds. Windows can be transparent or frosted. Decorative elements with geometric shapes look interesting.
Today, consumers increasingly prefer sliding doors in the Provence style. Such models are easy to use, equipped with ergonomic handles and save free space in the room.