34586
An original way to update the interior would be to make your own antique furniture; drawings and diagrams will help with this. Handmade is a very popular trend in recent years; unique technologies for creating vintage items have not bypassed the furniture sector. The future design needs to be carefully considered - whether it will be collapsible, which elements need to be decorated, since this determines what tools will need to be used.
Types of wooden shelves
Shelves are classified according to installation method into the following types:
- hanging;
- wall;
- floor;
- removable;
- stationary;
- corners, etc.
Wall structures are mounted above pieces of furniture (tables, armchairs, sofas). Blocks are individual decorative elements or included in the overall composition. For seasonings and utensils, a wall shelf can be created from 2 or more modules.
Hanging products should be lightweight and often serve as decorative items. Beautiful antique structures are attached using steel pipes, braided belts, chains, strong ropes, and brackets. Suspended structures are vertically fixed on the ceiling surface and do not have side walls.
Corner structures are attached with self-tapping screws to adjacent wall panels. The blocks can be located separately or be part of a furniture wall. You can add corner shelving to the interior surfaces of the furniture and the exterior walls.
The floor shelves are spacious and can be transformed into a vertical or horizontal position. The designs are optimal for small apartments.
In antique interiors, figured wall shelves (moduses) are used. The blocks are combined into a single composition and placed in living rooms and corridors. The advantage of the modes is the ergonomic use of space.
Shelves differ in design features, being divided into closed and open. The former are used for storing kitchen utensils, as well as cereals, herbs and seasonings. Publications, recipe books, and collectible dishes are placed under glass. Wine shelves for collection varieties can also be closed.
Open racks are designed for spices in sealed jars, indoor plants, designer plates, vases, souvenirs, etc. Plywood shelves are easy to use and ergonomic.
The design of the structures varies according to the design of the room. The interior of a home of a special style requires appropriate pieces of furniture.
https://www.youtube.com/watch?v=EdoFzxL3JLM
Rooms in classical and Provençal styles will be complemented by laconic wooden structures. Natural textures are emphasized with transparent or translucent varnish, decorated with carved ornaments, and artificially aged. Shelves in Provence style rooms are decorated using decoupage techniques or painted in pastel shades.
High-tech rooms are decorated with shelves in soft colors and laconic geometric shapes. LED lighting is acceptable. Wooden structures are complemented with transparent glass and metal inserts.
Shelving in a modern room should have rounded edges and non-standard curved configurations. The shelves are complemented with carved fragments or floral ornaments.
In rooms decorated in country style, shelves with minimal finishing, painted or decorated by brushing, are preferred. Designs made from pallets, boxes, and crates are acceptable.
The romantic style is emphasized by designs with forging elements, complemented by engraving and patterns.
A shabby chic room is decorated with shelves painted in light shades. The designs are often modular, consisting of several compact wall-mounted units.
How to make a wooden shelf with your own hands
Drawing of a shelf
The work on making a wooden shelf yourself can be divided into several stages, these are: preparatory, assembly, decoration and installation.
Preparatory stage
At this stage of the work, a drawing (scheme) of the shelf is selected or developed, and the need for its decoration is determined.
Based on these parameters, the required material is selected.
When the drawing has been developed, the material has been selected and prepared, the tools and other materials that will be required to process the assembled structure are prepared.
Installation of whatnot
Using prepared materials and tools, workpieces are manufactured and processed.
The workpieces are sawed in accordance with the existing drawing or sketch, after which the cut points are cleaned in order to remove irregularities in these places. When using boards, they are planed and sanded.
The shelf is being assembled.
Options for fastening workpieces to each other depend on the material used and must provide the required structural rigidity.
Methods and locations for installing fastening elements should be thought out at the stage of developing a product sketch.
Decoration of the structure
The simplest option for finishing an assembled product is to coat it with varnish or paint. This also applies to various types of lumber, as well as plywood and OSB sheets. When using chipboard, only edge processing is required, for which edge material is used that is glued to these areas of the structure.
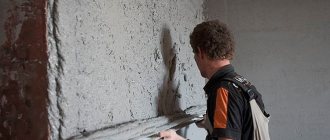
When using lumber and trying to make a “antique” shelf, several processing methods can be used, these are:
- Brushing is a method when mechanical processing of wooden products with metal brushes is performed, followed by polishing and treatment with wax-containing substances.
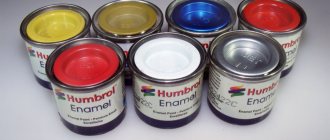
- The use of stains that are used to process the manufactured product.
- Patination is a method in which a wooden surface is painted with paints of various tones in several layers.
- Craquelure is a method of treating painted surfaces with a special compound, craquelure, which gives the product an “antique” look.
Selection of wood and necessary tools
Wood is practical, versatile, and easy to process. For shelves, novice craftsmen are recommended types of wood with a soft structure (pine, aspen, alder, linden).
When selecting, you need a material with an even outer layer, without deformation. The boards must be well dried, without cracks, voids, knots, or mold damage.
Stands are also made from wood derivatives (chipboard, laminated chipboard). Plywood shelves are economical, durable, and do not require special processing.
The work will require tools:
- roulette;
- table saw;
- sandpaper;
- screwdriver;
- hacksaw or jigsaw;
- grinding apparatus;
- electric drill;
- construction level;
- fastenings (nails, screws, brackets, dowels);
- glue;
- varnish or paint.
Safety regulations require safety glasses and gloves.
DIY book shelf
Despite the fact that electronic devices are replacing printed publications from a person’s life, many people still carefully store books and magazines dear to their hearts, the storage location of which often leaves much to be desired. If this is your situation, it will be useful to learn how to make bookshelves that are functional and fit into the interior.
Book shelf
If you are not a specialist, then you should not immediately take on the manufacture of a complex structure. Next, we'll look at the process of making a simple slatted bookshelf.
Stages of work
To work you will need a tool:
- screwdriver;
- electric drill;
- jigsaw or wood saw;
- roulette;
- construction square.
As for consumables, you will need:
- slats 20x40 cm;
- wood screws 3.5×45 mm (at the rate of 2 pieces per attachment point).
Now you can start making the shelf. The first step is to make “ladders” - side parts (and if the shelves are long, the middle ones too).
The dimensions of the shelf will depend on the size of the books that will be stored on it. If the books are not large, then shelves 20 cm wide are quite enough to accommodate them. The height of the cells is selected so that the book can be conveniently taken from the shelf. Also, the height of the cells at different levels may differ. As for the height of the shelf, this is a matter of personal preference, but it is important to note that although this shelf will be attached to the wall, it is not intended to be suspended, so it will sit on a solid surface.
First, slats are prepared that will be used as racks, and crossbars are already attached to them, for which holes are drilled along the edges of each plank with a thin drill.
Preparing to make a bookshelf
Having screwed the cross member with one self-tapping screw, you need to check its position.
Tighten the first screw and check the angle
Having aligned the rail, it is secured with a second screw.
After checking the correct angle, tighten the second screw
The assembled “ladders” are laid on the floor, and after checking the correct angle, they begin to be fastened with slats, which are cut according to the length of the structure.
Assembling the structure
Then the remaining slats are attached.
The frame is assembled. Now you can put it on the wall and secure it
The structure is lifted and attached to the wall, after which the remaining slats used as shelves are fixed.
After screwing it to the wall, install the shelf slats
This shelf will hold many books.
Slat bookshelf ready and loaded with books
The assembled shelf is designed for a large number of books, but if you need a smaller design, then you should pay attention to the video instructions and photos of the products you like.
Video: bookshelf on the wall
What are the shelves attached to?
Long-term use of wooden shelves is ensured by fastenings that are responsible for the ergonomics and functionality of the structure.
There are several types of fastenings:
- dowels and anchors;
- staples;
- belts;
- hooks, etc.
Strong fasteners with fixation are the most reliable. The shelves are attached to the wall panel with dowels and anchors, giving the structure strength. The method is optimal for structures for heavy objects. The disadvantage of fastening is the complex dismantling process, which requires additional cosmetic repairs to the room.
Suspended structures are attached to the ceiling or to the wall with your own hands using belts, strong ropes, harnesses, ropes, etc. The mount not only performs functional tasks, but is also a design decoration for the interior.
Brackets for removable shelves are hung on the wall panel using brackets and hooks.
Wall modules are equipped with an extension method. First, the lower tier is formed, then the upper blocks are attached to the lower ones using holders or removable elements. It is allowed to change the width and height of elements.
Hanging blocks are attached with standard hinges and brackets. Light wood species and MDF boards are recommended for structures. The shelves are screwed on with self-tapping screws, which are located in the side sections.
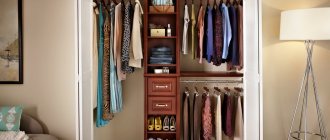
What to put on the shelf?
The shelf should not hang “idle.” There will definitely be things that can be put on it. If this is a kitchen, then on an antique shelf you can place dishes (beautiful mugs, jugs, etc.), or hang towels (if the shelf has hooks).
If the shelf is located in the living room or bedroom, then it can become a location for photographs, paintings, or memorable souvenirs. The shelf can also be placed under the mirror, and it can serve as something like a dressing table.
Antique-style shelves will look good in a bathhouse and will be a good place for various bath accessories.
The idea of antique shelves can be especially interesting for collectors who are wondering where to place their collection, such as beer mugs, china, and so on.
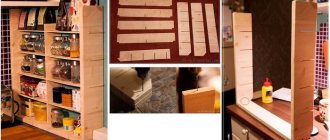
Step-by-step instructions for making a simple rectangular shelf
A step-by-step guide to making a rectangular shelf includes several steps:
- processing of raw materials;
- marking wood boards;
- sawing;
- grinding;
- varnishing or staining;
- assembly;
- fastening the structure to the wall.
Before creating a wooden shelf, you need to prepare a sketch, take measurements, and calculate the weight of things to be stored. It is necessary to calculate the indicators:
- width;
- length;
- height.
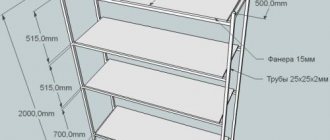
Depending on the weight of the items, boards with a thickness of 20-40 mm are required.
Marking, sawing and processing of workpieces
Dimensional characteristics are transferred to the surface of the boards. The materials are fixed with clamps and cut according to the diagram and patterns with a hacksaw. Wooden parts must be sanded to remove cracks and chips. The material for some shelves (in showers, kitchen areas) must have moisture-resistant characteristics, so it is necessary to impregnate the elements.
Then the places for fastenings on the boards are marked. After marking the points, holes are drilled with an electric drill (make sure the openings are horizontal).
Finishing includes rounding of sharp surfaces, engraving, carving of ornaments. Using a burning device, you can create original patterns on surfaces. Depending on the design solution, surfaces can be primed or varnished.
It is possible to preserve the natural texture of wood using stain or special wax. Paints for natural raw materials are recommended to be tempera or acrylic. Work is performed outdoors or in a ventilated area.
Assembly
The work is completed by assembling the parts. Horizontal long boards are connected to short vertical parts using self-tapping screws. At the ends of the boards, 2 fastenings are required.
Modules intended for massive objects are connected with 3-4 self-tapping screws and are supplemented with mounting angles for strength. The vertical parts can be reinforced with short boards, placing them in a vertical position between 2 bases. Additional supports serve as partitions, preventing long shelves from deforming under massive objects.
Openings for hanging fasteners are drilled in the wall panel; the holes are made strictly horizontally. Directional accuracy is checked using a measuring level.
Brackets are attached to the openings on which shelves are hung. You can add a sheet of plywood to the part of the shelf adjacent to the wall panel. The external block, if necessary, is closed with glass doors, which are hung on hinges.
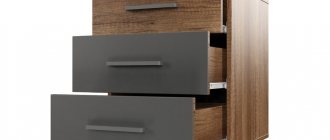
Chipboard shelf
You can make a more complex shelf using chipboard. Here you will have to work longer, but the result will be beyond praise.
Step 1. In this case, you need to purchase the following tools and materials. This is a jigsaw, iron, screwdriver, grinder, screwdriver, drills, hex key, pencil, tape measure, square. You will also need chipboard, edging tape of the required width and color, screws, confirmations, plugs for them, and hinges.
Tools for work
Prices for popular models of jigsaws
Jigsaw
Step 2. Next you need to make a sketch and drawing of the future shelf. It is important to immediately put all the parameters on the diagram - this will make life much easier. It’s easier to do something based on a specific diagram, rather than by eye.
This is what the shelf will look like
Drawing of the future design
Drawing of the future design (part 2)
Step 3. Now you need to make the side parts of the shelf. To begin with, you should draw the outlines of the blanks on the chipboard sheets.
The contours of the workpiece are drawn
Step 4. Next, the shelf parts need to be cut along the contour using a jigsaw.
Parts are cut out with a jigsaw
Step 5. The edge will most likely not be perfect. So the edges of the workpieces need to be sanded using a special machine.
The edges were far from perfect
Sanding the edges
Sanded edges
Step 6. Now the edges need to be covered with edge tape. It can be glued using an iron. You need to iron the edge through the fabric to prevent it from sticking to the iron.
Gluing edge tape
Step 7. Excess edging tape can be easily and simply cut off with a sharp knife. And then it is better to sand the edges with fine sandpaper so that they become completely smooth. The side parts and racks are ready.
Trimming the edge tape
Result of work
Step 8. According to the drawing, you also need to make shelves and an internal crossbar. Having marked the future holes, you can immediately drill them. The drawing will help you find the necessary points for marking.
Shelves made
Step 9. On one of the internal racks you need to make cutouts for shelves. Adding such a stand to the design will give it originality. This move will also make the shelf more reliable.
Shelf cutout
This will make the shelf more reliable.
Step 10. Racks and shelves need to be secured with confirmations. The holes for them must be drilled at a distance of 8 mm from the edge. The holes should be such that when the confirmat is screwed in from above, its cap will be recessed into the wood, that is, two-level.
Fastening parts
Confirmations are used for fastening
Prices for cordless drill/driver
Cordless drill/driver
Step 11. The shelf parts need to be connected with confirmations, screwing them all the way and placing plugs to close the holes.
Confirmats are screwed all the way
Another photo of the process
Then the holes will close
Closing the holes
Step 12. Now you need to fasten the metal corners on the back of the shelf that will hold it on the wall, and hang the product on the wall. The shelf is ready.
Finished shelf
Video – Simple shelf
Video - Original shelf
Video - The fastest and most reliable way to make a hidden shelf
Original designs for books of non-standard shapes
Book stands can be classic or non-standard configurations. Models in the form of wood, volumetric boxes, etc. are common. A very interesting idea of creating a stand for publications in the form of a honeycomb is suitable for interiors in a modern style (Art Deco, Art Nouveau).
The number of blocks and materials depends on the project and the dimensions of the room. To make such a composition of 3 blocks, 15 narrow boards are required. On the edges of the workpieces, cuts are made at an angle of 30° using a miter saw. The parts of the project have a trapezoidal configuration. Holes are created with a drill at the joints of the parts.
The elements are fastened with wood glue. Screws are screwed into the holes; 1-2 fasteners are needed on each side. The boards are sanded and painted.
Finally, the original shelf is suspended from the wall panel using brackets and screws. It is easy to hide the fasteners using decorative plastic plugs, the tone and texture of which matches the uniform design of the room. It is allowed to use mastic of a similar tone.
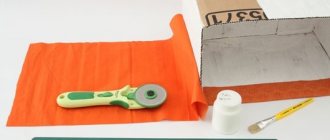
Making a wooden shoe rack
The shelf in the hallway is made with your own hands in the form of a corner rack, which allows you to save space. Standard wooden boards can be replaced with budget MDF boards.
Rectangular side elements and triangular-shaped parts (shelves) are drawn on the surface of the slab. The parts are cut out using a jigsaw. Sharp edges must be treated to ensure safe use of the product. The work is performed with sheets of sandpaper. Holes are drilled in the parts using an electric drill.
The work on making the shelf with your own hands is completed by painting or tinting the product. Decoration is recommended to be done outdoors or in a ventilated area.
Before assembly, the slab placement levels are marked on the side parts of the structure. The elements are assembled and fastened with self-tapping screws; now, for reliable operation, the side parts of the structure are additionally attached to the wall panel.
What can you make a shelf from: choice of material
Before you start manufacturing, you need to decide what you can make the shelf out of. The choice of material is as important as the manufacturing process itself. Focus on soft wood such as spruce, birch, linden or poplar. They are easily processed at home.
You can use chipboards and fibreboards, in other words - chipboard and fiberboard. True, they are quite heavy. In addition, their appearance leaves much to be desired. The surface has to be plywooded or covered with something. Then, this is not a very durable material. Furniture made from chipboard may become loose due to weak joints. For example, in places where hinges are attached. Plywood is not suitable for making load-bearing structures. It bends under the weight of objects and is deformed, so in its pure form it is more used for decorative purposes.
Despite the fact that you can make shelves with your own hands from scrap materials , you need to remember that only dry wood is suitable for processing. It is impossible to make shelves from raw material, since when it dries it becomes deformed, creating the most unexpected curved shapes.
Hinged design for spices on belts
The kitchen space requires compact stands for herbs, cereals, and spices; The spice rack is made according to standard drawings or an original design. You will need 1-2 boards, laminated on the outside, and steel fittings for a hanger. Plywood spice racks are a budget option.
After measuring the dimensions of the shelf, the boards are marked and cut. The elements are connected into a single structure using an adhesive base. It is necessary to secure the parts of the shelf with clamps and leave them to dry for 12 hours. The elements are additionally connected with self-tapping screws. The boards are sanded and painted.
A hole for fastening is drilled in the wall or ceiling surface, and the hook or bracket is secured with dowels. Ropes or belts are pulled into special openings. The homemade spice rack is adjustable and fixed at the desired height using a dowel.