What do we need
A TV stand is completely ordinary furniture, and therefore both materials and tools will be needed here. It is worth paying attention to the proportions of the selected model and the weight of the TV.
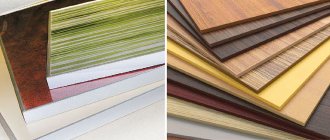
- wood - furniture board is chosen for production. The most affordable option is pine. There are no restrictions here, but if the product is made by hand inside and out, then it is worth remembering that different types of wood exhibit different properties from each other. Hornbeam is difficult to process, exotic wood is often not varnished, and so on;
- MDF – wood fiber board. Laminated or even veneered. The material is easy to cut and holds fasteners well;
- plywood is a layered wood material. Despite its low weight, it has good strength;
- Chipboard is the most affordable option and the lightest;
- Fiberboard - the material is used for the back wall of the cabinet and the bottom of the drawers, if there are any in the design.
Most workshops and even stores offering building materials also provide services for cutting, cutting and edging parts.
Articles on the topic (click to view)
- Photo of modern interior design with electric fireplace
- Photo of curtain design for the kitchen and living room with two windows
- How to make a mini bar for storing alcohol in the living room
- Built-in wardrobe with TV for the bedroom
- Photo of living room design in an apartment in black and white colors
- How and how to decorate a wall
- Photo in the interior of a wall clock in the living room
The standard mount is used:
- furniture confirmations,
- dowels,
- steel and brass screws.
The set of tools is also the most common:
- drill with attachments;
- jigsaw, if you decide to cut the material yourself;
- hammer;
- pencil.
DIY TV stand made of wooden materials
Subtleties in making a TV stand with your own hands
If you have at least some skills in carpentry, then you can make a TV stand yourself, but for this you will need a minimum set of tools for woodworking:
- jigsaw;
- drill, screwdriver;
- boards, screws;
- tape measure, level, ruler;
- Perhaps wood glue will come in handy.
In our video tutorial today, watch how to make a comfortable and durable stand from Euro pallets.
Dear readers, do you have any questions? Feel free to ask them in the comments, we will discuss every moment with you, because your opinion is very important to us.
How to make a TV stand with your own hands
The first stage of self-production is the same for any product: creating a drawing. Whether to use a ready-made one or develop a project yourself depends on experience, skill and self-confidence.
In any case, you first need to establish the dimensions of the TV, clarify its weight, and also measure the parameters of the accompanying equipment. Subwoofers, speakers, set-top boxes, etc. have very different dimensions, so the compartments in the cabinet must correspond to their parameters.
The drawing is made to scale, indicating all the values for both the main and supporting elements. Then the details are transferred to whatman paper, where they are displayed in true size. The resulting patterns are used for cutting.
Don't forget to also watch the following video with the process of making a white TV stand:
Cone products
The product got its name due to its unusual shape - in the form of a cone with an extension up or down.
- The model with an upward extension looks, of course, much more original. However, for making it yourself it is perhaps the most difficult project. The point is balance: here you will need to calculate the balance not only for the product itself, but also under heavy load conditions. Therefore, this model is not used as a TV stand.
- A conical cabinet with a downward extension is much more stable in its design. For self-production, the main difficulty here will be fastening, since the sides of the product or frame elements are assembled at an angle of less than 90 degrees. Complex and accurate calculations will be required to form a drawer.
- The simplest option is a cantilever model, where only the facade plays the role of the side of the cone. But if the product is supposed to be equipped with drawers, it again turns from relatively simple into very complex.
The furniture assembly itself is carried out according to a standard scheme, but it is difficult to find or develop an appropriate design for conical TV stands with your own hands.
DIY TV stand
From plywood
The procedure for working with any wood material is the same. The only difference is the processing speed and the effort involved.
Birch plywood is most often chosen for furniture. It costs more, but is very attractive in appearance.
- The patterns are transferred to plywood and cut out. The edges are sanded with sandpaper.
- The edge - plastic or wooden, is fixed sequentially on the ends of the shelves, the facade and the countertop. Glue is used; if desired, you can nail the wooden edge with finishing nails. After drying - 1-2 days, the wooden edge is sanded.
- Depending on the model, the frame elements are assembled using dowels or screws. In both cases, holes are drilled in the parts in advance, always checking the diagram. For dowels, holes are made not through, for self-tapping screws - through. The dowels are seated on glue. If necessary, the connected parts are tightened with a clamp and left until the glue dries - 1 day.
- Assembly begins from the top shelf - or tabletop. It is fixed to the sides or legs. Then the bottom shelf is installed, and then the filling elements - the third shelf, partition, and so on.
- It is recommended to install internal shelves on shelf holders. If you plan to install drawers, then guides, preferably telescopic, are fixed to the sides and partition.
- They assemble the boxes and install the fittings. Legs or rollers are mounted to the bottom shelf of the product.
- The finished product can be opened with 2-3 layers of varnish to preserve the natural structure and color of the wood. You can also use stain or paints - alkyd, water-based.
DIY plywood TV stand
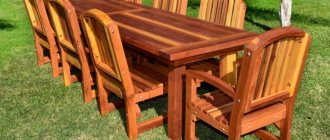
Made of wood
A wooden cabinet is made in exactly the same way.
- Shelves, a tabletop, and also sidewalls, if provided for in the model, are cut out of furniture panels.
- From wooden beams - 50*50, 20*20 mm, crossbars and crosspieces are cut. The latter are needed for long cabinet lengths - more than 1.2 m;
- Assembly begins with the frame, then the crosspieces are mounted, and then the sides and shelves are fixed. The last thing to install is the countertop.
- Dowels and screws are used for fastening. The holes must be drilled in advance - there is a high risk of splitting the wood.
- The external finish of the product depends on the style of the living room and personal preferences. The means used are the same: opening with varnish, staining, staining. Although in relation to an array of trees, the latter method is used less frequently.
The following video will tell you how to make a TV stand with your own hands:
Expert opinion
Romanova Ksenia Petrovna
Interior design expert and fabric store manager
Do you want to make a stylish TV stand with sliding doors from wood yourself? Then watch the following video carefully:
From other materials
- TV furniture is made from chipboard even more often. The sequence of actions and processing method are the same. The only limitation: if the parts are connected incorrectly and it is necessary to dismantle and reassemble, you cannot reuse the same holes. Chipboard does not hold up well when re-attached. If the household has a router, then with its help the tabletop, shelves and even sidewalls can be given a much more complex configuration than a regular square or rectangle.
- Glass can also be used to make furniture. In this case, only tempered glass with a thickness of at least 8 mm is used, usually this is a shelf and doors for blind compartments. In this case, to cut out the parts you will need a glass cutter and special fittings - hinges for glass sashes.
This product will definitely be unique.
Photo of a DIY TV stand
Decoration
After making a TV stand from natural solid wood, it will need to be given an attractive appearance. To do this, all fastening points with bolts and screws are puttied with a special filler for wood.
Next, the product can be coated with stain and varnished in several layers. Also, wooden furniture can be painted with water-based enamel or acrylic paints .
For classic motifs, a wenge shade is suitable, for country or Provence, white colors are chosen, and modern models can be painted in any color. Although people rarely paint over the beautiful texture of an array. If desired, you can decorate a wooden cabinet with carvings applied to the table top or external walls.
As for the range of use, the piece of furniture we made can be used not only as a TV stand, but also as a piece of furniture for storing things.
Tip : instead of a cabinet, you can place the TV on a home-made table or even a chest of drawers. And for comfortable viewing it’s worth making an armchair or sofa.
Blueprints
The easiest way is to use a ready-made drawing, especially if you are sure that the product was manufactured and used according to it. First, of course, you need to make sure that the dimensions of the cabinet are suitable for the dimensions of the TV, as well as speakers, set-top boxes, modems and other things.
More convenient are the drawings, which indicate not only the dimensions, but also the details of the product with the necessary parameters, and also provide recommendations on the characteristics of the material - sheet thickness, section dimensions, type of fasteners. In addition, on specialized sites you can find not only the drawing itself, but also a video demonstrating the assembly of the item.
A TV stand is more of a practical device than a decorative one. Making it yourself is not so difficult, and with imagination and perseverance you can give the product a completely unique look.
DIY TV stand (drawings)
2 drawers and 2 shelves 2-tier Long On casters Chest of drawers With 2 drawers Corner
Drawings and diagrams for assembling a TV stand
When you have decided on the model of the future product, its dimensions and functionality, you need to prepare a drawing. If you know how to draw, then do it yourself, otherwise you should find a ready-made diagram on sites with the relevant subject.
Important! When choosing a drawing, you need to pay attention to the weight and dimensions of the TV, as well as what additional accessories, decorative elements, etc. you plan to place on the bedside table.
Preparing for work
Before you begin the process of making a cabinet, you need to prepare well. You have to select the material from which it will be made and calculate the required quantity. And also decide on the design of the future product, prepare the necessary tools, consumables and accessories.
Let's look at these stages in more detail.
When choosing a material for making a bedside table, you should focus on the optimal price-quality ratio. You should also take care of the functionality and appearance of the future product.
Frame
- The most popular today is chipboard , which is pressed chips. This material is practical, inexpensive, and comes in a variety of colors.
- MDF is also wood chips that are treated with glue . The material is more durable and resistant to moisture.
- You can also use special plywood for furniture . However, finding high-quality plywood suitable for these purposes can be difficult. Moreover, its cost is higher than that of other materials.
- A TV stand can also be made directly from wood . For this, boards made of pine or oak . However, in this case, you need to have some carpentry skills and tools.
Accessories
You should also be responsible when choosing accessories.
Depending on what material you choose, use screws, self-tapping screws or regular nails .
Important! If your cabinet model includes drawers, do not forget to purchase special rails for them, as well as handles.
Selecting a model and drawing up a drawing
When choosing a specific model of your future TV stand, focus on the interior and the size of the room in which it will stand . Also consider your own strengths and capabilities. It is better to choose a laconic model of a simple shape, not overloaded with unnecessary details .
Before starting work, you should make a drawing of the future cabinet with calculation of the dimensions of each individual part.
You can also use ready-made drawings from the Internet.
Preparing tools
For comfortable work you will need:
- electric drill with various drills;
- hacksaw;
- sandpaper;
- screws or furniture ties;
- roulette;
- pencil.
The list can be expanded depending on which model of cabinet you have chosen.
Arrangement of shelves for TV depending on their type
Each shelf for a TV receiver differs in its operational characteristics, as well as in its design. Thanks to these two qualities, the cabinets provide additional reliability and last many times longer.
TV stand: its structure
It is not recommended to install such stands in a home where there is a possibility of tipping over, for example, if you have children or pets.
This option is suitable for small studio apartments, as well as small living rooms. It is immediately worth noting the strength of the legs and decent parameters. Typically, similar installations have three sections on a telescopic base. They are conveniently height adjustable using special levers. The diameter of the tubes can vary from 19 to 25 mm (depending on the brand). The standard height of the equipment is 2.4 m, and when folded it is a fairly compact unit, only 90 cm.
Features of direct TV stands
In closed versions of the stands it is convenient to store not only additional equipment, but also cables and filtering devices.
Straight bedside tables are produced as a floor structure with additional doors, behind which niches of different sizes are hidden. This option is considered the most common and reliable; it is most often made from wood or MDF. The structure is conveniently placed along the wall. It has good capacity and can be made without doors.
What is characteristic of a corner TV stand?
Corner cabinets are a great option for a small TV.
The corner TV stand is made of durable plastic, glass or wood. It can have an unusual design and be in a classic style. This option can be used for plasma installations in limited space. Looks great not only in living rooms, but also in the kitchen.
Wall stands for plasma TV
Wall-mounted stand models play not only the main role, but also the role of decor in the living room.
Hanging or wall-mounted TV fixtures are suitable for rooms with a small area or in cases where there is a small child in the house. The stand is attached to the wall with special clamps and has a dimensional base. The branches of the hanging structure cling to the body of the TV and support its weight. Such racks are rotating, inclined and standard.
Universal TV stands for tables
Universal brackets are useful for any TV model.
Table stands are a sliding design with a wide base. The TV is mounted on brackets to the center of the stand. It is made of metal tubes operating on a telescopic mechanism. The shelf base is wide and can hold a small kitchen plasma. The same models can be used to mount other equipment: a laptop, computer monitor or tablet. The device can be used in the bedroom on the bedside table.
Peculiarities
Modern TV models can be either compact or wide-screen, with the ability to be mounted on the wall using brackets, or simple with installation on a special cabinet or chest of drawers. In order to optimize space, especially in small apartments, flat TV screens are hung on the wall. However, the interior and construction features of the room do not always allow you to install the TV on brackets.
Window openings, bends, the thickness and material of the wall itself can interfere with this installation method.
In this case, modern cabinet furniture manufacturers offer a wide selection of TV stands that can easily fit into any interior style. Wide and narrow, high and low, simple and multifunctional, as part of modular furniture and representing an independent piece of furniture - any online store is literally replete with a variety of options.
But it also happens that the features of the living room interior require an individual approach. Products presented in furniture showrooms may not suit the customer in terms of dimensions or other characteristics. It is quite difficult to choose the ideal ready-made option that will correspond to the given size, design, color and functionality.
Therefore, more and more often, TV tables are made to order. But this option is quite expensive. An alternative and interesting solution would be the opportunity to make a cabinet yourself with your own hands.
Manufacturing scheme
A homemade TV stand should be made according to a pre-designed scheme. If the craftsman does not yet have sufficient experience in furniture making, you can watch numerous videos on the Internet on how to make a cabinet with your own hands.
You can create a drawing either independently or using special computer programs that allow you to create a 3D model of the future product.
First of all, marking and cutting of all parts is carried out. In the case of using laminated chipboard, after cutting, the bare end of the workpiece remains visible. You can hide it using a melamine edge.
When choosing, you must take into account that its size is several millimeters wider than the bare end. At home, when applying an edge, you can use an iron to heat the adhesive side of the product over the entire surface, after which the corner must be sanded.
A Russian proverb known to everyone since childhood says: “Measure seven times and cut once.” Before sawing materials, carefully measure the sides and clearly draw a cutting line.
Then the frame is assembled: the side and back walls are installed, the tabletop and bottom shelf are applied. A perforated angle can be used to secure housing parts. Afterwards the legs are fastened and the object is installed vertically.
Next, shelves, drawers or doors are installed, depending on the intended model. Lastly, the fittings are attached.
What to make it from: wood or chipboard?
Depending on the materials chosen for the manufacture of furniture, its appearance, practicality and ease of use will depend. Most often, home craftsmen use for these purposes:
Natural array.
This material is valued at all times for its naturalness and nobleness. You can make a TV stand from any type of tree. Most often, craftsmen use: oak, ash, pine or birch. For elite and luxurious furniture, which will be the highlight of a classic interior, it is better to choose oak, beech or black walnut .Linden, birch and pine are considered more budget options. When listing the advantages of solid wood furniture, it is worth highlighting: long service life, elegant appearance, beautiful texture. But not all tree species can be processed at home. For example, making oak furniture without the skills is quite difficult.
- MDF. This material is made from natural wood. TV stands made from MDF are extremely beautiful and aesthetically pleasing. But it costs much more than chipboard. The advantages of the material include: environmental friendliness and safety, low weight and uniform structure.
- Chipboard. This material is considered the most common due to: a large selection of colors, ease of processing, and affordable cost. Chipboard is a natural and safe material that does not emit toxins and does not provoke allergic reactions in people .
Chipboard.
In principle, this material is practically no different from chipboard. The only thing is that its surface is covered with a melamine film, which increases the material’s resistance to moisture. Like chipboard, laminated chipboard is resistant to defects, environmentally friendly and is supplied by manufacturers in a wide range.- Furniture board. It pleases craftsmen with its even and smooth surface and ease of use. It is attractive in appearance, durable and resistant to cracking. Thanks to the wide range of furniture panels, you can make a bedside table of any thickness.
Tip : Chipboard is considered the easiest material to process. No special tools are needed to process it.
Advantages of a homemade bedside table
Each buyer draws for himself an ideal model that will not only fit into the interior in size, but will also match it in color and style. A wide selection of furniture products, including TV tables, allows you to purchase seemingly any model.
However, when faced with the specific task of choosing, a person is often faced with the fact that the size, color, or design are not suitable. It is this factor that pushes many people to start making furniture with their own hands.
Expert opinion
Romanova Ksenia Petrovna
Interior design expert and fabric store manager
Making a TV stand with your own hands is quite simple. To do this, you just need to choose the right model, focusing on your professional level.
The choice of material for the construction is also critical. Some materials make it easy and convenient for even beginners to work with them, while others require not only skills, but also special tools for processing.
Assembling a TV stand with your own hands requires meticulousness and a correctly structured step-by-step scheme for installing parts.
By assembling a TV stand with your own hands, you can not only get a unique design, but also save significantly on the purchase of a ready-made model.
However, when faced with the specific task of choosing, a person is often faced with the fact that the size, color, or design are not suitable
In addition, you will need screws, self-tapping screws and four guides for further securing the manufactured drawers to them.
The inner wall should not be removed, because it gives the structure additional strength, preventing it from bending under the weight of the TV.
Required materials and tools
It is important to determine the main material of the TV stand for making it yourself. It should also be in harmony with the interior design. Self-assembly of a TV stand is made from popular building materials:
- plasterboard is a malleable and comfortable material; furniture of unusual shapes is often made from it, but it cannot withstand the loads of heavy equipment;
- Chipboard and plywood are budget options, easy to process, suitable for simple and undemanding products in terms of appearance;
- MDF is a good lightweight material with an attractive appearance, very durable and easy to use;
- natural wood (solid boards or furniture panels) is an ideal material for furniture; it produces uniquely beautiful things, including a bedside table.
Advantages of various types of cabinets with a mirror in the hallway, their design
Additionally, fiberboard is purchased to cover the back wall and bottom of the drawers of the cabinet. In the case of designing an open shelving structure, you can do without it. Particular attention is paid to the selection of accessories for the cabinet. Each person calculates the number of necessary components individually based on the specific model. Required elements include:
- confirmations;
- self-tapping screws;
- small nails;
- shelf supports;
- drawer guides;
- handles or “push mechanisms”;
- hex plugs.
Before assembly, you need to check that you have all the tools that may be needed for the job:
- electric drill with drills 5 and 8 mm;
- screwdriver;
- Phillips screwdrivers;
- hammer;
- roulette;
- ruler;
- level;
- a simple pencil;
- Whatman sheet.
This list can be supplemented with a jigsaw and a grinder if you decide to make the cut yourself. It is worth noting that many companies provide similar services on site. This significantly reduces assembly time.
Drywall
Chipboard
Plywood
MDF
Natural wood
Required Tools
Drawing a drawing of the future bedside table
For beginning furniture makers and just amateurs, it is best to use ready-made drawings of a bedside table. A lot of options can be found on specialized websites.
When choosing a drawing, you need to focus not only on the final result, but also on the complexity of manufacturing and assembly. An important factor is the material recommended for manufacturing.
Some designs require certain materials that may not be suitable for the craftsman in terms of cost or durability. For example, models with narrow countertops and shallow cabinet depths can withstand a lot of weight when made from solid wood.
The use of chipboard in such cases will sharply reduce, possibly, the permissible load on such a bedside table. Therefore, it is extremely important to evaluate the weight and width of the TV that will stand on it.
It is also necessary to remember about additional accessories that will be needed when operating the TV, these could be speakers, a video player, and more.
Often, a TV stand can accommodate CDs, magazines, newspapers and decorative items. This should also be taken into account before you start making your own drawing.
Making a TV stand with your own hands is quite simple.
The list of tools can be shortened or expanded depending on the complexity of the product and the selected materials.
Often, the decor of TV tables consists of combining different materials and decorating it with glass parts.
Manufacturing
Having prepared everything you need, you can start making a TV stand with your own hands.
First of all, you need to saw off all the parts according to the drawings and carefully fold them. By the way, before you start cutting materials, make a cutting diagram to make sure there is enough material.
If the choice was made in favor of laminated chipboard, then the next step will be gluing the ends. Before this, you will need to sand the ends with sandpaper for better adhesion.
Gluing the edge is quite simple, just apply it and run a hot iron along it through a thin fabric. You should pay attention to the fact that the edge is always wider than the end, so you need to glue it so that it extends beyond the edges, this is necessary so that you can then cut it off with a knife, in which case it will not come off over time.
Now we take a set of products and mark the places where we need to drill holes to fasten all the parts into a single whole. Having marked the places where the holes will be, you can begin. Those who have already drilled when hanging something on the wall know that it is difficult to immediately place the drill where it is needed, and it often happens that the hole is drilled in the wrong place. In this case, you need to make a dent; to do this, you need to place a nail in the center of the mark and lightly hit it with a hammer, or use special wood drills with a sharp tip.
The holes are auxiliary and guide. They should be 2 mm smaller in diameter than the fastener itself.
Having made all the holes and repeated measurements, you can proceed to the last stage - assembly. It is necessary to assemble the product carefully, because if you assemble and then disassemble it, then all the holes for the screws will increase and will no longer connect the elements of the TV stand tightly.
This particular drawing of a TV stand implies the presence of drawers, which are assembled separately and be careful when installing guides on the walls and on the drawers themselves. Even changes of 1-2 mm can affect the final appearance of the product
Selecting the best materials for the job
The variety of materials allows you to make very cheap and simple models, as well as go for the chic. Not every TV stand can be made with your own hands using any available material.
Some designs involve only wood or only plywood. There are also more universal designs that you can make with your own hands from existing scraps or leftovers from other furniture.
When making a cabinet you can use:
Expert opinion
Romanova Ksenia Petrovna
Interior design expert and fabric store manager
You can also make a cabinet partially from glass or decorative plastic. These materials are most often used for countertops and furniture doors.
Chipboard is the most unpretentious option for work; it does not require any special cutting tools or sanding machines. It is easy to cut and process. Its obvious advantage is its price.
When purchasing wood, you should pay attention to its quality. An important nuance is the absence of defects and the dryness of the purchased material. Damp wood can warp indoors, thereby ruining the finished product.
An important nuance is the absence of defects and the dryness of the purchased material.
Damp wood can warp indoors, thereby ruining the finished product.
You can make a bedside table with your own hands using only a jigsaw.
Varieties
There are many wall options for the living room. You can make the following models with your own hands:
- classic (straight);
- modular;
- corner;
- miniature;
- mounted;
- U-shaped.
In addition, craftsmen can make walls of mixed construction. However, there are other less popular types of walls: a model with a bar or sideboard, a radius option and designer furniture with a built-in fireplace. Before choosing your favorite variety and making a living room wall with your own hands, you should pay attention to the following important points:
- Size and shape of the structure.
- Furniture set design.
- The material from which the wall will be made.
- Installation location and parameters of individual structural elements.
- Features of installation of electrical wiring for connecting lamps.
Preparing tools for work
You can make a bedside table with your own hands using only a jigsaw. Some craftsmen even do without it, ordering cutting according to the drawing when purchasing the material. Assembling furniture with your own hands still requires the following professional and non-professional tools:
- Pencil, marker or other writing object.
- Thick cardboard for making patterns.
- Ruler and tape measure.
- A compass if some workpieces will have a round shape or rounded edges.
- A jigsaw with files of the required size.
- Clamps for gluing parts.
- Glue.
- Tape for finishing cut edges.
- Screws, self-tapping screws, confirmations.
- Grinding machine.
- Guides for bedside table drawers.
The list may be shortened or expanded depending on the complexity of the product and the selected materials.
Chipboard is the most unpretentious option for work; it does not require any special cutting tools or sanding machines.
When purchasing wood, you should pay attention to its quality.
Stained glass doors look beautiful, although these designs are more fragile than solid sheets of glass.
Restoring an old cabinet
Once the bedside table has been reassembled and all its fastenings have been replaced or strengthened, you can start transforming its appearance. Restoring a bedside table with your own hands can be done in different ways. But if you are not going to use dark opaque paint for this, then it is wiser to first coat all surfaces with one layer of colorless acrylic varnish. This will prevent yellow spots from appearing.
Then you can paint your furniture, use the decoupage method, laminate and veneer its surfaces, or simply treat it with stain and varnish. In addition, if desired, these techniques can be combined and supplemented with others. For example, it is now fashionable to artificially age furniture using the craquelure technique. It all depends on your personal tastes and preferences.
Related article: How to choose a kitchen design combined with a living room
Of course, painting furniture is the simplest and most affordable restoration option. It can be used by people who do not have drawing skills, and the use of stencils will help give your cabinet a unique and very original look. Ideas can be gleaned from fashion magazines, but floral and folklore motifs are especially relevant. A bedside table intended for a children's room can be decorated with funny animals, flowers or cartoon characters. You can even involve children in this work. Such furniture, improved with your own hands, will become much more valuable for kids.
Decorating a bedside table using painting
To make the cabinet look antique and worn, you should use acrylic paints along with liquid silver and silver leaf.
Before applying the paint, the bedside table is washed again, degreased with a weak soda solution (1 tablespoon per 2 liters of warm water) and dried thoroughly.
Then the primer is applied in 2 layers, allowing each of them to dry completely. The easiest way to prime the surface is with a small foam roller or sprayer. Next, the background paint is applied. It is best to use acrylic paints, as they dry very quickly and do not have an unpleasant odor. To apply an image to a varnished surface, use automotive spray paint.
First, paint the inside of the bedside table. Using a brush, apply paint to the corners and joints of the walls, and then paint the surfaces with a roller. This technique will help you avoid drips. The bedside table must be painted at least 2 times.
After the paint has dried, the outside of the bedside table is treated in a similar way. Then you can start painting. Now you can purchase ready-made stencils. They are sold in art supply stores. But you can create the pattern yourself. To do this, print out the design you like on a printer and copy it onto thick cardboard. The thicker your stencil, the longer it will last.
Then remove the places where the paint will be applied using a stationery knife or nail scissors. The stencil is applied or glued to the surface with masking tape and paint is applied with a sponge or roller. It is necessary to remove the cardboard before the coloring composition dries. But this should be done extremely carefully so as not to damage the drawing.
In the same way, you can decorate the cabinet with relief patterns. In this case, decorative plaster is used instead of paint.
Decorating with decoupage and craquelure
Decoupage is the decoration of a surface using images printed on paper. At its core, this technique is very similar to ordinary children's appliqués. Only the drawings are applied to special paper, which after drying becomes almost invisible. But if you do not have the opportunity to purchase special sets, then you can use ordinary disposable table napkins with a pattern. It must be remembered that the lighter the pattern, the paler the image on the surface of the bedside table will be.
Related article: How to watch HD movies from your smartphone on the wall! A simple DIY home theater
Before restoring a bedside table using this technique, it is also better to paint it. Then you need to prepare the selected images. They should not be cut out, but the edges should be torn off, trying to make them as fluffy as possible. This will help the application become less noticeable on the surface of the furniture. Then the drawing is completely dipped into glue (special or colorless PVA) and fixed in the desired place on the bedside table. Using a large, dense brush, the image is smoothed out, removing air bubbles, creases and folds.
Paint the cabinet with your favorite shade of paint, apply the prepared designs and cover the entire surface of the furniture with varnish.
After the application has completely dried, the entire surface of the furniture is coated with transparent varnish. But you can achieve a much greater decorative effect if you use craquelure varnish.
Craquelure is an effect in which a network of characteristic cracks appears on antique items. This technique is nothing more than artificial aging of furniture. If you decide to use it, you can get a bedside table that will look like a real antique.
The craquelure composition is applied to a painted or varnished surface without waiting for it to dry. Under the influence of special substances, the furniture becomes covered with cracks, but the protective properties of the paint do not suffer at all.
This way you can achieve amazing effects. For example, when it seems that gold shines through a dark varnish layer damaged over time. The intensity of surface cracking depends on the composition of the varnish. More detailed instructions can be found on the packaging of the product or from the seller upon purchase.
These are not all the ways you can restore the appearance of furniture. Restoring a nightstand is a creative work that largely depends on your imagination, imagination and patience.
Step-by-step instructions for making a bedside table
- We prepare the drawing. We take a ready-made and proven drawing, or we develop it ourselves, taking into account the size of the TV and its weight.
- We make patterns for all elements. This stage will allow you to accurately calculate the material consumption and not make a fatal mistake.
- We cut out the materials.
- We sand the cut edges. When working with wood, you will have to sand not only the cuts, but also the remaining surfaces.
- Cover the edges with tape. This step is necessary when using chipboard material. To glue the tape you will need an iron and a soft cloth.
- We assemble the cut parts. Assembly is always carried out according to the same scheme. You should start with the countertop. Legs or side backs are attached to it. Then the bottom shelf is screwed on. After the general structure is assembled, we fill the cabinet with additional parts - middle shelves. The rear backrest and doors are attached next to last. If there are drawers, provision should be made for preliminary fastening of the guides on the inner sides of the side walls.
- The last stage of assembly is attaching the legs, rollers or pads.
Assembling a TV stand with your own hands requires meticulousness and a correctly structured step-by-step scheme for installing parts.
Not every TV stand can be made with your own hands using any available material.
There are also more universal designs that you can make with your own hands from existing scraps or leftovers from other furniture.
You can also make a cabinet partially from glass or decorative plastic.
Manufacturing stages
After preparing all the tools, they move on to the actual process of making a TV stand. There are only a few stages. Each of them has some features.
Create a drawing
Knowing the overall dimensions, they create drawings and diagrams of the future bedside table. It is most convenient to do them on graph paper. For greater accuracy, three projections are required: front, top, side. They are quite sufficient to display all the necessary sizes. If an angular view is interesting, then it will be easy to construct it by intersecting lines from previous angles. The diagrams will give a detailed idea of how to make a TV stand with your own hands. When calculating the thickness of parts, the load on each of them is taken into account. The longer the shelf, the less weight it can support.
You should definitely take into account the thickness of the material used, otherwise there is a risk of ending up with insufficient distance between the shelves.
Cutting and edging parts
If you plan to do the cutting, sawing and trimming yourself, then it is important to take your time and carefully measure each line. It is advisable to start work by preparing templates for all parts. They will help distribute the elements of the cabinet on the canvas of the selected material and save it. To do this, all the details are drawn on thick Whatman paper and cut out. Then they are placed on the material sheet so as to fit the maximum amount. A cut is made along the outlined contours.
How to make a bedside table with your own hands, stages of work
To give the parts a neat appearance, be sure to grind the cut ends. If natural wood is chosen as the main material for the cabinet, all surfaces are subjected to the procedure. If the production is carried out from chipboard, then the edges are covered with a special tape using an iron or PVC edging. The edges of the plasterboard TV structure are not particularly treated. Simply coat them with primer and paint.
Prepare templates
Sawing parts
Sand the cut ends
Apply special tape
Prime and paint
Assembly
Having completed all the preparatory procedures with the sawn blanks, they begin to assemble the TV stand with their own hands. The work is carried out in the following order:
- The tabletop is used as a basis. The side edges are attached to it.
- Next, the bottom of the structure is screwed on.
- Next, the resulting frame is filled with internal elements: a partition, shelves, guides for the drawers are installed and assembled.
- Lastly, attach the backrest, doors, and cabinet handles.
To ensure that the furniture comes out level, you need to use a building level. There are short models that are very convenient to work with. Before finally fixing the cabinet parts, it is necessary to check the evenness of their fit.
Fixation of legs
The cabinet can stand on the bottom shelf, have static legs with thrust bearings or rollers to allow free movement around the room. This point must be taken into account when creating a drawing. If legs or rollers are selected, it is recommended to fix them at a distance of 50 mm from the edges of the structure. The fixation order is as follows:
- marking the location of legs or rollers;
- drilling holes for fastening with self-tapping screws;
- screwing all components using a screwdriver.
If the legs are deepened at a distance from the edge of more than 100 mm, then the appearance of the cabinet will be “floating”. This can only be done for a sufficiently wide base. Otherwise, the cabinet will be unstable.
When assembling the cabinet, you must use a level at each stage. It will help determine the parallelism and perpendicularity of the attached parts. With its help, the resulting curvature is leveled out.
Plasterboard sheet is a convenient and cheap source material, but it requires certain skills when working. A do-it-yourself plasterboard cabinet is quite weak in terms of its ability to withstand the weight of a TV and other equipment. This design requires mandatory reinforcement.
Advantages of glass TV stands, ways to place equipment