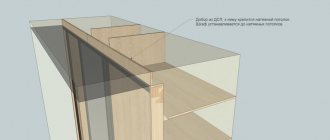
Ideas for transforming modern cabinet furniture
Many years ago, unable to change the kitchen, I covered the facades with napkins, having learned about this method on one forum in a decoupage thread. The furniture lasted a couple more years, and now it lives in a relative’s apartment as a temporary option.
Photo of an old kitchen
Now I'm annoyed by the closets in the bedroom. They are still strong, quite comfortable, just tired. In times of crisis, it’s not yet possible to dream of new ones, so I decided to look for ways that would help me modify them. It turned out that this is possible, and there are many options and all of them are quite budget-friendly.
I share my research.
Idea 1: applique
Applique or decoupage is the simplest and most common way to give new life to old things. The drawing or image can be anything. Quite often, three-layer paper napkins are used for decoration, using only the colored top layer.
But these can be special decoupage cards sold in art stores, wallpaper, photographs, pictures printed on a printer, and magazine clippings.
The decor of the old cabinet is made using applique
In order for the furniture to look decent and serve for a long time, you need not just cover it with paper with a pattern, which will quickly get dirty or tear, but perform a whole series of works:
- First of all, the doors and sides of the cabinet are cleaned of dirt using a soap solution. Sometimes they even have to be treated with sandpaper or a sanding machine - you need to look at their condition.
- After cleaning, degreasing and drying, the furniture is primed, and if it is dark, then painted with light paint. Although if you use a pattern on a dense opaque base for appliqué, this is not necessary. You can use regular PVA glue as a primer for napkins and decoupage cards.
- When the paint has dried, carefully stick on the image - a whole sheet to fit the door or cut out elements, it depends on your imagination. The main thing is that you like the decor of your closet with your own hands.
- To ensure that the applique stays firmly in place and does not come off, and that the cabinets can be subjected to wet cleaning, they are coated with colorless varnish after the glue has dried. Preferably in two layers.
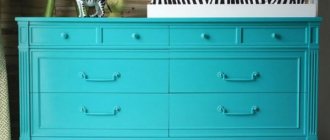
Idea 2: painting
The simplest solution that makes it possible to update an old cabinet with thousands of options. The most affordable is painting in one color. But not the only one. You can paint the body and shelves or drawers in different colors, or highlight the part of the facades limited by moldings or panels in a different tone.
Old bookcases can still serve in a children's room
Using masking tape or stencils, you can apply colored stripes, geometric shapes, and ornaments to furniture. And if you rub certain places with a candle before painting, and after the paint has dried, rub them with scratch paper, you will get an artificially aged surface.
As in the previous case, the surface of the cabinet needs to be prepared for decoration:
- Remove the fronts and fittings from them, take out the shelves and drawers, and clean everything well.
- If there is polishing, it must be removed using a sanding machine, since the paint will not adhere to it.
- Then all the details are painted with your own hands in the main tone. The number of layers depends on the desired result.
- Next, act according to the circumstances: if you are satisfied with a monochromatic cabinet, simply assemble it after the paint has dried, returning the handles to their place.
- If you are planning transitions of color and pattern from one part to another, then first insert drawers and shelves, hang doors, and then proceed to the second stage.
There will be dark stripes where the masking tape used to be.
You can buy figured wooden slats or polyurethane moldings, paint them in the desired color and stick them on the facades in the form of a frame. In general, there are a lot of options.
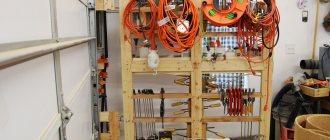
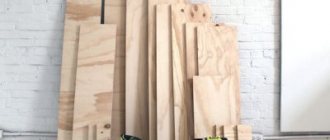
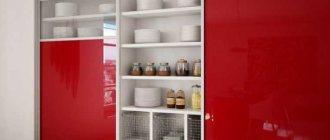
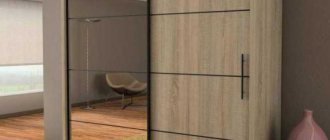
Idea 3: upholstery with sheet materials
Instead of paper, you can paste over the facades or nail thin sheets of plywood, laminated fiberboard or mirrors onto them.
Such a chest of drawers in a hallway with mirrored facades will visually add space and light
Pre-sheet materials are cut and cut to size. You can enclose them in a frame made of wooden slats.
Idea 4: decorating with fabric
If you've made new curtains or a bedspread and you have a lot of material left over, use it to update your furniture. Decorating with fabric is no more complicated than appliqué, the main thing is that it does not stretch and is dense enough.
All work is carried out using the same technology, only instead of a paper base, a textile base is used. But you can do it even simpler and fix the fabric using a furniture stapler on the back of the walls and doors. Of course, to do this, the cabinet will have to be disassembled and then reassembled.
Built-in wardrobe and door after decorating with fabric
You can go further and place a layer of thin foam rubber under the fabric. This is an excellent solution for a restless child’s nursery, but not only that. Such a soft wardrobe would also look good in an adult bedroom. You just need to carefully select the color of the fabric to match the wallpaper or decorative elements.
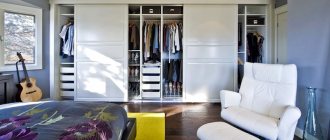
Inside view
The ease of use of the wardrobe depends on the thoughtful internal filling of the wardrobe. As you know, things in a wardrobe can be placed functionally and compactly using:
Rods for clothes. The height at which they are mounted depends on the type of clothing. Hangers with short clothes are hung on rods located 95-120 cm from the floor. For floor-length items and outerwear, according to standards, rods should be placed at a distance of 145-160 cm from the floor. According to the wishes of the owners, their placement and quantity change. For example, in a built-in high wardrobe it is possible to place rods in 2 rows in height.
Double row of rods in a spacious cabinet
Small wardrobe with clothes on hangers
We recommend! Do not make cabinets less than 50 cm deep if you plan to place clothes on rods. The rod parallel to the front wall requires a depth of 60 cm, otherwise the clothes will wrinkle and deteriorate when opening/closing the closet.
Wall-to-wall wardrobe
Drawers. Drawers that can be pulled out to their full length allow you to store clothes compactly. It’s easy to take things out of them, and besides, the clothes are visible: to choose the right T-shirt, you don’t have to take out the entire stack. The modern closer mechanism ensures independent closing of drawers and smooth movement.
Drawers in a miniature wardrobe
Original radius wardrobe with drawers
Shelves. Stationary or retractable shelves are an indispensable part of any closet. The desired shelf depth is 50-70 cm, but smaller cabinets with a depth of about 40 cm are also possible. It is recommended to place the shelves 30-40 cm apart. The specified parameters are suitable for book and clothing models of wardrobes. They allow you to compactly arrange photos and place your home library. It is advisable to think through the future content in advance, even before ordering a wardrobe from a furniture maker.
Thoughtful placement of shelves
Wire boxes. They are also called storage baskets and are literally indispensable for storing a variety of things, including small items and children's toys. The baskets are equipped with a roller mechanism, so they move gently along the guides. Things in them are always ventilated and are always visible.
Children's closet with toy basket
Shoe shelves or nets. Corner shelves for shoes help preserve the appearance of shoes, because in them the shoes are not deformed and are ventilated. Shelves are placed below, closer to the floor, sometimes in 2 rows.
Shoes in the closet
Round rotating shoe shelf in the closet
Ways to transform wooden cabinets
The texture of natural wood is very beautiful, and it’s simply a shame to hide it under a layer of paint, paper and any other materials. If you want to get real designer cabinets from old and dry ones, you will have to work hard.
Firstly, most likely, you will have to replace the hinges and other fittings; as for the surface itself, it all depends on its condition and what you want to get in the end. But in any case, you first need to fill up all the potholes, scratches and other defects with a putty or furniture wax that matches the color, and then these places, and if necessary, the entire surface, are sanded with sandpaper.
The old varnish must be completely removed
Next, you can choose one of the following decor options:
- Toning . Cover the entire cabinet with stain, choosing a color slightly darker than the original.
- Craquelure . Paint the furniture with glaze paint, and then apply a special varnish on top, which, when dry, “breaks” the base layer, creating characteristic cracks on the surface. They will be more noticeable if the paint color and the original cabinet color are different.
This is the surface you will get as a result
- Patination . Softwood and softwood furniture can be brushed with a stiff wire brush to create grooves. Then it is painted with acrylic compounds and, without waiting for the paint to dry, it is lightly wiped with a cloth. At the end of the work, the surface is varnished.
The price of such an independent restoration cannot be compared with the cost of work performed by a master, and the result may not be worse.
Features of filling the closet in different rooms
The layout of the sliding wardrobe inside varies depending on the purpose of the room. The contents of the furniture in the nursery and in the hallway will vary significantly.
The contents of wardrobes will differ in different rooms.
In the bedroom
In the bedroom, in addition to clothes, bed linen, bath towels and other things that take up a lot of space are usually stored. Therefore, for spaciousness, a wardrobe should include many shelves and compartments. This helps to organize and quickly find the necessary wardrobe item.
The wardrobe in the bedroom should be especially spacious.
Don't skimp on shelf depth. Make hanger bars long enough to accommodate all your items. Use modular sections to store shoes, bags, hats and other accessories. That is, in the closet in the bedroom you can plan:
- niche for shoes;
- built-in ironing board and holder for safe iron storage;
- pantograph;
- hangers for hanging clothes;
- hooks for things that are recommended to be stored in this position;
- trouser clips or bars;
- baskets for storing linen and small wardrobe items, such as socks;
- compartments for belts and ties;
- drawers for small accessories and jewelry.
A closet in a bedroom can accommodate many items.
In the hall
Hallways have practically no average standards. How to plan the inside of a closet when each apartment has different rooms in size and location? Therefore, coupes for the hallway are most often ordered according to individual measurements. Here you need to combine two factors:
- the dimensions of the room to understand what size cabinet you can install;
- what things are meant to be stored in the hallway.
In the hallway you will have to take into account the size of the room.
It is logical that a lot of shoes are planned to be placed here. Therefore, in the lower section there should be a shoe rack or a spacious niche. Its bottom can be positioned at an angle so that all products are better visible. Immediately add a couple of roll-out drawers for storing shoe care products, napkins, keys, and slippers.
There should be a large compartment for shoes.
Inside the compartment you can make a compartment for umbrellas and raincoats. The basic space of the closet is used for hanging outerwear. These could be hooks or a barbell.
In the nursery
The children's room, even if the child goes to kindergarten, should be stocked for school age. In the compartment, make compartments for toys and books, for school textbooks and for technical devices, for example, a game console. The more carefully you initially divide the common space into sections, the easier it is for your child to maintain order in the future.
The contents of the closet will depend entirely on the age and preferences of the children. But the mandatory elements should be open shelves, drawers, mesh baskets, a rod, and hooks. Over time, you will notice what your child uses most often and make adjustments to fill the furniture with additional organizers.
The children's closet is equipped taking into account the preferences and age of the child.
In the living room
In the living room, dishes for guests, books, photo albums and other items related to several family members are most often stored. In this case, it makes sense to make open shelves where memorable and dear things will be located. If you have beautiful vases and antique dishes, you can also make separate niches for them.
In the living room closet you can make open shelves for books and memorabilia.
Remember that the living room belongs to all family members at once. Therefore, try to ensure that the furniture also reflects the character of each resident.
Update methods
There are different ways to update furniture items:
The restoration tools at hand will help in choosing the appropriate method. Artistically updating the appearance of furniture will not require significant expenses.
Decoupage is one of the decoration techniques. Drawings, paintings or carved ornaments are attached to the object. Then the base of the composition is varnished. Various coating options, in addition to the main functions of protection and extending the durability of the service life, also perform the function of giving the item a visual effect.
Painting is decorating a surface using paints and a brush. It is distinguished from painting by the spatiality and tangibility of the pictorial surface in the environment.
Painting and filming eliminate defects on the facade of furniture, and also facilitate its integration into the interior of the room. The color scheme of surfaces is selected based on the overall design concept of the room.
Cabinet restoration technology
Before you decorate the cabinet with your own hands, you need to prepare it for work. First of all, you need to remove the existing fittings from the cabinet. At the same time, you should pay attention to the performance of the door hinges; it is quite possible that they require replacement. The tilt in the spatial position of the cabinet should be eliminated, if any. To do this, the gaps between the planes of the box are removed, after which they are reliably welded together.
The coating is removed with a spatula using a solvent. Then the surface is thoroughly sanded with sandpaper. The inside of the cabinet is treated with denatured alcohol to eliminate stubborn stains. This is followed by fungicide treatment to prevent mold formation.
After some time, the irregularities are smoothed out with sandpaper. After dust removal, the surface of the cabinet must be puttied and single scratches painted over with paint compounds that match the tone of the old coating. Using plastic moldings, plaster overlays and imitations of stucco (without disturbing the style), missing or damaged decorative fragments should be restored
Decoupage furniture
You can also make your own wardrobe decor from fabric. To add harmony and elegance to the interior of the room, fabrics are selected that match the color pattern with the tone of the wallpaper. The texture of the fabric should be dense to prevent deformation when stretched. Thin foam rubber can serve as the basis for the fabric upholstery of a wardrobe. The fabric must be secured to the back of the doors or the inside of the cabinet with a furniture stapler or liquid nails.
It is not difficult to decorate a wardrobe with your own hands using antique decoupage. Furniture is removed from paint using a sanding machine. Then the surfaces are degreased with a solvent, followed by a layer of primer. To age furniture, you don’t have to resort to scratching, creating cracks, etc. Modern chemistry can handle this perfectly. To create the effect of cracks, craquelure varnish is applied to the primed base.
Coniferous wood wardrobes are updated using the following technology. The surface is treated with a metal brush to give the wood structure characteristic stripes. After this, the wood should be coated with dark paint. Without waiting for the paint layer to dry, they pass a cloth over the painted surface of the wardrobe. After applying the varnish, the restoration is complete.
Updating a chipboard cabinet
Many apartments still have old chipboard furniture. It is quite functional and, despite the long period of operation, it is still possible to decorate a cabinet from chipboard with your own hands.
The cabinet is disassembled and old fittings are removed. Surfaces intended for pasting are cleaned with water and added dishwashing detergent. Then degrease with a cloth soaked in vinegar. This should be done with special care, since poor-quality degreasing will subsequently lead to peeling of the self-adhesive film.
After this, the required size of the film is cut, while not forgetting about a small margin. The prepared base is moistened with water from a spray bottle. This technique, in which the film will not immediately set to the surface, is used to allow it to be moved and adjusted when correcting distortions or folds.
The laid self-adhesive film must be smoothed with a soft cloth using movements from the middle of the tape to the edges. This removes air from under the film. If it is impossible to completely remove the air, the resulting bubbles are pierced with a thin needle, and the area is smoothed with a soft cloth. The updated cabinet is assembled and new fittings are installed in place.
Fixing to the wall
In families with small children, cabinets are often secured to the wall to prevent them from tipping over and causing injury to the child. Such precautions are not always unnecessary, especially if the child actively uses furniture during games.
As a rule, cabinets are attached to the wall using straps, which can be purchased at a specialty store, or using long screws or dowels. The second option is simpler and more attractive from a financial point of view, which is why it is chosen more often.
furniture seat belts
The essence of the method is that a dowel or self-tapping screw is driven into the wall through the back wall of the cabinet, securely fixing it.
These recommendations will allow you to both level the cabinet on an uneven floor and make it as stable as possible.
Decoration technologies
Stylish furniture can also be decorated with a photograph printed in a large photo studio.
When decorating an old wardrobe with your own hands, you can paste a photo with your favorite applique on the door. Before this, they are sanded with sandpaper, dusted, primed and covered with a layer of white paint. After sticking the photo, the wardrobe is varnished with colorless varnish.
When mirroring a cabinet, one achieves hiding defects on the doors, as well as expanding the space in a small room. First, mirror panels are ordered in the workshop. Then the mirrors, aligned in place, are fixed to the cabinet doors with special fasteners or using liquid nails.
Wallpaper remnants can also be used as furniture decor material. They are used to cover the facades of cabinets, doors, and interior walls. In this case, it is recommended to use PVA glue. A wide selection of self-adhesive wallpapers significantly expands the range of design inspiration.
Restoring old furniture is not difficult if you follow the recommendations. But among the household members there are many original craftsmen who can do everything. All they have to do is show them the decor of an old cabinet with their own hands, a photo, and they can easily restore it.
Good luck to them in transforming our old faithful companions in life!
Problems with the floor
The main options for purchasing a wardrobe are to buy it ready-made or to make it to order. In the second case, before signing the contract, the company’s measurer will take all the necessary measurements down to the millimeter and degree. Assembly of the finished cabinet will also be carried out on site and if any unexpected problems arise, they will be quickly resolved.
If you buy a cabinet in a store, it may not fit into the apartment. The buyer himself will have to think about how to level a wardrobe on an uneven floor - the furniture seller will not be interested in this. An uneven floor may cause the door to fail to close due to problems with the track. The cabinet may also squeak and lean on a corner.
When ordering built-in furniture, the problem is solved by installing a special box. Therefore, the answer to the question: is it possible to install a built-in wardrobe if the floor is uneven? The main thing is to contact the manufacturer with an individual order, and not to buy standard-configured cabinets that are only suitable for a perfectly flat floor surface.
Installation of a cabinet on an uneven floor can also be done using fasteners to the wall. Cabinets with legs are also often ordered. This helps to avoid wobbling and makes the structure more stable.
Crooked walls
Curved walls in a home may not even be visible to the naked eye, but they are very important for furniture installation. If your home has a niche or cavity in the wall, then custom built-in wardrobes are an ideal way to hide this problem, and at the same time increase the depth of the shelves.
But if the walls are simply uneven by a few millimeters or even centimeters, then the master can install special panels on the sides to eliminate the gaps. The remaining cracks can be sealed with silicone. In the case of a cabinet cabinet, you will also have to reduce the gap between the wall and the furniture using a false strip or fixing it vertically through spacers. You can cover up imperfections with a plastic decorative corner matching the color of the wallpaper.
It is very important to level the walls if, for example, they are uneven due to improper plaster, and you will have to install a cabinet cabinet rather than a built-in one.
It is better to install a built-in wardrobe where the walls are uneven. This will be a more reliable design, and the cabinet panel will hide all aesthetic overlays. It is quite difficult to install a cabinet with an extension yourself, since every millimeter is calculated. It is better to entrust this task to a good master.
Uneven ceiling
Installation of a wardrobe with a crooked ceiling is also carried out, but only if it was ordered individually. The quality of the ceiling matters only for built-in furniture, which practically rests on it. For cabinets that do not extend to the ceiling, this is usually not as important.
To level the ceiling, a false panel is usually attached. This visually aligns the design of the cabinet and does not create obstacles to the use of furniture. The fitting is carried out in such a way that the doors can open and close easily.
An uneven floor in an apartment combined with a crooked ceiling is by no means uncommon in our country, especially in older apartments.
A non-standard option is to install the cabinet on supports that allow you to change the height of the working surface. The installation method depends on each specific situation and the wishes of the customer.
Order furniture from us
You can make a sliding wardrobe to order in our company Rosmebel, which employs professional measurers who do not make mistakes in calculations, as well as craftsmen who can cope with non-standard sizes of any furniture: from sliding wardrobes to living room walls.
Our craftsmen will qualitatively carry out all work on the rehabilitation of your furniture: alignment of doors and drawers, assembly or after moving, fastening to the wall, etc.
Incorrectly displayed furniture loses its attractiveness, and a technical failure occurs in the functionality of mechanical parts. The load on the supporting structures is distributed unevenly, thereby causing the shelf supports to sag with the subsequent threat of collapse of the internal filling. When opening the doors, they touch the furniture bases at the top or bottom, the edges peel off at the ends, and when closed, the door bends and only partially adheres to the body. It is advisable to correct this situation in a timely manner, since the structure of parts in the furniture begins to undergo changes that subsequently cannot be eliminated at home. The manufacturer often forgets to complete the fittings with connecting elements for the full connection of vertical panels in sectional furniture - walls, slides, children's furniture. When assembling furniture, connecting modules is necessary for safety reasons - tall, narrow cabinets with high doors are quite unstable and require fastening to the wall of the room or, using an inter-sectional tie, to a large cabinet. In kitchen furniture, hanging shelves and lower cabinets are connected. Intersectional screed when hanging shelves gives an additional incentive for reliable fastening.
Correct installation when the floor surface is uneven.
Initially, the assembled cases are leveled, the highest point in the furniture system is fixed, and the furniture is leveled along it. Some cabinet models are equipped with adjustable legs; with the help of an adjustment screw, the sides of the structures are raised to a certain distance from the floor. In the absence of adjustable feet, we will use wooden wedges. For example, when all the bodies are aligned along one line and pulled together. The intersectional screed secures the installed product. Installation of connecting fittings is carried out by drilling a hole with a diameter relative to the screed. For reliable fixation, the screed is performed in several places, at the top and bottom of the structure. The tie screw can be hidden under the eyelet. The process of rehabilitation of previously installed furniture is possible with partial disassembly. Doors and cornices are removed, drawers and shelves are removed. After leveling and installing the intersection screed, all facades and internal contents take their place. It is not recommended to pull together cabinets or cabinets that are not level or standing unevenly, as the furniture frame undergoes a change in geometry, disrupting the functionality of all parts.
The evenness of the walls in our panel dwellings has long been a proverb. At the same time, the furniture that we make (install) has quite strict geometric proportions. if for cabinet furniture this discrepancy is not so critical, then built-in furniture should be so, that is, there should not be large gaps between the cabinet wall and the wall of the room.
But what if the wall has a convex or concave shape, and, for example, the cabinet counter is perfectly straight? We’ll talk about this in this article using the example of a built-in wardrobe that I installed in my children’s room.
So, the first step is to level the part in place strictly vertically. The photo looks a little different visually, but this is an artistic idea... The bubble reveals the true state of affairs!
It can be seen that the stand is attached to the wall... hmm, not very well. There are gaps.
Now the markings. We take a simple washer with a diameter of 20 mm (you can use any other one - I happened to have one on hand) and a pencil. We place the washer on the part, place a pencil in the inner hole and roll it along the wall. At the same time, the pencil rolls along the inner surface of the washer, repeating all the irregularities of the wall.
Now let's move on to the actual fitting. To do this we need a jigsaw, a belt sander and, preferably, a vacuum cleaner.
We remove the part, place it on a stand (I used a couple of stools) and first roughly (with an electric jigsaw - I use metal files for this - they leave less chips) remove the material along the marking line. The manipulation may have to be repeated. This is not the first stage in the photo, I have already applied, marked and filed once (since the gap is about 2 cm, and the washer allows you to mark only 7 mm.
The cut is far from ideal.
Then we pick up a belt sander and remove the material to the marking line, at the same time getting rid of chips in the laminate.
A vacuum cleaner in an apartment (and this is where the fitting is carried out) is a must-have device. Everything runs quite clean with him.
As a result, we should get a stand with a smooth, but not even edge that matches the profile of the wall.
We attach the part to the wall and repeat the manipulations until a result that is satisfactory, in your opinion, is achieved.
By leveling a wooden floor, you can significantly improve its appearance and make it more practical. Wood is an environmentally friendly, attractive material. But, unfortunately, wood is subject to all sorts of changes. These changes can create the greatest difficulty when wood is used as a floor covering. Over time, boards can dry out, rot, begin to creak and sag, creating a difference in the height of the covering elements. Floor repair, in this case, is mandatory. How to level a wooden base yourself - read the article.
How to decorate kitchen furniture (42 photos): ideas and instructions
Beautiful furniture in the kitchen instantly improves your mood and becomes the main condition for preparing real culinary masterpieces and delicious morning coffee.
Famous designers advise how to decorate an old kitchen set with your own hands.
Decorating will easily refresh the interior and make the furniture unique and elegant.
Furniture decoration is a fascinating creativity accessible to everyone, an interesting process and an exclusive, spectacular result.
Arrangement of a small wardrobe
The design of the wardrobe is such that even the smallest will differ in spaciousness compared to classic furniture. The main thing here is to make a department for hangers and a couple of drawers for smaller things. Try to make maximum use of retractable structures, trousers, telescopic rods, and roll-out drawers. This will help you use every centimeter of space extremely economically.
The small wardrobe uses space-saving elements.
Kitchen table decoration
The decoration of the tables is varied.
Oriental style table
Oriental style pattern for the table
We will paint the old table black and glue on gold patterns: gold leaf - thin gold leaf. We can buy it in all stores for professional artists or for handicrafts. And the price of such a rich restoration will please us.
Decorating kitchen cabinets
Antique decoration
We create the effect of crackle - cracked old paint.
Acrylic paints of two colors and craquelure varnish used with water-based paints will create a noble patina of time.
For this we need:
- water primer (can be replaced with PVA glue);
- acrylic paint – 2 shades;
- craquelure varnish;
- matte acrylic varnish;
- wide brush.
Advice! To acquire the skill of such decoration, it is better to first try it on an unnecessary board.
- Apply paint to the primed surface.
- After it dries, apply craquelure varnish, moving the brush in one direction.
- After an hour, apply paint of a different shade, moving the brush in the same direction.
- After it dries, we open it with acrylic varnish.
Decoupage cabinets
Ordinary pictures will masterfully breathe newness into old furniture.
- wood primer;
- acrylic paint;
- clear acrylic varnish;
- PVA glue;
- brushes and roller;
- sandpaper;
- pictures, patterns cut out from magazines, drawings or printed on a printer.
Here are the instructions for decoupage:
- prime the sanded surface;
- paint it in a suitable color and wait until the paint dries;
- we apply the selected drawings to the surface of the cabinet, marking with a pencil their most advantageous location;
- soak the pictures in water;
- apply glue to the marked areas of the cabinet;
- We put the wet drawings in place and, ensuring they fit perfectly, glue them;
- After drying, coat them with varnish twice.
Now this cabinet will become the most interesting piece of furniture.
Decorating the closet with wallpaper
Covering an old cabinet with vinyl or non-woven wallpaper is a cheap and easy way to decorate.
- Bright wallpaper for the closet will go well with light walls.
- If the walls have wallpaper with a pattern, then it is better to cover the cabinets with plain colors.
Advice! In a small kitchen, the same wallpaper as on the walls is used to decorate the cabinets so that they do not stand out, illusorily cluttering the kitchen.
- The newest version of this type of wallpaper is self-adhesive wallpaper with imitation metal, wood, and stone.
Note! It is better to glue wallpaper onto a closet using PVA glue - it is stronger and more reliable than wallpaper.
Decorating a cabinet with cork
Eco-friendly cork in rolls or sheets is suitable for original cabinet decoration.
- We can easily cut out even a complex pattern from cork and quickly glue it to the cabinet.
- First we’ll make the drawing out of paper and try it on the cabinet.
- Then, according to the template you like, we cut out the part from the cork and glue it with special glue.
- Its contrast on dark and white cabinets is very beautiful.
Other Cost-Effective Kitchen Cabinet Makeovers
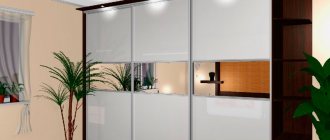
- We simply insert fashionable tinted mirror glass into the cabinet doors. By the way, they will visually expand the kitchen.
- We will stick ceramic tiles on the cabinet doors and place it above the sink - harmoniously and functionally.
- We will screw in new fittings, which will also give it an expensive and very stylish look.
- The doors can be lined with bamboo mats for an exotic style.
- We can easily make a gilded openwork antique frame for a cabinet from artificial flowers attached to a simple frame, which we will cover with gold spray paint.
So, decorating furniture with paper, fabric, and painting will renew and modernize it as much as possible. Numerous photos convinced us that it is possible to transform kitchen furniture without titanic labor feats and global spending. It's all about our sincere desire to successfully update it.