Gift decoration
In winter, you can use spruce branches. They can become the final decoration of the box while tying the bow. Today, cones are extremely popular.
They can be of various sizes and shapes, creating a truly festive mood on winter evenings. In order to attach the cones, glue or double-sided tape is used. Boxes decorated with Kraft paper look great with satin ribbons.
Benefits of storing items in boxes
Advanced housewives, when arranging their home, set themselves several tasks at once - to establish an exemplary order, free up space, place things compactly and carefully, and always know what is where. All these requirements are met by a storage box, which, through the efforts of designers, has long been transformed from ordinary packaging into an independent piece of furniture. So, what are its advantages?
1. Eliminates clutter. Opening a closet, pantry, mezzanine, looking at the shelves in the hallway or open shelving, you see even rows of decorative containers. Even with frequent opening and closing, a slight mess moves inside the box, but everything is perfect on the outside.
2. Space saving . Of all types of containers, boxes in the shape of a rectangular parallelepiped are the most economical. They can be placed end to end, stacked on top of each other, filled to the top with objects that normally take up a lot of horizontal space.
3. Use of vertical space. Capacious containers and baskets with seasonal and rarely used items can be placed on the closet, additional vertical shelves, in niches or, conversely, under the bed.
4. Sorting things. Once you start filling containers, you willy-nilly sort and sort things. This will allow you to create your own home organization system and make it much easier to find the items you need.
5. Careful storage. In closed boxes and trunks, wardrobe items, bedding, and shoes are reliably protected from dust, dampness, fading, and damage by insects.
6. Versatility is another useful property of boxes. They can store everything that surrounds us in everyday life. The only limitation may be incompatibility in size or material from which the container is made.
What should you pay attention to when buying boxes and cases for storing things?
DIY storage box decor
In any home you will find many necessary things scattered throughout the house. They can get in the way and constantly appear in your eyes. It is better to create a special place for them.
For example, it could be a storage box. Making it yourself is quite simple. To do this you need a few things and a flight of your imagination.
You can make a storage box using: Newspaper tubes. Cardboard to create the bottom. Acrylic paint. Glue and scissors are required.
You need to glue newspaper tubes to the bottom and connect them with glue. Afterwards, cover the product with acrylic paint and use additional decorations.
Gift box decor
Depending on the size of the gift, you can adapt the size of the box to fit it. The master selects the design depending on the reason for which the box is being created. An ordinary shoe box will do as a base. Here are some examples of packaging creation:
Heart shaped box
To do this, you will need to prepare a template and white paper, scissors, pencil, and glue gun. You will need to print the template on white paper and cut it out and fold it along the line. Take a narrow part and make a cut along the line, which is reflected in the form of an arrow. The templates are cut out on thick paper and cut out, you need to make a couple of hearts and two stripes.
When using scissors, follow the fold lines so as not to cut through. On long parts, many vertical cuts are made, and they are only brought to the fold. Wide parts are glued to the smaller heart so that the cut is on the other side. To make the lid, you will also need to make cuts, only on narrow elements.
They are designed vertically. These elements need to be glued to another heart. At the same time, you need to take into account that the cuts remain on the inside. Next, the box is covered with the resulting lid. The finished version of the box can be used as a gift for Valentine's Day.
Rectangular box
You need to use thick paper, a ruler and compass, a bow, scissors and a pencil. You will also need an adhesive. A pair of circles with a diameter of five centimeters are depicted on paper. Then, with a similar step of the compass, six marks are made on the circle at an equal distance from each other. All marks are connected to each other inside the circle.
You will need to draw lines outside each corner; in one circle they are four centimeters long, in the second they are two centimeters long. Next, the lines are connected to form rectangles. On the right side, draw a small part with a beveled top. Next, the craftsman needs to cut out the resulting parts along the lines; when using scissors, the inside of the circle and parts with a beveled top are outlined.
All figures are bent along the marked lines and glued together, a lid is put on the box and decorated with a bow. It is important to note that for each fake you need to make a lid in three-dimensional form so that it looks original in appearance.
Square box
To design, you will need to use scissors and sheets of thick paper, a ruler and pencil, as well as adhesive and bows. A square is cut out of paper, measuring twenty by twenty centimeters. It depicts vertical lines, as well as a couple of horizontal ones. To do this, step back five centimeters from each edge.
A square should form in the middle. When using scissors, the master makes grooves by running the scissors along the intended lines. However, you cannot cut the paper. The fold is made along the recesses. Next, the paper is cut along short lines and the resulting elements are folded and glued together. To make the lid, you will need to cut a square, the side of which is sixteen centimeters. It depicts a pair of vertical and horizontal lines.
You should retreat about 3 centimeters from the edge. Then they are cut and bent, gluing is done in the same way as described above. The box is covered with a lid and decorated using a bow. Also, instead of a simple lid, you can use a couple of triangles that will fit completely onto the box.
You can also make a pyramid-shaped box. To do this, use a thick sheet of paper, a ruler and scissors, and a pencil. In addition, you will need to use a hole punch and a disk, ribbon or yarn. In the latter case, the element can be replaced with a plate.
A square is cut out of paper, then using 4 lines it is divided into nine parts. You need to make marks in the central part of all sides of the large square. Triangles are depicted inside. A plate is applied to the sides of the triangle and traced. Next, a figure is cut out along the marked lines. The result is a shape similar to a flower.
It needs to be bent along the lines and form a pyramid. Then holes are made in the upper part, where the ribbon is threaded and tied.
It’s also useful to read: Making a large clock on the wall with your own hands
What materials are used
Decorating a cardboard box is a process that requires the use of different materials, such as: Packaging paper rolls or wallpaper rolls. They can be used to cover the product on all sides.
Various pieces of fabric. Old things, for example, a T-shirt or skirt, are also suitable for decoration. Paper napkins with beautiful designs are used in decoupage.
Decorating the box with fabric
In addition to a basic storage box and a piece of fabric, you need:
- Scissors;
- Thread and needle;
- PVA glue;
- Double-sided tape or silicone glue;
- Decorative elements (buttons, beads, lace, etc.).
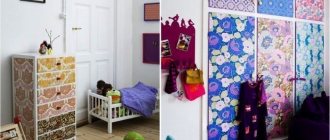
DIY storage box decorating idea
DIY cardboard box decor
Original decoration of cardboard boxes
The fabric must be cut in the form of a cross of five rectangles. These rectangles are the sides of the cardboard box. You should leave a margin of 1-1.5 cm on each side. Place the box in the middle of the pattern and glue the base with double-sided tape. Afterwards, glue each side in turn so that the edges of the fabric overlap slightly and are wrapped inward. The inside can also be glued using light fabric, or the bag can be sewn to the size of the box. You can make double-sided Velcro along the edges. This way the inner bag can be removed and washed if dirty.
DIY storage box decoration
Decor of storage boxes
Getting started to create a box
Before you start work, it is better to prepare everything down to the smallest detail, so that later you will not be distracted from the process. The box must be the correct size. The design needs to be thought out in advance. To do this, you can look at photos of box decor on various websites and make the right choice.
Prepare your workplace. Select all materials from scissors to glue. The process of creating a box on your own is exciting. It would seem that creating a box is not so much an interesting activity, but with the right design, it can become an excellent hobby.
A beautiful box in the right hands can become a real work of art. The main thing is that it fits perfectly into the existing space and is in perfect harmony with other interior items.
To create a box yourself you need to have some patience. Also, such an activity will require a large amount of free time, but it is worth it. After all, you get an excellent piece of furniture that can delight you every day.
Making a decorative box for storing fabrics
Do you have open shelves and a bunch of things at home that don’t always look decorative, but that need to be stored somewhere?
I have! And even a lot! True, these are not fabrics, but mostly seasonal clothes, shoes and various household items that are not often used. But I decided to show the master class using the example of storing fabrics, because it’s really convenient to store fabrics this way if you don’t do this professionally and you don’t need to access them every day, but you need to store them somewhere.
It is convenient to stack fabrics by placing the box on the side wall. This way you stack them like on a regular shelf. The main thing is to lay them tightly so that there is no free space and the fabrics do not lose their vertical position.
Although, of course, you can buy ready-made plastic transparent boxes, we are not looking for easy ways, but sometimes what is in the boxes is not always attractive, and you don’t want to show it.
You can also buy opaque plastic boxes. In this case, read what is crossed out above 
You will need:
- a box made of corrugated cardboard or just thick cardboard;
- fabric for covering;
- scotch;
- glue gun;
- sewing machine.
For such boxes, I take any cardboard box. It might not even be very attractive, like mine.
I glue the torn edges with construction tape. Although, of course, it can be simple, it is not fundamental. I love construction material because of my laziness, you can tear it with your hands, although for the master class I, of course, cut it decently with scissors
I bend the top flaps outward and glue them in the same way. For toughness.
I select and iron the appropriate fabric. For example, I have here an old sheet that can no longer be used, it will fall apart stupidly, but it will still serve, the color is very tasty.
I wrap the box with fabric and thus understand how much fabric I need to wrap the entire box. And I tear it off, taking a reserve of 5-6 centimeters.
I want it to be more fun, so I grab another companion fabric. Although, of course, you don’t have to do this.
I attach it and press the seam.
Next I bend the blue color by 5-6 centimeters. This fold will go inside the box.
If you have curious eyes that can look into the box, then take more. Mine will be at the very top. Only I can look into it when I’m filming.
Yeah, I forgot to say, we also fold the side edge and look at it. It will be visible, let it be beautiful.
At this time, turn on the glue gun to warm up.
And cut off the strips that will serve as handles. I have 30 cm by 8 cm.
We apply them according to the bias binding principle.
And then fold it in half and iron it again. You get two neat trims, although not slanted, but that’s not important to us here.
We give a line on both sides. And put the pens aside.
We apply the folded edge of the fabric to the box and secure the fabric with tape. Just so she doesn't run away.
We fix it in a circle with small pieces of tape.
And then we go around the entire edge of the fabric in a circle. To make it durable and last for centuries, you can pre-glue the edge with a glue gun.
And I fix the side edge of the fabric. It’s better if it doesn’t go out on a corner, it’s very difficult to attach it there neatly.
I secure the edges at the bottom with tape. Although they can also be done with a glue gun first.
I also glue the remaining edges.
I mark where the fabric handles will be attached. And I cut holes the size of the handles. I first cut the fabric with a ripper, and the cardboard itself with a stationery knife.
I insert the handles using tweezers.
So they stick out inside me. And I smear the bottom part of them with a glue gun and glue them.
For the beauty of the strength, I fix the handles from the inside with pieces of felt, coated with a glue gun.
Well, that’s all somehow . I will store seasonal items here, but for clarity and decorative purposes, fabrics have moved here for photography.
If the box is high, and things are rarely taken out of it, throw these things away, then you can attach a beautiful tag to the handle, where the contents of the box will be signed.
Under certain circumstances, you can, of course, store blond boys in it
I wish you beautiful interiors and good mood
Box in decoupage style
Initially, you need to prime the box in two layers. Each of them must dry well. Afterwards, sanding is carried out using strong and smooth sandpaper. Next, the product is painted with acrylic paints. The surface is thoroughly coated with glue and then it dries.
After the napkin is placed on the product, the unevenness is straightened out. The surface is carefully ironed using parchment. The excess edges are cut off and the product is covered with a layer of varnish. This method of decoration is especially popular today.
LiveInternetLiveInternet
Quote from Money-box message
Read in full In your quotation book or community!
Stylish box made of cardboard and fabric.
Master class At the request of the workers, as promised, I tried to make a master class on making my own boxes) The manufacturing process itself is very painstaking, it requires perseverance and attentiveness, but the effort expended is worth it, and the result will delight you for many days. A few words about process. It basically consists of covering each wall of the box with fabric, then stitching the side walls and bottom, and finally gluing the inner walls. The result is a box that can be additionally decorated with various scrapbook details, as I always do)
This kind of box can easily be made from cardboard and fabric. Thanks to the author for such a detailed explanation. Natali Lyuta
Source
So, initially you need to set the dimensions of the box: for me they are like this:
length - 15cm, width and height 10cm.
After this, for the outer walls of the box, I cut out 5 parts from thick cardboard (I take 2mm thick cardboard):
2 side – 10x15cm
2 side 10x10cm
2 for the lid and bottom - 10.5x15.5cm (in the future they will need to be trimmed).
I cut out 6 parts of the same size from a thin layer of padding polyester (it comes in different thicknesses, I take the thinnest one)
I also cut out 6 parts from the fabric that I will use to cover the cardboard. What size should I cut the fabric?! I simply attach the corresponding cardboard parts to the fabric and cut out “by eye”, adding at least 1.5 cm from each edge, but for the lid I should add more - 2 cm. Then I additionally place the fabric on non-woven fabric for density - then it will be easier to sew and the holes from the needle will not be visible on it.
Then I prepare only the SIDE walls of the box for stitching:
1. I sand the edges and corners of each cardboard blank, because... after cutting with a knife, they become sharp and unpleasant to the touch. I round the corners a little so that they don’t stick out through the fabric later. The photo clearly shows processed (top) and untreated cardboard (bottom)
2. Then I make this “sandwich” - fabric with the wrong side facing up, padding polyester, cardboard
3. I glue two opposite edges of the fabric to the cardboard from the wrong side
4. Forming beautiful corners
To ensure that the fabric at the corners adheres well, I clamp the corners with these office clips
5. And I glue the other edges of the fabric to the cardboard
After this, I sew the side walls together with a hidden seam so that the threads are not visible from the outside
This process is the most difficult - you need to be careful so that the walls do not move and the edges coincide, only then will you get an even rectangle
Now I need to make the lid and bottom of the box. To do this, I take a ruler and measure the distance between the walls of the box, it turned out to be 10.5 cm and 14.8 cm (this is due to the fact that the small walls were, when sewing, sandwiched between the large ones). To make the lid, I subtract 2 mm from these dimensions and cut the pre-prepared blank to a size of 10.3x14.6 cm, and the blank for the bottom of the box to the new measured dimensions, i.e. 10.5x14.8cm, and repeat with both cardboards all the work according to points 1-5. Then I sew the bottom of the box to the walls
Result
Next I prepare the inner walls of the box.
How to calculate them?! Because My lid will close completely, i.e. as if to drown in a box, then I should leave 5mm on top not covered by the inner walls. And with the other sizes, I again “dance” from the size 10.5x14.8cm. For the thickness of the fabric I add 2-3mm, cardboard 2mm, and thus get the height of the side walls 10-5(indent)-3(fabric)=9.2cm, and the width: for long ones 14.8-3(fabric)=14.5cm, for short 10.5-6 (fabric from both walls in the corner) - 4 (cardboard) = 9.5 cm. Bottom: length 14.8-4 (cardboard)-6 (fabric from two opposite walls)-3 (fabric from the very bottom) = 13.5 cm, width: I left 9.5 cm (but could be reduced to 9.3 cm - the bottom will fit more freely later, I had to make an effort). For the lid, I subtracted 1.3cm from the size 10.3x14.6cm.
So, after all the calculations, I cut out 6 parts from thick (2mm) cardboard and thin padding polyester:
2 side – 9.2x14.5cm
2 side – 9.2x9.5cm
1 bottom – 9.5x13.5cm
1 cover – 9x13.3cm
I also cut out 6 pieces of fabric for the inner walls, adding 1.5 cm “by eye” to each edge for gluing on the wrong side (I don’t put them on non-woven fabric).
After preparing all the parts, I repeat steps 1-5
At the next stage, it is better to think about the decorations for the box so that all the threads, legs from brads, etc. remain inside between the walls.
Only after decorating do I glue the outer and inner sides of the lid together
Then the inner walls with the outer ones - first long, then short
And only after that the bottom
After all the steps described above, I ended up with a beautiful, soulful and pleasant-to-touch box/box for storing something very important and necessary.
The article was specially written for the Scrapbooking+ section of the City of Handicrafts !
New Year's boxes
At the onset of the New Year holidays, many people try to choose not only fashionable gifts, but also try to decorate them beautifully. It is still unknown what New Year's box decor will be relevant this year, but there are traditional decorations that will never go out of style.
Table decor: 105 photos of the best examples and videos of the main ways to decorate a tableKitchen decor - a review of the best ideas and 130 photo examples of current kitchen decoration options
- Fireplace decor - 145 photos of modern ideas and methods of decoration in a house and apartment
- Christmas tree decorations can easily be used in place of bows and flowers.
- The top of the boxes is often decorated with designs. These could be bears, deer or hares.
- The use of buttons is very popular.
- Almond cookies are actively used as an addition and decoration to the box.
- Creating beautiful flowers from felt, fabric or paper will also be a great highlight.
Purpose of boxes
A lot of things are placed in various boxes in the interior of the premises:
- in the bedroom - bed linen, underwear, cosmetics, perfumes, jewelry;
- in the living room - books, tools and materials for needlework, a folded Christmas tree, chargers for numerous gadgets;
- in the kitchen - cutlery, napkins, dishes, towels, tea, cereals, cookies;
- in the bathroom, toilet - sponges, sponges, washcloths, dirty linen, intimate hygiene items;
- in the dressing room - small items of clothing and linen;
- in the nursery - toys from Kinder surprises, construction sets, stationery, children's books, notebooks, albums;
- in the hallway - gloves, scarves, umbrellas, hats, shoes, spare laces, shoe brushes, creams;
- in the office - office, paper correspondence;
- on the glazed balcony, loggia - clothespins, supports for flowers.
To store various little things in the nursery, they make a box-house, for a girl’s room - a box-box with princesses or flowers made from ribbons.
DIY products
To store many things in the house, boxes are a must. It’s more profitable to buy a ready-made one in a store, but it’s more profitable and enjoyable to make it yourself. It's best to transform existing boxes. For example, shoe boxes or crockery boxes are great.
The main thing is that they are durable and reliable. Decorating the product depends on your imagination. It is best to use rectangular rather than square products.
Shoe boxes are the easiest to decorate. They are ideal for storing jewelry, toys, medications and much more. A beautifully and originally decorated box can fit perfectly into the interior.
Fabric box
A budget textile box will decorate any apartment and help tidy up the shelves in the bathroom or bedroom.
The photo shows beautiful handmade fabric storage boxes.
What you will need:
- Thick fabric (burlap and double-thread) - 17 cm each.
- Handle tape.
- Threads.
- Sewing machine, pins, scissors.
Step-by-step instruction:
- We cut out the parts according to the pattern as in the photo:
- Having folded the elements, we sew the sides:
- We make a handle by sewing a ribbon of the required length, as shown in the photo:
- We secure the resulting loop with pins along the upper part of the base, sew:
- We insert the double-thread lining into the burlap base:
- Sew both parts along the top edge, retreating about a centimeter:
- Sew an allowance to the inside to secure it inside the burlap cover:
- Let's start processing the bottom. Sew the bottom part:
- And sew the sides together as shown in the photo:
- The textile box is ready!
The photo shows one example of a textile basket that you can sew with your own hands and design it to your own taste.
Wicker baskets and boxes in the interior
Nowadays, in interior design you can find all kinds of drawers, boxes, wicker baskets and even chests. Once they were removed from everyday human life, but they are beginning to confidently return to our everyday life and everyday life.
In some interiors it is appropriate to use baskets. For example, they can be found in the bathroom or in the kitchen interior.
In the age of new technologies, when modern furniture is used, containers, packaging materials, baskets and boxes serve as decoration and stylistic addition to the design.