After renovating your kitchen, you will probably decide to update your old kitchen set. As a rule, most stores selling kitchens impose an assembly service, and many are not even manufacturers of this kitchen, but simply order it from the factory and act as intermediaries. In any case, we will pay, although assembling and designing a kitchen yourself is not so difficult at first glance. In this article we will tell you how to independently make a design with exact dimensions, non-standard elements and how to assemble a kitchen into a single composition.
Tools
Before assembling the kitchen set, you need to assemble the tools for work. Simple tools are required, but they make the job much faster and easier.
- Screwdriver or set of screwdrivers.
- Drill with drills of different diameters.
- If the walls are concrete or brick, you need a hammer drill - drill holes for fastening the upper cabinets.
- A hacksaw or jigsaw may be required.
- Hex key - for fasteners (can be included in the kit).
- Hammer, ruler, square, bubble level.
DIY kitchen assembly can take a day or more
It's a good idea to have a plane builder or laser level. It makes arranging cabinets in one plane much easier.
Nuances of choosing accessories for fastening
Don’t wonder how to hang a cabinet in the kitchen, because today there is a large selection of different accessories. But there are some peculiarities. If you are hanging it on a wooden wall, it is better to use hardened screws with a countersunk half-round head. Screws with double-start threads and large pitches deserve attention.
The most important thing when choosing fasteners is what the wall is made of.
If the wall is made of brick or concrete, use dowels and plugs, anchor bolts, plaster and regular bolts. For a plasterboard wall, it is better to purchase Molly dowels.
With the help of modern fastening fittings, it is possible to eliminate minor inaccuracies when applying markings and increase the reliability of the structure.
Assembly of kitchen cabinets
The disassembled kitchen set is a set of boards of different sizes, a certain amount of fittings and a set of fasteners. From all this you need to assemble cabinets. Usually there are wall-mounted and floor-mounted ones. How to assemble a kitchen set, in what order - the choice is yours. Some craftsmen find it more convenient to assemble them in pairs - the top one, then the bottom one, and install it that way. But there are two other ways: first collect all the top ones, hang them on the wall, then all the bottom ones. They do the opposite - assemble and install the lower ones, then the upper ones. In general, any method is correct, do what is convenient for you.
The correct installation of the confirmat is in the middle of the chipboard
Assembly of wall cabinets
In any case, let's start assembling the cabinets. A typical wall cabinet consists of two side panels, a top, a bottom, a back wall made of HDF and two doors - the facade. The assembly order is as follows:
Installing hinges
The facades (doors) are finally hung after everything is assembled and put in place, but the hinges are installed from the very beginning. They come in mortise (considered more reliable) and overhead.
Types of hinges - mortise overhead
The mounting points are marked on the sidewall and door with holes. Place the side panel and the door on a flat surface (table or floor) close to each other, aligning the marks. We put the hinges in place (included in the kit). Screw it first to the side, then to the facade. In this case, the door turns out to be slightly lower in level than the side panel. Place a block of suitable size or a rolled-up rag under it so that it is at the same level, then screw the loop.
We disassemble the hinge itself (it consists of two detachable hinges that are connected by a screw. We unscrew this screw, put the doors aside, and continue working with the sides.
Assembling the body
We attach the top and bottom to the sides. They are attached to confirmations - special furniture fasteners that come with a hex head. If there is an appropriate bit, we put it on the screwdriver; if not, we work with a hand wrench.
How to assemble a kitchen set: assembling the cabinet body
The installation locations of the confirmations are marked on the outer part of the sidewalls. We fold the side panel and the top part, install the fasteners, then the bottom, and then the second side panel.
We turn it face down, lay and align the sheet of laminated fiberboard, which serves as the back wall. It is nailed down with small nails or staples from a construction stapler. First they nail it in the corners, carefully aligning the edges, then in the middle of each side and then, dividing each section in half. As a result, the installation frequency is 1 nail/staple per approximately 10 cm.
Installation of corners or hinges, shelf holders
The hinges on which wall-mounted kitchen cabinets are hung are different, and they are installed in different ways. We'll talk about them in more detail below. Shelf holders also come in different materials and shapes, but they are mounted basically the same way - into holes in the wall. Holes are drilled in the sides for them. Sometimes we install plastic choppers (small hollow plastic cylinders) in them, hammer them in by lightly tapping them with a furniture hammer, then place stops for shelves in them. But most metal stops (which are probably what you need in kitchen cabinets) simply fit into the hole.
Shelf holders
Actually, you know everything about how to assemble a wall kitchen cabinet. For a visual demonstration, watch the video. Floor cabinets with shelves without drawers are assembled in the same way, only first the legs are installed on the bottom and the top part is the countertop, which is common to all cabinets and is installed after all the floor cabinets are installed and fastened.
Assembling a cabinet with drawers
We continue to assemble the kitchen set with our own hands. Now the most difficult moment is the cabinets with drawers. The general procedure is as follows: install the hinges, bottom and back wall. The top-table top is installed after all the cabinets are assembled and fastened together with ties. There are also features - drawer guides need to be attached to the sides. Go.
Installing the feet
Before assembling the kitchen set, legs are installed further on the bottom. You can install the legs after the frame is assembled, but rotating a heavy bedside table is not very easy. In any case, it is best if they are adjustable - the floor is not always perfectly level. With adjustable legs, it is possible to set them so that the load is redistributed across all legs. For small cabinets - up to 80 cm in length - 4 stops are installed; for cabinets over 80 cm, 6 support points are needed.
Shelf holders
If there is a partition in the closet, we place the legs under it. If there is no partition - in the middle. 5-8 cm are removed from the edges, screwed onto self-tapping screws 15 mm long (with a chipboard thickness of 18 mm). Most finished furniture also has countersinks for the legs—small-diameter holes. Align the slots in the legs with the holes and install the screws.
Installation of guides and assembly for drawers
On the sides of the lower cabinets there are markings for installing guides (they are included in the kit). For their fastening, an M6*13 euroscrew is used. We install the required number of guides on both sidewalls.
Installing guides in a cabinet with drawers
The boxes are assembled using 4*45 screws. First, the guides are installed. Depending on the design, they can be mounted on the walls of the box or on the bottom edge of the sidewall. If there are markings (holes) on the wall, then they are placed on the sides. If not, go to the end. To be sure, check the assembly instructions. There should be pictures of the installation process.
How to assemble a kitchen set: assembly diagram for drawers
After the guides are connected, the sides are connected to the back wall, then the front wall is installed, followed by the bottom. Before installing the bottom, check the diagonals. They must match down to the millimeter. The bottom is secured with nails or staples.
Assembling the body
The assembly of the case is already familiar: we attach the lid to the sides, then the lower part with the legs. We put the cabinet in place, tighten the legs so that the top lid is at the desired height and is horizontal. We check the horizon using a bubble or laser level. Then we install the covers.
Features of assembling a corner cabinet
The main feature is that in budget kitchen sets the bottom consists of two parts (to reduce costs). If a sink is installed in this cabinet, the back wall is almost absent, but there are several collet ties that add rigidity to the structure. Otherwise, everything is the same as when assembling a regular cabinet with doors.
Useful drilling tools
A jack of all trades always needs certain tools to work in a private house, on a summer cottage, in an apartment, or when building his own house. Many of them are not even worth purchasing if they do not require constant use. For example, for drilling, there are many different attachments that will greatly increase the functions of your drill and significantly expand them.
Let's look at some devices for auxiliary potential.
To obtain precise holes of significant diameter in different workpieces, a device such as a drilling and milling attachment will help to carry out individual milling work.
Make a milling machine out of a drill.
The next device worth mentioning is very expensive, but has the highest versatility. You will sharpen all the tools that you have on the farm, be it knives, shovels, axes, hoes, various drills, effortlessly with a universal sharpening device.
When purchasing drill attachments, be sure to check their compatibility.
Holder with clamp. With its help, you can fix the drill anywhere, use it with various kinds of devices, use it as a mini-lathe, sharpening, milling or grinding and polishing machine.
The drill holder allows you to quickly secure the drill.
All kinds of attachments are also designed for drills. These can be stops that limit the depth of drilling, platforms with which you can drill at a certain angle or perpendicularly. There are nozzles that are adapters and extensions of different designs: offset, angled, flexible.
The angle drill adapter is designed for hand and electric drills.
Metal cutting attachments turn your drill into a one-of-a-kind tool. Some resemble sheet metal shears, while others have a different feature, such as roller shears. The nozzle, called the “Cricket,” seems to cut through the metal.
The main advantage is that they do not damage the polymer coating of the metal.
There are also other attachments designed for monotype work.
- For installing aluminum rivets. There are types for both the same size and those with interchangeable bushings for different calibers.
- Tape-shaped attachment for self-tapping screws. With its help, you will significantly save time when working with plasterboard partitions or when you need to secure other materials with self-tapping screws.
Maximum time savings for serial screwdriving.
It represents his striking unit.
They can be used to sharpen pencils, clean fish, and pluck birds.
Whatever attachments we use, the main thing is that the work is enjoyable.
How to hang cabinets in the kitchen
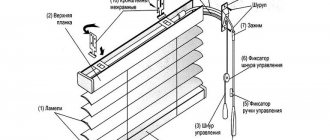
Even before assembling the kitchen set, you need to purchase canopies and intersectional furniture ties for attaching wall cabinets. Let's start with awnings; they come in different types, so we'll talk about them.
You already know how to assemble a kitchen set, you need to figure out how to install it in place. Kitchen wall cabinets are mounted on the wall. They are secured using furniture canopies. They come in the form of metal plates with holes for fasteners, but there are also more complex designs. Cheaper ones are ordinary metal plates. They can be of different shapes, made of ordinary or galvanized steel.
Simple awnings
The most common option (top left) is a plate with two small holes for fasteners and one large one (a hook or a screw head installed in the wall is inserted into it). It is installed on the end of the sidewalls - on the right and left. Under heavy load, this type of canopy can break, since the fasteners are located at a short distance from each other and the chipboard can fall apart. The bottom option is more reliable - more fasteners, but there is still a risk.
Furniture canopies
The other two types of furniture canopies are more reliable, since one of the screws will also be installed in the cabinet lid, that is, the load will be distributed over a larger area.
The corners performed well. One edge of this canopy is attached through the lid. A through hole is made, a bolt with a washer is installed at the bottom, and a nut (also with a washer) is tightened at the top. They are installed at a distance of 5-10 cm from the edge; if a large load is expected, you can install three or four pieces, which is impossible with previous models.
Kitchen cabinets are hung on corners with pads - to compensate for the difference in the thickness of the backsplash
The common drawback of all these mounts is that they are not adjustable. As they hanged, so it will be. There is no way to move it away from the wall or towards the wall. If the kitchen apron protrudes above the surface. walls, you have to mount a plank on the wall or select a lining (a piece of plywood, a piece of wood, etc.) for each fastener. The second drawback is that a separate hook or dowel must be installed under each canopy. Not very comfortable.
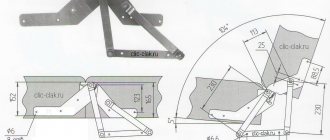
More modern furniture awnings for kitchen cabinets
Adjustable
A more complex and expensive canopy consists of a plastic body, a metal canopy and an adjustment system that allows you to move it forward/backward and up/down. These canopies are attached to the side walls of the cabinet from the inside; a small hole is cut in the back wall. These canopies are paired with a mounting rail or strip. It is mounted on the wall, and the hooks of the awnings cling to its upper protrusion. It is very easy to install and remove wall cabinets with this mounting system, and they have a sufficient “load capacity” of 20-50 kg per canopy (depending on the model and manufacturer).
How to install a kitchen unit
As already mentioned, the order in which the lockers are installed is arbitrary. You can hang the top ones first, then the bottom ones, or vice versa. It doesn't matter. The installation order is important: always start from the corner. How smooth this first cabinet will be will determine how easy the subsequent installation will be.
The installation height of wall cabinets depends on the height of the “users”, but not lower than 45 cm from the level of the countertop. When hanging cabinets on the wall, mark a horizontal line. It can be drawn using a bubble or water level, but the easiest way is to expand the plane to the required height using a level or plane builder. The upper edge of the mounting strip is installed along this line or the cabinets are aligned when installed on conventional canopies.
The task is both simple and difficult at the same time - to arrange the cabinets so that they are on the same level, and their walls are vertical and horizontal. In this case, there will be no problems during operation.
Furniture intersection ties
Since kitchen furniture consists of separate cabinets, they are fastened together. There are two options - install, then fasten, or first fasten, then hang. The second option is possible if you have helpers - hanging even two fastened cabinets alone is not an easy task.
The cabinets are fastened together using intersectional ties. They are of different diameters and different lengths - under laminated chipboards of different thicknesses. At least two ties are needed for one wall. They are placed in the area of the loops - a little lower or a little higher. Two cabinets are placed in the same plane, their walls are fastened with clamps, a through hole is made - along the diameter of the tie, into which the fasteners are installed, tightened with a screwdriver or screwdriver.
Initial stage of work: how to determine the height of the suspension?
Before you start attaching cabinets to the wall, you need to correctly determine the height of their hanging. Approximately the gap between the countertop and the bottom of the cabinets is 50-60 cm, and according to GOST - 45 cm. If you mount the cabinets above the refrigerator or high oven, then their height will indicate the required hanging point.
Size is influenced by several factors, but the primary one is human height.
You should also take into account the quality of the wall partition. In modern houses it is most often made of plasterboard. In this case, do not hang the cabinet too high - the wall may become deformed. In older houses, the floors may also be dilapidated. The walls will not bear such weight and will crumble. In this case, the furniture may fall, and you will be forced to repair it or purchase a new one.
To prevent heavy loads on the floors, you must install auxiliary supports and metal frames.
In most cases, the height of the suspension can be influenced by design innovations. We are talking about facade kits, where everything you need is included in the kit, and this is very economical.
The instructions indicate what height the suspension should be.
How to install a countertop on a kitchen unit
To finally assemble the kitchen set, you need to install the countertop. It is fastened after the cabinets are pulled together. Steel corners are installed on the walls, which secure the tabletop. Watch the video for details on processing ends and cutouts for sinks.
How to process the edges of laminated chipboard countertops, see the following video. It will be useful for those who want to assemble a kitchen set according to all the rules.