How to choose glass for a table?
The most important parameter in the characteristics of glass is its thickness. In second place will be the texture: matte, glossy, with a relief pattern. In some cases, the color of the glass will be important. The type of material you choose depends on the purpose of your table. Glass with a thickness of 5-6 mm is suitable for a coffee table. Such products do not experience heavy loads, so this thickness will be optimal. If you are planning a large dining table, then the glass thickness should be 8-10 mm. It is better to order the tabletop itself from a glass company. Using professional equipment, you can cut any shape of the tabletop, as well as carefully process the edges.
Design
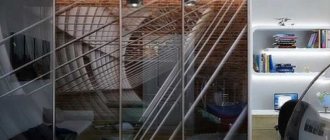
The table must fit into the interior of the room in which it will be located. If the furniture in your home is in a classic style, then the table legs should be made of solid wood, with carved patterns and curls. To make the tree presentable, you can cover it with stain, imitating expensive wood. If you have even a little experience in creating furniture, then it will not be difficult to make a glass table with your own hands. The photo shows an option that is made of only one glass.
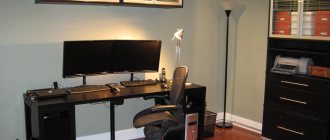
For lovers of high-tech style, a table with metal symmetrical legs is suitable, and the tabletop itself can be in the shape of a circle or square. The Mediterranean style implies simplicity in the interior, so the glass tabletop can be placed on rough wooden legs of the correct shape, painted, for example, white.
Advantages, disadvantages
A glass table has many positive qualities.
- High aesthetics and versatility allow you to use this piece of furniture in almost any room with different design solutions. In addition, a wide range of glass products allows you to choose the ideal countertop (be it simple transparent glass or frosted, white or colored).
- Glass products are environmentally friendly, do not absorb odors, fats, paints, and are resistant to chemical materials. These characteristics are ideal for the kitchen.
- It is very practical: caring for glass involves regular washing or wiping, even without the help of detergents.
- The technology used in the manufacture of glass makes this piece of furniture very resistant to impacts, chips, scratches, and a special film will retain all the fragments even after breaking, eliminating the risk of injury.
Along with many positive qualities, there are also negative aspects of glass countertops:
- Glass is not capable of absorbing sound, so it produces a lot of noise when it comes into contact with other objects. To solve this problem, you can use special stands. But under no circumstances should you set a glass table, as it will completely lose its main role - transparency and weightlessness.
- On glass, with its high reflective abilities, any, even the most insignificant marks and stains are visible. To solve this problem, it is enough to choose the right cloth napkins for polishing the tabletop and cleaning products, position the table away from light sources, or choose a frosted type of glass.
- If more affordable plain glass was used in manufacturing, there is a risk of scratches and such a surface can easily break.
Wooden legs paired with glass belong to the classic or loft style, and are suitable for any color scheme of the interior.
Making a glass tabletop with your own hands
The most important and most expensive element of a glass table is the tabletop. If you are wondering how to make a glass table with your own hands, then you need to know about some rules for glass processing. Cutting it to the right size can be a challenging task for a beginner. Practice on scraps before starting work. If the glass cutter is roller and not diamond, then the pressure force should be approximately 2 kg.
If you have a good, even cut, you can proceed to the next stage - processing the edges. Before starting work, be sure to take care of eye and hand protection. For convenience, you can soak the file in turpentine or kerosene. Movements should be smooth, along the edges of the sheet. You can use an emery block.
Next comes the stage of grinding the edges. To perform this work, a grinder with a special grinding attachment is used. The angle at which the corners are cut should be the same throughout the entire perimeter. Sanded edges are polished. The curve of the tabletop should be smooth and smooth.
Glass table repair
One of the main disadvantages of glass tables is the appearance of various cracks or scratches on them over time. In order to repair small cracks on a glass table, you can use car polishing or a special GOI paste (however, there are now many counterfeits on the market). To get rid of scratches on the countertop, use regular clear nail polish.
As you can see, making a glass table yourself is not so easy; you need quite a lot of tools and, of course, work skills. However, the result is worth all the effort.
Wooden base
To make such a table you will need a 50 x 50 mm beam if you are planning a coffee table. You can use a board, it all depends on the design of the structure.
Let's consider making a glass table for the kitchen with your own hands, measuring 800 x 1400 mm. For such a massive product you will need a beam of 150 x 150 mm. The surface of the timber must be carefully sanded, it must be perfectly smooth. To protect the wood, you need to apply varnish, stain or paint. If you want the structure of the wood to be visible, then use varnish or stain.
To join beam elements, it is better to use an open tenon joint in half a tree. This will disguise the joint and increase the level of strength at the junction. Even a person with a minimum amount of experience in this field can make their own legs for a glass table and a base made of timber on which the tabletop will rest.
Furniture and interior items
62 votes
+
Vote for!
—
Vote against!
A glass table will be an excellent addition to any interior. However, its cost is quite high, especially for designer models. Therefore, it is much cheaper to make a glass table yourself. We'll look at how to do this further.
Table of contents:
- Glass table in the interior of an apartment or private house
- DIY table with glass: a variety of shapes and configurations
- Glass furniture made using the frame method
- Glass table photo and glass cutting features
- DIY glass coffee table
Glass table in the interior of an apartment or private house
Glass is an environmentally friendly material that harmonizes with almost all objects and adds chic to any room. Among the advantages of glass we note:
- combination with any materials such as wood, glass, metal, leather, plastic;
- stylish appearance;
- Fire safety;
- variety of shapes and colors;
- duration of operation;
- ability to transmit light;
- high level of strength when using special glass.
A glass table fits quite well into the living room or kitchen, as well as into the bedroom or children's room. This table makes the room more sophisticated, original and aesthetically attractive.
In a small room, a glass table will help to increase and expand the space. In addition, glass makes the atmosphere lighter and more relaxed.
For the manufacture of glass tables, for safety reasons, it is recommended to use durable tempered glass, which is resistant to mechanical damage and scratches.
In addition, there is the option of making glass tables using unusual glass that is tinted, matte or glossy. In relation to the shape, the imagination is also limitless; tables can be of ordinary square, round and oval shapes or asymmetrical - wavy. Thus, it is possible to install the table in a room with any interior style.
To make table legs, metal, wood, stone or beautiful forging are used. We invite you to familiarize yourself with the features of combining a glass table in the interior:
- An excellent solution would be to use a glass table in a room that combines a dining room with a kitchen and a place for receiving guests;
- glass tables or small tables are most appropriate for a modern interior style - modern or high-tech;
- in order to make the accent in the room on a glass table, it is enough to use glass in bright, saturated colors or colored mosaics;
- A table with a dark glass top is distinguished by its high cost and special luxury;
- Coating the glass with special compounds will prevent the formation of stains on its surface.
DIY table with glass: a variety of shapes and configurations
Making a glass transfryer table will be an excellent option for a small room. Sliding or folding type models are quite popular. It is also possible to build a table whose legs vary in height. If you install the table on small legs, it will function as a coffee table, otherwise it becomes a table for eating.
Coffee tables that have a glass top and legs made of wood or steel are quite popular and easy to manufacture. Such models have a simple shape, so you don’t need any special glass cutting skills to build them.
Chairs with bright upholstery will be an excellent addition to the dining table. It is possible to purchase chairs based on thermoplastic. In addition, the use of wicker chairs will also be quite relevant.
If you plan to install a table in the kitchen, we recommend choosing tiles, a refrigerator hood and other chrome-colored household appliances for this room. You can place a basket on the table containing fruits or a vase of flowers.
A DIY kitchen table with glass can be an excellent decoration for any kitchen or dining room. Its installation in a small room is especially relevant. Transparent glass can expand and enlarge the space. To ensure that there are no streaks left on the glass after it is made, it is recommended to apply a special solution to the surface of the tabletop, which is sold in a hardware or furniture store.
Glass furniture made using the frame method
When making your own glass table and other furniture based on glass, this method is the most successful. To do this, you will need a furniture panel in which a hole of any configuration is cut.
Next, the previously cut glass is fixed in it using a bead. Among the disadvantages of this method are the not particularly attractive appearance and the inability to install sufficiently thick glass.
With the help of mechanical fasteners, after a certain time it is possible to change the furniture and install different glass. The presence of a facet is mandatory.
Doors, windows, and some models of desks made of glass are made in the same way. Fixing the glass in the frame does not require additional processing, so the entire process is based only on the installation of the glass sheet.
Glass table photo and glass cutting features
Before starting this process, you should decide on the thickness of the glass and the size of the glass cutter. There are different types of glass cutters:
- roller type;
- diamond type.
The first option is designed for thinner glass, up to four centimeters thick. Such tools have from one to six rollers. Each glass cutter has a cutting line. There are models that have an oil reservoir; for beginners, we recommend using them.
The cost of a diamond glass cutter is higher than that of a roller glass cutter. These glass cutters are capable of cutting glass that is more than one centimeter thick. In order to cut glass, you will need a flat, hard surface on which a thick film or fabric is laid. To ensure even cutting, you must have a wooden ruler; if you need to cut glass of a certain shape, you should make a pattern in advance. For these purposes, we recommend using plywood.
We recommend that you wear gloves, strong shoes, and tightly woven clothing to avoid injury from falling or breaking glass.
Next comes the process of preparing the glass for cutting. To do this, the glass is washed and degreased. If the glass has a corrugated surface, then a diamond glass cutter will not be suitable for cutting it. In addition, such glass is cut exclusively from the smooth side. Before starting work, we recommend taking a small piece of glass and trying to cut it in the right direction to get used to the tool and practice a little. When cutting glass using a roller glass cutter, the line along which the cutting is carried out is covered with turpentine solution.
The entire sheet of glass must fit on the surface without protruding beyond it. A thick ruler or pattern is placed directly on the cutting line. The glass cutter is held in the hand like a pencil and placed on a ruler. To prevent it from sliding on the surface, we recommend gluing it with fabric-based tape. The diamond glass cutter practically does not press on the surface, while in the process of moving it along it a strip is formed. If the pressure was too weak and the glass does not separate, then re-cutting is not carried out in the same place. This rule is relevant for both diamond and roller type glass cutters.
The roller glass cutter is placed in the hand so that the ring and middle fingers press on it. After cutting, a white stripe is obtained. Next, the glass is moved to the edge of the table and tapped from below using a glass cutter. Holding the main part of the glass, gradually break off the areas that are not on the table. For these purposes, you can use pliers or do it manually.
If you plan to perform shaped cutting of glass, then for this, a pattern is applied to the glass according to which the cutting will be performed. Next, this fragment is outlined with a rectangle, which is cut out with a glass cutter. Gradually, unnecessary parts are cut out with a glass cutter.
To ensure that the end sections of the glass are not sharp and uneven, sandpaper is used to polish them.
DIY glass coffee table
We offer the option of making your own coffee table with chrome legs. The legs are fixed with special glue, without the use of clamping mechanisms.
To purchase additional accessories, contact a construction or furniture store. In order to build such a table, you will need chrome legs, the length of which depends on your personal preferences.
You will also need to purchase a special glue, after application of which no traces remain, and the glass adheres to the surface very firmly. This composition is able to polymerize only in the presence of ultraviolet radiation, which is produced by a special lamp. With this device, the entire process of making a glass coffee table takes no more than two hours.
Please note that using regular superglue or silicone sealant is unacceptable. Firstly, after using them, cloudiness and stains are visible on the surface of the table. Secondly, during the operation of such a table, after a maximum of a month, the legs will begin to move away from the surface.
Therefore, having decided to make such a table, you need to spend money on special glue with a lamp necessary for its hardening. At the same time, this glue, after hardening, will not allow you to detach the table leg from the glass roof; if you try to do this, the glass will simply break.
When constructing a glass coffee table, use glass that is at least 1 cm thick. To cut it, you will only need a diamond glass cutter.
To build a glass coffee table you will need:
- glass;
- glass cutter;
- rulers;
- pencil;
- mittens;
- glass glue;
- ultraviolet lamp;
- drills;
- file;
- sandpaper.
First, determine the optimal size and shape of the coffee table. Depending on this, it is recommended to make markings directly on the glass. The shape of the table can be either strict oval or rectangular, or arbitrary. To make the second option, you will need experience working with a glass cutter.
After marking the surface of the cover, begin the cutting process. We recommend checking the markings several times to avoid mistakes when cutting.
Before cutting, the glass cutter is dipped in vegetable oil, if necessary. The cutting process is described in detail above, we will not dwell on it.
After this, the process of grinding the ends of the glass surface follows; if this is not done, then there is a risk of injury when using the coffee table. To begin, put on gloves made of thick fabric, take a file and polish the surface. The following is the process of using a diamond-coated grinder, if available. The work is carried out at low speeds, the result is a slightly rounded, not sharp edge. Next comes the process of sanding the coffee table cover using sandpaper. The processing of the ends is completed with felt, which is sold in roll form. It is wound onto the surface, providing reliable protection to the glass. In its absence, special paste-like compositions are used, which are applied to a pre-degreased coating. Their cost is much higher than that of felt.
The main step in constructing a coffee table is fixing the legs to the lid. To do this, the tabletop must be turned over and laid on a flat surface. First, markings are made according to which the legs will be fixed on the table. Next, glue is applied to the glass and the leg is attached to it. The work should be carried out by at least two people. To polymerize the glue, use a special lamp with ultraviolet radiation.
If it is not possible to purchase glue, we recommend using special suction cups. They are attached to the leg and then to the glass. For additional fixation of the legs on the suction cups, a small drop of wood glue is applied to the surface of the glass before installing the legs; it will ensure reliable fastening.
Install the table, and place books where the legs are fixed to improve the adhesion of the glass and the legs. After 48 hours, remove the books, wash the glass with special solutions and install it in the living room. It is possible to cover the glass with a special decorative film with different patterns imitating a matte surface, ornaments, flowers or mosaics.
Metal base
Not every carpenter can afford to use metal. To work with such material you will need special equipment and skills. To connect the elements of the table frame you will need a welding machine. You can use metal tubes, corners or even a profile.
Consider how the glass will be attached to the tabletop. In this case, the tabletop is installed in a special recess, which was formed when connecting metal profiles. All you need to do is fix the glass to the profile with glue. A self-made glass kitchen table on a metal base will ideally complement a minimalist kitchen.
If you intend to manufacture a forged product, then it is better to connect the tabletop and base using mechanical fastening. Holes are drilled into the surface of the glass and fasteners are inserted.
What should you pay attention to when purchasing?
For starters, this is, of course, the quality of the glass countertop. Its thickness is usually 10-12 mm. There should be no scratches or chips on the surface, and no bubbles, inclusions or voids inside.
If there are children in the house, then preference is given to a table with rounded edges.
As for the structure itself, it is necessary to make sure that the fasteners and components are reliable, as well as the presence of all seals between the table top and the frame. Finally, read the information about the manufacturer and read reviews from other customers.
A glass sliding table in your kitchen is not only interesting and unusual, but also practical. It will easily decorate your kitchen and also complement the atmosphere of family comfort.
Chipboard base
The simplest material for making furniture is, of course, chipboards. Coming up with a design for a glass table with a chipboard base is not at all difficult. There are a large number of options, colors and textures of laminated coating for chipboard.
The chipboard sheet is cut using a circular saw. The cut produces a rough edge that needs to be covered with an edge. If you don't have specialized edge finishing equipment, don't worry. The end tape can be glued using a regular iron.
The connection of chipboard parts is carried out using euroscrews, self-tapping screws, and corners. The most acceptable option is to use euroscrews. For them you need to make holes in the chipboard using a drill. These screws are tightened with a hex wrench. In the places where the screw heads are located, special stickers are installed to mask the joint.
DIY glass table
Dear visitors to the site “Visiting Samodelkin,” from the master class presented by the author, you will learn how you can independently make a table with a glass top from a double-glazed window and place it in the courtyard of your house or cottage.
Today, tables with glass tops are quite popular; they look original, fashionable and fresh, but as always, the manufacturer sets the price of the product through the roof. So, for this reason, the author decided to make a budget version of a glass table, and just after the renovation he was left with a glass unit measuring 1x0.9 m, almost an even square, which is just right for a tabletop. I welded the base from a corner, made a frame for installing the glass, made the legs from a 30 mm metal pipe 70 cm long, and also for the stability of the structure, welded spacers from reinforcement 17 cm long. Before installing the glass, the metal was cleaned, painted and a rubber band was laid as gaskets
So, let's look at what exactly the author needed to create a table from a double-glazed window?
1. double-glazed window 1x0.9 m 2. metal corner 3. round pipe 30 mm 4 pieces 70 cm each 4. fittings 5. paint 6. rubber tape
1. welding machine 2. grinder (angle grinder) 3. hammer 4. angle 5. tape measure 6. marker 7. mini grinder 8. personal protective equipment (goggles, respirator, gloves)
Step-by-step instructions for making a table from double-glazed windows with your own hands.
As already mentioned above, after renovations in a private house, the author still had a double-glazed window; he did not throw it away, but made an excellent table with a glass top. First of all, the glass should be removed from the frame, washed and wiped with a dry cloth.
This table has a number of advantages
: 1. not afraid of precipitation and can be safely left outdoors 2. perfectly flat surface 3. fashionable, stylish, unique, unusual.
Disadvantages: glass is still fragile and with a strong impact it can crack, burst, or break.
But with careful use and careful care, the table will last for decades. As you can see, there is nothing complicated and it is quite within the power of a skilled person, step-by-step instructions are presented to you, so let’s take it and do it. Be brave, friends! To consolidate the material covered, we recommend watching a video from the author.
Receive a selection of new homemade products by email. No spam, only useful ideas!
*By filling out the form you agree to the processing of personal data
How to attach glass to the base?
There are several ways to attach glass to a base; the choice of the appropriate method depends on the materials and weight of the glass. If the glass is massive and thick, then you can simply install rubber fasteners on the surface of the tabletop; the mass of the glass and the friction force will not allow the tabletop to move.
The mechanical method of fastening is as follows: holes are drilled in the glass and fasteners are inserted into them. There must be rubber gaskets between the metal of the fastener and the glass.
In some cases, the glass is glued to the surface of the underframe. This is a very common fastening method. The main thing in this case is to choose the right glue. It must be compatible with the materials used.
Another time-tested method of securely fastening glass is using rubber suction cups. This fastening method is often used when it is necessary to secure a tabletop with a wooden base of a non-standard shape.
Imitation glass using epoxy resin
Epoxy resin can be used to make not just a table, but a work of art. Particularly interesting are the tabletop options, which include time-warped wooden elements connected with transparent epoxy resin.
To make such a glass table with your own hands, we will need a suitable cut of wood. It is desirable that it has cracks and signs of aging. You can add irregularities yourself by artificially aging a wooden piece. Two elements of wood 4-5 cm thick are laid out at a distance of 20-30 cm from each other. The uneven side surface should be between the saw cuts, and the edges of the tabletop should be smooth and even. The surface is carefully polished and leveled.
A container for casting epoxy resin is constructed - bottom and walls. You can color the resin using pigments. After the resin is poured into the container between the two halves of the tree, you need to wait about 1 day. After complete drying, you need to cover the surface of the product with several layers of varnish. Remember safety precautions when working with epoxy resin. A respiratory mask and gloves are required. Resin is toxic and can cause poisoning.
Making a glass table
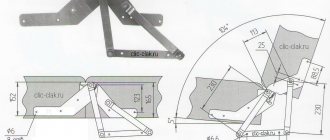
Figure 1. Diagram of a metal support for a glass table.
You can put the finished tabletop aside for now and start constructing a support for it. The simplest options include purchasing and attaching a set of metal legs (universal supports for glass tables. Fig. 1) and a set of suction cups for glass.
The places where the legs are attached are marked and degreased with acetone or another solvent. The legs are placed in such a way that a distance of 8-12 cm is maintained from the cuts to the fastening, and 15-16 cm from the corners. Drill the upper ends of the supports with a drill whose diameter corresponds to the diameter of the suction cups. Insert the suction cups, fixing them with universal glue. The tabletop is laid on a flat surface, the suction cups are pressed tightly against it at the marked places. To increase the reliability of fastening, you can use glue by applying it to the places where the legs are attached. Turn the table over, lightly tap the fastening points with a rubber mallet and place a weight on the tabletop. After 48 hours, the glue will completely set and the glass coffee table will be ready for use.
Related article: Bathroom tile design: hog, sakura
Another support option could be a prefabricated structure made of plywood or chipboard 20 mm thick. The details of the support are shown in Fig. 2. You need to cut out 2 parts of each type and connect them like a children's construction set, placing the cuts on the rectangular parts into the cuts on the square parts.
The dimensions of the parts can be arbitrarily changed depending on the required dimensions of the table. Apply universal glue suitable for glass and wood to the upper ends of the support, lay the tabletop and press it with a weight for 24-48 hours.
Other ideas for making glass tables
Figure 2. Scheme of assembling a plywood support.
In order to create a glass coffee table, you can use various materials at hand: old window frames, bottles, driftwood or stones, etc.
Bottles of unusual shape can be used to make excellent legs for a glass tabletop. To bring this idea to life you will need:
- 6-8 identical bottles;
- 3-4 foam balls or ping pong balls;
- 3-4 wooden sticks matching the inner diameter of the neck of the bottles;
- 6-8 squares of foam with a side of 20 cm and the same with a side of 16 cm;
- newsprint, paint, varnish, universal glue.
Each leg needs 2 bottles. Using wooden sticks that fit tightly into the neck, they are connected, while at the same time putting a ball with a hole of a suitable diameter onto the connection. Foam squares are glued together in 2 pieces. larger with smaller, superimposing them on each other. Cover the structures of bottles and squares with newsprint, dry them for a day or two, and glue the squares to the bottoms of the bottles at the top and bottom. This produces a leg like the one shown in Fig. 3(1). It can be painted with acrylic paints and varnished. For a triangular table you need to make 3 legs, for a square table - 4 (Fig. 3 (2). The table top is glued with universal glue and left under load for 48 hours.
Related article: Driftwood in the interior
For another option you will need:
Figure 3. Making a coffee table: 1 - painting the legs, 2 - gluing the tabletop.
- old window frame;
- cuttings for shovels;
- decorative elements (sinks, pebbles, etc.);
- hemp cord;
- glue;
- Chipboard or board.
Clean the frame and paint it. Cut the cuttings according to the height of the coffee table. Cut dies from chipboard or boards 8 cm long and width equal to the frame. Drill 4 holes for self-tapping screws in the corners of the dies and closer to one edge - for the self-tapping screw securing the handle to the die. Screw a self-tapping screw through the hole into the end of the handle; you can strengthen the fastening with universal glue. Mount the dies with the legs secured to the screws at the corners of the frame, taking into account that its deeper side should form a side under the table top. Wrap each cutting with hemp cord, securing the turns with glue. Place the decor on the glass of the frame and glue it.
Place the glass tabletop on top of the “box” with the decor and secure it with glue or “liquid nails”. On top of the tabletop you can make additional decor from a cord tied in a sea knot, shells, etc.
Tables with glass tops look elegant and weightless. Having the ability to not look bulky, they will be appropriate in the interior of a relatively small room.
Table with glass top in eco-style
Recently, rough interior elements have been gaining popularity, which are transferred almost unchanged to our home from the wild. Eco-style is a direction of interior design that involves the use of natural materials or their imitation for the design of furniture, walls, floors, and decorative elements.
Large driftwood or tree roots are an excellent basis for making a glass table with your own hands. This piece of furniture looks very original. The process of processing natural material itself can take a significant amount of time, but this process should not be neglected.
The first step is to remove the bark and flaking rotten elements from the wood. A strong frame should remain. All bends must be sanded. At the point where the glass is attached, you need to cut down the branches so that they form supports for the surface of the glass. At the final stage, you need to treat the wood with several layers of varnish or stain. It is better to fasten glass using suction cups, as other types of fastening will look unsightly.