Do-it-yourself carriage screeding is a rather complex but fascinating process that anyone can figure out. The use of the carriage screed technique is gaining great popularity around the world, because it is one of the most interesting types of finishing. The main advantage is that you can decorate your furniture in an unusual way - you just need to prepare all the necessary materials, accessories and follow the detailed instructions.
DIY carriage screed
What is a carriage tie
In France many years ago there was a "carriage" or "capitonné" technique. It was used in the manufacture of coverings for seats and decoration of houses of noble people.
Carriage tie —
a popular technique for decorating the surfaces of upholstered furniture and walls. It got its name from the royal carriages, therefore it is associated with wealth, chic and luxury.
This technology has gained popularity and is widely used in creating modern interiors. The carriage screed provides convenience and gives an aesthetic appearance to the premises. To create it, they usually use ordinary furniture material, natural and eco-leather.
Where is it used?
The technology is often used to decorate furniture, doors, and decorate walls in rooms, which not only makes them original, but also protects the residents of the house from noise coming from neighbors.
This kind of upholstery can mainly be found in the cottages of rich people. But with a little effort, anyone can make a similar decoration at home.
Advantages of use
Using the carriage making technique, you can create a superb design.
Finishing advantages:
- The headboard of the bed is often decorated in this style, which is comfortable and looks beautiful.
- It is comfortable to work or just sit on a sofa with a similar finish.
- This surface is easy to care for. It is enough to periodically clean it with a vacuum cleaner.
- The upholstery is characterized by the highest strength and durability.
- A room decorated in this way looks modern.
- The finishing provides additional heat and sound insulation of the walls.
- To make a carriage, you do not need to carefully level the surfaces.
In what cases is a carriage tie appropriate?
Let's start with the fact that the classic carriage screed is quite versatile: it is used both for upholstering upholstered furniture - beds, sofas and armchairs - and for decorating walls. And in the latter case, the trend is really declining: wall panels with peaks are giving way to smooth soft tiles of simple geometric shapes. So, on the walls, the carriage screed remains appropriate only in thematic interiors - for example, in the English club classics.
The situation is completely different with upholstered furniture, for example, sofas. Here it is important to understand that the carriage screed is not only massive Chesterfields and traditional Italian sofas in the “heavy luxury” style. In recent years, many manufacturers have freely mixed the classic carriage screed and the modern design of sofas: they lighten the silhouette of the models, give them a more laconic shape, raise them on high metal supports or place them on brass plinths. One of the secrets of a stylish sofa with a carriage screed is the contrast of textures: the pickwork looks advantageous and, most importantly, fresh, in combination with smooth surfaces, metal decor and fine decorative stitching. Such models, combining traditional technologies and advanced design, are in trend.
At the same time, if you look at the situation a little more broadly, even classic Chesterfields can be quite modern - it all depends on the environment. Thoughtful contrasts in the interior allow even the most traditional carriage sofa to look stylish and up-to-date. Chester and industrial style, Chester and “soft minimalism”, Chester and neoclassicism or modernism are win-win combinations.
Types of screeds
The panels are made of rigid material and can have different shapes and configurations of individual parts. The appearance will depend on the location of the buttons or pins. An unusual pattern can be made on a large panel to create a distinct relief design.
There are 3 types of carriage screed:
- traditional rhombus;
- square;
- with geometry changing from floor to ceiling.
The screed acquires uniqueness and chic thanks to buttons, which can be completely different. Upholstery material can be of either natural or artificial origin, the color palette is chosen according to the interior.
Buttons or nails can be placed quite deep or slightly recessed according to the pattern, it all depends on the chosen relief.
Materials and tools
Materials and tools for making carriage screeds
After the sketch is made, you can proceed directly to the manufacturing process.
List of required materials and tools.
- A sheet of plywood as the base of the structure (of suitable shape and size).
- Furniture fabric (with a large supply, since when forming folds, a lot of it is used).
- Furniture buttons.
- Foam rubber with a thickness of 5 cm (according to the size of the headboard).
- Sintepon.
- Glue.
- Furniture stapler.
- Scissors, bookbinding needles, high-strength threads, stationery knife.
- Drill.
- A “tsifenbor” attachment for a drill (necessary for making even holes in the foam rubber).
When choosing foam rubber, you need to pay attention to its density, elasticity and purpose. The service life of the finished product depends on these parameters.
The choice of glue also requires special attention. It is highly recommended not to use adhesive solutions containing toxic and flammable components, such as trichloroethane and toluene. In addition to the obvious harm to health, the strength of their bonding also leaves much to be desired. It is recommended to use adhesives based on polyurethane, neoprene, butadiene styrene. High-quality glue for foam rubber must be safe for humans and the environment, form a strong seam, elastic and moisture-resistant, and be non-flammable.
High-quality glue for foam rubber
Which fabric and buttons to choose
Not every material is suitable for laying the carriage. When sectors are performed, the canvas experiences significant load, and the upholstery is under tension. Therefore, the material used must be dense.
You can choose the following fabrics:
- Genuine Leather. Durable and soft.
- Jacquard. It has a large relief pattern, holds folds well and looks great.
- Flock. Equipped with pile, has a rich palette of shades.
- Velours. Has a beautiful velvet surface. Thanks to these features, you can make beautiful folds.
- Eco-leather. Wear-resistant, able to form folds and retains its shape perfectly.
Buttons and buttons for the carriage are often chosen classic - round. But the design of such products can be very diverse, ranging from square elements to metal rhinestones. Special furniture nails occupy a separate niche, and LEDs are a bestseller.
Plastic buttons are not suitable for these purposes; under constant load they quickly break. For ties, it is better to use buttons with a metal eye. The market offers a large selection of products, and you can choose accessories to suit your taste.
Manufacturing rules
To properly fasten the carriage, it is recommended that you first read the instructions and the main stages of the work.
All necessary materials must be prepared immediately. First make a layout, attach it to the surface that you plan to decorate, if the pattern suits you, you can start working.
Compliance with the following rules will help to complete the job efficiently:
- Holes can be made with a drill when the foam has dried completely.
- You should choose rubber glue; it is advisable to apply it to foam rubber and plywood in two layers.
- You need to prepare a pattern on cardboard; it will help you drill holes evenly in the future.
- The fabric must be stretched evenly, otherwise it can tear or create unnecessary folds and distortions.
- A more convex, embossed pattern can be obtained with an elastic, thick lining.
- The folds are carefully straightened with your hands in a diagonal direction.
- Screw holders screw into the wall better and hold tighter, so you should give them preference.
- Buttons and nails should be immersed in the material to the same depth so as not to disturb the geometry of the design.
- The cord must be strong so that it does not break under strong tension.
How to make it yourself
First you need to complete the drawing. To do this, you will need to take cardboard and draw the future model on it, indicating the places where the buttons will be located. The simplest option is to make a square marking of 10 x 10 cm. Using a marker and tape measure, make marks every 10 cm along the entire length and width of the sheet, then draw vertical and horizontal lines. When choosing the geometry and size of figures, it is important to maintain the given proportions.
To obtain a diamond-shaped pattern, you can also use a surface marked into squares. Draw diagonals in each of them, and then mark their intersections and vertices with a felt-tip pen to get the desired geometric figure. For convenience, diamonds should be circled with a marker. At the locations of their tops, cut holes through which nails or buttons will then be attached.
Required tools and materials
To begin work, you should purchase the necessary materials and prepare the tools.
To complete this task you will need:
- chipboard or MDF sheet for the base;
- thick textured fabric or leather;
- nails with beautiful heads or metal buttons;
- cord, wire for creating decoration;
- foam rubber, padding polyester in the shape of plywood;
- crochet hook;
- cord for fastening buttons;
- sharp knife;
- drill with Ziefendorf attachment.
- drill with attachment;
- glue;
- pen and ruler;
- furniture stapler.
Creating a carriage tie
To make a carriage screed with your own hands, follow the instructions given. Chipboards or MDF plywood are usually used as a base; it is possible to use other suitable material on which it will be convenient to mount the fittings.
A piece of plywood of the required size and shape is cut. Next, markings are made on it and holes are made.
Superglue is applied to the plywood and a sheet of foam rubber is attached. The adhesive can be applied in several layers. For the glue to dry completely, it is better to leave it for several hours.
The location of the screed is marked on the foam rubber with a simple pencil.
Using an electric drill with a Ziefendorf attachment, holes are drilled.
Excess foam rubber is cut off, and a layer of synthetic padding is laid on top of it and also glued. Holes are also cut in it, coinciding with the previous layer.
Markings are made on fabric or leather, depending on what material was chosen for the upholstery. You need to step back 17.5 cm from the edge.
A pre-prepared cardboard stencil is taken and applied to the wrong side of the fabric or leather. The location of the first point is verified. It is necessary to ensure that the indentation of the material from the edge to the marks is the same on all sides.
The remaining points are placed.
Threads are inserted into each of the marked tightening points.
Using a needle or crochet hook, the first row of threads is pulled through the foam rubber and plywood, then fastened on the reverse side with a stapler.
Then the material is turned inside out and the next row of threads is inserted. Folds are created and the threads are secured with a stapler. To eliminate the appearance of distortions and make beautiful folds, you need to lay them not immediately, but gradually moving from one row to another.
Wrinkles are straightened using a special stick.
A series of ties begin to be secured from the middle, then the material will not be overtightened, and the upholstery will look attractive. First, the folds are carefully straightened, and only then the thread is secured with a stapler.
We must ensure that all diagonals are even.
Buttons are inserted and secured. They can also be placed along the edges, but before the folds are finally fixed.
The formation of side folds is carried out. The counter is fixed, resulting in a perfectly smooth edge.
When all the folds along the edges are laid, the corner is fixed.
The finished capitonné screed looks very beautiful.
You need to buy thick material for the work; thin fabric is not suitable, as it can tear at the places where the nails or buttons are attached. In addition, it is advisable to choose upholstery material without a pattern, otherwise the image will shift during work. To make the panel look original, special decorative caps with rhinestones or patterns are attached to the buttons.
For more noticeable tightening, polyurethane foam is used instead of foam rubber, and fabric is placed on top of it, then the wall will look extraordinary due to the airiness of the layer.
The carriage fastener is an extraordinary and beautiful design solution that is becoming increasingly popular over time. Using a similar design method, you can place many planes with different patterns on the walls of a room.
Step-by-step instructions for carriage screed
After studying some of the intricacies of the carriage screed, you can begin work on surface cladding. Today we will look at the steps of finishing a panel with a solid canvas, because this is the most popular and convenient method.
Cladding using the capitonné technique using a single piece of fabric
Step one: first you need to attach the foam rubber to the plywood base. For this purpose, we use glue, but the use of other techniques is also permitted.
We fix the soft part on the base
Step two: on top of the foam rubber you need to put a pattern with markings where all the holes are marked, as in the preliminary diagram. The cardboard sheet should be held well, so this activity will require the help of another person. Then you need to circle the round holes using a textile marker.
We apply the pattern to the foam rubber
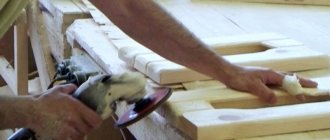
Step three: then you need to make holes in the foam rubber exactly according to the markings using a screwdriver and a special nozzle. Next, you need to make holes in the wood through the same recesses. They will be needed to tighten the fasteners.
Making indentations in the soft part
You can do it another way; to do this, mark the plywood before gluing the foam rubber. It is necessary to mark the points for fixing the buttons on it. Then holes for fasteners should be made at these points.
Making markings on plywood
Foam rubber can be fixed on top of this base
Step four: then you will need to pierce the foam through the base using sharp nails. In these places it is necessary to leave marks for attaching buttons. After which the nails should be removed and holes should be made in the foam rubber using the same nozzle.
We pierce the foam right through
Step five: the next step is to apply diamond markings to the surface. In this case, their size will be 18x12 centimeters. In order not to make a mistake with the markings, it is advisable to prepare a diamond model from cardboard.
Diamond model for marking foam rubber
Step six: Next, you need to mark the upholstery fabric from the inside out. In this case, you should take a larger diamond model, taking into account the formation of the relief.
Diamond layout
Step seven: you need to once again check the accuracy of the markings. After all, any mistake will lead to a crooked screed.
It is necessary to check the correctness of the markings
Step eight: Next, you need to make punctures along the marked points (use an awl for this). Dense threads will pass through them to secure the buttons.
It is necessary to make punctures in the material
Step nine: when all the holes for fastenings are ready, you need to carefully lay out the material on a soft base. For ease of operation, it is necessary to install the panel in such a way as not to block access to it from the inside. The best solution would be to place it on several chairs.
Placing the panel on a flat surface
Step ten: then you should prepare the threads for fixing the fasteners. In our case, for the purpose of tensioning the material, buttons covered with eco-leather will be used. It is necessary to cut the threads into several parts, exactly according to the number of buttons. The ends of these dense threads must be processed using matches or a lighter. Then the cut parts are bent and tied with a tight knot (it should not fit into the hole).
Threads for fastenings
Step eleven: place the pieces in the holes from the extreme part of the panel from the second line. The thread is threaded into the skin using a needle so that one of its ends is on the wrong side. The other end of the thread should remain on the front side.
We thread the threads through the holes
Step twelve: the end of the thread from the wrong side must be fixed to the plywood base using a furniture stapler. You can make this task easier for yourself and do as shown in the picture - install several screws on the plywood, which are easy to hook threads onto. After which they can be attached with a stapler without any problems.
Securing the cord from the inside out
Step thirteen: other threads must be fixed in the same way, securing them to the previous ones that are in this line.
Alternately fastening threads
Step fourteen: the same actions should be done with all holes. It is important to remember that one edge of the thread should be on the outside.
Leave the edge of the thread on the front side
Step fifteen: the same manipulations must be done with the first line from the edge.
It is necessary to insert the needle into the holes one by one
Step sixteen: after pulling up the row, tensions are formed, from which folds are made.
Forming folds
Step seventeen: during the stretching process, part of the pattern begins to be visible.
The diamond becomes noticeable
Step eighteen: upon completion of the formation of diamonds of one line, you need to secure them with threads through buttons. After obtaining the desired tension depth, you should hook the edge of the thread with a stapler to the plywood.
It is necessary to pass the end of the thread into the button
Step nineteen: upon completion of work on the site, it is important to evaluate the quality of the screed.
Finished finishing area
Step twentieth: after forming the relief in the center, you need to move to the edges. In order to make even folds on the skin, you need to cut the edges.
Cutting the skin along the edges
Step twenty-one: then these cuts are folded to the wrong side, and a normal fold is obtained.
Folding the edges
Prices for the model range of pneumatic staplers
Pneumatic staplers
Step twenty-two: at the end you need to bend all the corners and trim off unnecessary pieces of leather.
Ready screed
Video - Carriage screed on a wall panel
How to make your own buttons
If you couldn’t find buttons that match the material in the store, you can make them yourself. You will need a small supply of fabric and smooth buttons with a metal eye.
Cut a strip of fabric, cut a square out of it with a small amount of material around the edges, trim its corners.
The resulting circle should be 2 times larger than the button.
Take a thick, strong thread, insert it into a needle, then fold it in half and make a knot at the end.
Then, stepping back a little from the edge of the material, make small stitches in a circle and tighten the thread. The result will be a small depression where you need to place the button.
Then the thread must be tightened and secured, the metal button will be trimmed.
Useful tips
When working, it is important to follow all instructions and choose high-quality materials for it.
The carriage screed in the interior will look beautiful if you follow the following recommendations:
- Wall panels, beds and doors are made separately and then secured. On upholstered furniture, the screed is done permanently.
- A workpiece of suitable size is cut from the selected material.
- The foam rubber is glued to the finished base. Then you will need to wait until the glue is completely dry.
- The upholstery must be distributed in such a way that it forms folds, but cannot strongly compress the padding polyester and foam rubber.
In this way, you can make a carriage fastening of furniture with your own hands, decorate an important section of a wall or a door. If you do everything correctly, you can get an unusual interior element, devoid of shortcomings.
Self-upholstery using carriage screed technology
Some recommendations for working with the carriage screed technique
Before moving directly to a step-by-step examination of carriage screed technology, it makes sense to get acquainted with the general recommendations shared by experienced craftsmen.
The task is not as simple as it may seem initially, and you should not ignore the recommendations of the experts
- The first step is always to prepare a carefully thought-out drawing of the future cladding with the appropriate dimensions. Without this, it is impossible to make a high-quality carriage screed.
- If the carriage screed will be performed for the first time, it is recommended to practice on a small panel, approximately 500x500 mm in size. Otherwise, you can easily ruin the main material.
- The material chosen as the base must have a certain strength and thickness so that during the work there is no deformation or even destruction of the structure. Carrying out a carriage tie still requires the application of certain mechanical forces.
- The foam rubber is glued to the base using a special glue, which is sold in cans or in the form of aerosols. The latter option is more convenient to use and significantly speeds up the work.
Glue for fixing foam rubber on a plywood base
- Holes in foam rubber and plywood, according to the drawn up diagram, can be drilled only after the glue has completely dried.
- To correctly apply markings to foam rubber, it is recommended to first apply it to cardboard of the same size as the panel to be covered.
- If fabric is chosen for covering the panel, it must be dense and of high quality. A thin version of the material will not be suitable for this purpose, since in the area of punctures and fastening nails, especially with inevitable tension, the fabric may “crawl”.
- You should not choose a material with a pattern for upholstery, since the finished panel or piece of furniture will look sloppy.
Instead of round buttons, some craftsmen are trying to come up with something more interesting
- If you need to add special aesthetics and charm to the trim, or make it more harmonious with the rest of the interior, instead of traditionally trimmed buttons, you can use nails with wide heads decorated with rhinestones or other decorative elements.
- To give the cladding a deeper relief and softness, instead of foam rubber, you can use two materials in combination - this is foamed polyethylene, on top of which a thick layer of padding polyester, 30÷50 mm, is laid.
- Before fixing the material to the base, it should be smoothed by hand and the correct folds should be formed. There should be no distortions or deformations on the fabric or leather.
Neatly formed carriage tie pattern
- All buttons must be equally recessed into the facing material, otherwise the geometry of the pattern will be disrupted and the finish will not look smooth and neat.
- The cord for fastening buttons must be strong so that it does not break when attaching buttons and during use of the upholstery. This is especially true for upholstered furniture, which will be subject to very significant mechanical stress.
- If a “test of the pen”, that is, an attempt to perform a carriage tie on a small “training” fragment, is not crowned with success, then it is better not to spoil the material in vain and turn to a professional craftsman. There's nothing you can do - not everyone succeeds well.
Cost of labor and materials for carriage screed
Drawing up an upholstery scheme
In order to purchase the required amount of material and accurately calculate the location of relief elements and fasteners, it is necessary to draw up a sketch project.
An example of a sketch drawing of a future panel cladding using the carriage screed technique
Using the example of the project drawing presented above, you can consider the process of independently carrying out calculations.
To do this, first of all, the actual dimensions of the surface to be finished are determined and transferred to a sheet of paper. Naturally, the drawing must be made to a certain scale.
The figure above shows a panel having linear dimensions of 2000x950 mm with diamond quilting. However, in order to correctly position and calculate the distance between the fasteners, a square is taken as a starting point, the size of which on the panel will be 200x200 mm. The dimensions of the sides of the square determine the height and width of the diamonds.
The carriage screed in the form of diamonds is made only in the upper part of the panel, and in the lower part there are even strips, separated by folds-bridges. The width of the stripes corresponds to the width of the rhombus, that is, 200 mm. On each side of the panel, a 100 mm wide deviation is made for side fastenings - a total of nine vertical stripes are obtained. The height of the strips to the first fasteners is 400 mm. From the top line of the panel to the first row of buttons - 50 mm. Thus, the size and location of the elements of the carriage screed on the base are calculated.
Fabric or leather must also be marked and drawn before its initial installation. The size of the squares on fabric or leather should be 240 × 240 mm, based on this, it turns out that taking into account the bends, which are allocated 100 mm on each side of the panel, the material should have a size of 2600 × 1285 mm.
Expert opinion: Masalsky A.V.
Editor of the “construction” category on the Stroyday.ru portal. Specialist in engineering systems and drainage.
The squares on the material are larger in size by 40 mm than on the base, since this margin is necessary both to ensure the relief of the upholstery and to form folds framing the diamonds.
After all dimensions are determined, they are transferred to a cardboard pattern, which should have the actual dimensions of the panel. You need to very accurately transfer the installation points of the fasteners onto it and cut holes in these places. How accurately they will be marked and cut, as well as how evenly the pattern will be laid on the base, will depend on the evenness and accuracy of the screed.
Materials and tools for covering panels with carriage screed
To carry out the work, you will have to prepare not only the materials necessary for the process of creating the panel, but also the tools.
Materials include the following:
- A sheet of plywood with a thickness of at least 8 mm for making the base. The linear parameters and shape of the base depend on the draft sketch and what the product is specifically intended for.
- The material for cladding is natural or artificial leather or thick, high-quality plain fabric. It will be required approximately one and a half times more than the size of the base.
- A sheet of foam rubber, the dimensions corresponding to the plywood panel, and the thickness - 50÷70 mm. Instead of foam rubber, you can use padding polyester of the same thickness.
- Buttons or nails with a head with a diameter of approximately 15÷20 mm. Their number depends on the size of the panel and the parameters of the selected pattern. Everything is determined according to the drawn up drawing.
- Durable nylon cord for attaching buttons.
- A sheet of cardboard for making a hole pattern.
- Glue for gluing foam rubber to plywood.
The tools you will need to prepare are:
- Metal rulers - long and short.
- Roulette.
- Several markers for marking.
- An electric drill or screwdriver with a tsifenbor attachment with a diameter of 10÷12 mm.
- Electric jigsaw.
- Stapler and staples 8÷10 mm.
- A hook 150÷170 mm long or a needle of the same size.
A few words need to be said about the tsifenbor attachment, since not everyone is familiar with this tool.
Sharp cutting cylindrical nozzle for drilling holes in foam rubber and other soft materials - tsifenbor
So, a tsifenbor is a cutting attachment for a drill or screwdriver, designed for drilling holes, not only in soft, but also in relatively hard materials, for example, wood. Using this device, you can easily and quickly cut neat, even holes of the desired hole diameter in foam rubber.