You can make an original, stylish interior decoration from ordinary materials that you can always find at hand. An amazing candlestick, a fancy lamp, a memorable gift - all this is created from an ordinary bottle. To turn it into a real work of art, you just need to find a little free time and turn on your imagination.
Beautiful decoration of bottles for a wedding
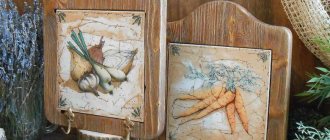
Decor of bottles with grape bunches
DIY bottle design options
There are different ideas for creating beautiful decor. You can decorate the craft in accordance with the style of the apartment: in this case, it will successfully complement the overall interior of the room and will please people’s eyes. It is advisable to decorate a room made in accordance with classical standards with a wine bottle of a simple geometric shape. Vessels of various shapes are suitable for Provence. They are filled with coarse salt, cloves of garlic, coffee beans, cereals, dried flowers or fruits.
Glass bottles of unusual shapes will complement the Provence style interior
New Year's decor of bottles for a feast
A non-standard bottle decorated with shiny paint will organically fit into the high-tech look. You can decorate the craft with metal elements: buttons, hairpins, coins, old keys, etc. Objects decorated with sparkling sparkles, rhinestones, beads and lace will go perfectly with the glamorous finish. The decor of bottles with your own hands is so diverse that you can use it to create crafts for absolutely any style. For this purpose, various techniques for transforming objects were invented and developed.
Champagne bottles decorated in glamorous style
How to decorate bottles with paint and glue
Decorating bottles with paints
One of the simplest ways to decorate. You just need to paint the bottle to your liking using paints. Stained glass or acrylic paints are best suited for these purposes. But aerosol cans will also work. After the work is completed, you need to coat the top with varnish.
There are two types of bottle painting - inside and outside. We offer several ideas for making crafts using this technique.
Idea No1. Bottle painted on the outside and decorated with a “newspaper tulip”
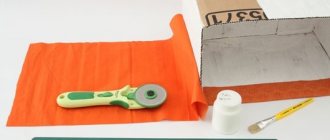
This is a great opportunity to turn unwanted wine bottles into original vases or decorative items for the kitchen and living room. What will you need for this? The simplest materials you can find on hand. Moreover, men will also be able to complete the master class. Any woman will thank you if she is rid of such unnecessary trash, turning it into an elegant work of art.
Materials and tools:
- Empty, clean bottles;
- White spray paint (Rust Oleum paint works well);
- Tulip stencil;
- Newspaper pages or sheets of an old book;
- Glue for decoupage;
- Brush.
Instructions:
- Step 1: Make sure the bottles are clean and free of labels. If this is not the case, then wash them thoroughly and remove all paper stickers from the glass. Dry well.
- Step 2: Paint the bottle white using spray paint and leave it until it is completely dry.
- Step3. Find a tulip stencil on the Internet and print the image. You can use any other picture (butterflies or birds, for example). The main thing is that it fits in size.
- Step 4. Take a sheet of an old, unnecessary book or newspaper or magazine. Using a stencil, draw a tulip and cut it out.
- Step 5. Using a brush, apply glue to the “newspaper tulip” and glue it to the painted bottle.
- Step 6. Apply glue on top (a small layer) to secure it. Once the glue dries, there will be no traces left.
Idea No. 2. Bottle painted inside - “purple lace”
Glass containers look no less beautiful if they are painted on the inside. A purple vase decorated with a lace ribbon will set you in a lyrical mood. A bouquet of lilacs will complete the beauty of the handmade vase.
Materials:
- Bottle (white);
- Purple paint;
- Wide lace ribbon (white, beige, brown - optional).
Instructions:
- Step 1. Wash the bottle thoroughly, remove the label, remove the glue underneath it. After this, boil it for 15 minutes.
- Step 2. When the vessel is completely dry, you need to pour paint inside.
- Step 3. The bottle is rotated in different directions, turned at different angles so that the paint completely covers the inside.
- Step 4. Turn the bottle upside down and place it over some container where excess paint will drain. It is important to fix it well.
- Step 5. After the first coat of paint has dried, you can apply the next or several other layers. Depending on the desired result. When all the layers are dry, the craft is ready.
- Step 6. Decorate the resulting blank for the vase on the outside using lace. We measure a piece of the required length and glue it around the circumference of the bottle. The decor can be supplemented with fabric flowers, ribbons, beads, beads. The flower vase is ready. Such a gift will be exclusive, because it is made with your own hands.
Decoupage bottles with salt
This idea is especially relevant during the New Year period, when you need to create a festive atmosphere in your apartment. To create a unique accessory, you need to stock up on empty wine bottles, nail polish remover (with acetone), a can of spray paint, PVA glue and sea salt. The design of bottles occurs in stages:
- Surface preparation. To do this, you need to remove the label from the container using nail polish remover (or alcohol).
- Coating. Paint is sprayed onto the bottle so that the resulting layer is not transparent. If nothing works the first time, you can dry the vessel and repeat the procedure.
- Decoration. The container is covered with glue and rolled in sea salt. It is better to coat the bottle with PVA up to the middle so that it looks lightly dusted with snow.
- Drying. The craft should be placed in a cool, dry place until completely dry.
You can decorate any glass products in this way. For example, small jars covered with salt will become wonderful decorative candlesticks, and beautiful New Year's toys will look as if Santa Claus just brought them.
DIY bottle decor for the New Year
Halloween Bottle Decor
Decorating bottles with bulk materials
The most affordable way to decorate bottles with your own hands is to decorate them with bulk materials. This idea came from Africa, where there is a lot of colored sand, which is used to make souvenirs for tourists. Local craftsmen pour layers of colored sand so skillfully that they create entire paintings with landscapes of the Sahara. Fillers of different shades are poured into the bottle through a narrow funnel, and the layers are adjusted with a stick to create camels, thorns, mountain peaks on the horizon, and even a completely round sun.
The traditional technique has come into use among modern Europeans as a way to decorate glass bottles with their own hands. Instead of sand, you can paint with salt, sugar or semolina, only after drying they need to be kneaded so that there are no lumps, and the colored material is free-flowing and pliable for filling.
Beautiful bottle design
Decorating bottles for the interior
Bottles with colored fillers will decorate any kitchen, but the material is chosen to suit a specific interior design style. Colored dragees are suitable for emotional bottle decoration. A colored filler made from a combination of products and seeds of different colors looks great in a glass coffee jar:
- green pea;
- black pepper;
- white and red beans;
- orange lentils;
- yellow corn;
- yellow millet;
- unshelled peanuts;
- mustard seeds, etc.
If you have several varieties of colored beans in your kitchen, you can also fill them in even layers or in zigzags (fill them at an angle). After a while, this filler will go into a vinaigrette or other dish, and the bottle will be filled with something else. Today it is also fashionable to do decorative canning, when the blanks are laid out as decoration for bottles and jars.
Original decor of glass bottles
Decoration of glass bottles for interior
DIY bottle decor
Decor of cereals and pasta
Crafts decorated with such materials will fit perfectly into Provence, rustic, country and boho styles. To create it you will need:
- brandy bottle (or any other);
- pasta, cereals and grains;
- decorative elements (beads, butterflies, nuts);
- alcohol;
- a can of gold paint;
- pattern sketch;
- hot glue gun.
Bottles as wall decorations
Gray and white bottle decor for a wedding
Step by step registration process:
- The bottle is completely cleared of labels and degreased with alcohol.
- PVA glue is applied to its surface in accordance with the sketch. Pasta, cereals and other decorative elements are attached to it.
- The craft is put away in a cool, dark place until completely dry.
- After this, the bottle is coated with gold paint and dried again.
In this way, you can create not only an interior item, but also a gift for a loved one (a woman will especially appreciate it).
DIY bottle decor using scrap materials - pasta
Bottle decor in a marine style
Other decor ideas
You can take the techniques described above as a basis and come up with many different creative ideas on how to decorate simple or shaped bottles with your own hands so that they become a real decoration for your home.
IDEAS FOR INSPIRATION
A craftswoman will always have fragments of stitching, lace or guipure in her closets. Using them in combination with beads, glass beads, and glass beads in the decoration of glass containers, you can create surprisingly delicate souvenirs.
BOTTLE DECOR USING FABRIC AND LACE
An interesting technique is macrame, which allows you to create openwork splendor, with which you can interestingly decorate bottles of champagne. Or use the crochet technique for this.
FOR FANS OF MACRAME SOME PHOTOS
Even just wrapping a bottle with twine or spinning thread and decorating it with bows, beads, shells or lace - you can already get a rather interesting option that will decorate and enliven the interior.
NEW APPLICATION OF SPIPE FROM CREATIVE PEOPLE
Using old newspapers with original fonts or foreign words, as well as clippings with inspiring quotes from magazines, you can apply the decoupage technique to decorating bottles.
You can paste over glass containers with all sorts of objects. Seashells will evoke a nautical theme, and silver-painted keys will hint at the techno style.
MARINE STYLE DECOR WILL BE AN OPTIMAL COMPLEMENT FOR A SIMILAR INTERIOR
Using stencil technology, beautiful ornaments can be easily applied to colored glass using PVA glue. It can be left white or painted a different color without removing the stencil.
For those who own a brush, decorating a bottle will not be difficult - just apply a multi-colored painting on the glass.
IF YOU DON'T KNOW DRAWING, USE A STENCIL
If you apply several decorating techniques, using different colors, you can create unusual, and at the same time beautiful, original products that will add zest to any home. Ideas for decoration will be suggested by the style of the interior itself, according to which the decor is selected. And the implementation is so simple that even a child can handle it.
Bottle decor with napkins, toilet paper and newspapers
With the help of such products you can decorate a kitchen, living room or country house. To create this craft, it is advisable to use kitchen paper napkins (plain or patterned) and toilet paper. For the creative process you will need:
- bottle;
- toilet paper or napkins;
- wallpaper glue;
- bottle stand;
- acrylic paints (or gouache and varnish);
- brushes
Decorating bottles in boho style
Decorating bottles for kitchen interiors
Step by step process:
- You need to take 4-5 napkins.
- The bottle is placed on a stand and carefully coated with glue on all sides.
- Pasting begins from the neck: you need to distribute napkins or paper over the surface so that relief folds are formed. The texture can be changed depending on what type the final product should have.
- The ends of the strips that hang along the perimeter of the bottom must be carefully hidden.
- The craft must be left out of the reach of children and animals until it dries completely.
- After this, the bottle is painted. It all depends on taste and preference. It is recommended to depict a fancy painting or a simple pattern on the surface.
The decorated craft is placed on a window or used as a vase for gerberas. Not only glass objects are decorated in this way, but also ceramic pots.
Decorating bottles with toilet paper is an easy and fun process. Even children's hands can handle this
Country style bottles
Decoupage bottles
Decoupage is a simple but effective technique for decorating absolutely any surface. First, wash and degrease the bottle with acetone or alcohol. Then prime it with acrylic primer or a special aerosol primer for complex substrates.
Cut out the fragments that you like from beautiful napkins and carefully separate the top decorative layer. Place it on the bottle and immediately cover it with PVA glue so that there are no uneven spots or bubbles. And when the workpiece dries, paint the bottle with acrylic paints, glue three-dimensional elements or use stencils. The last layer is finishing acrylic varnish.
Decorate bottles with rope and twine
You can surprise guests with such products by decorating a chest of drawers or a coffee table in your apartment. In order to create an original beautiful craft, you will need:
- glass bottle (the twine does not fit well on plastic surfaces);
- twine;
- elements for decoration (beads, twigs, semolina, seed beads, coffee beans);
- glue gun
The main task is to carefully wrap the rope around the bottle. To do this without much difficulty, you need to apply glue in horizontal stripes from the bottom to the neck using a glue gun. After this, you need to quickly wrap the thread around the bottle. All kinds of decorative elements can be attached to the resulting surface in any order or in accordance with the sketch. A good solution is to take design ideas from the Internet or create your own piece of art inspired by others' creations.
This product can be given as a gift to a loved one.
Bottle decor for the holiday table
Bottle decor with twine and salt
For this type of creativity you will need the following materials:
- leg-split;
- white acrylic;
- silicone and PVA glue;
- colored fine salt and semolina (made independently, as in the internal salt decoration).
First you need to paint the bottle with acrylic. After it dries, glue the thread in layers, leaving a distance of about 5-7 centimeters between them.
Coat the empty spaces with glue and sprinkle tightly with colored salt, let dry.
You can also additionally decorate the bottle with beautiful decorative elements.
Instead of salt, you can use semolina or beads.
Decorating glass bottles with twine
Bottle decor with twine
Bottle decor with ribbons and lace
You can complement your home interior with cognac bottles decorated with satin and lace ribbons. To decorate the vessel you will need:
- satin and lace;
- glue gun;
- additional decorations (pins, candies, shells, beads, etc.).
Decoupage bottles with white napkins
Unusual bottle decor using drawings and garlands
You need to start by measuring the bottle to determine the size of the tape. Next, you should attach the pieces to the place of gluing (to estimate how they will look). Having removed the excess, they begin to glue the bottle: small dots are placed on its surface in the places where the satin ribbon will be placed. It should be in slight tension, and each new layer must be adjusted in length. In the neck area, the edge should be absolutely even.
After the lace or satin ribbon is firmly attached to the surface, you can glue additional decor.
Wedding decor bottles in blue
Decorating bottles in a marine style
Bottle decor with satin ribbons
Decorating bottles with satin ribbons is an opportunity to create a stylish decoration for a children's room, kitchen or living room: it all depends on the color combinations and the desire to create a special design element in the room. In order for the work to turn out neat, you should not use a lot of glue; you should apply the tape closely, with strong tension. Each subsequent layer must be adjusted in length. When narrowing the tape, you need to make sure that the edge is even along the neck.
Delicate pair of hand-painted bottles
Glass bottles using decoupage technique
Bottle decor with eggshells
This technique (crackle) allows you to repeat the mosaic texture on the surface of the bottle or create an antique effect. For production you will need:
- empty bottle;
- toothpick;
- cotton pad and alcohol;
- acrylic lacquer;
- PVA glue
- brushes and colored acrylic paints;
- stationery clip and foam sponge;
- bitumen varnish;
- eggshell;
- card for decoupage.
Decor of bottles with stained glass paint
Painting bottles to look like flowers
Stages of work:
- The outside of the bottle is primed with white paint. A sponge secured in a clamp will help to distribute it evenly over the surface. The advantage of this method is clean hands. The paint must be applied in two layers.
- Pictures of the corresponding theme are applied to the surface using PVA glue. The craft is drying.
- The empty spaces between the pictures are filled with glue, and pieces of eggshell are placed on it.
The finished product must be completely dried. To make the surface more even, varnish must be applied on top.
Bottles covered with beads
Bottle design in vintage style
Bottle decor
Surely there are interesting bottles in your kitchen bottle holder that can be decorated.
Internal and external finishing used:
- Decoration from the inside is carried out for bottles that have a completely transparent design and have a perfectly smooth or unusual shape. Expensive alcoholic drinks or even children's juices are often sold in bottles that are decorated with recesses, recesses, and even entire aesthetic or comical designs.
- Decorating the outside requires fewer features from the bottle. It is enough to use even the most ordinary water container. Of course, unusual shapes look much more interesting.
When performing external finishing, the master takes advantage. An empty bottle can be filled with water, then it will become elastic. When all elements are completed, the contents are poured out. This method of decoration is recommended for beginning needlewomen.
Design ideas:
- a combination of colors in the interior, such as gold, burgundy, sea green (suitable for a marine-style kitchen), bright yellow or green;
- vintage with noble and nostalgic contours, suitable for a moderate brown kitchen;
- shiny finish reminiscent of precious metals or stones;
- nautical motifs, detailed execution of all the attributes of a summer holiday, or even sticking on small souvenirs brought as keepsakes;
- heterogeneous openwork patterns based on the color of the lining or applied directly to the transparent structure.
Step-by-step instructions for decorating with twine
Using the technique of decorating a bottle with twine, you can create the likeness of many interior items: decorative panels, dishes, fabric products and various vessels. You can choose not only bottles, but also cans.
The only condition for decorating with twine is that it is made of glass. This will help preserve the structure for a long time, since plastic bases are less durable.
You can take not only a transparent frame, but also a painted one. All stickers that may fall off must first be removed. The color of the base is not important, since it is usually completely covered with decorative material. If you need a beautiful and unusual thing, you need to choose the most bizarre shape of the product as possible. Interesting kitchen design ideas can be found in this article.
Materials:
- selection of a quality basis;
- any fabric that is made through a rough and simple weave of threads. Beading or tapes are great;
- purchasing paper twine. You can do without store-bought material by using sisal or hemp rope;
- wire 2-4 mm. It should bend perfectly; it is advisable to purchase this element from aluminum;
- two different glues “PVA” and “Moment”;
- It is advisable to wear gloves so as not to be nervous about your hands sticking to the surface.
Step-by-step instruction:
- The work starts from the bottom of the bottle. You need to follow in a circular order. Apply a thick layer of Moment glue to the entire bottom part of the glass product.
- Glue the twine to the very edge and begin to wind it sequentially from the outermost line of the bottle.
- Place the strings of twine tightly against the previous layers, while adding a little glue. It should not be applied to the threads themselves or to the entire surface. It is enough to regularly add 2-4 drops to the base in the place where the thread is subsequently wrapped. There is no need to immediately pour glue over a long distance, as it dries quickly.
- When protrusions or depressions begin, as well as when moving to a tapering element of the base, it is necessary to coat the surface with a sufficiently thick layer and try to twist the thread in these places as quickly as possible. It is advisable not to damage the quality at the speed of work, since a non-uniform coating can spoil the appearance of the finished product. Absolutely all parts, even when overlapping each other, must be wrapped with this material. If you need to place threads inside large recesses, you need to carefully push the material into them using a stick or your hands.
- The neck or other particularly thin parts are wrapped a little more tightly than the rest of the bottle, as there is a risk of the fasteners delaminating.
- Separately, crochet a pigtail from twine. It is done using a basic technique by threading each new loop into the previous one. If the master does not know this knitting technique, you can simply divide the threads into three parts and tie a usual braid. When this line is produced, it is necessary to periodically place it against the edge of the bottle to see if it fits the exact size of the circle. It is necessary to make an exact part in size, since the stability of the entire structure depends on it.
- Glue the resulting braid to the bottom, slightly extending onto the base of the structure.
- The bottle is being decorated. You can use any available materials that have an aesthetic appearance and are suitable for twine. Most often, craftsmen make curls. To do this, take ordinary strands of twine, wrap them in several layers and twist them in a chaotic manner or form a circle.
- It is advisable to decorate the central part of the resulting elements with some kind of bead or decorative flower.
- If the resulting product seems too dull, it can be easily refreshed by choosing a bright color scheme, if you wisely use old jewelry or any transparent elements from clothing. You can look at children's and already unnecessary creativity kits. They also help create a great appearance for the product.
Such decorated bottles will fit perfectly into the Mediterranean or Scandinavian style.
Twine is not a bright material, so it is advisable to give it a brilliant and original appearance by adding something shiny or stylish. To finish it in a simple style, just add a coffee bean or a soft button inside. It is advisable to add exactly the same circle to the very top of the bottle so that it looks complete.
Decorating bottles with twine, watch the video master class:
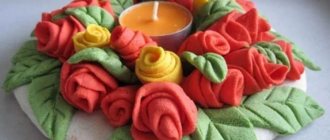
Decor with salt dough
With this design, the most difficult thing is to make the salt dough. If there are no problems with this, then with a standard set of tools and materials (glue, brush, bottle) you can create a beautiful craft. Salt dough elements are made in advance and dried until completely hardened. After this, the finished products are glued to the surface in accordance with the specified composition. On the bottle you can place a grapevine, a glass of wine, a Christmas tree, a tree and any other art object.
Decorating bottles to update your interior
White and gold wedding bottle decor
Bottle decor with salt dough
Decorating bottles with salt dough will be an interesting activity to work with your child. To do this you will need a bottle, glue, napkins, and salt dough. From the salt dough you need to create the desired decoration, for example, flowers or an image of an animal, apply glue to the surface and press firmly onto the finished and dried bottle with napkin decor. After complete drying, which may take 2-3 days, the salt dough can be colored and supplemented with beads, colored salt or any other elements. The same principle is used to decorate bottles with polymer clay.
A fascinating composition of translucent bottles will become the “highlight” of the interior
Bead decoration
If you use this material for decoration, then you need to prepare for the application procedure:
- Think over the sketch.
- Degrease the vessel.
- Using a glass contour, transfer the boundaries of the design to the surface of the bottle.
- Fill the outline image with paints.
- Cover the design with glue and place beads on it.
You can also decorate the bottle using fishing line. To do this, you need to first string glass beads onto it and wrap a beaded rope around a vessel coated with glue.
Bottle decor with salt
Bright bottle decor for the New Year
Satin ribbons for the kitchen
Required:
- satin ribbons;
- brocade ribbons (with the addition of shiny inclusions);
- glue “Moment”;
- additional decorative decorations.
To make the decoration successful and the bottle to become an excellent souvenir, it is advisable to take a product with gold foil without adding any inscriptions. The amount of tape used depends on the width of the material. To make bottle decoration easy and the result to be excellent, you need to decorate according to the following scheme:
- To implement each layer, you must first apply the tape to the required place without gluing, and then cut off the excess.
- Dots are placed on the surface of the bottle with glue. There is no need to use a lot of this substance.
- The tape is glued close to the surface and stretched. Each subsequent layer is adjusted in length.
- When gluing the tape, a kind of pigtail is formed at the joints. You should always cross the edges of the material in one direction to ensure an even pattern.
- When narrowing the tape towards the neck, make sure that it is absolutely even.
- After you have finished gluing the bottle with the base decorative layer, you can decorate it with any additional elements.
Video: how to decorate a bottle for a wedding with ribbon
How to decorate bottles using ribbons for a wedding:
The flat (wide) part of the bottle must be sealed with even strips. The result will be a sloppy seam. It is covered with a ribbon threaded across it.
Decor with threads
With this design of the craft, the procedure will be identical to decorating a bottle with twine. The difference is in the material itself: the threads can be colored, shiny, fluffy. You can recreate the underwater world on a bottle by wrapping it with a blue rope, symbolizing water, and placing decorative fish and transparent stones on top.
Decoupage bottles
Rustic Bottle Decor
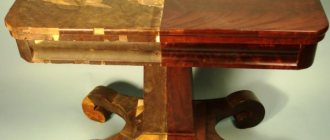
Bottle decor with leather
Such design will require some expenses, but the result will be fully justified. To save money, you can use leatherette or eco-leather. First you need to measure the bottle and prepare two or more pieces of leather that will completely cover its surface. The material must be fastened with tension so that it follows the natural curve of the bottle. It is better to attach the skin with universal glue so that it fits tightly to the surface. After the product has dried, you can place a beautiful decorative element (for example, a golden vine) in the center.
Unusual design of white bottles
New Year's bottle decoration
How to decorate bottles with your own hands
Decorating bottles with your own hands and improvised means can be done in two ways: decorate the inside and outside.
To decorate the inside, you need to use a transparent bottle, it is better if it has a wide neck. The easiest way to decorate it is to fill it with colored salt. It is budget-friendly and requires only a good imagination.
Photo: artbarblog.com
Mix salt in a heat-resistant bowl with acrylic paint. Dry it in the oven for an hour at 100 degrees. Make several types of colored salt. Then pour through the funnel, alternating shades. After finishing work, close the bottle tightly so that the salt does not spill, and decorate as you wish.
Photo: artbarblog.com
You can decorate the outside of the bottle using paint. You need to pour the paint of the desired shade into the container, twist the bottle and leave it to dry with the neck down. Be sure to lay down some material so that leaking drops of paint do not stain other surfaces.
Photo: shop.cyprusweddingsmagazine.com
Decoupage
This technique is also called napkin technique and consists of decorating surfaces using printed pictures and glue. The finished image is varnished so that it is not affected by any external factors. Decoupage pictures can be anything: Christmas tree decorations and balls (for New Year’s products), images of a garden and flower fields (for interior decor in Provence style), vintage scenes (for decorating a room in shabby chic).
Bottle decor with rope
Decorating a bottle in boho style
Bright bottles in boho style
Kitchen decor made from cereals, pasta and eggshells
For those who don’t know how to decorate a bottle for the kitchen with their own hands, there is another simple solution - pasting it with pasta. Today there are a lot of original pasta on sale, ranging from small noodles to large shells. Some craftsmen use PVA glue to glue individual hexagonal figures together, making delightful lace souvenirs in the form of kitchen utensils. The finished “service” is painted with gold plating or another color.
External surface decoration with bulk materials is another simple technique. It's easy to turn ordinary beer bottles into designer bottles by transforming the outer surface. An original mosaic base can be easily obtained by gluing pieces of shell onto glass and covering it with paint. Then you can use any other technique.
Beautiful bottle design
Decorating bottles for the interior
Drops of glue, resin, paint, or any quick-drying liquid are applied to the surface of the container. After drying, decorate the bottle by opening it with an aerosol. The design of a beer bottle sprinkled with cereal or salt on top of the adhesive surface will look no less interesting. You can apply layers of bulk materials of large and small fractions, for example, semolina and buckwheat, interspersing them with millet. Under white or golden paint they will be evened out, playing in the decor with contrasting textures.
In a similar way, you can decorate a bottle of wine that has not yet been opened, and after a memorable event, use the container as a memory. To decorate wine bottles with your own hands, you can use traditional handicraft techniques - macrame, crocheting and knitting, beading.
As a good example, we offer a master class on decorating wedding bottles.
Button decor
For this purpose, you can use both colored plastic buttons and plain metal ones. The first ones are suitable for decorating a gift for a child, the second ones are suitable for creating an original souvenir for an anniversary. To prevent the buttons from starting to fall off, it is better to attach them with special glue.
White and pink decorated bottles for weddings
Simple bottle decor
White bottles for interior
Where and how can decorative bottles be used in the interior?
Beautifully decorated bottles in the interior can be used in different rooms, regardless of the main decor. The main thing is to maintain the same style in the interior and decor. For example, bottles painted with silver paint are suitable for high-tech, while strict bottle shapes will look good in a classic style.
Photo: weddingchicks.com
Calculate the exact cost of repairs using an online calculator
and receive a free detailed estimate for repairs
Calculate
Bottles can be used for window decoration. Place them on the windowsill. They will shimmer beautifully in the sun and cast glare.
Photo: abeautifulmess.com
Another option for the windowsill is flower pots made from bottles. They look unusual and will definitely not leave anyone indifferent.
Photo: hallmarkchannel.com
In any room you can create lamp shades or even a whole chandelier using bottles.
Photo: chrome-effect.ru
Candlesticks made from bottles can be used to decorate a bedroom or living room. In these rooms you can also place decor from large and small bottles. It is only important to choose a style. For example, transparent bottles will complement a minimalist interior. However, do not overdo it with their quantity, otherwise cleaning the room will become much more difficult.
Photo: protoolguide.com
The design of bottles for the kitchen turns out to be special, since here the designers try to maintain the theme of food. Therefore, most often pasta, cereals, seeds, grains, colored salt and other products are poured into bottles. The contents of the bottle, laid out in layers, look most interesting. To place small items in the bottle, use sticks or knitting needles to push them into the neck. And bulk products can be poured through a funnel.
Photo: stylishkutak.info
Decoration with candies
This edible material opens up limitless scope for imagination. You can place an apple, pineapple or any other candy fruit on the surface. Such a bottle, presented to a friend on a cloudy day, will be a good remedy for a bad mood.
Decoupage bottles with newspapers
White and yellow bottle decor
Knitted decor for bottles
Decor with shells
Such natural materials will help create a unique souvenir that will remind the owner of the sea and warm summer days. Shells can be successfully combined with clay, fabric and sea salt, and also painted in various colors.
Decoupage and bottle decoration with cord
Bottle decor for a wedding
Bottle decor with rope
Bottle decoration with sparkles and gold
Bright iridescent vessels will perfectly complement a room decorated in a glamorous style. You can make such a souvenir yourself and give it to a colleague or friend for the New Year. The gift should be complemented with wine glasses decorated with rhinestones and tinsel.
Bottle decor with silver paint for kitchen decoration
Golden paint and sequins in bottle decor
Decorating bottles with gold paint
Photo bottle decor
Look here: Kitchen decor - a review of the best ideas and 130 photo examples of current kitchen decoration options
Did you like the article?
0
Bottle decor for a wedding
Usually this responsible matter is entrusted to the witness. She selects a design for the bottles that will match the overall theme and color scheme of the celebration. There are a great many options for decoration: decoupage, macrame, flocking, kanzashi, and decoration with polymer clay.
Beautiful decor of bottles with fabric in purple tones
Bright bottle decor
Bottles decorated with sparkles in the living room interior
Bottle decor with napkins
Decorating bottles with napkins or decoupage on glass does not require large financial investments, but everyone can express themselves by choosing this design option, making the most of their capabilities.
Delicate vintage bottles using decoupage technique with voluminous decor from various materials
You can also use aged newspaper and various prints that can be found on the Internet to decorate bottles.
Napkin with a pattern - option No. 1
We will need a piece of fabric, a man's handkerchief will do. We impregnate the material with glue and wrap it around a previously defatted bottle, giving it arbitrary shapes. After the glue has dried, cover the product with white acrylic paint. Take a napkin with a pattern, select the fragment you like, cut it out and separate the top layer (most often napkins with a pattern are multi-layered). Glue a piece of napkin onto the bottle and apply a base coat of paint of the chosen color. After the paint has dried, coat the folds created when decorating the bottles with fabric with acrylic mother-of-pearl and cover the entire bottle with acrylic varnish.
Applying paint to a pre-glued and already dry piece of fabric
Finishing touches with gold paint, which gives the bottle luxury
You can also use a few more colors from the paint palette to finally get this result
Another option for designing bottles in a vintage style
Napkin with a pattern - option No. 2
Delicate vintage bottle in light colors