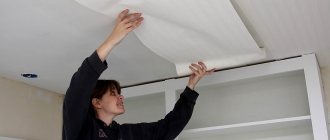
How to glue wallpaper on inner corners
- Using a tape measure, measure the distance from the edge of the last strip to the corner.
- A new canvas is cut with a margin of 1.5-2 cm for an allowance on the adjacent wall. The margin increases in case of large surface unevenness.
- Apply glue to the wall and wallpaper (if the type of canvas requires it).
- The canvas is joined to the previous one with the even side, and the cut edge goes to the other wall.
- Using a roller or wallpaper spatula, roll out the wallpaper, expelling the formed air and excess glue. The edge of the wall is rolled with an angle roller.
- The width of the previous cut strip is measured from the corner (the allowance is not taken into account). Using a level or plumb line with a pencil, draw a vertical line on the wall from the ceiling to the floor. Instead of a solid line, you can make vertical lines at a distance of 20-30 cm between each one.
- A new strip of the same length is cut as in the second stage.
- The second trellis is glued with the even side to the drawn line. The cut edge should overlap the adjacent wall on top of the previous trellis.
- In the corner, the wallpaper is smoothed well with a roller or brush.
- The allowance is cut off by moving a metal spatula and a utility knife from top to bottom, without tearing off the blade.
- The excess piece of the top sheet can be easily removed, but to remove the bottom layer you need to pry off the top one.
- The raised edge is coated with glue with a thin brush, pressed and smoothed again.
General tips and tricks
Each master involved in finishing work has his own set of optimal solutions to issues that arise during the pasting process. Below are tips from professionals to help you understand how to properly glue wallpaper in corners and avoid mistakes:
- To paste walls with dense roll materials, you should use the most durable types of glue, and you need to choose glue with a transparent structure;
- Applying primer to the entire surface of the walls, and especially at the joints, is mandatory;
- Often, adjusting the pattern at the joint takes a lot of time, which leads to the glue drying out; therefore, it is necessary to add the adhesive in time in places where it has dried out;
- In old panel houses, significant deviations may be found in the corners. In this case, it is difficult to achieve effective alignment, so to make the work easier, you should purchase wallpaper without a pattern to avoid adjustment;
- If there is no special primer mixture, it is recommended to use wallpaper glue to treat the surface before gluing. It is enough to apply it 5 hours before the start of the main work, as a result of which the setting of the materials will be much more reliable;
- Coat the corners with a brush. The roller will not be able to cope with the complete processing of the entire surface of this unit, which will negatively affect the setting of the material;
- In complex joints with large deviations, it is recommended to glue a strip of small (up to 15 cm) width before gluing the main panels end-to-end. This precaution will protect the connection when joining the wallpaper and mask flaws in the event of an inaccurate fit. This method is used only for plain wallpaper without a pattern;
- For those who still have difficulty imagining how to hang wallpaper in the corners without defects, it is recommended to use non-woven wallpaper. They best mask flaws on problem surfaces;
- If folds form when smoothing the canvas, they can be carefully trimmed at an angle of 45 degrees, which will eliminate the unevenness and continue working;
- Smoothing of the panel is carried out until the air pockets are completely eliminated. Otherwise, these places will not stick and over time will lead to peeling of the entire trellis;
- When using the overlap method of joining wallpaper, followed by trimming the extra centimeters along the length, it is necessary to carefully move the joints away from the wall with a wide metal spatula and apply glue again, since when removing excess strips, the glue is also removed from the wall. It is better to trim off the excess with a utility knife, using a wide spatula as a guide.
These practical tips will allow any novice home craftsman to cope with difficulties and understand how to glue wallpaper in the corners of a room without mistakes.
Gluing external corners
- A strip is cut, the width of which should be equal to the distance between the last panel and the edge of the wall with a minimum allowance of 5 cm.
- The wall is treated with an adhesive composition.
- The straight edge joins the previously glued strip, and the cut edge fits onto the adjacent one.
- The trellis is leveled with a roller, spatula or brush.
- A wallpaper of similar width is being prepared.
- From the edge of the wall, at a distance equal to the width of the canvas, a vertical line is drawn with a level.
- Another strip is cut 2 cm wider than the previous one.
- The straight edge of the trellis is fixed to the line, and the cut overlap overlaps the previous strip.
- Applying a long metal ruler to the intersection of the wallpaper with a sharp knife, a cut is made in both strips.
- First, the upper excess piece is removed, then the lower one from under the canvas.
- The joint is carefully rolled out with a roller until it becomes invisible.
Procedure
The first 2-3 glued canvases help you get used to the process and understand the technique. Then the work goes faster, easier, until it comes to the next corner.
External
On the outer corners (these are the ones that are “convex”) you will have to slow down. The process of gluing external corners is very painstaking and takes place in several stages .
- First you need to measure the distance from the corner to the last glued strip and add 2.5 cm to the resulting value. For accuracy, it is better to measure both from above and from below, since perfectly even corners are very rare.
- After taking the measurements, you need to cut a strip of wallpaper of the required width and glue it.
AdviceFirst you need to carefully press the wide part of the canvas, and the remaining 2.5 cm overlap - this part is pressed last.
- The next strip will be glued strictly from the corner, and the existing 2.5 cm from the previous strip will be “hidden” under it: this way you can hide the unevenness.
Below is a visual video of work on the outer corners:
Domestic
Internal corners are insidious in that with the wrong technique, instead of an even transition, you get a curved line full of bubbles, dents, and crooked creases. Therefore, they are pasted over like this:
- The distance from the last canvas to the corner is measured. 1-2 cm is added to the obtained value.
- The next canvas is measured in accordance with the resulting width and carefully cut along a pre-drawn vertical line on the reverse side.
- The canvas is carefully applied to the wall, carefully greased with glue. It needs to be pressed well with a roller, spatula or improvised means to prevent bubbles from forming (how to remove bubbles on wallpaper?).
The 1-2 cm added during measurements will appear on the adjacent wall . They need to be cut off slowly and very carefully with a sharp construction knife, holding the fresh canvas with a spatula. The main thing in this matter is not to rush.
Below is a video about working with an internal corner:
What to do with uneven corners
If the walls and corners are uneven, it is not recommended to glue wallpaper without leveling it.
Irregularities will lead to possible divergence of the joints.
Repairers use two methods to identify and correct crooked areas.
Method 1. Apply a rule or metal profile strictly vertically to the wall, identifying the most protruding points. An angled spatula is placed against the irregularities found, and a profile is applied to the tool itself. Verticality is maintained with a plumb line. Marks are made on the wall, holes are drilled and dowels are installed. The profile is attached to the wall with self-tapping screws.
The corner is moistened with water. For leveling, puttying is carried out using an angle spatula. Excess gypsum mixture is removed. After the putty dries, it is sanded down with sandpaper.
Method 2. A plastic or metal profile with a reinforcing mesh attached to it is placed vertically at the corner. Its location is secured by treating it with a putty mixture, which, after drying, is also rubbed down to a rough finish.
The result is a perfectly flat surface that can be pasted over.
Evenness of corners
The first thing you need to check is the evenness of your wall corners. Because if the corners are not even, then you won’t be able to wallpaper them evenly. If necessary, you need to perform plastering work, install metal or plastic corners on the outer corners. The internal corners are leveled with plaster, without any corners. Aligning corners is a separate topic for discussion, so we will return to it in future articles.
Aligning corners
If the wallpaper has a pattern
Wallpaper with a monotonous small pattern, for example, checkered or striped, does not need to be adjusted to the pattern. The joints will not be visible to the naked eye. The situation is different with a more pronounced pattern, when the entire wall forms a full-fledged image or, if there is no pattern at all.
In this case, it is better to join the wallpaper end-to-end rather than overlapping. Non-woven wallpaper, which is always glued end-to-end, is perfect.
It is better to cut the sheets immediately before work on the floor covered with clean oilcloth. This way you can immediately cut strips that will match the pattern.
How to adjust the pattern in the corners
Wallpaper in the corners with geometric designs or patterns can be joined so that it will be almost impossible to find the seam. The whole process consists of the following steps:
- Place a cut piece of wallpaper with a pattern on the floor, face down, joined to the edge of the last pasted sheet.
- Measure the distance from the top and bottom edges of the glued sheet to the corner.
- Mark them on the first sheet laid out, adding 5–6 cm to them and cutting them off.
- Place the resulting piece of roll, joining the pattern so that the minimum point along the width of the first sheet overlaps by 3 cm.
- Cut to the required length and cut out the part that overlaps the mark.
- Both sheets are smeared with glue and glued one by one, joining according to the pattern. The overlap area is well rolled with a rubber roller.
Tips for work
Non-woven wallpaper is very practical; you don’t need any special skills to glue it. But there are a few tips that will undoubtedly be useful to owners who decide to do the repairs themselves.
- Don't let the meter-long wallpaper scare you. Gluing them is no more difficult than standard ones, but as a result, the repair will be much faster, and there will be fewer joints;
- should not be glued overlapping. Non-woven wallpaper does not stretch during gluing, therefore, there is no need to make a reserve. As a result, you will get beautiful, invisible joints;
- non-woven wallpaper does not need to be smeared with glue; it is enough to simply lubricate the walls and the material will stick better and more firmly;
- To prevent the canvas from peeling off from the walls, close the windows in the room, do not turn on the heaters and air conditioners. This regime must be observed until the material dries;
- use glue that is designed specifically for this type of wallpaper. They are heavy and universal glue simply cannot hold the material on the wall;
- Be sure to remove metal objects: nails and various types of fasteners. If it is impossible to completely remove them, paint over them with white oil paint. Otherwise, you risk getting rusty streaks on the new wallpaper, which will ruin the whole job.
You can clearly see how to glue non-woven wallpaper in the video:
Wallpapering with a pattern in the corners
The vertical pattern of the wallpaper makes it difficult to paste in the corners, because distortion is especially noticeable in these places. A pattern with a horizontal position is no exception; for example, after gluing it can become completely skewed. To avoid such incidents, it is necessary to make a small overlap on the wall next door and hide the joint at the top of the corner.
Advice: the difficulty of wallpapering corners is to follow the rule - the edge should be plumb and lay flat, and the other should be trimmed along the edge of the corner.
A non-professional will not be able to hang wallpaper without shifting the pattern without experience. The main thing is to make it less noticeable, using the instructions provided above.
Repairing an apartment, house or office takes a lot of time and effort, as well as money if you decide to turn to hired workers for help. But thanks to the instructions given to you above and strict adherence to them, you can begin to decorate yourself, devoting attention and time to studying wallpapering in the corners. Pay attention to the presence of defects, whether your walls are even, and carry out preparatory work to eliminate unevenness. In addition, radiators and pipes often pass through the corners, interfering with the gluing process, making repairs a hassle.
If you approach this task responsibly, taking into account all the recommendations and rules, then you will find quite a wonderful result, no worse than if the gluing was carried out by a professional team of craftsmen. By doing the finishing work yourself, you will significantly save money. Good luck, and have a good completion of your home renovation!
Pasting external corners
Before you begin gluing the outer corner, you need to assess its condition. If necessary, unevenness should be eliminated by puttying. Upon completion of processing, they begin to glue the canvas. You can simply turn the corner with it, but you should ensure that the position is correct. This is due to the fact that the further success of the work depends on it.
There is also a second method of gluing the canvas. It is similar to the method used for interior corners.
Thus, wallpapering using the proposed methods is typical for a material that is applied end-to-end to the walls. Such approaches and canvases are good because, if everything is done correctly, they do not shrink or diverge. To prevent errors from occurring, you can watch the video and visually evaluate the result of the work:
Recommended Posts
Vinyl wallpaper on non-woven fabric, foam, hot stamping, ...
Washable vinyl wallpaper for the kitchen
Wallpaper for a black and white kitchen
Options for wallpapering in the living room, kitchen, bedroom
How to choose two types of wallpaper for the living room
How to glue wallpaper with your own hands
Features of gluing corners
According to the recommendations of experts, you should not glue a whole sheet of wallpaper into a corner. This can lead to the formation of folds and the appearance of inconsistencies with subsequent stripes. To avoid this outcome, the transition from wall to wall should not exceed 4 cm.
When working with this finishing material, it is necessary to evaluate its features. So heavy wallpaper needs additional plumb.
Gluing should be carried out with minimal vertical deviations. The peculiarity of working with corners is to carefully coat them, since it is in these places that the probability of lag is highest.
Moving from corner to corner, there is a need to de-energize the room in order to avoid receiving electric shock from sockets and switches, since it is necessary to remove the covers from them. After gluing the canvases, make slits. When gluing door frames, the wallpaper is cut vertically and adjusted along the edge.
Each type of wallpaper is characterized by its own application characteristics, but problems with corners are common to all. Despite the fact that non-woven ones do an excellent job with unevenness, it is impossible to repeat this with corners.
Attention! To reduce the likelihood of distortions, it is not recommended to glue entire panels in the corners.
Since during the repair work you may encounter such a problem as the curvature of the corners, it should be solved using the “cutting” method. Very often it is difficult to notice such a situation with the naked eye, and therefore, before you start working, you need to use a level. This approach is mandatory when using thick canvases, which include, for example, vinyl.
Materials for work
Regardless of the type of canvas chosen, before gluing it is necessary to prepare the following tools and materials:
Home tutors - wallpaper, paint, tiles
You can use them with halogen lamps.
We usually paint with paint or both. In the bathroom we cover it with plates. We can also use wood, veneer or plastic. Advantages of using drywall: - Placement. Prepare the floor: wash the wall, fill it with a trowel and smooth it with paper. Measure the height of the wall and cut the wallpaper into appropriate pieces. wedges Don't forget to add up to a few centimeters of extra space, which will allow you to fold the templates. And they fell in love, without exception: she, her assistant James, and even their two teenage sons, Jasper and Cyrus. It was like a dream: a space with luxurious proportions, two-meter high windows, walls with cornices and plaster, rose ceilings. And this three-story tower is the entire building.
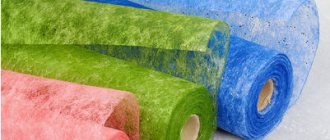
- rolls in the required quantity;
- wallpaper glue suitable for the selected type of wallpaper;
- roulette;
- a long metal ruler or a piece of profile;
- plumb line;
- pencil;
- construction knife or sharp paper blade;
- rubber roller, brush or clean cloth.