When it comes to finishing the ceiling surface, people in most cases consider only three options: installing a stretch ceiling, installing a suspended structure and painting. It would seem that there is not much to choose from, but there is a fourth option, which has been used for decades, but today for some reason it is becoming a thing of the past. We are now talking about wallpapering. Ceiling wallpaper was not always glued, mainly because gluing it is quite difficult and inconvenient. This article was written so that even a beginner can understand how to hang wallpaper on the ceiling.
To begin with, this finishing option has always been original, as it provided wide design possibilities. Wallpaper allows you to create unique interiors that you cannot find in other houses or apartments.
How to wallpaper the ceiling
As for other advantages of this method, these include:
- no need to frequently paint the ceiling if it fades over time;
- no need for significant financial costs associated with the arrangement of tension/suspended structures.
In other words, wallpaper is the best option according to several criteria at once. However, it should be remembered that the choice of material must be approached with all responsibility (this is especially true for rooms with high humidity).
Now let's look at the gluing process itself. This procedure, as noted above, is extremely inconvenient: it is not easy to glue wallpaper onto walls, but here all the work is done overhead.
Gluing wallpaper to the ceiling is extremely inconvenient, since all work is done above your head
For which rooms is wallpapering suitable?
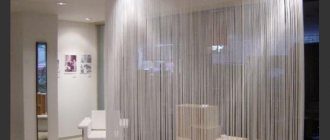
It is not suitable for every room. Embossed colored ceilings are known to visually make a room smaller, so this method is suitable for large rooms - say, a living room, where you can not only experiment using different textures, but also hide imperfections in the finishing. The fact is that the latter are less noticeable in large rooms than in small ones.
The ceiling, covered with wallpaper, also has a large set of visual effects. With its help, for example, you can both make a room more comfortable and divide it into several zones. It is quite obvious that the ability to delimit rooms is especially important in one-room apartments, where one room serves as an office, a living room, and a bedroom. Finally, the porosity of the wallpaper also provides additional sound insulation.
Prices for photo wallpapers
photo wallpaper
Ceiling wallpaper in the interior
Sticking to drywall
Before finishing with decorative material, putty the drywall and apply a primer mixture to it. Be sure to mark the suspended ceiling made of gypsum plasterboard to prevent the panels from moving during their gluing.
It is convenient to apply the glue with a roller: first treat the wallpaper with the mixture, then the wall in the place where you will apply the canvas. Trim the strips only after they have completely dried.
Stage one. Deciding on the type of wallpaper
First, you need to familiarize yourself with the features of some types of wallpaper, and also find out which option is more suitable for finishing the ceiling.
- Paper . The most common type of material, characterized by low cost. A good choice for cosmetic renovations.
- Liquid . Who doesn’t know, such wallpaper is a special liquid mixture that, after application, gives a seamless and perfectly smooth surface.
- Vinyl . Very popular today, they are distinguished by durability, strength and moisture resistance.
- Non-woven . Such wallpapers are especially durable, elastic, and abrasion-resistant.
- Textile . They consist of two layers - a paper (or non-woven) base and a textile fabric.
Fiberglass ceiling wallpaper
We have not considered all types of wallpaper present on the current market, and this is of no use. Instead, let's return to the main topic, namely wallpapering the ceiling with your own hands.
GOST 30834-2002. Wallpaper. Definitions and graphic symbols. File for download.
GOST 30834-2002
Kitchen
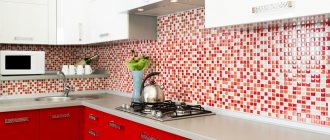
To cover the ceiling in the kitchen, you need materials that can withstand humid air, sudden temperature changes, and increased vaporization. The surface must be periodically washed using aggressive compounds to remove stains of greasy soot and splashes formed when oil boils, so strength and resistance to chemicals are important. These properties differ:
- vinyl wallpaper on non-woven backing;
- plastic panels;
- ceiling tiles made of polystyrene foam.
Important! Cladding materials can be attached directly to the ceiling, having previously prepared the surface, or pasted over elements of a multi-level plasterboard structure.
When choosing vinyl ceiling wallpaper on a non-woven basis, it is advisable to give preference to canvases made of smooth or hard vinyl, which have high density, moisture resistance, air and vapor permeability, and resistance to aggressive substances. Foamed vinyl wallpaper and silk-screen printing do not have these qualities.
Plastic panels fit perfectly into the interior of any kitchen. They are affordable, easy to install, and can withstand cleaning agents. When purchasing, you must read the accompanying documents, which describe their performance characteristics, including resistance to heat and the absence of toxic substances.
Ceiling tiles are affordable, easy to install, do not require special skills, but absorb soot and dirt. A stained fragment can be easily replaced, but with large footage this will cause significant problems, so it is better to choose a different cladding method.
USEFUL INFORMATION: Choosing wallpaper for the living room: design basics
Stage two. We prepare everything you need
As for the wallpaper itself, there are no restrictions in terms of their choice - you can use any of the options listed above. For example, the starry sky is a very original method of decorating the ceiling surface.
On a note! Wallpapering for painting deserves special attention. Modern models of the material can be painted up to 15 times, which means that if you are tired of the color, then it is not at all necessary to remove the previous finish - instead, you can simply repaint it.
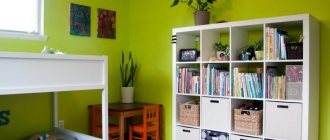
If the ceiling in the room is low, then it is preferable to use wallpaper in light colors, and always with small and dim patterns. This will visually raise the ceiling, and the light wallpaper itself will be suitable for almost any interior. In order to reduce the height of the ceiling, you need, on the contrary, to use dark colors. However, this is a matter of taste, so no one can stop you from using the option that you personally like for gluing.
Prices for non-woven wallpaper
non-woven wallpaper
Light wallpaper is preferable to glue to ceilings in low rooms
You will also need the following tools:
- stepladder (or durable table, sawhorses);
- brushes;
- bucket;
- rags;
- a construction mixer (in extreme cases, you can use a regular wooden stick) to stir the glue;
- pencil;
- roulette;
- roller (the handle should be long and the length of the pile should be medium);
- a special tray for the roller (thanks to it the glue will be distributed evenly).
Wallpapering tools
On a note! The strips must be laid parallel to the window. With natural light coming from the window, the joints will be less noticeable. For this reason, trimming wallpaper should be done taking into account the longitudinal size of the room.
And one more thing: it’s better to do the gluing together. One will glue the wallpaper, and the other will hold the edges of the strips and make sure that the installation is done correctly. Although this can be done independently (by folding the canvas into an “accordion”), but only if you have a lot of experience.
Materials and tools
The building materials market offers a fairly wide range of putty mixtures. That is why the issue of their choice must be taken especially seriously.
Plastering the ceiling can be done with two types of material:
- dry,
- liquid or viscous.
It is better to putty plasterboard ceilings for painting with a dry mixture. It has a long shelf life and is not exposed to high temperatures. A viscous material, depending on how it is stored, may lose its properties. The dry mixture can be diluted as much as needed for work.
According to its composition, putty material is divided into three types:
- Gypsum is most often used in dry rooms.
- Cement is suitable for puttying a plasterboard ceiling for painting in a bathroom or any other room with high humidity.
- Polymer is considered the ideal option for all cases. It costs more, but is characterized by low consumption and high quality.
When the material is selected, you can begin to prepare the tools. For more experienced craftsmen, you will only need two spatulas of different sizes.
For less experienced people, more tools and equipment are needed:
- a larger spatula;
- small spatula;
- self-adhesive mesh;
- priming device (roller or brush);
- primer;
- construction mixer.
You need to calculate in advance how much putty you will need. To do this, it is necessary to determine the ceiling area and mixture consumption (usually 1 kg per 1 m2).
Stage three. Preparing the ceiling
One of the main advantages of wallpapering is that it is not necessary to remove the old covering from the ceiling. But if there is whitewash, then it is advisable to remove it and then putty the surface twice. If there was already wallpaper on the ceiling before, they also need to be torn off.
If the working surface is uneven or has significant slopes, then it needs to be leveled (in especially serious cases, plasterboard is used for leveling). However, this again depends on your budget, as well as what kind of renovation you will be doing.
Prices for putty
putty
Preparing a concrete ceiling for wallpapering
If wallpapering will be done on a puttied surface, then before starting work it must be properly treated. You can use acrylic primer for these purposes, applying it to the ceiling with a regular brush.
When the primer layer dries (and this will happen quite quickly), you can begin directly gluing the wallpaper. Let us also note that priming the ceiling is an optional procedure, but wallpaper on a primed surface, which has been repeatedly proven, sticks, sticks and dries much better.
How to putty a ceiling?
If you don’t know, you can find a detailed step-by-step guide on how to putty a ceiling in this article. In addition, we recommend that you read the article about how to prepare a ceiling for painting.
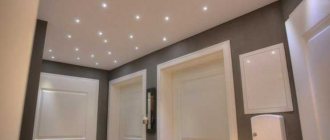
Be sure to sand down the dried primer. Also, the treated surface must be marked in such a way that the strips of material are glued at an angle of 90 degrees relative to one of the walls of the room. Seal the area where the chandelier will be hung using masking tape. Don't forget to turn off the electricity before gluing.
Direction of movement when sanding the ceiling
Choosing adhesive for ceiling wallpaper
An important point when preparing to decorate the ceiling with wallpaper is the choice of glue. After all, here the force of attraction on the sheets of trellises is tens of times greater than on the wall. Therefore, specialized adhesive compositions are needed for wallpaper bases (universal types of glue do not hold wallpaper well on the ceiling).
Details about the types of glue, their composition and the level of adhesion with various materials (the ceiling can be concrete, wood, plasterboard) and different types of wallpaper can be found in the material “How to choose wallpaper glue?”.
Stage four. Cutting the wallpaper correctly
It's no secret that to hang wallpaper, you first need to cut it according to the required sizes. For this reason, you should definitely know how to cut without ruining the material. Below is an algorithm of necessary actions.
Step 1. First, take the roll and place it so that the front side “looks” down.
Step 2. Next, unwind the material to the required length.
Step 3. Using a tape measure, measure the appropriate length, then mark the location with a pencil.
Wallpaper glue prices
wallpaper glue
How to cut wallpaper for a ceiling
Step 4. Where we put the mark, we bend the material (the front part should be on top) and smooth the resulting bend.
Step 5. At the end, take a stationery knife and cut the strip along the bend (more precisely, along the inside of the latter).
Do-it-yourself finishing of plasterboard ceilings in different ways
First, treat the gypsum board with a deep penetration primer, then cover the structure with sheets. Please note that the distance between the previous and next sheets should not exceed 2.5 mm. The distance between the screws is 25 cm.
The caps of the fastening elements must be completely sunk into the material.
- dismantle the old chandelier and other lighting elements;
- we clean the ceiling and walls of old wallpaper, falling off plaster and old finishing;
- We seal the cracks with putty or a mortar of sand and cement;
- We treat surfaces with antiseptic compounds to protect against mold and mildew.
Uneven ceiling surfaces can spoil the impression of any renovation. In the article we will look in detail at the options for plasterboard ceilings, how to finish a plasterboard ceiling with your own hands for painting, as well as other methods of decorating the material. To check the quality of coloring, you can use a portable lamp.
It is turned on and brought to the surface at different angles. All visible flaws must be re-sanded with sandpaper, then painted again.
- The paint is thoroughly mixed and, if necessary, diluted with water.
- The first step is to paint the areas where the plasterboard sheets meet the wall surfaces in order to eliminate unsightly stripes after the ceiling has dried.
- The main part is painted with a paint roller. The first layer is applied parallel to the position of the window opening.
- After the previous one has dried, it is necessary to apply a second layer of paint, but this time perpendicular to the window and the first layer.
Stage five. Draw a line for the first strip
When the ceiling is properly prepared and the wallpaper is cut into strips of the required length, we need to mark a line along which we will glue the first sheet of wallpaper.
Drawing a chalk line on the ceiling
To make the line as even as possible, we hammer in a couple of nails along the width next to the ceiling on opposite walls. We tie and pull the rope tightly between these nails, after rubbing it with chalk. Next, we pull back and sharply lower the rope - as a result, a white line will remain on the ceiling, along which we will glue the first strip.
Note! The line must be marked before the actual wallpapering begins.
Preparatory work
All furniture must be removed from the room during renovation. If this is not possible, then move it to one corner and cover it with polyethylene.
You also need to think about a reliable stand with which you can reach the ceiling.
First of all, we prepare the wallpaper, glue and tools - a wide brush for applying glue, a roller for processing seams, a wallpaper brush and scissors.
We clean the ceiling surface from old decorative materials:
- dye,
- wallpaper,
- whitewashing, etc.
Stage six. Let's start wallpapering
Here, a lot depends on the type of wallpaper chosen for the room. If we are talking about, say, vinyl or paper, then the glue should be applied directly to the wallpaper sheets themselves. If non-woven wallpaper is used, the adhesive mixture should be applied to the ceiling surface. The adhesive that was applied to non-woven wallpaper must be kept for several minutes, while for paper wallpaper this is unacceptable - the material should be laid on the ceiling immediately after applying the adhesive.
Scheme for wallpapering the ceiling
Let us add that the strips of material must be laid parallel to the window opening, as was already mentioned at the beginning of the article. Thanks to this, the joints will be practically invisible. When everything is ready, we get to work. For the convenience of visitors, the instructions are presented in table form.
Table. Pasting ceiling wallpaper.
| Steps, no. | Short description |
| Step 1 | Stir the glue. It must be very thick to securely fix the wallpaper. |
| Step 2 | Take the first strip and apply the adhesive mixture to it, spreading it from the center to the edges. It is important that the glue never gets on the front of the wallpaper. |
| Step 3 | It all depends on how many people are doing the pasting. If you do this alone, then fold the glue-coated strip into an accordion shape, then glue along the previously marked line, gradually straightening the material. As you glue, smooth the material with a roller or a special smoothing brush. If two people are working, then one must climb onto the trestle, holding the edge of the strip. The second one at this time should hold the second edge and monitor the process. |
| Step 4 | Now we squeeze out the remaining adhesive solution and air from under the wallpaper strip. For this purpose, we take a clean roller and roll it, moving from the center to the edges. To remove excess glue, use a sponge or rag. |
| Step 5 | We perform similar actions with the remaining wallpaper strips. Difficulties here can arise only with the adjustment of the adjacent strip to the already glued one. We do this end-to-end, without overlap. If there is some kind of pattern on the wallpaper, then we need to combine adjacent stripes (we need to take care of this at the stage of cutting the material). |
Note! There should be no drafts in the room during gluing. It is recommended not to open windows and doors for several days after completion of work.
If you work alone, you can make yourself a convenient device designed to support the strips from a plasterboard profile, connecting it with the letter “T”. The video below clearly shows how to wallpaper a ceiling yourself.
Video - Wallpapering the ceiling with your own hands
You can use ceiling plinth to seal joints.
Surface pasting
Before climbing onto the prepared platform, check that all the tools are near you. To properly glue the wallpaper to the ceiling, and then carefully smooth it out, you will need a wallpaper brush, roller, scissors and a soft rag.
Under the influence of the paste, the wallpaper becomes especially sensitive and can easily tear. To prevent this from happening, you need to hold the canvas not with your hand, but with some object that is large in area. To do this, take a cardboard roller, a roll of wallpaper, a broom, at worst.
With one hand you will hold the roller, or whatever you have, and support the unfolding “accordion”, and with the other hand, glue the edge of the wallpaper, focusing on the marking line and guiding the panel along it.
Then, the glued section of wallpaper must be pressed firmly to the ceiling and smoothed using a wallpaper brush or soft cloth, making movements from the middle to the edge (but not vice versa).
Having glued a small piece, you can move on, straightening the wallpaper “accordion” and repeating the same procedure - outline, press, smooth. It is important that the edge of the glued sheet goes exactly along the reference line. This is a guarantee that the strip will be glued perfectly evenly, and all subsequent strips will be positioned absolutely straight, parallel to the wall.
Otherwise, everything will go awry, somewhere there will be a lack, and somewhere there will be an overlap. It is better to immediately control this process.
Common mistakes when gluing
The most common defect is material lag. This can happen after gluing it to old and peeling plaster. To avoid this defect, you must first remove the layer of plaster or paint. This is especially true in the case of lime or chalk whitewash. After removing the old coating, the surface must be treated with fixing paint.
When gluing, it is advisable to apply glue both to the ceiling and to the wallpaper. As a rule, special adhesive solutions for heavy types of this material are used for this. Moreover, it is recommended to dilute the glue somewhat thicker than indicated in the manufacturer's instructions. The ceiling surface itself should be treated, and the smaller the thickness of the wallpaper sheets, the more careful the alignment should be. If thick textured wallpaper is used, then leveling can be done less carefully, since small defects will not be noticeable. Sanding and priming, as noted earlier, will help improve grip.
Prices for suspended ceilings
suspended ceiling
If thick textured wallpaper is used, then leveling can be done less carefully, since small defects will not be noticeable.
Pay special attention to air bubbles under the material, as they will be especially noticeable when the lights are on.
Finally, to avoid getting wet through, you should not soak the wallpaper for too long, and the glue layer should not be too thick.
Finishing a plasterboard ceiling with your own hands
An example of calculating the number of plasterboard sheets for a hall with a width of 4 m and a length of 7 m. Since material with dimensions of 2500x1200 mm will be used for cladding, the calculation procedure is as follows: Thin sheets of plasterboard should be used, since the ceiling is not subject to mechanical loads. In specialized stores it is called ceiling. The choice of type of finishing material depends on the room.
If finishing work will be carried out in the bathroom, then a moisture-resistant type of plasterboard should be used. The ordinary one is suitable for finishing in dry rooms. You should also prepare the tool in advance, as this will save a significant amount of time.
It should be possible to connect an electric tool to the network so that it can be reached anywhere in the room where repairs will be carried out. For repairs you will need the following equipment: Preparation for repairs consists of purchasing the necessary building materials, which should be calculated before purchasing, and preparing tools. For finishing, the following building material is required: After preparing the ceiling surface, it should be finished using putty. After drying, it must be sanded to eliminate unevenness. Next, you need to start choosing wallpaper, which is divided into the following types: A method that has long been known to everyone, which can also be used for finishing plasterboard ceilings.
Wallpaper can be paper or non-woven for painting. Before carrying out the main work, you need to plaster the sheets.
- Decorative plaster can only be used on moisture-resistant gypsum boards;
- It is necessary to use a deep penetration primer before using the material;
- Apply textured plaster in several thin layers.
If the room has a ceiling with a complex structure to be painted, then it is necessary to check its outer corners; there should be no plasterboard protrusions on them. To do this, use a spatula - it is passed along each plane of the angle. The tool should not catch on the edges of the sheets. If necessary, the plasterboard is trimmed with a knife.
The final step of puttying before painting with your own hands allows you to create an absolutely flat surface, without roughness or unevenness. Mandatory precautions - protective equipment (goggles, respirator). Tip : to cover the surface with paint, choose a roller with a wool coating; when painted, it leaves a bubble mark, which, when dried, forms a uniform coating and shade. The plaster mixture is applied to the ceiling using a spatula and stretched over the surface. The roller is immediately rolled over the composition for leveling.
Leave to dry for 24 hours. In order to carry out the procedure efficiently with your own hands, you must follow certain rules and stages of work. Finishing a plasterboard ceiling requires the following tools, which must be purchased and prepared in advance: First, you need to apply the first layer in one step to avoid streaks. In this case, you can use only one tool, then you need to let the layer dry and apply subsequent ones until the color becomes sufficiently saturated.
By following all the steps and tips, you can achieve a high-quality coating that will not be too expensive and can last for many years.
Rules of care
To extend the life of the wallpaper, you can coat it with varnish. Most paintable wallpaper can easily withstand at least several stains, so this finishing option is extremely economical. And if the wallpaper comes off, coat the fallen edges with glue and press them to the surface with a clean roller.
As for embossed wallpaper, they are distinguished by the fact that they absorb dust and unpleasant odors well. For this reason, such material requires periodic cleaning, for which you can use a vacuum cleaner, dry cloth or brush. Moisture-resistant wallpaper can be wiped with damp cloths.
Video - Gluing non-woven wallpaper to the ceiling
Ceiling tiles
Ceiling tiles from:
- expanded polystyrene;
- polyvinyl chloride (PVC).
Expanded polystyrene tiles are made from foamed synthetic material and are embossed products of square or rectangular shape. There are regular and seamless tiles.
- Standard tiles have smooth edges with edging around the perimeter.
- Seamless tiles have slightly curved, sinuous edges, which after installation become almost invisible against the background of the relief. This material is suitable for cladding the ceiling in a small, low living room.
Advice. Before installation, it is recommended to paint polystyrene foam tiles to simplify the cleaning procedure in the future, since the cladding quickly absorbs dust, which is practically impossible to remove.
Read about how to properly glue foam and polystyrene tiles here.
USEFUL INFORMATION: Ceiling frame from a profile for plasterboard: diagrams and installation