The times when beams on the ceiling were exclusively in rural houses are long gone. In addition, it is worth noting that today they perform not only the role of support for the roof, but also a decorative function. It is because of the latter that many people prefer to install decorative beams not only in country houses, but also in city apartments. They will look original and unusual, but only if they are played correctly. We will tell you in this article exactly how to decorate beams on the ceiling in an apartment or an old house.
Decorative beams
To complement the interior, it is absolutely not necessary to redo the roof and undertake expensive repairs; it will be enough to buy decorative beams and install them on the ceiling. In a specialized store you can find three types of beams:
- wooden;
- metal;
- made of polyurethane.
The classic option is wooden beams for the ceiling. They are made from ash, pine and oak. They can be solid or hollow inside, which will allow you to hide various communications.
Made from polyurethane
Previously, beams were masked, but now designers include them in the interior of various rooms, where they fit organically. It can be:
- kitchen;
- living room;
- bedroom;
- cabinet;
- corridor.
You can zone the room
Another original solution would be zoning the room. This is especially true for a studio apartment or a country house with large rooms. It is enough to correctly position the beams on the ceiling. If we consider the styles in which wooden decorative elements occupy a leading position, then we can highlight:
- Scandinavian;
- rustic;
- country;
- eco;
- Provence;
- Mediterranean.
Chandeliers with chains can be mounted on beams
You can also attach lamps or chandeliers with chains to the beams.
Design Features
Brushing
When planning the interior, you need to pay attention to all the details, even the most insignificant ones. When it comes to beams, there are several options: to beat the entire surface or to decorate it partially, making strict structures. You can lay beams in a wide variety of ways, relying on your own taste and discretion, so you shouldn’t be limited by the rules.
Aging
There are several current ways to finish wood beams on the ceiling:
- Brushing. This technology will highlight the wood texture. Masters even imitate marks from the bark beetle. As a result, the beams are transformed beyond recognition, and outwardly it will seem that the residents are in an old house that is more than 200 years old.
- Fire treatment. This is a technology for artificial aging of wood. For this method you will need a blowtorch and special brushes.
- Vintage style. You can make a ceiling with load-bearing beams look like an old one using special paints and varnishes.
- Ethnic style. It is necessary to include forged elements and twine in the interior.
- Traditional style. A distinctive feature is simplicity, this is what allows you to create an atmosphere of comfort and warmth.
Triangular Beam Designs
Some designs involve transitions from ceilings to walls. At the same time, beams can give a refined European style to the room.
In an old house
Quite often, in country houses that are used seasonally (in summer), the finishing quickly deteriorates and loses its attractive appearance. This happens especially often in a wooden house, since the wood is exposed to moisture and dampness. To return the beams to a presentable appearance, you can:
- dismantle old beams and install false beams made of polyurethane (this material imitates the texture of wood well);
- decorate the structure with ropes, creating an interior in a marine style;
- hide imperfections on the surface with paint or varnish;
- if the defects are too obvious, putty and prime the surface, after which paint should be applied;
- not just paint the beams, but also paint them manually or using stencils.
Can be painted or varnished
There are also several recommendations regarding the interior style of the room. For example, the high-tech style goes well with metallic shades; wires that are not hidden and simple light bulbs for lighting will add originality. If we talk about country or Provence style, then a whitewashed ceiling against a background of bright beams would be most appropriate.
When painting beams, it is not necessary to give preference to natural (brown) and pastel shades. By choosing bright colors, you can get a bright accent on the ceiling.
Features of wooden houses that must be taken into account when finishing ceilings
Wood is a rather capricious material. Wood never becomes completely static. It is affected by changes in humidity, which cause variations in the size of parts. Dimensional changes are especially strong in a new building until the moisture content of the wood from which it is built has reached an equilibrium value.
A new wooden house always undergoes shrinkage, and this process takes from several months to a year or even two, depending on the quality of the wood and the nature of the structure. The greatest shrinkage is caused by a log house made from “wild” logs. Profiled and laminated timber “sits” much less. Frame houses have almost no shrinkage, but even in this case it is not zero.
Rafters and walls when installing a log house. More details: https://srbu.ru/otdelochnye-materialy/444-chem-obshit-steny-v-derevyannom-dome-vnutri.html
Rafters and walls after a year. More details: https://srbu.ru/otdelochnye-materialy/444-chem-obshit-steny-v-derevyannom-dome-vnutri.html
Typically, finishing work is not carried out until shrinkage is complete, but if necessary, finishing can be done immediately, using special installation techniques that make it possible to painlessly move structural parts during shrinkage of the house.
After shrinkage, wooden structures also retain some mobility due to size fluctuations, which usually occur with the change of seasons.
Different materials are used to decorate the ceiling of a wooden house. Preference is most often given to wood, since it most closely matches the very idea of a house built from wood.
Masking a concrete beam
Now let's look at the basic methods of how you can beat the beams on the ceiling in a house in different situations.
Used for hanging dishes
Beams in the kitchen. In this case, you can proceed as follows: the beams are lowered below the ceiling level and fixed in a stationary state. The structure is secured with hooks on which you can hang dishes, kitchen utensils, food (garlic, onions or hot peppers), aromatic herbs, dried flowers and much more. This will look especially good in a house with high ceilings.
Attaching a hanging chair
If the beam is in good condition, then you can attach a hanging chair or swing to it. They will fit perfectly into the living room interior. It is important to remember that if we are talking about imitation, then this option is unacceptable.
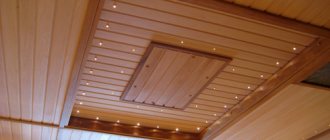
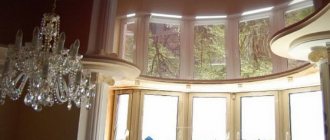
Beams with spotlights
Lighting system. In this case, you place antique-style lamps; for example, a chandelier in the form of a wheel with light sources in the form of candles will look original in a large hall. You can also abandon the central light source and use spotlights that are mounted on all beams or through one.- LED Strip Light. This is a chic and modern option. LED strips are mounted at the junction of the beam and ceiling to make them less noticeable. This way you can get the effect of a ceiling floating in the air.
- False beams. When one or more elements have lost their attractiveness and their structure is completely destroyed, you can replace them with cheaper polyurethane analogues. They imitate the structure of wood well.
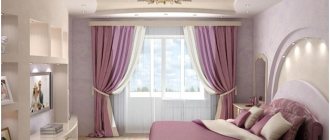
- Textile. When it comes to decorating the ceiling in the bedroom, beams can be used to form a canopy. The most common options are suitable here: cornice, rings and ropes. The material can be hung in a chaotic manner or in a planned pattern, for example, around a bed. This method will add a feeling of lightness, weightlessness and romance.
- Decoration with rope. If other options cannot be implemented, then decorative ropes can be secured along the contour of the concrete beam.
Illuminated by LED strip
The option of installing LED strips is suitable for a modern style or for a teenager’s room.
What to do if you can’t disguise a concrete beam? In this case, you should make a suspended structure from plasterboard or stretch ceiling. You can make a box in the shape of the letter “P” from drywall. Such a box should be fixed directly to the ceiling and adjacent wall. It is not recommended to drill into the beam, as it may lose its technical characteristics.
Moreover, if the concrete beam is located vertically, then this disadvantage can be turned into an advantage. For example, make a built-in wardrobe. This will completely hide the existing beam while creating plenty of storage space.
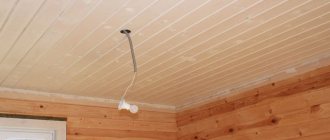
Fastening the lining
Installing lining on the ceiling with your own hands is not something too difficult; even inexperienced performers can do it. True, it is advisable to work with the paneling together to make it easier to fasten long panels.
We begin to attach the lining to the ceiling with our own hands, perpendicular to the sheathing from the wall. The first board is tightly fixed to the wall with a tenon. Using a level, adjust the position of the board and then secure it. To lay the lining, you can use both small nails and clamps. In those rooms where the design of the lining ceiling should be ideal, clamps are used, and in other rooms, ordinary nails are also suitable.
Then we take the next board and insert it with a tenon into the groove of the previous one. At the points of contact between the panel and the sheathing, we firmly fix the board. We fix all other lining panels onto the battens in the same way.
On the opposite wall, the last strip of lining may need to be trimmed. In this regard, it is advisable to place it in a place where it will be least noticeable. When working with plastic panels, it is better to use a hand saw, while wooden lining and MDF panels are easier to cut with a jigsaw.
It is better to make any holes for wiring or mounting lighting fixtures immediately at the time of fixing the lining, so as not to damage it.
If you use nails to cover the ceiling with clapboard yourself, then you must first cut off their heads. At the end of the work, the nail holes are opened with wax.
The final stage of arranging a lining ceiling will be attaching the baseboards around the perimeter of the room. These decorative elements will add completeness to the ceiling and hide the gaps along the edges. Typically, wooden lining is opened with varnish, and baseboards with a darker stain and varnish. If desired, this ceiling can be painted.
Full or partial camouflage
Quite often, owners decide to completely hide the beams from view, but you can only close the space between the beams by making a ceiling. In this case, the following types of ceilings and materials are used:
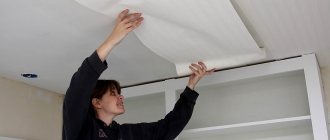
- tension;
- plasterboard;
- caisson;
- lining.
Coffered ceiling
The most expensive and sophisticated is the coffered ceiling. In addition to beams, this design involves the creation of other elements, for example, cells, recesses and cornices. The cassettes can be of any shape:
- polygon;
- rhombus;
- square.
Using partial masking, you can hide flaws and defects on the ceiling and at the same time leave beams in the interior of the room.
If your home has ceiling beams, then getting rid of them would be the worst decision. After all, you can add zest to the interior of a room with minimal financial and time costs, just by correctly playing with the existing design features.
Characteristics of MDF lining
In appearance, a ceiling made of MDF paneling resembles a wooden laminate, although this material is, in fact, a board made of pressed sawdust. This material is very sensitive to moisture. At the slightest contact with water, it begins to swell, losing its appearance and original quality.
It is worth noting that MDF paneling is used more often for walls than for ceilings. It allows you to organize various decorative elements and diversify the interior. In addition, the material has high thermal and noise insulation qualities.
If desired, you can combine MDF lining with different colors and textures. Installation of such material is not difficult.