You can implement any option in your garage
Assembling a tool rack with your own hands is not difficult if you know the assembly technology and have all the necessary tools and materials on hand. Naturally, there are a number of additional factors that need to be taken into account, which we will discuss below. It is important to figure out which option suits you best, and then get to work.
Organization of all sorts of junk
Sometimes completely strange or unnecessary things end up in the garage that are a pity to throw away.
A very convenient way to have several drawers for all sorts of rubbish, for example, separately for wood, separately for metal, plastic and electronics. About once a year, review what you have accumulated and throw away what you definitely won’t need.
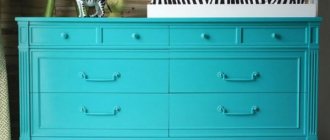
Simple tool storage cabinet
Often in life a problem arises when you cannot quickly find the right tool in a workshop or at home.
The reason for this is often that it is impossible to remember where you left what when there are many tools and the search area is large. I'm not even talking about those cases when one of the relatives took the instrument and moved it. To avoid such problems, build yourself one good closet where everything you need will be stored. If you always return the tool to it when you use it, you will no longer have problems finding things.
The author made himself such a cabinet; it has 6 drawers. Four of them are small in size and are used to store small items. And two drawers are large, they are located at the very bottom of the cabinet. Everything is done simply, glue and wood screws are used, and plywood and boards are used as materials. It is not at all necessary that the material be new.
Materials and tools used by the author:
List of materials:
- sheet of plywood; - boards; — handles for drawers (the author used parts from water taps); - glue and screws for wood - slider for shelves (guide).
List of tools:
- drill with drills; - screwdriver or screwdriver; - clamps; — oil for impregnation; - pliers; - a circular saw; - building level; - pencil, ruler and other measuring instrument.
Cabinet making process:
Step one. Cabinet design
First of all, the author took all the necessary measurements and developed the design of the cabinet. The furniture was made from almost waste materials that the author found on his site. It was mostly oak and cherry. Of course, the materials should not be rotten, cracked, and so on.
Step two.
Making boxes Boxes are made very simply, and the author decided to start with them. Here you will need plywood, as well as boards. The boards need to be cut to the required sizes; for each box you will need four blanks. You need to cut grooves along the bottom of each board; they will be needed to install the plywood. We cut the plywood to the required size, and drill holes in the boards for screws. If desired, you can apply glue to the grooves, so the plywood will hold more securely, but this is not necessary. That's all, the shelf can be assembled, just screw in the screws in the right places. Finally, we sand the drawers and paint them. The author used a cherry-colored dye.
Step three. Front part of shelves
You will need some materials to finish the outside of the shelves.
The author used cherry boards for such purposes. We cut them to the required size, sand them, and then simply glue them to the shelves. We clamp the whole thing with clamps and let it dry completely. Once the glue dries, you will need a drill.
Use it to drill a hole in the center of the face board. This is where the bolt or screw that is used to secure the arm will be inserted. Finish with 320 grit. Step four. Assembling the frame
The author assembles almost the entire frame using glue; if desired, you can use dowels or screws.
For assembly, cherry wood slabs, boards, and thin blocks were used. When cutting wood boards, you will need three parts, the largest back and two smaller sides.
It is most convenient to cut on a circular saw. You will also need to cut all the necessary components for the frame from boards or beams. Next, you can begin assembling the frame. The author drills holes in the right places and assembles the frame with wood screws. To be on the safe side, you can also combine this with wood glue.
After assembling the frame, you can install the walls. We just put them in place, and then make slits at the corners of the frame. They should be of such depth that they reach the wood boards. You can insert plywood or pieces of wood boards into these slots. Of course, these parts are thoroughly lubricated with glue and hammered into place.
When the glue dries, we cut off the protruding parts and thoroughly sand the entire structure. The author used 320 grit sandpaper as an abrasive.
Step five. Cabinet finishing
For the side and back walls, the author used low-quality materials.
The slabs absorbed moisture for a long time and did not look very good visually. In this regard, it was decided to decorate them on the outside. We take the finishing material, cut it into the required pieces and glue the outside of the cabinet. We use good wood glue and clamps. Step six.
Installing sliders The sliders (guides) are purchased from the author, they are made of metal.
Using a measuring tool, attach them to the box using wood screws. As for the moving part, we screw the block to it. Next, this block is screwed to the drawers themselves. We drill holes, screw in screws, nothing complicated. The main thing is to do everything smoothly, otherwise the boxes will jam. Step seven.
Assembling and installing the handles And now about the most important thing, the handles. This is the main component of the cabinet, which at first glance says that it is a tool cabinet. The author decided to use handles from old faucets as handles. To assemble one handle you will need a long bolt, a nut, three washers and a piece of metal tubing.
First we insert the bolt, then we put the washer and tube on it, and again we put the washer on top of the tube. Now put on the faucet handle, with a washer and nut on top. That's it, the handle is installed, there are still 5 pieces left.
Step eight.
Making a tabletop The tabletop is made from boards, cut them into pieces of the required length, and then glue them together with a ladder, but it is not necessary to use this approach. After the glue has dried, level the tabletop using a circular saw.
Finally, you will need to make a border; it will emphasize the appearance and strengthen the tabletop. Here you will need boards, cut them to size, and then attach them to the manufactured slab. The author uses wood screws for fastening. Finally, sand the countertop, making it absolutely smooth and even.
Step nine.
Final assembly and finishing touches For the tabletop to be securely attached, it must have reliable support. For these purposes, the author screws supports made of boards to the top of the table. Now the tabletop can be installed, how to do it is up to you, you can simply glue it. The author screwed the tabletop from the inside to the frame, so securely. Finally, sand your creation if it has any imperfections, and then treat it with oil, varnish or another coating. Oil will make your closet as natural as possible. If the wood used is of poor quality and does not look good, the furniture can be painted and then varnished.
That's all, the cabinet is ready, now the author has complete order on his desktop and does not have to constantly look for a tool.
Source
Become the author of the site, publish your own articles, descriptions of homemade products and pay for the text. Read more here.
Material
Before starting work, you need to take care of the materials for work. To design a tool cabinet at home you will need:
boards _
This is the main building material for the cabinet. The best option in terms of price/quality ratio is pine boards. They make the frame of the cabinet. The thickness of the boards is not critical, but experts advise using thicker boards.The tools that you will place in your cabinet will likely be heavy, so the shelves and frame must be durable;
- plywood _ Designed to create the back of a cabinet, as well as partitions for drawers. Exactly how much plywood will be needed depends on the size of the cabinet and the size of the partitions;
- timber _ It is advisable to stock up on beams made of the same material as the boards. The beams are used to create legs or runners on which the cabinet will stand.
Important . Do not use plywood as bottoms for drawers. Plywood sheets are not at all durable, so they will not be able to withstand a lot of weight.