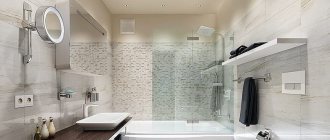
Cornice material
Before we move on to a review of various mounting options, let's study what materials curtain rods are made from. This is the easiest thing to deal with.
- Wooden cornices are distinguished by their impressive weight, they look solid, but they are also the most expensive. Such a cornice will fit perfectly into a classic interior, and in some cases, into a modern setting. The main thing to remember is that wood does not like sudden changes in temperature (more than 7 degrees) and does not welcome high humidity, but it is durable and able to withstand the weight of heavy panels. Wooden cornices come in a wide variety, but carved models look especially luxurious.
- Aluminum cornices are the golden mean; there is a margin of safety combined with low weight and an adequate price. They are not afraid of cold, heat or humidity, do not put a load on the floors, can withstand three-layer lambrequins, but the hollow structure is easy to deform and should be used with caution. There are both laminated and painted models on sale, so choosing the right product will not be difficult.
- Steel curtain rods are a good companion to heavy curtains, but such a product is heavy in itself. It is used when the length of curtains is more than 3 m. It is steel curtain rods that are used to decorate stages, and there the weight of the curtain is more than substantial. They can be decorated with wood or plastic to look more harmonious in the room. The cost is higher than that of the aluminum counterpart.
- Plastic – a bestseller in any city. Plastic can be painted or laminated in almost any way, so it allows you to bring any design idea to life. Although the material is not so noble, the strength without defects is impressive. However, there are minimal restrictions on the range of movement of curtains. However, it is better not to hang heavy curtains on a plastic curtain rod.
Additionally, sometimes there are forged cornices , which have all the same advantages as steel ones. They are strong, durable, reliable, can withstand the weight of heavy curtains, and look interesting, but it is difficult to call such products universal. They will fit well only into certain interior styles, incl. Provence, country, classic.
In addition, there are also combined cornices. The base, for example, can be made of aluminum, on top of which plastic is used. This combines the strength of aluminum and the wide decorative possibilities of plastic.
We also note that, regardless of the material of manufacture and method of fastening, curtain rods can be designed for 1-4 sets of curtains, i.e. you can hang tulle, thick curtains and a lambrequin for decoration on the same cornice.
Cautions
If you decide to hang the cornice yourself, it is recommended to take into account all the risks. Stretch ceilings and cornices normally coexist, complementing each other, but film is a delicate and capricious material, and consoles often have sharp edges or jagged edges, especially if made of aluminum or plastic.
Tip: to avoid snagging the ceiling fabric during work and damaging the expensive tension material, it is recommended to cover the edges of the tire with a soft cloth or plugs.
Ideally, to prevent dangerous ruptures in the technological holes made in the film, they are strengthened using thermal rings made of plastic. If this is not possible, the holes are not cut, but burned, as if soldering the edges.
It is better that the installation of the console and ceilings is carried out by the same company: this will protect you from troubles associated with possible damage to the canvas.
You can install the cornice on the ceiling yourself or use the services of specialized workshops. The main thing you should not forget about is caution during the work process!
The best posts
- Rubber tile laying technology
- How to build a reliable house from boards?
- How to assemble a bedside table yourself?
- 2 by 2 bedroom design
- DIY heated floor pie
- DIY bed under the ceiling (photo)
- We cover the steps of the stairs ourselves with tiles and porcelain stoneware
- Do-it-yourself dressing room, how to arrange a dressing room from a pantry
Related article: Half-timbered houses: nuances of building a building with your own hands
Types of cornices by type of installation
Despite the fact that the topic of the article touches on cornices that are mounted under a suspended ceiling, it would be wrong not to talk about an alternative solution. So, according to the method of installation, curtain rods are:
- wall;
- ceiling
Wall cornices
The wall mounting option is the simplest, fastest and cheapest. Someone might think, why even bother with installing a cornice under a suspended ceiling, if at any time you can take it and attach it to the wall. Yes, it’s convenient, easy, and minimal preparatory work is required. In addition, the cost of wall cornices is lower than ceiling cornices. Another significant advantage is that there is no need to make holes in the fabric of suspended ceilings (however, with a hidden ceiling installation, you won’t have to make holes in anything either), and it will be much easier to replace the cornice with curtains if necessary.
On the other hand, a wall cornice can make low ceilings visually even lower (it seems to “cut” the room), so in standard apartments this option should be chosen only when funds and time are limited, and there are no special requirements for aesthetics. Wall-mounted cornices look best in rooms with high ceilings. However, it is impossible to say that this installation option looks unsuccessful, because if you approach the issue wisely, you can get a decent result, but again, if we are talking about a room with high ceilings.
When installing, you should take into account the window sill outlet, otherwise the curtains will unsightly bend around it instead of falling beautifully. You can carry out all the installation work yourself, having a level and a screwdriver in stock. Installation can be performed before and after the installation of suspended ceilings. However, installers still advise fixing the crossbar after the stretch ceiling - this way you can more clearly guess the height. And it’s much easier to focus on a baguette and microplinth that has already been leveled (especially important for several individual parts).
Installation is carried out on two brackets, and if the length of the cornice is more than 2 m, additional fasteners will be needed every 1.5 m. During installation, it is also important to take into account the distance from the cornice to the ceiling sheet - it should be such that the hooks, rings or other products on which The curtains are attached without damaging the suspended ceiling.
Ceiling cornices
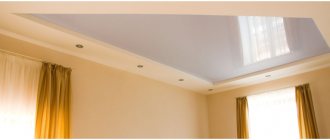
Curtains attached to the ceiling cornice look as if they are flowing out of nowhere. The visual effect cannot be compared with wall mounting. In addition, such a cornice helps to visually “raise” the ceiling. Since the element is fixed at the top, the wall appears longer than in reality. This is an excellent design solution for a typical old housing stock with a wall height of 2.5-2.7 meters.
Ceiling cornice is an excellent alternative to drilling into walls. It is not always possible to violate the integrity of a vertical surface, especially after a fresh, expensive finish. In this situation, it is more logical to fix the cornice to the ceiling. In addition, we can highlight the fact that the ceiling cornice can withstand a large mass. The owner of the premises will be able to choose any fabric, including dense ones with a lot of weight.
In addition, there are cornices that provide an area for installing LED lighting. This solution allows you to turn the most ordinary cornice into the highlight of the interior.
Let's be honest, there is also a flip side to the coin: to secure the cornice using the open method, you need to make holes in the canvas.
In this case, the suspended ceiling becomes more vulnerable in the event of flooding with water from neighbors above. Fortunately, this is practically the only disadvantage (which is absent with a hidden installation) and, if the prospect of flooding from above does not frighten you, you can install the cornice on the ceiling without any doubt.
Attaching ceiling cornices to a suspended ceiling
Mounting methods
One of the main advantages of a ceiling cornice is its ease of installation. The simplest installation is when the cornice needs to be mounted on a permanent ceiling.
In the case of a plasterboard ceiling it will be somewhat more complicated. This material is not able to withstand a large mass, so you will need to take care of selecting the lightest possible design and thin curtains.
Note! If, in the case of a plasterboard ceiling, it is still necessary to use heavy curtains, then it is better to abandon the ceiling cornice. It would be more correct to give preference to a wall structure or a string cornice (the fastening in this model is fixed on opposite walls).
The most difficult task for the master is to combine a stretch ceiling and a ceiling cornice. At first glance, it may seem that such a task is generally impossible to implement - how to attach a cornice to a stretched fabric or film without stretching or damaging the ceiling.
But you can still cope with this task thanks to several ways:
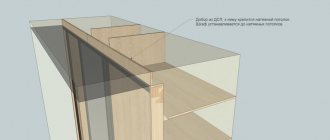
- Fix the visible part of the cornice on support bars that will be hidden under the ceiling;
- Install a hidden ceiling cornice on the main ceiling. In this case, the suspended ceiling will be fixed on a stand located in front of the cornice.
The first method is quite common and easier to implement, the second is much more difficult to implement, but at the same time much more attractive in design.
Both methods will be described below and by choosing the one that is most suitable for you, you can easily combine the ceiling cornice and suspended ceiling into a single whole.
Types of cornices according to installation features
It would seem, what options could there be, because the ceiling cornice is attached to the ceiling, and that’s it. In fact, there are some features, depending on which there are two options for installing a ceiling cornice.
Open installation method
The cornice will be visible to everyone who enters the room. It is impossible to attach the cornice to a suspended ceiling, therefore a mortgage is installed under the suspended ceiling in advance, on which the cornice will be mounted after the installation of the canvas. The work order looks approximately as follows:
- On the rough surface in the area of the future cornice, a support is pre-fixed - usually a wooden beam. To ensure maximum durability for the trim and cornice, the timber is pre-treated with an antiseptic or coated with a hydrophobic primer. attach the mortgage to the dowels, fixation occurs in pre-drilled holes
- After this, the tension fabric is installed as usual, without any special features.
- The cornice itself is attached using self-tapping screws at any suitable points above which the beam is located. During its installation, you cannot do without several holes in the newly stretched ceiling. However, if a real professional takes on such work, the above-mentioned changes will in no way be noticeable. To avoid deformation of the stretch ceiling, plastic rings are installed, and the holes are burned out with a special soldering iron, rather than scrolled with a self-tapping screw. In the end, holes are also made in the ceiling for chandeliers, and this does not cause concern to anyone.
- It is extremely important that there are no gaps between the wooden base and the film - otherwise, the ceiling will “lead” and the canvas will be subject to deformation. If the ceiling is not very level, then special mounting wedges can be used between it and the mortgage.
Experienced installers strongly recommend choosing a thick beam so that the structure being fixed does not collapse to the floor under the weight of the curtains. In case of such a problem, you will have to redo both the suspended ceiling and the curtain. In addition, even before installing the stretch ceiling, it is better to select curtains and cornices so that workers can make the correct markings
The Master Ceilings organization offers a wide range of suspended ceilings made of PVC or turnkey fabric with installation in Moscow and a number of regions. The company's installation teams have extensive experience working with curtain rods and will help the client with the choice in a specific situation. A small but pleasant bonus for those who finished reading: until May 31, 2020, for your first order with the promo code REMSTROIBLOG, we will give you a discount on your first order, free electrical wiring, as well as installation of lighting and cornices. Hurry up to take advantage of this great offer!
Hidden installation
This option fits well into the concept of minimalist room design. The essence of such installation is that an indentation is made from the wall to a certain distance, from the border of which the suspended ceiling will begin. A niche is created. In a similar way, you can create the feeling that the curtains are flowing directly from the ceiling, and this will visually make the apartment more spacious and tall. The cornice can be mounted on a wall or ceiling, but the second option is chosen much more often.
The hidden installation method allows you to get a much more aesthetic result, but this solution is also more difficult to install. Several features will need to be taken into account
- It is necessary to think over the design of curtains and purchase a curtain rod before installing a stretch ceiling, because workers will need to determine the size of the niche and build it correctly;
- the size of the niche is calculated individually, but, as a rule, it is 15-20 cm;
- do not forget to take into account the design of the curtains and the width of the folds - it is important that the fabric does not constantly rub against the niche and suspended ceiling
- the cornice can be of any type.
A niche can be organized in one of the following ways:
- plasterboard box . A box is assembled from a metal profile, which is mounted with a special fastener. Next, the structure is covered with plasterboard, the seams are sealed with putty, and the surface is painted. The width of the box must be at least 50-70 mm, if it is planned to install LED lamps - from 250 mm. The obvious advantage of this format is the wide possibilities for design, and the stretch ceiling does not come into contact with the curtain, so the risk of damage to the fabric when installing new curtains is reduced to zero. A significant disadvantage is that the assembly and installation of a plasterboard box takes some time. Add to this the additional wait until the paint dries, and the installation of the stretch ceiling will have to be postponed for at least another 1-2 days.
- wooden mortgage. A piece of timber with a cross section of 30×30, 40×40 or 50×50 mm and the length of the wall (or slightly shorter) is fixed. For fixation, it is practiced to use reinforced metal corners, or, if the rough surface is smooth, long self-tapping screws through the embed. A baguette is attached to the lower edge of the beam, into which the canvas is tucked. The advantages of this option: the whole process takes extremely little time and can be completed by an installer right before installing suspended ceilings (usually the service costs 500 rubles per linear meter). Minor drawback : the wooden beam will be visible from the side of the curtain, but it is important to note that this is not a particularly common situation. However, the reverse side can also be hidden from prying eyes - for such purposes the film is not pulled directly, but with a bend over the bumper (such services will cost the client a little more). It is important to choose dry wood, and before installation, treat the surface with an antiseptic to further prevent the formation of fungus.
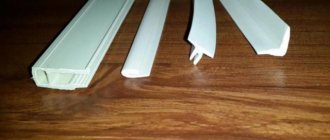
- Profile for BP-40 for cornices . This method is almost similar to the previous one, but instead of timber, a special metal profile is used. The latter is essentially an aluminum tube 2.5 meters long with a square cross-section of 40x40 mm and a gap for inserting the blade. A definite plus of this material: it is extremely easy for the installer to create a natural-looking rounded corner. The disadvantage is that although the installation process takes a little less time compared to timber, it also costs a little more.
- Special profiles “Niche” 2.5 m long or “Curtain” 3.2 m. Installation in both cases is quite simple - on metal corners. The rest of the niche can be covered with a piece of stretch ceiling. Such solutions enjoy well-deserved success, however, for a high-quality result, the installer must have the appropriate qualifications.
There is a type of hidden cornices called combined : in essence, this is any of the previous options, combined with perimeter lighting.
From a design point of view, this is an extremely successful solution, and adding an LED strip should not significantly impact the customer’s pocket.
Device techniques
Since you plan to install a stretch ceiling, forget about installing classic products that are suitable for plasterboard or concrete. This trick will not work with film systems! And although the task itself seems “starred”, in fact there is nothing complicated in the installation process. So don't be afraid.
Niche with lighting in front of the cornice
The cornice is attached not to the film itself, but to the base ceiling or embedded beam. In total, two installation options have been developed:
- visible - ceiling systems for fixing curtains are mounted on hidden supports;
- hidden - installation is carried out on a permanent ceiling, the material for the ceiling is fixed in front of the cornice.
The first option is simpler, therefore it is used many times more often. The second method is more difficult to execute but produces an elegant design. Below we will consider each of these methods in detail.
If you need to hang curtains made of heavy fabric, then it is better to abandon the idea of installing a ceiling cornice. In such a situation, it is more advisable to install a wall structure. This product is considered more resistant to static loads. Combining a ceiling with a cornice is considered a rather difficult task. If you install the system on film, it will stretch, which will lead to additional costs for its restoration. Therefore, one of the methods presented above is used. Now it’s worth going directly to the description of each of them.
Cornice design
When thinking about the future design of the window area of the room, you must immediately decide on the design of the cornice. There are several main options:
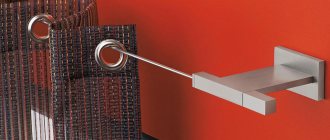
- string cornice It is a stretched wire with hooks to which the curtain is attached. Most models are equipped with a string tension regulator. An excellent minimalist option, but such a curtain rod is unlikely to withstand heavy curtains;
- tire cornice It looks like a flat plate with several slots for mounting hooks. Several layers of curtains can be attached to one such curtain rod;
- profile cornice made of aluminum. Thanks to its high flexibility, it can be bent almost any way, which allows you to use profile cornices to design semicircular window openings;
- Separately, it is worth highlighting the flexible cornice , which is made of plastic. It can be given absolutely any shape, creating an unusual trajectory for the curtains. Such cornices are often used not even when decorating a window opening, but for zoning space and creating a screen;
- baguette cornice It is distinguished by the presence of a decorative strip around the curtain fastening system, i.e. the hooks will not be visible at all. Sometimes LED lighting is mounted under the bar, obtaining an original result. A good option for open ceiling or wall mounting.
Cornices also differ in the number of guides. The most popular models are those with two guides: you can hang tulle and curtains on such a cornice. If it is necessary to decorate the structure with a lambrequin, choose a cornice with three guides. If blinds are chosen to darken the room, and only translucent tulle will be attached to the cornice, then you can take the simplest and cheapest option with one guide.
There is a classification according to the control method:
- mechanical curtain rods are a true classic. To open and close the curtains, you need to pull the cord. Everything is simple and reliable;
- A motorized curtain rod allows you to open and close curtains simply by pressing a button. The decision is justified if the curtains are long, wide, heavy, and you regularly manipulate them.
Separately, it is worth highlighting the so-called. “smart” curtain rods , which, thanks to a controller and a sensor system, can open and close themselves according to a certain schedule or depending on the light level in the room.
In some cases, you can enable the effect of presence when no one is at home.
How to make a cornice to illuminate a stretch ceiling
To install a curtain rod with hidden lighting, you will need more knowledge and skills. However, this makes it possible to literally transform the room. It is recommended to carry out fixation before installing the tension fabric and finishing the walls.
The work is performed in the following order:
- We prime the surface of the future fastening using a primer.
Using a building level, a metal or wooden meter and a soft pencil or charcoal, we make a marking line for the installation of the cornice.
We fix the wooden plank at the marked level.
We glue foil tape to the inside of the product.
Using liquid nails or universal glue, attach the cornice to the installed strip and wall. You can also use acrylic-based putty for these purposes.
If necessary, cut out corners using a miter box.
We install the fixing profile of the stretch ceiling. The distance from it to the cornice should be 7-10 cm.
Preparing the LED strip. We connect the sections by soldering and remove the protective paper in these places.
We glue a special patch onto the contacts and wait for the glue to dry.
We remove the protective paper and glue the tape to the cornice, making a minimum distance at the joints to avoid the appearance of light gaps.
If desired, you can make the backlight monochromatic or multi-colored. It is also recommended to install a smooth shift mechanism. This will create an original lighting effect and extend the life of the diodes.
How to install a cornice for a suspended ceiling - watch the video:
What else do you need to know about ceiling cornices?
- There may be a slight loss in ceiling height. A complex design can take away at least 5, or even 10-15 cm, but well-chosen curtains visually compensate for such losses.
- Loss of height can be completely avoided if you use the open beam method. In this case, first fix the baguette of the glazing bead or harpoon system, and after fixing it according to the existing level, adjust the location of the site.
- You can not limit yourself to just one wall with a cornice, but extend the plasterboard box or profile along the entire perimeter. If you connect the LED strip along the inner box, you can get a beautiful two-level structure like a floating ceiling.
- In small spaces, the use of both hidden and open variations is justified. But it’s better to refrain from using wall mounting; remember the immutable rule: the fewer elements, the better.
Finally, remember how important it is to correctly fit the cornice into the style of the interior. For large rooms decorated in a classic style, a wooden wall cornice is suitable - it will only emphasize the luxury of the room. In a modern minimalist interior, hidden cornices, perhaps with lighting, will look much better.
Tags:Windows, ceiling
Video of installation of suspended ceilings: what is worth learning?
One of the best ways to learn for beginners is to learn the intricacies of editing from special videos.
Here the procedure is as follows:
- marking the walls. At this stage, it is necessary to use a tape measure or laser pointer to accurately measure the height in all angles. Don't expect the distance to be the same. Often the discrepancy between different parts of the room is 3-5 centimeters. In the process of marking, it is worth considering the subsequent installation of the chandelier and additional lamps. Then you need to draw a line around the perimeter (a laser level is used for this purpose). Make sure the line is as straight as possible;
- attach the profile under the canvas to the walls. Next, focus on the already drawn line and attach the profile to the walls (use dowels or self-tapping screws for these purposes). The distance between each fixation point should be on average 6-8 centimeters. To facilitate subsequent fixation, you should first glue the profile, and then secure it completely;
- mount the canvas. To properly install the ceiling and avoid distortion of its level, the room is heated using a gun. Such equipment can be rented or purchased. The second option is more preferable if you plan to earn money from installation in the future;
Next, the sequence of actions should be as follows:
- take out the material and place it on the previously washed floor. Make sure that there are no metal objects or construction debris on the floor that could damage the film;
- attach the film in the corners (diagonally). The corners are fixed using “crocodiles” (special clamps). Their peculiarity is the presence of special linings that prevent damage to the ceilings;
- warm up the film and gradually push it into the baguettes of each corner;
- proceed to fixing the film in a straight line. Here, when performing work, use a special spatula.
The process of hanging a ceiling is in some ways similar to hanging a curtain. The principle of operation is simple. First, the product is attached along the edges, then in the center, and then the remaining part.
During installation, make sure that there are no distortions or folds that could spoil the appearance of the structure. If a mistake is noticed, it must be corrected immediately (for this you should use a heat gun).
Detailed instructions: Installation of a stretch ceiling
At the final stage of installation, the lamps are attached.
Please note that space for lampshades should be provided in advance.
At the same time, it is recommended to do the fastening of lamps without haste.
All that remains is to mount the plugs (masking tape) in the gaps between the wall and the profile.
One option is to install the film directly into the resulting gap.
If you don’t want to make a plug, then an alternative option is to install a plinth. But here it is important to act carefully so as not to damage the canvas or wallpaper. If fabric rather than film is used as ceilings, then there is no need to solder different fabrics, and you can do without a heat gun.
Attach to the wall using dowels
One of the most common methods of solving the problem. The main thing is to do the work carefully so that no defects form on the ceiling.
If necessary, the installed cornice can always be replaced with a more suitable model. All you need to do is place the corner against the wall, drill holes and screw it on!
For drilling, you can use a drill or hammer drill. It is important to mark in advance the places where the dowels will be screwed. They should be located on the same level.
Additional Information! Determine the height of the corners before installing them. The slightest excess can cause the formation of cracks and dents on the wall surface.
How to change a cornice on a suspended ceiling
This need arises if the old crossbar is broken or there is simply a desire to change the interior.
The method depends on the technology of fastening the old cornice, as well as on the size of the new one. The simplest option is when the tire is installed on mountings, and the dimensions and weight are the same. Then just unscrew the fasteners, remove the old cornice and hang another one. But it is important to align the holes accurately.
If the tire is heavier or wider, you cannot hang it on an old pawn! There is a risk of timber collapse and damage to the canvas. As a result, the ceiling will have to be repaired or completely replaced.
In such cases, two replacement options are possible. First:
- Partially remove the canvas.
- Dismantle old mortgages.
- Install new ones that fit the tire.
- Stretch the ceiling again.
Expanded polystyrene cornices
Separately, we should consider cornices, which are made of polystyrene foam and are a decorative element for suspended ceilings. However, they can also serve a functional purpose: to hide the LED strip. In any case, it is important to know how to properly attach a cornice to a suspended ceiling.
According to the most common method, the profile is attached to the wall using glue.
You will need the following tools:
- glue (liquid nails, Titanium, you can even use acrylic putty);
- a well-sharpened sharp knife;
- matches;
- miter box.
Installation begins with cutting the cornice tape using a miter box. Then glue is applied to it. The strip is glued to the wall and the previously fixed strip (installed below the ceiling so that the LED strip can be hidden). To make the connection rigid, matches are used as dowels.
LED strip can be hidden behind polystyrene foam cornice
It should be remembered that there should be about 10 centimeters between the suspended ceiling and the cornice, but the hidden lighting should not be visible in the opposite corner of the room.
When carrying out repair work, you should adhere to several recommendations:
- The ceiling cornice should not interfere with the opening of the window. If possible, it should be mounted 5 cm above the window frame.
- The curtains should fall down freely and not cling to radiators, window sills, or window handles in the future, which means this must be taken into account when removing the cornice.
- If the curtains are multi-layered, it is advisable to take measurements from the very first layer, which will be as close to the window as possible.
- The number of rows in the cornice should also be selected based on the number of layers of fabric.
- At the end of all work, the ends of the cornice must be capped so that the curtains do not slip out of the tracks.
Methods for installing curtain rods
It is necessary to clearly understand that the methods of attaching traditional cornices are unlikely to be suitable for installation with film.
To attach the cornice to the film, so as not to damage or stretch it, immediately before installing the ceiling sheet, you need to secure the embedded elements to the ceiling. Such elements can be ordinary timber. It must be attached directly to the ceiling using ordinary dowel nails. Attaching the cornice to the suspended ceiling occurs in two ways.
- The cornice is attached to bars , and then a PVC sheet is stretched on top. The cornice itself is screwed with self-tapping screws to the bars directly through the film. In this case, you need to try to cause as little damage to the canvas as possible so that no holes are noticeable. The bars need to be selected at the correct thickness so that they adhere to the canvas after installing the film, otherwise pits will be noticeable on the canvas. Wood must be treated with special solutions and septic tanks against rotting. Many craftsmen neglect this procedure, as a result of which the customer may have problems in the future. It is recommended to burn holes for self-tapping screws so that the fabric does not tear. It is better to reinforce the place where the screws are screwed in with polymer rings.
- Installation in a hidden niche is noticeably different from the first method. First of all, this is a question of price, which can be several times higher. But this is compensated by a more interesting design and the ability to independently choose any solution. The cornice is not noticeable, and the curtain seems to come straight out of the ceiling.
Many, fearing difficulties, choose curtain rods with wall mounts , but when choosing ceiling mounts, the consumer gets a much more interesting option.
The curtain will seem to flow from the ceiling, with the fastening elements completely invisible. If you want to make hidden lighting, you will need a niche. If you place several niches around the perimeter of the ceiling, the lighting will look very aesthetically pleasing, and the fasteners will not be noticeable at all. To understand which curtains for curtains under a suspended ceiling will suit you, and which curtains to choose, you need to know what curtains are and how they differ from curtains. Curtains provide complete blackout and are hung closer to the room. Curtains are translucent and provide diffused light. Curtains can be made from:
- tweed, corduroy or velvet (they collect dust and are very difficult to care for);
- brocades and tapestry (very beautiful and easy to care for);
- cloth and wool (old-fashioned and loved by moths).
Materials for curtains:
In addition, curtains often consist of two elements. This is a working canvas and a narrow panel called a lambrequin. To choose which curtains are better for a suspended ceiling, you need to answer yourself how much you are willing to spend on them. After all, the price directly depends on the type of material used. All curtains are quite light, so when choosing them you should rely on your taste.
Installing fasteners for curtains and curtains to the ceiling panel or in a niche is not such a difficult task. If you follow all the technologies and take your time, then this procedure is within the capabilities of every owner. If you want to entrust this procedure to professionals, knowledge of installation technology will help you carefully and with full understanding control the process.
General information about cornices
In order to clearly understand the compatibility of curtain rods and PVC coverings, you should understand what they are - structures for fixing curtains, tulle and lambrequins.
As a rule, this is a flat tire that can be mounted on both regular and suspended ceilings. Cornices perform several important functions at once: practical and aesthetic. They not only hold the curtains securely, but also beautifully limit the ceiling, giving it a certain completeness.
Cornices on a suspended ceiling perform several functions at once