Advantages of wood lining
Wood is widely used in all industries. Wooden products have become widely used. Wooden lining is used in construction for finishing work.
The advantages of wood products are:
- High strength;
- High thermal insulation;
- Increased heat resistance;
- Durability;
- Electrical insulating ability;
- Naturalness;
- Environmental friendliness;
- Aesthetics.
A special advantage of wood is the manufacture of lining at home.
Making the lining with your own hands is carried out in the following order:
- Choice of wood species;
- Determination of product sizes;
- Equipment selection;
- Manufacturing of lining.
Choosing a wood type
For the production of lining, coniferous and deciduous wood is used. Pine, spruce, larch, cedar, and fir are used as coniferous species. Products made from deciduous trees are widely represented by products from linden, alder, oak, ash, and aspen.
Spruce
Spruce panels have increased plasticity and softness. These properties are used in the manufacture of linings and for finishing curved interior elements. The softness of the wood has a positive effect on the tightness of the panels. The surface of the spruce board is flat and smooth. The wood texture is clear, without blur.
The disadvantage of spruce products is the increased level of moisture absorption (hygroscopicity), the appearance of resin stains, and low biological resistance. Spruce is susceptible to rapid rotting and destruction by harmful insects. Spruce products require mandatory treatment with protective agents.
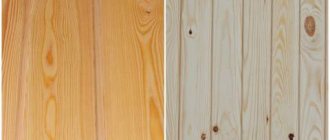
Pine
DIY pine lining is the most common softwood lumber. Pine is characterized by increased strength, lightness, and low cost. Pine wood has a beautiful pattern and a delicate golden hue. The most valuable varieties of pine have a red-brown color.
There are up to 200 species of pine in nature. However, the tree grows only in the Northern Hemisphere.
The presence of a large amount of resin has a beneficial effect on the environment. Essential oils contribute to the long-term preservation of a pleasant pine aroma in the room. The smell of pine wood has a calming healing effect.
The disadvantage of pine is the appearance of resin stains over a long period of time.
The low density of wood contributes to the formation of scratches and chips if the technology for making the lining with your own hands is violated.
Larch
It is characterized by high strength, water resistance and density. Products made from this breed are excellent at resisting harmful insects and fungal parasites.
Larch lining is distinguished by long-term preservation of its physical properties. Products made from this wood have a clear wood pattern. A large number of essential substances have a beneficial effect on the nervous system.
This is interesting! The larch root system is capable of developing in a layer of sand only one centimeter thick.
The bright reddish hue distinguishes larch from other tree species.
Many positive qualities cause a significant increase in the cost of larch products.
Cedar
Cedar products have high strength and durability. The high content of essential oils causes a pleasant pine aroma. The healing qualities of cedar have been well known since ancient times.
DIY cedar lining is highly resistant to harmful insects and pathogenic bacteria. The widespread use of cedar wood is limited by the high value of cedar.
Linden
It is characterized by high strength and water resistance. Linden wood has a beautiful pattern and a pleasant light shade. Linden products are easy to machine.
The disadvantage of wood is that it darkens over time.
Alder
Products made from alder have increased strength, water resistance, and sound insulation properties.
This is interesting! The alder root system is capable of saturating the soil with large amounts of nitrogen. This allows the tree to grow in the most difficult conditions.
A large number of beneficial essential substances have a beneficial effect on human health.
Oak
Refers to trees with increased timber value. Do-it-yourself oak lining is distinguished by high strength, hardness, and significant weight. A large number of positive qualities affect the cost of oak products.
What materials and tools are needed for the job?
Characteristics of the lining.
- rough boards 1.5-2 m long, 10-2 cm wide;
- desktop woodworking machine or manual milling and cutting device;
- large diameter circular saw;
- disc cutter of the required thickness;
- green or blue colored pencil.
If the lining is treated with special compounds to protect against mold, insects and putrefactive bacteria, then it can last 30-40 years.
Making it yourself will bring significant financial savings and will help any room acquire an attractive appearance.
Determining the scope of work
Before making the lining with your own hands, calculate the volume of necessary materials. To determine the scope of work, calculate the dimensions of the room. The area of panel finishing is calculated based on the area of all surfaces. Depending on the height of the ceiling and linear dimensions, the width of the board is determined.
The accuracy of the calculations is verified by repeated measurements. Measurement accuracy affects the efficiency of raw material use.
To make lining with your own hands, use edged boards of the same width and thickness. The original lumber can be purchased or made by hand.
The boards are purchased on a lumber basis. Before purchasing, they are carefully inspected along their entire length. Lumber with defects and irregularities is rejected.
For purchase, choose the highest grade boards. This lumber has the least number of knots and resin pockets.
Advice. The width of the blanks for trimming is taken from 7 to 10 cm.
The length of the prepared products can vary from 1 to 3 meters.
In the manufacture of linings, powerful sawmills are used. For one-time use, it is advisable to rent industrial equipment.
For home use, it is beneficial to purchase a machine with a double-sided surface planer. To level the surface of products, a jointing machine is used.
In the absence of machine equipment, a manual electric plane is used. The disadvantage of manual equipment is low productivity and increased labor intensity.
Lining dimensions
Lining length . To begin with, let’s select a not very long piece of unedged board. The length of the lining is determined based on the average length of available boards, as well as the requested length. Lining longer than 2 meters is more difficult to process, so this length is not very profitable. But for a patient master nothing is impossible! Any length can be used effectively. Based on personal experience, we can say that even from the shortest board, actually from garbage, you can make wonderful homemade parquet that will save a lot of money and will look no worse than something bought in a store!
Width of the lining . Let's decide on the width of the future lining. If the board is narrow, it will make a wide lining at the rate of one lining from one board. If the board is wide, it will make two narrow linings. Based on experience, it must be said that it is much more practical to use lining 7-10 cm wide. It is important to remember that all lining used in one room must be the same width.
Selection of equipment for the manufacture of lining
The production of lining at home is carried out using two types of equipment:
- Industrial;
- Home made.
Industrial equipment is characterized by full readiness for work after purchase and installation at the work site. All parts and assemblies of such equipment are factory-made.
Milling attachments are used to cut the main profile elements. These elements are metal circles with a hole in the center. The hole in the center of the circle is intended for installing the cutter on the machine shaft. The machine shaft is directly or via a belt drive connected to the motor shaft.
Each cutter has two or four diamond-coated alloy steel cutters. The cutters are designed to form a tenon and groove. For a continuous method of producing products, industrial machines are capable of simultaneously performing several functions.
When carrying out work, observe personal safety precautions and requirements when working with electrical equipment. The area around the machine installation must be clear to allow free movement. Wear safety glasses when sawing boards. Overalls must be made of thick fabric. The electrical equipment used must be grounded.
The speed of rotation of the shaft depends on the engine power. The higher the rotation speed, the greater the productivity of the machine. The shaft rotation speed on modern industrial machines reaches 1200 rpm. This rotation speed makes it possible to produce linings 3 m or more long at high speed.
Self-made equipment is characterized by lower installation productivity. Such machines have low power motors. The main components are made at home on lathes.
Before making the lining on a homemade machine, individual components and assemblies are assembled.
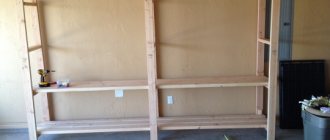
Installation of lining on the wall surface
The wooden paneling is ready for work. Now you need to install it on the wall. To do this, a frame is made, then insulation is carried out, and after that the boards are attached to the surface. This step-by-step work ensures good results.
Fastening the frame
First we work with the frame. Using a tape measure and pencil, mark the lines, check the lines several times for correctness, and then attach the mounting brackets to the wall. They must be mounted at approximately the same distance. To make the connection sufficiently reliable, it is better to fix the brackets with anchor screws.
Methods of fastening the lining.
After this, all the staples need to be bent so that grooves are formed into which the wooden blocks will be inserted. Usually it is better to bend inwards. After inserting the bars, you should additionally secure them with wood screws, and then finally bend all the excess ends of the brackets. In this way, you need to secure all the horizontal parts of the frame.
After completion, we work on the remaining vertical slats. First, using a plumb line, the evenness of future lines is measured and appropriate notes are made. Then the marks are connected with a pencil using a tape measure, after which the fastening is carried out using a similar method. Please note that the distance between both horizontal and vertical slats should be about 50 cm.
Particular attention should be paid to unnecessary staples and installation of the frame in the place of non-standard window openings and arches. It is not recommended to attach excess parts of the brackets, if they are quite large, on top of the beam. It's better to cut them off. And for finishing rounded windows and arches, it is better to first make the frame separately, and only then attach it to the wall. This process is a little more complicated, so it is recommended that you even seek help from specialists if you do not have special skills.
Insulation of the frame and fastening of lining sheets
After this, you can move on to the next step - insulating the frame. For this, it is best to use a standard material such as mineral wool. It is recommended to use a roll paper so that you can cut out suitable sheets.
Article on the topic: How to lay tiles on the floor: laying and how to lay them with your own hands correctly, how to lay video and lay tiles
The cotton wool is secured by laying it normally between the frame posts and fixing it with glue or staples along the edges. Pay special attention to sealing the cracks between its sheets. It is better to do this with ordinary polyurethane foam, which expands slightly.
When insulating, do not forget about waterproofing the wall. This applies to absolutely all rooms, regardless of humidity level. It is better to use an ordinary waterproofing film, which must be stretched over an already insulated frame and secured to wooden beams with mounting brackets.
Now the main thing remains, but at the same time the simplest and fastest thing - installing the lining sheets on the frame. If you do everything slowly, the work will go very quickly, and the quality will be high. For fastening you will need little: ordinary nails and a hammer.
So, take one sheet of lining, attach it to the edge of the wall and drive a nail into its groove at an angle from above. So gradually you need to drive the nails in to the very bottom, keeping equal distances between them - about 15-20 cm. You need to drive the nails in so that they are not visible behind the groove. It is recommended to recess the head so that it does not interfere with the connection.
When attaching the planks, constantly check everything with a building level.
If everything is done smoothly, then there will be no problems with subsequent fastenings. The sheets of lining installed next to each other must be firmly pressed to each other - tenon into groove.
All this does not require builder skills, so you can experiment and not be afraid for the result. The main thing is slowness and attentiveness. Then you will get a beautiful and reliable finish that does not require further processing.
The best posts
- How to make a plasterboard ceiling in the kitchen with your own hands
- How to paint drywall: little tricks
- Socket boxes for drywall: correct selection and installation
- Grouting drywall joints: materials and techniques for performing the work
- Epoxy resin, application
- How to cover a radiator with plasterboard without losing heat in the room
- Repair of plasterboard ceilings: we fix the problem ourselves
- Machine for the production of profiles for plasterboard: production of frame elements
Do-it-yourself manufacturing of machine tools
The machine for making lining consists of three main parts:
- Electric motor;
- Sawing table;
- Desktop equipment.
To make a cutting table, durable sheet iron with a thickness of at least 7 mm is used. The table has a reinforced frame structure. To increase stability and reduce vibration, the table frame is bolted to the floor.
To make machine tools with your own hands, use an electric motor with a power of 2 to 5 kW. When choosing an engine with less power, the productivity of work at home drops sharply. An engine with a power of more than 5 kW will not allow high-quality detailed work on profile elements.
Before making the lining on a machine, a hole is made in the middle of the sheet. Two rolling rollers are placed in the hole. The top point of each shaft coincides with the surface of the table. The shafts are connected to the motor shaft using a belt drive.
The engine is a low-power electric motor of 2-5 kW. In most cases, motors from large household appliances are suitable for use.
Before making the lining yourself at home, adjust the pressure rollers and metal stops. Pressure rollers are designed to facilitate the movement of the board along the table surface. The rollers are made of metal or durable plastic. The stops are designed to guide the movement of the board and prevent its possible shift during movement.
Aluminum benchtop equipment leaves dark streaks on the surface of finished products. To prevent marks from appearing, use a coating made of galvanized steel or organic glass.
Manufacturing lining requires many years of experience working with turning equipment. All mechanism components are made from high-quality parts.
The use of low-quality parts significantly reduces the service life of production equipment
The use of equipment components with poor assembly quality can cause sudden failure of the device.
Differences between lining and eurolining
- Eurolining has the best quality wood
- Has a more complex profile
- Eurolining has a deeper tongue-and-groove fastening
- Has ventilation channels
- More expensive than regular lining
The process of attaching eurolining does not differ from covering it with ordinary lining, even though eurolining has higher requirements for board moisture and the quality of surface treatment, so pay special attention to this.
Based on materials from the site: samoremont.com, svoimi-rykami.ru, kubvagonki.ru
Work procedure
Do-it-yourself lining is done in the following order:
- Sawing boards;
- Surface planing;
- Cutting profile elements.
Sawing boards
The production of lining is carried out using a circular saw with large teeth. Before starting work, check the reliability of fastening the saw and locking devices. If necessary, secure the part to the required level.
After checking the reliability of fastening of all parts and assemblies, turn on the device. Carefully insert the end of the board between the guide rollers. With smooth movements, bring the end to the board.
To protect against accidental movement, stops are used.
The workpiece is sawn into the required number of boards.
Residues from cutting boards can be used to make slats or bars for sheathing.
The harvested material is stacked in a predetermined location. Wooden spacers are placed between the rows of folded boards. Using spacers will speed up the drying of boards with high humidity.
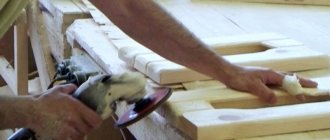
Surface planing
Before making the lining, the surface of the board is jointed. Jointing is the process of obtaining a straight surface of boards using cylindrical shafts. To perform jointing, the circular saw is replaced with rolling rollers. The work is carried out in one direction. To do this, the board is passed on each side along the surface of the table.
To obtain a high-quality surface, the amount of pressure and the number of passes must be the same for all products.
To automate the jointing process, clamping devices with adjustable pressure force are used. Such devices are made independently or purchased in specialized stores.
Cutting profile elements
The tenon and groove are cut on each board using removable cutters or an inclined circular saw.
Before cutting profile elements, check the operation of all fastening and guiding mechanisms. When using milling attachments, the cutters are adjusted according to the thickness of the board and the level of penetration of the cutting edges into the wood.
Remember! The use of low-quality materials in the manufacture of machine equipment elements affects the safety of work.
When using a circular saw, carefully adjust the angle of the blade. After adjusting the cutting mechanisms, they are securely fastened. To ensure uniform passage along the length and obtain the correct profile, stops must be used.
You can see a full description of how the lining is made with your own hands in this video.