Hanger
Any boy over 10 years of age can make this product. The process must be supervised by an adult. Making a hanger is quite simple, and it will not only decorate the hallway for a long time, but also be useful.
To create a fake you need to prepare:
- 3 boards 10*70 cm;
- 2 boards 15*40 cm;
- 2 metal corners;
- 3 hooks;
- screwdriver;
- self-tapping screws;
- paint or varnish.
DIY crafts from boards: an example of a simple hanger made from three boards
Drawing of a hanger made of boards
The algorithm for making a hanger is the following sequence of actions:
- Carefully paint or varnish the boards on all sides.
- Take 3 boards, lay them out on a flat surface so that there is a gap of 5 cm between them. Place one of the boards measuring 15*40 cm on top of them. Use a screwdriver and self-tapping screws to secure the structure.
- Screw metal corners onto the sides of the horizontal board. Attach a free board to them.
- Screw 3 hooks under the top of the hanger with a screwdriver.
Wall shelves
Wooden shelves are a multi-functional room decor item that takes up little space and gives the room an organized look. Thanks to wall shelves, you can neatly and originally place many things that make the interior lively and interesting (books, photo frames, vases, figurines).
You can build an original bar shelf from old boards with your own hands. It will decorate not only a city apartment, but also a country house or a private house. It is not difficult to make due to the simplicity of the design.
The shelf consists of two parts:
- top - for bottles of alcohol;
- bottom - for glasses, goblets, wine glasses.
You will need to build a wooden shield from boards and attach two shelves (upper and lower) to it.
At the initial stage of work, lumber is trimmed. The boards are cut using a circular saw. They should be the same size. The edges are trimmed at an angle of 90 degrees. The base of the bar shelf - a wooden panel - will be constructed from the processed boards.
The boards from which 2 shelves will be made are processed in the same way.
The shield will need to be framed with 4 bars of 50x50 mm in the form of a corner. For this purpose, cuts are made on each side of the beam. The workpieces are cut keeping to an angle of 45 degrees. Finally, the bars are sanded with sandpaper. Assemble the base of the structure.
The upper and lower shelves are attached to the finished panel. The resulting piece of furniture is varnished.
Shoe organizer
Often, a large number of shoes accumulate on the floor in the hallway. This situation really spoils the entire Internet. You can solve this problem by making an organizer out of ordinary boards.
In order to make a shoe rack, you need to use the following materials and tools:
- 6 boards 15*90 cm;
- 4 boards 5*45 cm;
- 8 boards 15*50 cm;
- 8 metal corners:
- hammer;
- nails;
- paint or varnish.
After everything is prepared, you can start working.
The process is the following algorithm of actions:
- Take 8 identical boards and arrange them in pairs. Attach them perpendicular to each other, additionally interlocking them with metal corners.
- Set the corners vertically. Make a mark on each of them located in the middle.
- Connect together 3 boards 15*90 cm. To do this, you need to nail a 5*45 board on each edge. Install this structure at the level of the marks of the wooden corners.
- Nail 2 5*45 cm boards on the sides of the top of the future organizer. Secure the remaining boards to them.
- Spread plastic wrap and place a shoe rack on it. Cover the product with varnish or paint.
Wall decor
Transform your apartment with a mosaic made from scrap boards. An original panel, laid out on the wall from slats of different sizes, sanded and painted with varnish or paint, will transform the look of your home and give it a zest. The scraps, joined end-to-end in the shape of a boomerang, look beautiful. Creative owners can independently draw a sketch of the panel and lay out the scraps according to color or shape according to the diagram. Be sure to attach the material to a plywood base, and only then to the wall.
panel on the wall
Rack
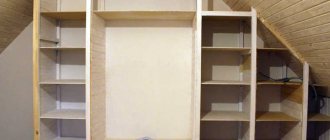
DIY crafts made from boards can bring real benefits. For example, most families are faced with the problem of a lack of storage space for various household items.
You can solve the problem and at the same time engage your child in a useful activity if you make a shelving unit yourself. At the same time, it can easily fit into any interior by first choosing the right paint color.
Before you start work, you should prepare the following tools and materials:
- 6 wooden blocks 5*5*160 cm;
- 4 boards 25*60 cm;
- 8 wooden blocks 3*3*25 cm;
- self-tapping screws;
- screwdriver;
- dye.
Prepare the boards
Cut the boards into racks
Assemble the side supports
The rack can be assembled in a vertical position
The rack of boards is ready.
To make a rack, you need to follow the instructions:
- Make 4 marks on all long bars. The distance between them should be 40 cm.
- Take 3 bars. Place them on a flat surface, maintaining an interval of 5 cm between them. Connect the structure with small bars. Fixation should be carried out according to the marks.
- Repeat the previous step with the remaining wood blocks.
- Connect the 2 sides of the rack by placing boards on top of the small pieces. Securely secure the result using a screwdriver and self-tapping screws.
- Paint the product, paying special attention to small details and corners.
Table shape and design
First of all, we need to decide on our desires and needs, because the table must perform certain assigned tasks.
To do this, you can go to the Internet and look at a photo of a table made of boards made by yourself or made in a factory. Both conventional and designer solutions will suit you, because they are often very simple, yet stylish.
It can be an ordinary table of the simplest design - four legs and a tabletop, or it can be a sliding, oval, corner, book table or even a transformer.
Look here for sliding dining tables for the kitchen in stock and at a competitive price.
There are really a lot of options, because some people need a simple table made of boards, while others are looking for a universal solution.
Table
A great idea for crafts made from boards is a coffee table. It will decorate any room and can be useful. For example, such furniture is convenient for gatherings with friends. The table can also act as additional storage space. As a result, the product itself looks very aesthetically pleasing, so it will easily fit into any interior.
Drawing of a classic coffee table
Fastening the frame with self-tapping screws
Coffee table frame
In order to complete it, you need to stock up on the following set of tools and materials:
- 4 wooden blocks 5*5*60 cm;
- 1 wooden block 5*5*60 cm;
- 2 boards 10*100 cm;
- 2 boards 10*60 cm;
- 4 boards 15*100 cm;
- 4 wide metal corners;
- self-tapping screws;
- screwdriver;
- varnish
The algorithm for creating a table consists of the following sequence of steps:
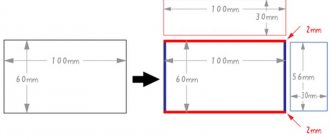
- Make a rectangular structure. To do this, you need to take boards with dimensions of 10*100 cm and 10*60 cm. Connect them using metal corners.
- Attach 4 wooden blocks vertically to the inside of the resulting rectangle. This should create a table base with legs.
- Using a screwdriver and self-tapping screws, install the remaining wooden block perpendicular to the 10*100 cm boards.
- Make the tabletop. To do this, you need to secure 15*100 cm boards on top of the base of the table. During work, you need to make sure that the material fits tightly together.
- Cover the table with varnish. If desired, you can replace the varnish with paint of a color that matches the interior.
Feeder
DIY board crafts can be simpler than the options described above. The product will bring no less benefits, teach children to take care of animals and provide an opportunity to acquire new skills.
A bird feeder will help keep your child engaged not only while creating a craft, but also for a long time, it will be possible to regularly bring food and water for the birds.
Before you begin, you should stock up on the following set of tools and materials:
- 4 boards 10*25 cm;
- 4 boards 3*20 cm;
- 4 boards 5*20 cm;
- 4 boards 5*25 cm;
- 4 wooden blocks 2*2*20 cm;
- 8 narrow metal corners;
- screwdriver;
- self-tapping screws
To make a bird feeder, you must follow the instructions:
- Fasten 2 10*25 cm boards together. To do this, you need to use self-tapping screws and two 3*20 boards. This will create the bottom of the product.
- Make the sides. Fix 2 boards 5*25 cm along the length of the bottom, and 5*20 cm along the width. Additionally, fasten them to each other using metal corners.
- Make a roof for the feeder. To do this, you need to repeat the 2 previous steps.
- Connect the bottom of the product to the roof with wooden blocks.
Material
If you intend to assemble a table yourself, the first thing you should pay attention to is the material of manufacture. Very rarely, a whole piece of wood is used as a material at hand; much more often, wooden boards are used. The advantages of this material: they can be cut to the required sizes on any construction site; It’s also easy to transport them to the assembly site if you have a personal car.
The only downsides that can be mentioned are possible difficulties that may arise during installation, and also the fact that you should pay attention to the correct processing of the material - otherwise the boards may come apart and will not last long.
Sexual
This material is used for flooring, for cladding buildings and premises and, according to the topic of this article, for the manufacture of interior items. The advantages of this material are as follows:
- Most floorboards have a groove, as this is how they are held together.
This allows you to fasten the boards into a tabletop without any problems, while the joints will be identical and look aesthetically beautiful; - Most of the edged boards have already been processed, so after assembling the table you don’t have to resort to additional painting or varnishing the product;
- even if the floorboard is an ordinary edged one, it still fits together with other boards better than the rest.
But floorboards also have disadvantages .
For example, for a board that has been varnished, a buyer can pay a larger amount than for an ordinary board with subsequent self-coating. The floorboard has a limited size, that is, its size will dictate the size of the countertop, or you will have to adjust the length yourself. Important . It is impossible to make legs from a floorboard, only a tabletop. This means that you will have to select a different material for the legs.
Unedged
This board has jagged edges with bark as it is made by cutting a tree trunk lengthwise. Such boards are cheaper, and with their help you can achieve original design solutions. But at the same time, they require additional processing, and joining them is quite difficult.
Oak
They are distinguished by unique strength, density and resistance to many biological and physical influences. Very expensive , but in terms of service life, this material completely pays for itself.
Stool
Another option for a wooden craft that is easy to do with your child. You can make several stools at once, add pillows to them, which you can also sew yourself, and get comfortable furniture.
Before work, you should prepare the following tools and materials:
- 2 boards 250*25 cm;
- Chipboard 25*30 cm;
- board 9*20 cm;
- edge for pasting;
- iron;
- screwdriver;
- 4 confirmations;
- hammer;
- knife;
- 5 chopiks;
- glue.
The work process is represented by the following algorithm of actions:
- Edge all materials for the stool. To do this, you need to get the iron as hot as possible and run it across the surface. Later you need to press the edge a little with a rag. Cut off all excess, turn the board or chipboard over and glue again on the other side.
- Screw the first leg to the crossbar, which will be a 9*20cm board. To do this, you should use 2 confirmations and a screwdriver. Repeat the same steps on the other side.
- Make 5 secret holes in the chipboard and in the base of the stool. Add a drop of glue inside and connect the seat with the legs.
Swing
Crafts made from boards with your own hands can be very simple to make, but at the same time bring great benefits. One such option is a swing. In this case, a simple model is proposed that is easy to make yourself. It can be attached to any tree or special supports. If there is a small child in the house, then you should hang hooks above the doorway.
Before you begin the work process, you need to stock up on the following materials and tools:
- 2 boards 15*30 cm;
- 2 boards 3*20 cm;
- electric jigsaw;
- screwdriver;
- 4 screws;
- 2 ropes.
The creation algorithm is the following sequence of actions:
- On each of the 15*30 cm boards, make 2 drinks. One is in the center of the short edge, the second is closer to the edge on the long side.
- Make the seat by joining the material from the previous step. Secure the result using 3*20 cm boards, screwing them with self-tapping screws.
- Pull the ropes through the grooves.
Photos of tables made from boards with your own hands
Read here - DIY children's table - 140 photos of interesting projects and a video review of the construction of simple and stylish children's tables
Did you like the article?
0
1
Book shelf
Very functional and practical use of boards. After all, every home needs a hanging shelf to store books.
Materials and tools needed during the work process:
- 2 boards 10*50 cm;
- 4 boards 15* 70 cm;
- dye;
- brush;
- 4 metal corners;
- screwdriver;
- self-tapping screws
The process of creating a book shelf is the following algorithm:
- Paint all the material and let dry.
- Place 10*50 cm boards parallel to each other. Connect them at the top and bottom with two 15*70 cm boards.
- Attach metal corners. Install shelves on them and connect them with self-tapping screws.
Crafts for children
Rodents
To create rodents, only ecologically grown wood is used. Animals are cut out of solid wood with a recess for small hands. Sometimes crafts are covered with fabric, but more often they remain in their natural form.
Applications
Applications are crafts that children can create themselves. It is best to use plywood or thick cardboard as the basis for wood appliqué. Wooden material in the form of twigs is glued to the base. The tree itself is created from the branches or, by twisting, the sun, flowers, birds, etc. are created. To work, you need to have strong glue; PVA glue is not suitable for such work.
Wooden objects have a unique aura. They fill the house with comfort, light, harmony with nature. The tree should be treated with respect. Before making the work, you need to carefully consider the layout. Wood cannot change its shape again and again, unlike plasticine. The tree requires a careful approach.
Do-it-yourself wooden crafts remain in everyday life as a memory. When using special wood processing products, crafts last for decades, leaving behind the memory of your home.
I really wanted to build something with my own hands. So go outside for the first material and start creating. The idea will come on its own. Try to use only a knife and all available materials that you can find on the street and create a machine. Let the wheels be made of cones, and the body itself be made of a thick stick.
Constantly develop and build new things.
Original wood decor ideas
DIY crafts from boards: an original shelf made of boards and jars for flowerpots and flowers
Wood always looks good in the interior. Therefore, you can use boards to create crafts for your home. Wall stands for vases with flowers will look interesting.
In this case, you will need a minimum amount of materials:
- 4 boards 20*20 cm;
- 4 rings of any material that can hold the vase suspended;
- 4 jars;
- screwdriver;
- 8 self-tapping screws.
The process of creating crafts is the following algorithm of actions:
- Arrange the first board in a diamond shape.
- Using a screwdriver and self-tapping screws, attach the ring to the diamond. Thread the jar through the ring.
- Repeat the previous steps with the remaining boards.
Afterwards you can mount the crafts on the wall. It is better to arrange them also in the form of a diamond. You can put any flowers in such vases.
Another interesting idea for decoration is a special panel for photographs. This fake will help decorate any living space and will look very original. At the same time, creating a wooden panel will require a minimum amount of time. For the most stylish look, it is better to use black and white photographs.
Before you begin, you should prepare the following materials and tools:
- 2 identical long boards of any width;
- varnish;
- 2 metal strings;
- 4 screws;
- screwdriver;
- wooden clothespins;
- photos.
Then you need to complete the following steps:
- Carefully coat all sides of the board with varnish. Let them dry.
- Step back 3 cm from the edge of the boards and screw in the screws. They should not be completely immersed in the material.
- Pull the string onto the self-tapping screws. The remaining ends need not be hidden.
- Hang the photographs along the strings, attaching them with clothespins.
Another option for storing photos is an eco-style frame. All materials used to create crafts are harmoniously combined with each other. Several similar photo frames placed on any rough-finished wooden surface will look interesting in the interior. The creation process is quite simple, so even a little girl can be involved in it.
In this case, it is necessary for an adult to take over some of the actions or control them. This is especially true when using hot glue and a screwdriver.
Before work you need to prepare the following set of tools:
- 2 boards 10*15 cm;
- 2 boards 2*20 cm;
- 4 screws;
- screwdriver;
- dye;
- brush;
- pin;
- sackcloth;
- twine;
- hot gun;
- scissors;
- lighter.
Algorithm for creating a photo frame from boards in eco-style:
- Connect 2 boards 10*15 cm, tightening them with the remaining boards. In this case, it is better to use small screws so that the fastening is not noticeable.
- Paint the photo frame. Let it dry.
- Cut a rectangle from burlap. Treat the edges of the material with a lighter so that they do not fray later.
- Roll the burlap into a bow. Tie the center with a string.
- Glue the bow and clothespin to the photo frame.
DIY crafts made from boards can be very extraordinary. For example, a fashionable eco-style in the interior can be emphasized with the help of wooden candlesticks. For such work, you should choose old boards.
On the one hand, they should not have an even cut, but be slightly broken. The older the material looks, the more interesting and original the candlesticks will be. For these purposes, you can deliberately make the board older by breaking it.
Before you begin, you need to prepare the following tools and materials:
- 3 boards of any size;
- 3 boards 10*10 cm;
- 6 metal corners;
- jigsaw;
- screwdriver;
- self-tapping screws;
- 3 candles.
Next you need to follow the instructions:
- Saw off one end of long boards so that one of the edges has an even cut.
- Screw 2 metal corners onto each of the boards. Use them to attach the shelves.
- Arrange the candles.
Another extraordinary design solution is an eco-style watch. They are very easy to complete, so any child under the supervision of an adult can cope with this task.
For work you will need the following tools and materials:
- 3 boards 15*5 cm;
- 2 bars 2*2*15 cm;
- clock mechanism with hands;
- battery;
- hot gun;
- stencil with numbers;
- pencil;
- burner;
- drill;
- screwdriver;
- self-tapping screws
The work process is represented by a sequence of actions:
- Press the boards evenly together to form a square. Secure the structure with bars. In this case, the screws should not be visible from the reverse side.
- Make a mark in the center of the square. Drill a hole for the arrows in this place.
- Using a stencil and pencil, draw the numbers 3, 6, 9 and 12. Treat them with a burner.
- Install the clock mechanism using a hot gun.
A wooden key holder can be both useful and an element of home decor. Such a thing is indispensable in the house, because it is much more convenient when all the keys are stored in one place.
To create a craft, you should stock up on the following set of tools:
- board 10*25 cm;
- small wooden choppers;
- wood glue;
- hammer;
- drill;
- pencil;
- burner.
After preparation, you can proceed to the following actions:
- Place the board horizontally. Make marks for choppiks closer to the bottom edge. There should be as many of them as there are keys in the house.
- Drill blind holes. Add a drop of wood glue to each and drive in the choppers.
- Use a pencil to mark the future inscription. It can be in the form of the word “Home” or the phrase “Welcome”, recently the family surname is often used.
- Use a burner to process the inscription.
Crafts made from boards, which you can do with your children with your own hands, can resemble real masterpieces. For example, you can make a wooden picture-panel. The work is creative.
Therefore, the child can be involved in the process either fully or partially. Making panels requires the presence of a stencil. You can use different images. A bicycle or a running horse will look interesting.
To create a product you must use the following tools and materials:
- 4 boards 12*70 cm;
- 2 wooden blocks 3*3*40 cm;
- 4 multi-colored paints;
- White paint;
- brush;
- scotch;
- stencil;
- sandpaper;
- screwdriver;
- self-tapping screws
The work process involves the following algorithm of actions:
- Paint each board a different color. Dry. Afterwards, you need to carefully sand the boards with sandpaper. At the same time, you should not worry because the abrasions are not evenly distributed throughout the material.
- Lay the boards out on a flat surface so that there are no gaps between them. Connect them using wooden blocks. Self-tapping screws should not go through. The attachment point should not be visible from the front side.
- Secure the stencil with tape. Fill the image with white paint. Dry.
Trend or tradition?
The use of old boards when decorating the interiors of city apartments, country houses, restaurants or showrooms is considered by many to be a tribute to modern fashion, another trend, which could not have come at a better time at a time in which everything exclusive, unusual, and non-standard is valued. But this opinion is only partly true.
Each person at all times tried to make his home individual, not like everyone else, experimented with styles, furnishings and decor. And of course, from time immemorial, people have used wood to decorate their houses, which added warmth, coziness, and created an atmosphere of comfort and harmony with the outside world. The new houses smelled of wood and fresh resin, but they lacked the atmosphere of life, family traditions and touching memories.
Zoning the dining area by finishing the wall with a wide barn board
Light wooden floor with an aged effect
Only over the years did the boards absorb the spirit of the family, the change of generations, smells, memorable cracks and marks appeared on them, layers of paint changed, forming the so-called patina of time.
New generations, returning to the house of their ancestors, recalled their childhood with nostalgia, looked at photographs of grandparents, young parents, immersed in an atmosphere of domestic serenity, accompanied by the slight creaking of old floorboards. And it became so sad when the old house was being demolished, the fence on which things were dried was dismantled, and the boards were burned in the oven, not a trace remained of the barn, and the leaky boat was used for firewood.
In a rapidly changing world, there was no place for old things, and the glossy shine of plastic, the cold shimmer of metal and glass, the severity of concrete and granite, which replaced natural wood from the interiors of progressive city dwellers, deprived many of the chance to express individuality. History faded into history, and was replaced by luxurious but empty glamor and practical but detached high-tech.
But everything is cyclical, so residents of megacities soon began to miss what the post-industrial era could not offer: home warmth, traditions, harmony. By the end of the 20th century, everything natural began to return to fashion, eco-style and vintage became the favorites of the era, and the reuse of old things acquired its army of followers. The new interiors acquired what they had previously lost: soul, the application of the ideas of harmonious coexistence of man and nature, history and character.
Warm atmosphere of the room thanks to natural materials
Cozy kitchen-dining room located on the attic floor
Modern owners of new apartments and newly built houses make a lot of efforts to give their home a character with history, to create a kind of family nest. Old boards in the interior cope with this task perfectly, playing a completely different role in their renewed life than in the past.
Kitchenware
There are a large number of crafts that can be made for the kitchen. The most functional of them is the kitchen board.
To create it you will need the following tools and materials:
- board;
- sandpaper;
- electric jigsaw;
- pencil;
- burner.
Next, you need to perform the following algorithm of actions:
- Use an electric jigsaw to give the board the required size. Carefully sand all edges with sandpaper.
- Use a pencil to mark the future drawing. If necessary, you can use a stencil.
- Use a burner to process the drawing.
A stand for various small items will look unusual in the kitchen interior. Such a product will add a touch of eco-style or emphasize it.
Before you start work, you need to prepare a set of tools and materials:
- many small boards that should be approximately the same size;
- bottle;
- hot gun;
- twine;
- lighter;
- big button.
The process of creating an eco-style stand is a sequence of actions:
- Place the bottle on a flat surface. Vertically press small boards against it, treating them together with glue using a hot gun. The result should be a glass made from boards. Dry.
- Wrap the stand with twine. For better adhesion, you can add a small amount of glue. Treat the ends of the rope with a lighter.
- Glue the button to the twine.
In any kitchen there are many tools that need to be hung. To solve this problem, you can make a special organizer.
To do this, you need to prepare the following set of materials and tools:
- board 5*25 cm;
- metal hooks;
- dye;
- pencil;
- brush;
- self-tapping screws;
- screwdriver
The work process can be represented as the following algorithm of actions:
- Paint the board. Dry.
- Make markings with a pencil.
- Screw on the metal hooks with self-tapping screws.
Boards of any size are a universal environmental material. You can use them to make many useful things, from small organizers to furniture. Children should definitely be involved in the process so that from a very early age they learn how to make various fakes with their own hands.
Article design: Natalie Podolskaya
New life for old boards
Oh, how attractive, charming and romantic old boards look in the interior, the photos are simply amazing, forcing more and more people to join the circle of fans of this design. Dried by the sun and wind, absorbed by sea salt, cracked by frost or heat, eaten away by bark beetles—these boards have lost their original appearance, but over the years they have only become more noble, more expressive, and “wiser.” Now they are carefully stored in warehouses, trying not to damage them, awaiting new owners who will value and love them even more than in their previous life.
Advice ! What was previously thrown away or burned is now highly valued: barn or fence boards, cargo boxes, shelves, parts of furniture, boats, carts - there is a place for everything.
Beautiful double bed in shabby chic style
In a modern interior, old boards have many uses: