Are you wondering what to give to your friend or daughter? Give a cardboard chest of drawers with your own hands! Did you know that you can make a great dresser out of regular corrugated cardboard or cereal boxes?
You don't always need to spend crazy amounts of money and buy expensive gifts.
A chest of drawers made from boxes, made carefully and without haste, can be decorated in such a way that everyone you know will simply gasp. After all, this is so unusual and pleasant for the owners of the house.
And for a little girl, a do-it-yourself dresser for dolls will come in handy. As for the size of the chest of drawers, here you can choose to make a chest of drawers from cardboard, adhering to the dimensions presented in any of our master classes. A chest of drawers made from matchboxes is suitable for a dollhouse.
Chest of matches - master class
You can make a lovely chest of drawers for dolls with your own hands from matchboxes and paper. And if you decorate it with organza roses, crocheted flowers, and white felt roses, the child’s delight will know no bounds.
To do this, you need to prepare 3 boxes of matches, colored paper, PVA glue or double tape. Beads are used for the legs, and parts that are sold in scrapbooking stores are used for the handles.
What you will need for work:
- Boxes of matches (quantity - unlimited).
- Colored paper.
- Double tape or PVA glue
- Scissors.
- Beads for dresser legs.
- Handles for drawers.
- Glue Moment.
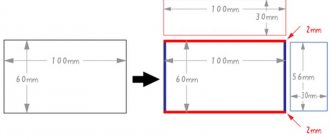
After we have taken the matches out of the boxes and pulled out the “boxes,” we need to put the empty boxes together and glue them with double tape or PVA glue. Then, using a ruler, measure the distance from one lower corner to the other, as well as the width and height of the chest of drawers. We cut out 2 pieces for decoration from colored paper and paste over our chest of drawers.
Sharp edges can be sanded with a nail file. All that remains is to glue the beads instead of the legs, make a hole and screw in the handles (you can use beads or small buttons - sew on with thread or secure with wire).
To make a felt rosette, cut out a circle of the required size and draw a spiral with a pencil. We make a cut with scissors in a spiral, cutting out “waves” on top. We twist and sew or glue the stem of the flower.
And this is how you can knit cute and delicate flowers from any thread. For knitting these colors, a thin hook with a thickness of 1-2 mm is suitable. Scheme:
Tools and materials
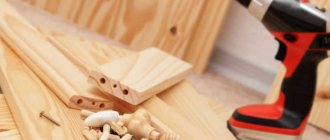
Depending on the planned product, the list of necessary tools and materials may differ. The design can be either simple, consisting of 2-3 boxes, or more dimensional in the form of a cabinet. In this case, additional elements will be needed, which can also be used as boxes or tubes (frames for winding film, paper, etc.). The list of everything needed is as follows:
- Cardboard. For the structures under consideration, it is better to choose a denser material. This will increase the strength of the product. However, thin cardboard is also suitable for gluing joints.
- Scotch tape and glue. You can use any glue, but it is better to use “Moment”, since it does not soak the paper, and the parts are securely fixed to each other.
- White paper and materials for decoration. For decoration, you can use wallpaper, fabric, and basically anything you can think of.
- Pencil, ruler.
- Stationery knife. The tool must be sharp.
- Sandpaper. Used for sanding edges.
- To dry the glue faster, use a hairdryer.
Dresser for dolls made of paper and cardboard - step by step
Our next master class is another version of a small chest of drawers made of cardboard. This cardboard chest of drawers has four shelves. For work, it is advisable to take thick corrugated cardboard. We will also need an Erich krause or Kores glue stick. Prepare a couple of sheets of office paper, a stationery knife, Moment glue, 2 beads for drawer handles, a ruler, a pencil, and scissors.
When working with paper, it is important to take your time and glue all the parts carefully and evenly. Instead of white office paper, you can take thin colored paper.
Parts Dimensions:
So, let's start with the details of the chest of drawers. Draw the details on a sheet of cardboard using a ruler and pencil:
- 2 parts of the back wall 12*15 cm.
- 4 side parts 15*6 cm.
- 2 children top 13.5*6 cm.
- 2 children bottom 12*6 cm.
- 6 shelf parts 12*5.2 cm.
We glue the parts together in pairs for thickness. We will get:
- 1 back wall.
- 2 side.
- 1 top piece.
- 1 lower part.
- 3 shelves.
Next, all these blanks need to be covered with plain white paper using a glue stick.
Then take Moment glue, bottom part. and the back wall and glue them together, while maintaining an angle of 90´. Keep the back wall in this position until the glue dries. Next, glue the side walls in the same way.
We arrange the shelves so that there is a distance of 4.5 cm between the lower ones (there will be drawers here), leave the upper shelves open. Glue the shelves with Moment glue.
We will make boxes. For the drawers, we cut out 4 parts for the back wall 10.7*4 cm, 8 side parts 4*5 cm, 4 front parts. 4*12 cm. We will cut out the bottom later.
On the two front children. draw frames, retreating 0.7 cm from the edge. We cut out the frames with a stationery knife. Then, we must cover these frames with white paper. To do this, smear the frame with glue, take a sheet of paper and place the frame on it.
We make a cut with a knife, stepping back 1 cm from the frame. Make a triangle at the end of the cut line.
Apply glue to the paper inside the frame and carefully bend the paper onto the frame. Cut out a 4*12 cm piece from white paper and glue it onto the front cardboard piece on one side. Next, we place the second front piece on top of the frame with the paper facing down and paste it over the front of the drawer with paper.
We should get 2 white parts like this with a frame inside. We glue together the parts of the back part in pairs and glue these 2 resulting parts. paper. We do this to strengthen the box. Cover 2 lower and 2 upper parts with paper.
We assemble (glue) the boxes with Moment glue.
In the center of the front det. Sew on beads with white thread. Glue the front part to the finished drawers.
So the doll chest of drawers made of cardboard is ready.
On the video - how to make a chest of drawers for dolls with your own hands:
HOW TO MAKE A DRESSER FOR DOLLS ♡ HOW TO MAKE FURNITURE FOR DOLLS ♡ #DOLL WORLD ♡ FOR DOLLS
Peculiarities
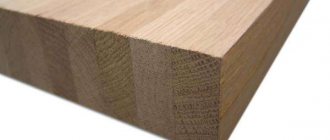
Before you begin to embody your creative abilities, it is worth considering the main technical characteristics of the cardboard itself. After all, this material has both advantages and disadvantages. Its positive aspects include:
Strength. A piece of furniture made from cardboard, made by yourself, can cope with various loads .- Low cost. You can make a chest of drawers from old boxes from household appliances and appliances. They are available in every home, and you do not need to pay money for consumables to make furniture.
- Environmental friendliness. Everyone knows that cardboard is made from natural and safe raw materials. It does not release toxins and does not provoke allergic reactions.
- Flexibility and elasticity. A cardboard chest of drawers can be given absolutely any shape and design.
As for the disadvantages of the material, these include:
- Not durability. Unlike wooden products, cardboard ones will not serve their owners for 20-30 years. With proper manufacturing and use of high-quality material, the chest of drawers can be used for 5-10 years.
- Can only be used in dry, well-ventilated and heated areas. Cardboard is very afraid of moisture, and under its influence it gets wet and loses its technical qualities. It will not be possible to install a chest of drawers made of cardboard in the kitchen or bathroom . Since it will quickly become unusable from exposure to steam and other negative factors.
Important : before starting to manufacture a piece of furniture, the cardboard must be cleaned with alcohol to remove dust and dirt.
Medium size cardboard chest of drawers - mk
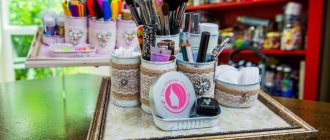
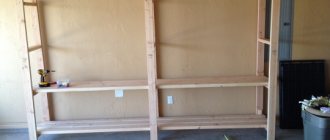
If you want to make a medium-sized chest of drawers, this master class will definitely come in handy. This chest of drawers is useful for handicrafts or for things, cosmetics, office supplies, and so on. Such chests of drawers are sometimes used as boxes - for papers, bills, accessories. If you cover such a chest of drawers with fabric or paste it with colored paper, you will get an original gift.
The product is made of corrugated cardboard and has dimensions of 27*20 cm. To work you will need thick cardboard, a stationery knife, scissors, Moment glue, a ruler and a pencil.
Cut out from cardboard:
- 3 parts 27*20 cm (main).
- 3 parts 19*20 cm (shelves and bottom).
- 6 children 18.5*9 cm (side drawer.)
- 2 children 18*18 (bottom of the box)
- 2 children 21.5 *10 cm (in front of the drawer)
- 4 circles with a diameter of 4 cm and 2 strips 1*17 cm (handles).
We took 3 main children. and cut off an acute corner on two of them (you can use a cup or saucer).
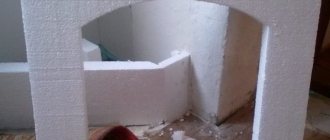
You can see in the photo the sequence of actions: first we glue the main parts (27*20) - the back and side parts. Then, at the same distance of 9 cm (the height of the box), we glue the shelves and the bottom. Then, having coated all the cuts with glue (see Photo), we lower the second side part of the product from above.
Then our task is to make a box. You need 2 of these boxes. Glue the 3 side walls and the bottom of the box.
After the box is assembled, all that remains is to glue the front part, glue the handle from two circles, and cover the handle with cardboard tape. If you are planning to finish this chest of drawers, duplicate all the internal corners with reinforcing masking tape. That's all. All that remains is to move on to finishing: painting, or sheathing, or pasting, and so on.
In the video - a blank for a chest of drawers from cereal boxes:
Blank for a chest of drawers.
In the video, how the craftswoman decorated the chest of drawers:
Decorating a chest of drawers for cosmetics
How to make a box for cosmetics
Any cosmetic department offers a sufficient selection of chests of drawers and organizers for cosmetics. However, high-quality ones are expensive, and cheap options are made of plastic, which is not durable or aesthetically pleasing. A self-made box is an ideal solution for storing all cosmetics and accessories.
The simplest base option for making a cosmetics box with your own hands is a shoe box.
If you don't have much cosmetics, a small sandal box will do. It is divided into compartments by cardboard dividers.
To create you will need the following materials:
- base box;
- cardboard, tube or small boxes;
- pencil, ruler;
- decorative paper for lining or napkins for decoupage;
- glue;
- braid, lace, beads and other decorative elements for decoration.
Before starting to make the organizer, collect all cosmetics, combs, brushes and makeup sponges. It is determined that it is necessary to place creams and decorative cosmetics in one box. Measure the size of the tube with eye shadow, lipstick, mascara and other small items. Determine the number of compartments required to accommodate cosmetics. Toning and skin care products are placed separately.
Once the number and size of the compartments have been decided, their location is determined and the length and width of the base are measured. Draw a simple diagram. For the bottom, take a larger box. The organizer can be single-tiered, filled with boxes of smaller widths and different heights, or multi-tiered with drawers and many side compartments.
The exact size of the sections depends on the packaging of the cosmetics placed
Sections for storing brushes, combs and mascara are made from toilet paper or towel rolls, cups or boxes that are smaller in size, but high enough and dense enough to prevent items from tipping over. The cardboard is pre-glued with decorative paper and attached to the base using a glue gun. This will be the highest level of the organizer.
If you can’t find small boxes, cut out partitions from thick cardboard and cover them with paper or napkins for decoupage. The joints of the end sides are decorated with braid or lace.
Ideas for chests of drawers made of cardboard
An amazingly beautiful chest of drawers is obtained if you decorate it with scrapbooking paper, fabric, or self-adhesive film.
In the video there is a chest of drawers made from milk cartons:
DIY – Organizador porta-trecos #parte 2 ✂️ Artesanato #27
A few more ideas on how to make an organizer for storing cosmetics
Organizer in the shape of a half-barrel with many sections and drawers
An interesting side detail made of bars allows you to open the drawers
Cube-shaped organizers with an opening top and multiple drawers accessible from different sides
The organizer for cosmetics is made in the form of a box with an opening top.
Bright drawers are framed by a calm box
The chest of drawers consists of drawers of varying heights and widths
The open part of the box is equipped with a magnetic strip on which hairpins and bobby pins are attached
Cardboard suitcase with slots serves as an excellent organizer for cosmetics
Jute thread decorates the product
The combination of polka dot stripes and a floral pattern gives the box a romantic feel.
Conveniently, the box is equipped with open sections and drawers
Lavender organizer made in Provence style