The advantages of modern computer chairs are difficult to overestimate - a comfortable design provides anatomically correct back support, reduces the load on the spine, and eliminates tension in the neck muscles. The only inconvenience is that any office chair is delivered disassembled, and it is not always possible to resort to the services of an assembler. In most cases, this is not necessary - understanding how to assemble a computer chair is quite simple and on your own. First, you will need to understand the principle of the design and the functionality of each element, and then study the instructions, which are always supplied with the furniture. The description of the assembly process and useful tips collected in the article will allow you to carry out all the manipulations without extra effort, while saving your family budget.
Design Features
A high-quality office chair is a complex design, in the development of which various specialists took part - engineers, doctors, designers. The main elements are as follows:
- Back and seat. Provide back support and seat comfort.
- Permanent contact. A component that connects the two previous elements and is responsible for changing the position of the backrest.
- Five-pointed cross. It is the base on which the entire load falls.
- Rollers. Elements at the bottom of the cross, responsible for the ability to easily move the chair without damaging the floor covering.
- Gas lift. A shock absorber that guarantees the elasticity of the structure and allows you to adjust the office chair in height.
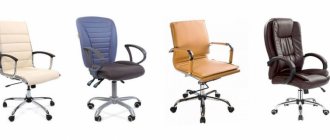
- Armrests. They significantly increase the comfort of the seated person, especially if they are supplemented with soft pads, but this element is variable, and not all models are equipped with it.
What unites all types of computer chairs is the ability to adjust the position of the seat and backrest.
Despite the external similarity of all office chairs, they differ in types and models. The adjustment mechanisms also have their differences, which are shown in the table.
| Spring-screw, or Freestyle (SVM) | It is characterized by an elastic spring under the seat, reliability and unpretentiousness. Able to change the position of the backrest and the degree of force when deflecting. The distance between the backrest and the seat can be adjusted. Used in budget models together with piastr. |
| Piastra | The directions of work are only up and down. Used in conjunction with front driving position. |
| Top gun | The mechanism allows you to swing, like a rocking chair. Provides deflection of monolithic seats in the range of 95-130°. Guarantees the stability of the chair even at the maximum angle of inclination. |
| Synchronizing mechanism | The device is reliable and very durable, with precise adjustment of the chair position. The set of functions includes tilting and fixing the backrest, height adjustment, and seating depth adjustment. Under the weight of a person, it automatically changes the angle of the seat. It is considered the most expensive mechanism. |
Contents of delivery
The equipment is what the office chair consists of. In this case, these are two components: a support part with height adjustment and roller wheels, as well as a seat with a backrest. For compact packaging and ease of transportation, they are disassembled into smaller parts. Each delivery kit is supplemented with instructions that detail how to assemble a computer chair.
Assembling the chair should begin by checking the availability of all components.
The standard set includes the following elements:
- roller supports or wheels - serve for the mobility of the chair;
- cross with overlays - the main supporting part;
- lifting mechanism with casing - responsible for the height of the seat;
- an adjusting element for connecting the backrest and seat;
- two armrests;
- back;
- hardware;
- hex wrench;
- seat.
If the contents of the package correspond to the list and have no defects, scratches, or abrasions, you can begin work; the assembly diagram will help with this. The procedure will not cause difficulties if you follow all the instructions exactly.
Assembly instructions
In order for the computer chair to serve for a long time without any breakdowns or extraneous squeaks, during the installation process you need to carry out all manipulations step by step, as prescribed in the assembly instructions. To independently perform all the work, a minimum set of tools and basic skills in handling them are sufficient.
Installing rollers into slots
The most convenient way to start assembling an office chair is by installing the wheel casters. It’s easy to place them in the slots of the cross:
- For convenience, it is better to place the star-shaped part on a horizontal surface, for example, on a table or floor, with the holes facing up.
- Then insert the roller rods into the sockets and press on each wheel until a characteristic click occurs - in this case, locking occurs. If you don't have enough hand strength, you can use a rubber hammer - this tool will make the task easier.
- When the fastening of all the roller supports is completed, all that remains is to place the cross on the floor, and then press on it with the whole body, which will help check the reliability of the wheels. This completes the assembly of the support part.
You need to hit the plastic wheels with a mallet very carefully so as not to accidentally damage them.
Turning the cross over
Insert the rollers into the slots
We check for strength
Seat preparation
The next step is to install the adjustment device on the seat. The piastra is attached to the bottom side, and the mechanism itself is attached to the back. They are bolted to the seat using a hex key. Fasteners should be tightened securely, taking into account long-term use of this furniture.
In order for the self-assembly of an office chair to be successful, before starting work you should check the completeness of the fasteners. All bolts should be equipped with flat washers and lock washers to prevent premature loosening.
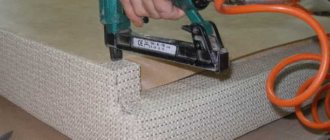
When installing armrests, it is important to determine the correct location (left, right), otherwise you can confuse the elements during installation. Having attached the armrests to the seats, they are fixed - each with three bolts. The backrest is screwed on with a large adjusting screw. There are models of computer chairs in which the armrests are mounted using brackets on the metal body of the seat.
Assembling the base
Installing the piastra
We fix the base
Tighten the bolts with a hexagon
Installing a gas lift into a crosspiece
Before installing the lifting mechanism, it is necessary to remove the protective caps from its ends - otherwise they will interfere with the normal operation of the shock absorber. After this, the lower part of the gas lift will need to be aligned with the hole located in the center of the cross. As a result, the base with the rollers will stand on the floor, and the working mechanism will be in a vertical position.
The telescopic plastic casing is designed for insurance; it protects the seated person from falling in the event of a lift failure. In addition, this element performs a decorative function, masking the shock absorber in a ready-made computer chair. Its body consists of several parts, which are more convenient to assemble by stringing directly onto the gas lift from above. When the supporting base is ready for attaching the seat, you can proceed to the final stage.
The crosspiece consists of five beams - this number provides the product with maximum stability, but at the same time good mobility, so it is strictly not recommended to stand on it or use it as a stepladder.
Removing the protective caps
We insert the gas lift into the cross
Installing the lifting mechanism
Putting on the cover
Connecting chair parts
You should be extremely careful when securing the assembled seat to the supporting base - brute force can damage the gas lift and completely disable it. The assembler's main task is to gently install this element onto the lifting mechanism. The procedure does not require special training or special knowledge:
- The shock absorber rod must be carefully fitted with a piastra, rigidly fixed under the seat.
- Next, press on it with force, or even better, sit down. At this moment, reliable adhesion of the parts will occur.
It is not recommended to assemble the product by any other means. After all the steps described above, the computer chair will be ready for use; all that remains is to check the quality of the work performed.
Place the seat on the shock absorber
Press to secure
Checking the build quality
Procedure
A standard office chair is not a complex mechanism, especially when it comes to wheels. Removing them will not be difficult, and you don’t even need any available tools. The thing is that they are simply inserted into specially made holes in the crosspiece and secured with a small click.
You can fasten them yourself, by hand. The main thing is to put in a little effort so that they do not break again during use.
It is most convenient to do this with a disassembled cross, then the top of the product will not interfere with a tight fit. But even with this approach, completely replacing all the rollers will take you no more than fifteen minutes. This suggests that there is no point in turning to someone for help; even a fragile woman can cope with this task. The advantage is that you don’t need a lot of knowledge to understand how to disassemble the wheels of an office chair.
Build quality control
You can check how well the chair works quite simply with the help of simple steps. The serviceability of the lifting mechanism is the first criterion that must be considered. When testing, you need to sit in a chair, press the piastres lever - under the influence of the person’s body weight, the seat will lower. When the desired level is reached, the pressure on the lever should be stopped. If you pull it up and stand up from the chair, the seat will return to its original position.
Silent and trouble-free operation of the lift is the second criterion that will indicate a successful assembly. For greater comfort, you can adjust the position of the backrest and start using it without doubting the strength of the finished product. Correct adjustment of a computer chair is very important, because comfort when working at a desk affects the activity levels of employees, and an uncomfortable backrest position causes fatigue in the spinal region.
There are times when office furniture needs to be dismantled. A user who has personally carried out the process of assembling the structure will easily figure out how to disassemble the chair. It is important to remember that after long-term use of computer chairs, the parts in them can become compressed - it is better to do the work using a power tool. It may also be necessary to use physical effort, so it would be a good idea to pre-treat the fasteners and joints with technical oil.
If something goes wrong when assembling a computer chair, it is better to use the services of professionals - they will not only quickly and efficiently complete all the work, but will also provide a guarantee for it.
Checking the swing mechanism
Adjusting the lifting mechanism
Product disassembly stages
If an office chair breaks, the first thing you need to do is disassemble the structure. To do this, you will need a rubber hammer, slotted and Phillips screwdrivers, and a ring drift. All actions are carried out in stages:
- First of all, remove the seat, turn the chair over, and remove the fasteners.
- Unscrew the bolts that secure the armrests and remove these parts along with the plates.
- Disconnect the fasteners holding the permanent contact.
- The crosspiece is separated from the pneumatic chuck by gently tapping the connection with a hammer.
- The wheels are removed from the mounting sockets, and the plugs located in the steel case are removed. The procedure is performed using a slotted screwdriver.
Ergonomic Ikea rocking chairs, pros and cons of popular models
It is recommended to carry out all manipulations with the mechanisms while holding the structure suspended so as not to break the fragile plastic parts. For the same reason, you should not use physical force when unscrewing fasteners. After completing the dismantling of the computer chair, you need to collect all the parts in one place so as not to lose anything.