Before installing blinds on plastic windows, you need, first of all, to acquire a minimum set of necessary tools, and also familiarize yourself with information about how to install them. Blinds help regulate the flow of bright sunlight into the room, as well as protect from prying eyes from the street. But at the same time, they do not interfere with the passage of fresh air through an open window and are very easy to use.
Methods for attaching this type of curtains depend on their design, as well as on the condition of the surface to which they will be attached. They can be installed even without drilling, using double-sided tape or other special fasteners.
Question:
What are blinds?
Answer:
Blinds are one of the types of window curtains, which is a structure made of plates (slats), a special cornice, as well as a mechanism by which control is carried out.
Variety of species
Horizontal
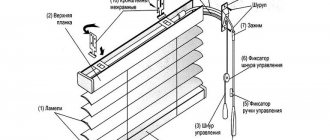
Horizontal blinds (Venetian shutters) are a canvas made of thin plates arranged horizontally. They are built into a rotating system of a special drum and a system of cords that sets them in motion. With their help, it is convenient to regulate the level of natural light in the room, so they are appropriate to use on windows in the bedroom, kitchen or bathroom.
The photo shows horizontal blinds in a home interior; they add special charm and comfort to the design of the room.
Horizontal blinds, in addition to standard models, are:
- Cassette curtains - this type of curtains has a system in which the lamellas, rising upward, are hidden in a special box - a cassette. They are compact and take up very little space, so they allow you to make maximum use of the window sill surface.
- Inter-frame horizontal blinds are installed between window frames and can only be mounted inside windows that have two independently opening frames, with at least 40 mm between the panes. Therefore, they are installed between wooden window frames, and it is technically impossible to install them inside a sealed double-glazed window.
Inter-frame blinds are controlled using a rope, which is pulled out through pre-drilled holes, which are then covered with a decorative plug
Vertical
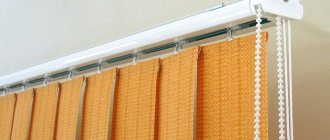
Vertical blinds consist of a cornice and vertical slats attached to it using holders in the upper part, and connected with a chain in the lower part. They slide apart in both directions thanks to a rotary-sliding mechanism and a cord. More often they are made of fabric impregnated with special compounds, but there are also models made of aluminum or plastic.
Based on the width of the lamellas, they are divided into narrow - 89 mm (American standard) and wide - 127 mm (European standard).
This type of blinds helps to visually expand a narrow room, but for small rooms it is better not to use them, as they take up a lot of space, because they are mounted above the window opening or even on the ceiling
Rolled
Roller blinds are a solid canvas that, when closed, rolls up onto a special shaft in the form of a roll. They can be mounted either on the ceiling or wall, or on the vertical part of the window opening.
Roller blinds are designed to completely cover the entire window or its individual sashes, so if you need to change the degree of shading during the day, then this option of curtains will not be entirely convenient
Types of blinds
Blinds perform the same function as curtains - they protect the room and furniture from direct rays of sunlight, and, in addition, from curious prying eyes. But blinds have their undeniable advantages.
- Firstly, they do not block the flow of fresh air into the room.
- And secondly, with the help of blinds you can regulate the lighting in the room. You can make it twilight, you can make it completely dark, or vice versa - fill the room with sunlight.
Blinds correspond to the modern style of minimalism and rationality, maximizing the free space of the room. They do not take up much space and are easy to maintain.
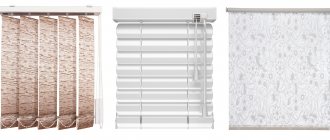
Modern manufacturers offer us blinds that differ not only in appearance (vertical, horizontal, cassette - for use outside the window), but also in material. They can be plastic, metal, wood, bamboo, fabric, etc. There are roller blinds, roller photo blinds, protective roller blinds and much more.
Note!
Standard vertical blinds are quite often used not only in office spaces, but also at home, and not necessarily on windows. A wide range of colors and a variety of shapes allows these structures to be used in the most unexpected design solutions. The design of vertical blinds consists of a cornice, runners, slats and a chain
The slats must be selected in accordance with the shape and size of the window. When installing vertical blinds, you first need to decide on the type of mounting - on the wall or on the ceiling
The design of vertical blinds consists of a cornice, runners, slats and a chain. The slats must be selected in accordance with the shape and size of the window. When installing vertical blinds, you first need to decide on the type of mounting - on the wall or on the ceiling.
Next we make markings and install the brackets. After this we install the cornice, runners and slats
When installing the latter, it is important to hang them in the exact order in which they were in the package
Helpful advice!
A special feature of installing vertical blinds is the installation of additional weights at the bottom. They are connected to each other by a chain from inside and outside the structure.
Horizontal blinds, just like vertical ones, are quite popular both in office spaces and at home. When installing them, several more fastening components are used. They are usually attached to the wall (completely covering the window opening) or to the window (installation occurs on each window sash).
If we decide to do this on our own, the main thing is not to damage the window and blinds, and strictly follow the instructions. The installation process is standard - markings are made, fasteners are installed, the cornice and slats are hung.
Everything new is well forgotten old. Our ancestors used wooden shutters in their homes as the most reliable way to protect from the sun's rays. In addition, they were an original decoration for every home. So today we are back to this.
Blinds are modern shutters, highly improved and modified, made from various materials. But essentially they haven’t changed anything. Firstly - protection, secondly - a harmonious element of the interior.
Material of manufacture
The choice of blinds is not limited only to the functionality of the design, but also to the material from which they are made.
Aluminum
– lightweight material, not susceptible to temperature changes. Curtains made from it can be placed in rooms with high humidity and dust, but they have a small drawback - noise in the event of a draft. To clean them, you can use a sponge dipped in soapy water or even a vacuum cleaner.
For the manufacture of lamellas, a tape is used from a special bend- and fracture-resistant aluminum alloy with a heat-resistant color coating of acrylic.
Aluminum can be easily painted in different colors, so blinds made from this very practical material can become a bright highlight in a house or apartment.
Textile
(cotton, polyester or mixed fabric), after pre-treatment with special compounds, is used for the manufacture of vertical or roller blinds. Depending on the density of the fabric, they can be 100% light-proof and also create light shading, which is why they are best placed in the bedroom, nursery or living room.
Textile blinds can be cleaned dry or wet, but it is still not advisable to hang them in rooms with high levels of humidity and pollution
Tree
does not tolerate high humidity, and it is also not advisable to install products made from it next to a radiator, stove or fireplace, as they may become deformed. Wooden structures are made from very thin plates, which undergo preliminary preparation, including lamination.
Thanks to their color scheme, wooden blinds will bring nobility and sophistication to the interior; they should be placed in offices, dining rooms or living rooms
Plastic
used for the manufacture of blinds for industrial premises, as it is resistant to most acids and solvents, mineral oils and alkalis. Such products do not absorb odors, they are easy to care for and do not fade in the sun.
Products made from thermoplastic polymer vinyl chloride - plastic, do not accumulate dust and dirt, they are resistant to deformation, as well as temperature changes, therefore blinds made from it always retain their original shape
What calculations will need to be made?
Before purchasing blinds, you will need to find out the size of the window. Many stores offer ready-made models, but they are not always the right size for your space. As a result, the canvas may turn out to be too large or, conversely, will not completely cover the window opening, which will not only look unattractive, but also will not solve the problem with excess sunlight. Most of the products are made to order according to the dimensions specified by the customer.
If you are going to attach the blinds not to the window opening, then the canvas should be 5 cm wider than the window as a whole. The same applies to the height, it should exceed the window opening by 10 cm; you can do more, depending on what visual effect you want to get.
To prevent the window handle from clinging to the blinds, you can use brackets and move them away from the frame.
Mounting options
Before choosing a method for attaching blinds to a window, you must first of all pay attention to the condition of the walls and the design of the window opening, as well as the type of curtains themselves, because each has its own characteristics in fastening.
Main types of fastening:
- Inside the window opening;
- Overlay;
- Separately for each sash;
- To the ceiling;
- On the wall.
Installing blinds on plastic windows is quite simple, and you can do it yourself without resorting to the services of a specialist. They come with instructions that describe the recommended installation process for this type of curtain. The main thing is to think about whether it will be convenient to open the window for ventilation, and whether constant access to the window sill is needed.
You need to use the blind mount that matches the material of the walls, ceiling and window profile.
Installation using self-tapping screws is considered the most common, simple and reliable.
Installation of horizontal blinds on PVC window sashes
With this installation method, the blinds are attached with small self-tapping screws (included in the kit) to the window profile. They must be installed so that they do not interfere with the handle turning. Be careful: if you drill too close to the bead, you can damage the glass unit. Therefore, in this case, correct measurements are very important.
Installation of blinds on a PVC window
Installation step by step
The procedure is as follows:
- We install the fasteners on the cornice so that they do not interfere with the moving parts inside.
- Let's try the product on the frame. We set it so that the slats overlap the drain frame and the right at the same distance.
- Mark with a pencil or marker the place where the fasteners should be located. During this operation, you need to keep the cornice as level as possible. You can follow the contours of the window frame or use a level.
- Although the plastic is quite soft and you can immediately screw self-tapping screws into it to prevent the frame from cracking, it is better to pre-drill the holes. The diameter of the drill is slightly smaller than the diameter of the screws. Usually the kit comes with self-tapping screws with a diameter of 3 mm, so you need to take a 2 mm or 2.5 mm drill.
- We take the brackets and fasten them to the frame with self-tapping screws.
- Insert the blind rod, pressing until it clicks.
- We close the ends with the plugs that come with the kit.
Having to drill holes in a window frame can be intimidating, but it's no big deal. In case of incorrectly made holes, the unsuccessful ones can be filled with sealant. White silicone, not acrylic (acrylic quickly turns yellow). The performance of the windows will not be affected. What can be dangerous is getting into a double glazed window. Then it may crack. But this is not fatal either - it can be replaced, although it will not be cheap.
We install the lower clamps
But that is not all. To finally install horizontal blinds on plastic windows, you need to drill a couple more holes - for the clamps (also called anti-wind). These are additional fastenings at the bottom of the opening window sash. The lower edge of the blinds is tucked into them. They do this so that when ventilating, the blinds do not hang down, dangle in the wind, or knock over objects on the windowsill.
Don't hang out...
We install the clamps like this: we try them on, pulling the blinds down a little, mark the fastening points, drill holes, and install them. We tuck the bottom bar into the installed clamps. Now, even with a draft or an open shutter, the blinds will not dangle. The only thing you need to watch out for during installation is not to get caught in the glazing bead (this is a long strip that runs along the glass unit and holds it in place). It is necessary to drill a hole in the frame itself, stepping back at least 1 cm from the edge. Otherwise there are no problems.
No drilling
There is also a way to install blinds on plastic windows without drilling the frame. This method is only available for those blinds that are hung on opening sashes. In this case, they are simply hung on plastic mounts/brackets, which are placed on the frame from above. To prevent them from moving, a strip of double-sided tape is attached to the back of the bracket. After removing the protective film, you can glue it (but you don’t have to fix it).
The shape of the plastic fasteners depends on the type of cornice. So you need to select it specifically for each
These L-shaped plastic brackets are not included, but can be purchased at a store or company that sells horizontal blinds. This method is convenient by simply dismantling the blinds, which is convenient if they need to be repaired or washed.
Installation on plastic windows
Preliminary preparation: measurements and markings
Blinds have a clear geometric shape, so you need to carefully prepare and take the necessary measurements to avoid unnecessary holes and asymmetry. Proper placement of the structure depends on the dimensions of the window opening, as well as on the distance between the fasteners. To install it, it is enough to have a screwdriver or screwdriver, a pencil, a tape measure and a level. The height is measured from the mounting location and, of course, an allowance must be made depending on the type of installation.
- Inside the window opening - you need to subtract 4 cm from the width of the window opening, and 2 cm from the height, this is so that there is a gap between the curtains and the window so that it opens freely when the blinds are raised.
- Outside the window opening (if the window is located in a recess in the wall) - add 10 cm to the width and height of the blinds.
- Outside the window opening (the window is on the same plane as the wall) - you need to add 20 cm to the width of the curtains, this will better darken the room, and their height should be no less than the height of the window.
- On window sashes, add 3 cm to the width of the blinds so that they do not interfere with the rotation of the window handle.
Proper preparation is the key to comfortable use of this type of curtains, because they must completely cover the glass, slightly extending beyond the frame and not scratch the window sill
Before installing the blinds on the window, you need to make markings and mark the attachment points using a marker and draw a straight line with a pencil along the level. Correct markings must be carried out with extreme precision, because the slightest distortion will ruin the appearance of the window. The main thing is to maintain the optimal distance between the fasteners - symmetrically on all sides.
Experts recommend installing an additional fastener on the side on which the adjusting cord is attached, because that side will bear the heaviest load. After marking, you can install the cornice, to which the slats and runners themselves will be mounted in the future.
Taking measurements yourself
Expert opinion
Mikhailova Maria Vasilievna
Furniture store manager. Knows everything about comfort and interior design
Taking measurements so that the installation of blinds on a plastic window is successful is not particularly difficult, but it has some features that should not be missed.
If the choice is made on vertical blinds, then special attention should be paid to the width of the product. Unfortunately, adding an extra plate will be much more difficult than, say, shortening it. As a result, after adding at least one plate, you will have to redo the entire product.
If you decide to hang horizontal curtains, then there are several options for both fastenings and measurements.
To attach blinds inside a window, you need to know the width and height of the product. Of course, the height can be subsequently adjusted using the built-in mechanism, but it is better to calculate it as accurately as possible so that the excess does not “little” on the window sash as an unnecessary burden.
Width is a measurement that requires special attention, because depending on the accuracy of its removal, the window will be completely closed or sunlight and unnecessary noise will break through the left cracks.
If the window opens, then measurements must be made in the following way. Take accurate measurements of the height and width of the glass itself, and then add 2 cm on top and 0.5 cm on the sides. It is necessary to take into account the presence of window fittings, which should not interfere with the operation of the blinds.
Using the same principle, measurements are taken for roller blinds.
Of course, you can take measurements, calculate the number of strips, make or purchase materials of the required sizes yourself.
But is it necessary to put in so much effort and time? Buy brackets, adhesive tape, glazing beads and much more? It is much easier to come to the company with your own sizes and choose the product you are interested in.
Possible options for installing cornices
The cornice is the basis of any blinds and there are several basic ways to install it. When purchasing curtains, the kit always includes installation instructions, which indicate recommended mounting methods.
Installation of cornice without drilling
The advantage of this method is that there are no visible holes in the profile, and the blinds can be easily removed without leaving traces of them on the window.
Installation is carried out using special brackets, which are attached to the frame of the plastic window, and the load-bearing part of the blinds is already mounted on them. The brackets are attached to the window sash using double-sided tape or by hooking onto the upper part of the profile.
Installing a cornice on a window profile using self-tapping screws
To do this, you need to determine and mark the location of the top bar of the blinds - this will help to avoid displacement of the load-bearing part and the formation of cracks in the profile. Only after this make holes for the screws, and then, and then attach the curtains and screw them with screws.
Installation of a curtain rod with mounting to a wall or ceiling
It is necessary to drill holes 3-4 cm deep in the marked places and insert dowels into them corresponding to the wall material. After that, attach the brackets using screws and insert the curtain rod into the bracket locks until it clicks (or screw it in).
If the blinds will be attached to the ceiling, the vertical distance from the window can be any, and if to the wall, then this distance is limited by the length of the standard bracket - 15 cm
Adjusting the size of blinds
Standard blinds do not always fit window openings in size, and custom-made products are much more expensive than ready-made ones. In order to save money, horizontal blinds can be cut on the sides yourself, and vertical ones can be shortened.
Cutting horizontal blinds to width and height
If horizontal blinds do not match the width or height of the opening, their size can be changed. This process is labor-intensive and requires special tools.
Since designs from different manufacturers have different sizes, sometimes it is necessary to adjust the product to a specific window. To do this, the main thing is to make the correct calculations and all manipulations must be carried out very carefully so as not to spoil the product itself.
In order to change the width of the blinds, you need to cut the slats and cornice themselves, on one or both sides at once. It is better to shorten on the side on which the control mechanism is located.
Step by step trimming process:
- Remove the plugs and protective cover from the cornice, and move the control mechanism and cord system to the pin;
- Place a mark on one of the slats and, folding all the slats into one multi-layer strip, clamp them with clamps or an elastic band;
- Using a hacksaw with fine teeth, saw off the excess along the mark - cornice, lamellas and rail;
- Finish the edges with a file or sandpaper;
- Reassemble the structure in reverse order.
In order to change the height of horizontal blinds you need:
- Open the blinds completely and make a mark at the desired height;
- Open the bottom bar and untie the knots on the restrictive cords, then remove the clamps;
- Remove excess trims and trim the lace;
- Reassemble the structure in reverse order.
Cutting vertical blinds to height and width
In order to adjust the width of the vertical structure, you must first cut the cornice, but adhering to the basic rule - the cornice should be slightly larger than the window opening.
Step-by-step process for cutting vertical blinds:
- In order to trim the cornice, you need to measure the required length with a tape measure and make a mark on the side on which the lifting mechanism is located;
- Since there is an aluminum rod and cord inside the cornice, you need to remove the side cover from the cornice using a screwdriver and move the cord to the side so that it does not interfere;
- Using a hacksaw, grinder or special file, first make a small cut so as not to damage the lace, and then cut the cornice according to the mark;
- Remove excess hooks from the cornice, unfastening them from each other if you need to cut the top with wire cutters;
- Shorten the cord by first unscrewing the plug that secures it and removing the end from the cord. After cutting, the plug must be put in place;
- To cut the chain - to do this, you need to unfasten the special plastic clasp connecting its edges, take out the outermost ball and cut off the required length, and then fasten the clasp again.
When cutting vertical blinds to width, it is important not to damage the cord during the process of shortening the cornice.
In order to make the slats of vertical blinds shorter you need:
- Remove all the plates from the hooks and pull out the bar with the hook eye from each one.
- Place all the plates together, perfectly straight, and secure them with an elastic band.
- Measure the desired size and make a mark, adding 3-4 cm for the hem.
- Cut the slats using scissors.
- The edge of each strip must be treated with fire so that the fabric does not fray.
- Fold each lamella and make a hole in each for fastening.
- Insert the strip into each lamella and secure the ends with glue.
It is very important to make marks with a pencil so that each lamella is the same size, because an error of a few millimeters will create a sloppy effect.
Cutting roller blinds to width and height
To cut a roller blind to width you need:
- Unwind the roller blind and pull out the control mechanism along with the fabric weight.
- Make a mark at the desired height and carefully cut the fabric with scissors.
- The length of the curtain drum should be 1 cm longer, so it needs to be cut with a margin.
- Cut the weighting material exactly to the size of the fabric.
- Assemble the structure.
Photo instructions for correct cutting of roller blinds to width
It is very easy to change the length of a roller blind; to do this, you just need to remove the bottom curtain rod and cut off the excess, then trim the edges of the curtain and insert the weighting material into place.
Features of fastening curtains depending on the type
All types of blinds have a similar design, which includes slats, latches, brackets, holders (lower cornice) and a mechanism for controlling the product. But at the same time, each type of these curtains has its own installation characteristics.
Installation of vertical blinds
Vertical models are supplied with all the necessary elements for fastening, as well as instructions for their installation. First of all, you need to decide on the place of attachment of this type of curtains - on the wall, ceiling or upper window slope, as well as carry out the correct preparation and marking - this process is described above.
Installation process for vertical blinds:
- Make markings for installing the cornice.
- Drill holes in the wall and secure the brackets.
- Snap the curtain rod into the brackets.
- Insert the slats into the cornice - to do this, you need to insert each plate into the corresponding latch until it clicks.
- Unfold the lamella runners perpendicular to the cornice.
- Insert the slats into the runners.
- Attach the weights to the bottom of the slats and connect the weights with a chain.
To attach vertical blinds with a width of more than 1.6 m to the ceiling, you need to install 3 fastening brackets, instead of 2. To do this, you need to place an additional fastening point at a distance of 10 cm from the control cord.
With the help of vertical curtains you can transform the interior, making it elegant
Installation of horizontal models
Horizontal blinds can be attached to the wall, in the window opening, or on each sash separately.
Installation of horizontal models
- Fix the brackets (fasteners) on the top panel of the blinds.
- Attach the curtains to the window and make markings for the top fastening.
- Secure the brackets with self-tapping screws and insert the curtain rod until it clicks.
- Unfold the secured fabric downwards and mark the points where the lower bar will be attached and install it according to the same principle as the top one.
- Attach the adjusting strips.
When installing this type of curtains, it is important to attach the brackets symmetrically to each other, as well as to the window opening
Installation of horizontal cassette blinds
A special feature of the installation of horizontal cassette models is that its box with the mechanism must be mounted on the window frame. Installation of this type of curtains is very simple:
- Attach the top strip with the canvas using screws.
- Side guides on an adhesive base, glue to the window sash in a vertical position.
- Unfold the canvas and adjust the boundaries of the upper and lower positions of the canvas.
- Install all accessories.
With the help of this photo instruction you can learn the basic principle of how blinds are attached. Cassette curtains are easy to install yourself and you don’t have to contact an installer
Installation of roller blinds
Roller blinds have the same mechanism as horizontal ones, which is why they are installed in almost the same way. It is more convenient to mount them directly on the window sash, so it will be more convenient to open the window for ventilation. To attach this type of curtain, you need to use special brackets so that the window handle does not protrude from under the curtain.
The photo shows the mechanism for installing open-type roller blinds without drilling
How to install inter-frame blinds
To install interframe blinds you need:
- Unscrew the window frame and attach them to the inner sash of the window to check that the sizes of the slats match the size of the glass - ideally, these slats should be a little wider.
- Make markings for the holes for the cord and control handle.
- Using a drill, make two vertical holes in the window frame - top and bottom.
- Secure the brackets.
- Route the cord and flexible lead out through the holes.
- Secure the blinds using inter-frame brackets.
- Connect the control stick to the flexible rod using a clamp.
- Close the frame.
Inter-frame blinds require special installation skills, so if they are not available, it is better to contact specialists
Dimensions and measurements of blinds
To determine the size of the blinds and the features of their design, you should take measurements of the window.
Armed with a tape measure and step-by-step instructions, it’s not difficult to do this yourself, without the help of professionals. Since such structures are produced in several types, the measurements for them differ. Therefore, before taking up a tape measure, you should decide on the type of product.
Measurements for horizontal blinds
Such products can be attached in three ways.
On the wall.
- The width of the blinds that will be attached to the wall should be ten centimeters greater than the width of the window.
- The height of the products is determined independently. They can cover the window sill completely or be slightly higher.
- It should be taken into account that the structure will be fixed to the wall, so its length should be five centimeters longer than desired.
In the doorway.
- Measurements are taken at least at three points in width and height. Then the smallest value from the three digits is selected. This should be done because window openings are often not entirely rectangular.
- The length of the product is equal to the height of the glass with sealing rubber bands and a margin of one centimeter.
- The width of the glass plus the rubber seals is the width of the blinds.
- The length of the chain should be equal to 2/3 of the length of the window.
- It is necessary to ensure that the structure does not interfere with the opening of the window.
On the sash.
- When it is intended to install blinds on a sash, the height of the product should be equal to the length of the window sash.
- The distance from one bead on which it is planned to fasten the structure to the other is measured, thirty millimeters are added and the width of the product is obtained.
- If you want to install some additional fasteners, you cannot do without the help of a specialist when measuring the window.
Measurements for vertical blinds
Such designs have become very popular in recent years. This is due to the variety of colors and textures of products, as well as ease of installation.
There are three ways to attach vertical blinds:
- to the ceiling;
- on the wall;
- into the opening.
When attaching the product to the ceiling, its width should be equal to the width of the window opening, plus at least ten centimeters. The height will be equal to the distance from the ceiling to the window sill plus two centimeters.
When choosing to install the blinds to the wall, the length of the product should be five centimeters greater than the height of the window opening. The width of the window opening plus ten centimeters will be equal to the width of the blinds.
For a structure that will be attached to a window opening, the length of the product will be equal to the height of the window opening minus one centimeter. The width of the structure will be equal to the width of the top of the window minus one centimeter.
Roller blind sizes
The products can be hung either on the wall or in the window opening.
The width of roller blinds that will be mounted on the wall can be arbitrary. In this case, it all depends on the personal preferences of the apartment owner. And in order to find out the required length, just measure the distance from the window sill to the window opening and add five centimeters to the result.
The width of the curtain that will be attached to the window opening should be equal to the width of the opening minus four centimeters. The length of the canvas is equal to the height of the window opening to the window sill.
Having measured the windows and decided on the size of the blinds, you will need to choose the type of construction mechanism and its location (right or left).