The nuances of restoring an old door with your own hands. Ideas and methods, photos.
A person associates his home with a place of rest. Therefore, she tries to create comfort, choose an interior and a pleasant color scheme in order to fully realize this.
On the other hand, everything in our world tends to become outdated and destroyed. Our homes and their interior decoration are no exception.
By renewing anything around us, we awaken creative energies within ourselves and feel like creators.
Although most types of interior work require special deep knowledge and skills to perform them, we are quite capable of updating interior doors on our own.
Let's talk about the features and methods of reconstructing old doors in more detail.
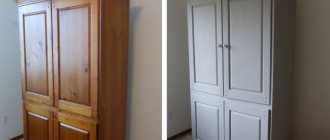
How to make a new one from an old door with your own hands: options, photos, tips
photo of an old door before and after restoration using decoupage technique
It is important to prepare it before updating the old door:
- remove the doors from their hinges and place them on a flat horizontal surface
- fold all accessories separately or prepare them for disposal if they become unusable
- if there are glass elements, carefully remove the glazing beads and then remove breakable parts
- if the door has been painted, turn on a hair dryer and gradually warm up its surface
- equip yourself with a piece of coarse sandpaper and remove the bubbles of old paint
- replace the paper with another one with a finer abrasive and go over the entire surface of the door again
- carry out final sanding with sandpaper with minimal abrasiveness
- treat the door surface with a special putty for wooden products
- After complete drying, clean the doors in 3 steps with sandpaper of different abrasiveness.
- fix the result with drying oil or stain
- then carry out those types of work that are necessary to update the appearance of the door
- if there were glass elements in it, put them first and then new beads in a fresh color/design
As examples, look at the options for updated doors in the photo.
embodied ideas for decoration and restoration of an old interior door, example 1
embodied ideas for decor and restoration of an old interior door, example 2 embodied ideas for decor and restoration of an old interior door, example 3
embodied ideas for decor and restoration of an old interior door, example 4
embodied ideas for decor and restoration of an old interior door, example 5 embodied ideas for decor and restoration of an old interior door, example 6
embodied ideas for decor and restoration of an old interior door, example 7
embodied ideas for decor and restoration of an old interior door, example 8
embodied ideas for decor and restoration of an old interior door, example 9
embodied ideas for decor and restoration of an old interior door, example 10
embodied ideas for decor and restoration of an old interior door, example 11
embodied ideas for decor and restoration of an old interior door, example 12
embodied ideas for decor and restoration of an old interior door, example 13
embodied ideas for decor and restoration of an old interior door, example 14
embodied ideas for decor and restoration of an old interior door, example 15
embodied ideas for decor and restoration of an old interior door, example 16 embodied ideas for decoration and restoration of an old interior door, example 17
embodied ideas for decor and restoration of an old interior door, example 18
embodied ideas for decor and restoration of an old interior door, example 19
embodied ideas for decor and restoration of an old interior door, example 20
embodied ideas for decoration and restoration of an old interior door, example 21
embodied ideas for decor and restoration of an old interior door, example 22
embodied ideas for decor and restoration of an old interior door, example 23
embodied ideas for decor and restoration of an old interior door, example 24
embodied ideas for decor and restoration of an old interior door, example 25
embodied ideas for decoration and restoration of an old interior door, example 26
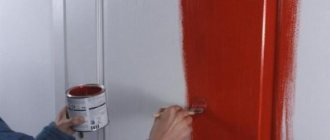
Painting and decor
Before painting, degrease the door leaf and remove any dirt. Paint in two stages - applying a base layer of white paint, and then tinting.
Adviсe:
- Apply paint with a spray gun or brush, moving along the fibers. You can apply another layer without allowing smudges to appear.
- For tinting, it is better to use glossy or matte paint. Choose the color yourself. Painting is done in the same way. But don’t get carried away and create a thick coating (it will be difficult to remove during the next repair).
After the layers have completely dried, apply a glossy varnish. Protect glass and fittings with masking tape. To add sophistication to the door leaf, just use your imagination. Drawings and patterns should be in harmony with the interior of the room. Decorations can be applied:
- brush;
- PVC film;
- stickers;
- paper;
- unusual skirting boards.
We offer you to watch a video on how to properly paint a door:
Overlay facades
Interior doors cannot always be restored. In this case, you can change the facade. Decorative elements are made from different materials, but craftsmen advise choosing MDF overlays. Advantages:
- moisture resistance;
- long service life;
- do not lose their shape;
- a light weight;
- attractiveness, accessibility.
They are fixed to the panel with self-tapping screws or PVA glue. Decorative facades decorate the interior and give them solidity. Look great regardless of the material.
Stencil drawings
Stencils are a popular method that effectively transforms any old door. Templates can be purchased or created by yourself. Stencil drawing is performed according to the following instructions:
- Surface preparation.
- Clean the cloth from dirt and stains.
- Remove grease with soapy water and dry thoroughly.
- Coating with paints and varnishes.
- Apply varnish or paint of the required shade.
- Wait until it dries.
- Decoration.
- Attach the template to the prepared surface and secure it.
- Paint over the free areas inside the stencil.
- Upon completion of work, remove the template and wait until the paint dries.
Additionally, you can make the contours in a different color. The drawing will look more voluminous and interesting. Paint over the voids only with a small brush so that the work is much neater and more beautiful.
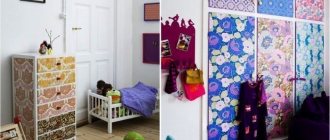
Wallpapering
Refers to more attractive, inexpensive methods. The method can be performed every month or year. The instructions are as follows:
- Primer. Apply the mixture in one layer. Wait until completely dry.
- Preparing wallpaper. They can be glued in a solid piece or individual patterns can be cut out to create a unique design - it depends on the imagination and wishes of the owner.
- Sticking. Here you need to prepare an adhesive solution for wallpaper. Apply it to the panel and firmly fix the wallpaper.
Attention
Removing air bubbles is mandatory, especially when gluing a solid piece of wallpaper. If you allow air bubbles to get into the space between the door surface and the wallpaper, the piece will eventually fall off or look unattractive.
Photo wallpapers are also popular. Their price is higher than standard rolls, but photo prints have a significant advantage - the beauty of the design. There are many variations:
- flowers;
- nature;
- animals;
- birds;
- landscapes.
They highlight the sophisticated design.
We offer you to watch a video on how to wallpaper a door:
Updating the canvas at home
You can update the door by radically changing its appearance. For example, you can increase the number of glasses or change their location. The process is labor-intensive and will require effort and patience. Stages:
- Surface preparation. Remove paint with fine-grit sandpaper. Proceed carefully.
- Remove the glass. Cover the holes with plywood. Make slits in the desired areas of the fabric.
- Prime and putty areas with flaws. Wait until it dries. Then apply a thin layer of varnish or paint to hide the presence of plywood.
- Install glass in new openings. If necessary, cut the elements to the required dimensions. Secure the glass with glazing beads. Instead of glass pieces, you can use decorated panels.
It is recommended to perform additional decorative fittings:
- It is enough to sand the element and apply primer enamel. It will emphasize the beauty of the ornament.
- Wait until it dries and attach the handle back.
Another interesting way to update the panel is to use fabrics. This is a very original, extravagant and young idea. Fabric can be replaced:
- posters;
- cards;
- photographs;
- notes;
- other fantasy elements.
The material must be glued to the panel with construction glue.
How and with what you can update the color of old wooden doors: ideas
a girl paints an old wooden interior door with white paint.
After you have completed work on restoring the surface of the old interior door, choose a new color for it.
Among the ways that can help you in this moment, we note:
- Painting with stain, paint or opening the wooden surface of the door with varnish. Remember, for the best result, brush along the fibers, then all the cracks will be filled with dye.
- Accents on moldings, or painting protruding door parts with contrasting or similar colors. If such elements are missing, glue them from wooden or polyurethane slats and paint them.
- Artistic painting, coloring using stencils. The method is suitable for creative owners who want to bring originality to their interior.
- Pasting wallpaper, large drawings on paper, pieces of fabric. Decoupage. In this case, follow all the requirements for fixing the material on the surface of the door - soak it with water, glue, and treat it with a stream of hot air on top.
- Stained glass painting on glass. If you are good at drawing or have some interesting stencils, buy special stained glass paints and decorate the glass elements of your old door.
- Pasting vinyl stickers. Note that this method saves you time preparing the old door. In other words, you can not even remove it from the hinges, but immediately glue the vinyl elements.
The art of traditional decoration
Many decorative elements of past centuries are being revived in modern interior design projects.
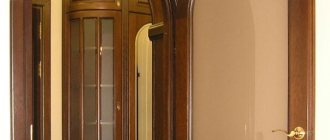
Carved platbands of Old Russian architecture
We all remember the front windows and doors of old Russian log houses, which were framed with carved platbands. The carved element has always been, and will continue to be, considered an architectural tradition in ancient Rus'. Carving decorations are coming into fashion with renewed vigor, both as decoration for the facades of new private houses, and as individual elements in interior design.
So, well known to many, are the door strips, which are used as an important finishing touch in the door structure. The detail is not very noticeable, but in its complete absence, the gap between the swing door wings clearly hurts the eye. The plank extends beyond the adjacent second half of the swing structure or onto it.
The rebate strips also mask the gaps in the rebate of the canvas when closing along the perimeter. This way drafts and the noise of the other world are completely blocked.
And in sliding door systems, rebates solve the most important problem of standard systems - there is an ideal pairing of the moving part of the door with a stationary wall, for example, a cabinet or door slope.
For those who are not familiar with the discussed name of the part in question, we note that the recessed strips in everyday life can be called an overhang or a flashing.
Carved platbands on modern buildings
When considering two well-known components in the form of platbands and false strips, it is worth drawing a conclusion. Both parts in their modern form of use are structural elements, the purpose of which is to cover gaps and cracks between openings, door panels, walls, and other things in order to prevent precipitation, dust, drafts, noise, and other things from entering the residential microclimate. At the same time, the decorative load on the porches and platbands is minimal.
But in ancient Rus', the level of prosperity of the owners of the house could be determined by the external platbands. In addition, in different villages, even very close ones, the shapes and patterns of the carvings of the plaques were noticeably different. The art of wood carving has reached our modern times in the form of symbols of the nationality of architecture.
So that's why we told all this. And besides, the platbands, like the trim strips, can perfectly serve as a decorative decoration when the question arises of how to update the doors with your own hands.
Modern decoration with openwork trims
If doors that you had previously created with your own hands fell into disrepair or acquired an unaesthetic appearance, then decorating them consisted, at most, of covering them with wallpaper. A little later, decorative self-adhesive film imitating the surface of various types of wood appeared in construction pavilions for consumer demand. In the primitive version, the old door could simply be painted, which updated its appearance for the next few years.
Related article: French cross stitch patterns: knot with video, designs on how to do, books with bulldogs, France theme and poster
So, if you are the happy owner of an old solid wood door, then we congratulate you. After all, today, purchasing real wooden doors, firstly, is beyond the means of the average consumer. And secondly, they no longer make door structures that are not only environmentally friendly, but will also last for decades.
The right approach to updating the canvas using platbands or trim strips will make old interior doors the main accent in the decor.
How and with what can you update varnished doors?
a man removes the old varnish coating from the doors to restore them according to a new design.
To carry out restoration work, remove the old varnish from the door in one or more of the following ways:
- sandpaper
- grinding machine
- chemical solvent
The first method was discussed in the previous section. The second method will significantly speed up the process of removing the old varnish coating. And the third has one nuance - the varnish can selectively remain on the door leaf. Therefore, be sure to polish the latter.
After removing the old layer of varnish, sanding and drying the doors, decide on their new design, for example:
- apply new varnish or laminate,
- paint it the color you want,
- stick wallpaper/photo wallpaper or other self-adhesive tape with imitation, for example, natural wood,
- apply hand painting, copying a specific drawing, or using a stencil,
- decorate the door by gluing bulk cereals - rice, buckwheat. Be sure to apply a layer of varnish on top for better fixation of the material.
Possible ways to update old doors
When the preparatory stage is completed, you can begin the most interesting part - restoration and decoration. All that remains is to decide exactly how to update the old interior doors. The choice of new cladding option depends on your existing skills, the availability of certain tools, materials and devices.
The easiest way to update interior doors at home is in the following ways:
- painting or varnishing;
- wallpapering, photo wallpaper;
- decoration with vinyl stickers;
- using self-adhesive film;
- painting using stencils;
- renovation using overlay facades.
The listed methods are the simplest and most inexpensive; they have found their application in modern restoration work. And the materials that are used for this can be purchased at any construction and art stores.
Painting or varnishing
To restore the old appearance of an interior door at home, the first thing that comes to mind is painting. Wooden canvases are coated with different compositions: it can be enamel, transparent or tinted varnish, stain, decorative coatings with protective properties. To give the door a rich color and obtain a durable coating, you can use acrylic, alkyd enamels and nitro paint.
It is best to choose acrylic paint. Alkyd composition and nitro paint will be cheaper, but their main drawback is the pungent odor and harmful fumes.
To apply enamel, you can use both brushes and rollers. In the first case, the tool will have to be combed to get rid of loose bristles, and then kept in warm water. The second option does not require any preparation.
Before applying paint, it is necessary to treat the surface - thoroughly sand, clean, apply a primer for better adhesion of the paint composition. It is recommended to apply paint or enamel in two or three layers, leaving gaps between them until dry. Protruding and shaped elements, as well as corners, are painted with a brush; flat areas are painted with a roller.
Related article: Decorating interior doors - an original approach to interior decoration
If you plan to use varnish, then it must be applied to a previously stained surface. Instead of stain, it is even better to use a wood antiseptic to prevent the development of fungi and mold.
Wallpapering
It's even easier to use regular wallpaper. These can be paper or non-woven fabrics. The most important thing here is to choose a reliable glue and the most suitable design, pattern or texture of the wallpaper itself. The material for decorating doors can either match the color of the walls or differ significantly.
The process of transforming interior doors looks like this:
- First, the surface is treated with a primer designed specifically for wood. One layer will be enough for the wallpaper glue to adhere well.
- Wallpaper is cut to the size of the door leaf. It is important that the cut out contour exactly matches the door (taking into account the allowance for folding).
- Wallpaper glue is diluted according to the instructions from the package and applied evenly over the entire area of the decorated area of the door.
- A paper sheet is applied and smoothed from top to bottom using a rubber spatula or a clean roller. Excess around the edges is trimmed off.
It is important to wait until the wallpaper dries completely - approximately 12 hours or a day. Then you can attach the fittings in place and hang the door on its hinges. But it would be nice to additionally decorate the canvas with some decor.
Foam or polyurethane moldings can be an excellent option. They are glued on top of the wallpaper. You can make a decorative frame out of them along the edge of the canvas - the design style will completely change.
In the video: covering a door with wallpaper and decorative moldings.
Decorating with a stencil
You can easily and simply restore a door leaf using stencils over which paint is applied. The result can be an interesting design or pattern. Stencils are sold ready-made in many art stores, but you can make such a template yourself. To make a stencil, you can take a large sheet of paper, cardboard or old wallpaper. First, a drawing is created and transferred to the base, after which it is cut out along the contour of the image.
Before using the resulting stencil, it is better to completely paint the door in a specific color and wait for the paint to dry. Next, the template is glued to the surface of the canvas in the desired area. This can be done using regular tape. Paint of a different color is applied over it, all the voids in the stencil are filled. It is most convenient to use a roller or spray for this.
Use of vinyl stickers
Vinyl stickers are a modern option for decorating various surfaces. They are glued to any smooth surface, they are not afraid of moisture and exposure to ultraviolet rays. If the interior doors have a slightly worn surface, then such areas can be easily hidden under such interior decor. The canvases can be washed and cleaned if necessary, without fear that the sticker will come off or deteriorate.
The main advantage of vinyl stickers is reusable. They stick easily and come off just as easily, leaving no traces.
In the video: decorating an interior door using a homemade sticker.
Application of self-adhesive film
You can also restore an old wooden door using self-adhesive film. It is sold in rolls in the same way as wallpaper. It will not be difficult for you to buy self-adhesive tape; it is available in every construction supermarket. This film is available in different versions: matte and glossy, plain and with a pattern, there are analogues with holographic images, wood imitation, and photo printing.
Before updating interior wooden doors using this method, they must be prepared: cleaned of dirt and greasy marks, and removed all fittings. The surface must be flat and smooth. If there are any defects, they are eliminated by sanding and further varnishing. This makes it easier to achieve the perfect base.
This film is easy to apply; just peel off the protective layer and apply the sticky side to the base. You should start from the top edge of the door leaf, smooth it with a plastic spatula from the center to the edges, gradually moving down.
On video: how to properly apply self-adhesive tape to doors.
Related article: How and how to paint interior doors at home [basic recommendations]
Updating with overlay facades
If you have tried all the methods listed above, but did not achieve the expected result, then the restoration process requires a radical approach. Overlay fronts will help you turn old doors into new ones. Overlays are used when the canvases need not just to be restored, but to completely renew their lining. They are made from different materials: wood, MDF, plastic. The second option is more affordable.
Such decorative overlays are attached to the door leaf in two ways: with mounting adhesive and using self-tapping screws. But first you need to purchase such a facade from a construction company of the required size (the overlay must correspond to the parameters of the door leaf).
Overlay facades made of MDF are not afraid of moisture; they can be washed and cleaned with chemicals. They do not deform over time, have sufficient rigidity and strength, and will serve you for a long time.
How and with what can you update veneer doors?
photo of updated old veneer doors
One of the most common problems with veneer doors is swelling of the panel in certain areas. Therefore, first prepare it, carry out restoration measures before updating.
The following will help eliminate the problem of canvas swelling:
- Iron. Heat it on medium and iron the swollen surface of the door folded on a horizontal stand.
- Wet rags. Moisten a piece of cloth with water and spread it on the problematic surface of the door. After a quarter of an hour, remove and wait until dry.
- PVA glue. Fill it into a syringe and carefully insert it under the swollen surface of the door. Smooth the area with a dry cloth.
To eliminate cracks and chips on an old door made of the material in question, stock up on strips of veneer of a similar color.
- Cut strips that match the parameters of the surface being repaired.
- Cut off the excess with a scalpel after applying it to the site of the chip/crack. Please note that the fibers of the patch should be perpendicular to the door being restored.
- Treat the door leaf with a special putty and wait until it dries completely.
- Use double-sided tape to secure the veneer strips.
- Sand the joints.
When your old door has only minor scratches and chips, treat them with wax:
- liquid
- pencil
In the first case, drop a couple of drops into the crack and immediately wipe with a dry cloth to remove excess. Before doing this, be sure to clean the door from dust and dirt, and also sand the surface.
In the second, tear off a piece from the wax pencil, knead it in your palms and stick it on the problem area. Wipe off the mark with a rag. Only do this on a previously cleaned and prepared door.
The following will help you update a prepared old veneer door:
- varnish
- dye
If you masked chips and scratches on the door with wax, then remember that varnish and paint will not cover them. Or they will linger on it for a short time and then fall off.
How and with what can you update paneled doors?
old panel doors after updating with paint, options in decor
Panel doors in the interior look interesting. However, it is not always convenient to treat their worn surface. We won't go into details. Let's look at restoration options.
Successful solutions:
- painting in several colors highlighting protruding areas
- gluing wallpaper in segments, adhesive tapes along the contour, on panels
- decoupage of individual segments
- varnish coating
The cardinal method is to disassemble the door panels and replace them with laminated hardboard. To do this, you cover the door frame with it and select the color especially carefully when gluing its ends.
If there is glass in the door, decorate it with special paints or imitate stained glass. Stencils for decoration are also suitable.
Other ways to decorate a door
In addition to painting, there are many more ways to update a wooden door with your own hands. In fact, there are no limits to your imagination, so you can go wild.
Wooden door trim
Let's look at the most common variations:
- Covering a wooden door with leather (leatherette or eco-leather). You can secure the material using buttons or glue.
- Upholstery with fabric is considered one of the most original ways to decorate a door.
- Rivets and other metal fittings that are attached to the door. In this way, you can create various designs and patterns on the door.
- Panel painting. Using masking tape, the doors can be painted to imitate a panel of one color and the rest of the space on the canvas can be painted with a different color.
- The slate board is created using a special coating, thanks to which you can draw on the door with chalk. This solution is ideal for a nursery, because kids love to write on the board (walls, wallpaper).
- If there is glass on the door, you can paint it with special stained glass paint and get a Tiffany style design.
- Words and letters can be applied using stencils and create an original, bright door design. Also, letters and numbers can be rags (felt), which are attached to the door. This is an ideal option for a child’s room, especially for a child who is just learning to write and read.
In addition, you can paint the doors with absolutely any color, texture and design. Decoupage from family photographs is considered an original idea. To do this, you need to varnish the canvas, attach photographs on top in any order, and cover it again with a layer of ghost varnish. This solution will serve as a memory, a family photo collage, and just a cute decoration for the door.
How and with what can you update painted doors?
a man paints old previously painted interior doors.
Your first task is to remove the old paint from the doors and prepare them for restoration work. Their sequence:
- decide on the location of the door in space - either lay it on horizontal supports, or remove it from its hinges and leave it vertically,
- use a spatula to go over the entire surface and remove the layer of old paint,
- sand with sanding paper,
- treat with a special primer for wooden surfaces,
- let dry and sand again,
Seal off areas of the door that you do not plan to paint or open with varnish.
How to prepare the door leaf?
Interior doors made of wood, which can be seen in almost every home, are mostly coated with paint or varnish. If they have lost their attractive appearance, this does not mean that the wood under the layer of such finishing is in poor condition. Therefore, before you decide to restore a wooden door, you need to free it from everything unnecessary, including old paint or varnish.
Important! Before you begin restoring the door leaf, you need to remove the product from the hinges - this will make it more convenient for you to work. Don't forget to remove all fittings (hinges, handle, lock).
Article on the topic: Choosing the entrance door to an apartment: design features and advice from professionals
There are several ways to remove paintwork from the surface of a door leaf:
- Removing the layer using a sander. If you have such a power tool at your disposal, then this is the easiest of all methods. If not, then you can do manual sanding, but it is very difficult and time consuming. For hand sanding, use coarse sandpaper first, then fine sandpaper.
- Chemical removal of varnish or paint. In any hardware store you can find a universal remover that can remove any paint coating. However, this product must be used very carefully, preferably outdoors or in a well-ventilated area, since the pungent odor of the product is toxic.
- Using a hair dryer. This tool is designed to heat various surfaces. If you direct a stream of hot air onto a layer of varnish or paint, the coating will instantly soften and can be easily removed using a regular spatula.
In the video: removing old paint from wood (example with a hot air gun).
The next stage of preparing and restoring the canvas will be the elimination of visible defects, such as chips, cracks and scratches. They can be sealed with special means for this purpose. Thus, wood putty is more suitable for filling up serious damage and leveling the surface, furniture wax is good for filling small cracks, and a retouching pencil is easy to disguise small scratches.
You can also make homemade putty, which will be no worse than store-bought putty. To prepare it, just mix equal parts of wood dust and clear varnish.
After drying, areas covered with putty or putty must be sanded to achieve a smooth surface. To do this, use a sander or fine-grained sandpaper. Clean the prepared door from any remaining wood dust, treat it with drying oil or stain if you want to give it the desired color.
How and with what can you update paper doors?
updated paper doors in the interior
Renew paper doors with lightweight materials that will not weigh them down and cause the fabric to tear. For example:
- self-adhesive film
- decoupage
- gluing individual elements, for example, paintings, three-dimensional drawings
- painting with paints
- stencils
How and with what you can update an old door frame: ideas, photos
a man measures the level of a door frame during its restoration.
You should remember about the restoration of a door frame when you are updating an old door leaf. Of course, fiddling with the first one is less convenient, since it cannot be removed.
The door frame processing technology is similar to those discussed above about doors. Choose carefully the shades of paint and stain, as well as the color of the self-adhesive tape and wallpaper, so that this area on the wall is in harmony with the updated door leaf.
Below are a number of interesting door frames after DIY restoration.
updated door frames to match the interior and doors, example 1
self-adhesive door frame decorative elements, example 2
self-adhesive door frame decorative elements, example 3
Ideas for updating an interior door
The easiest option is to paint the canvas. With the right shade of paint, you can transform a room, complement or update the color scheme of the interior.
It is better to paint with an acrylic or water-based composition. Such paints do not have a specific odor. Never use alkaid paint.
In addition, it is better to use matte compounds for the door leaf rather than glossy ones. The latter leave visible fingerprints. In addition, the gloss will highlight all the flaws and unevenness of the canvas, if any.
Paint the doors using a wide roller and a thin brush. The first is used for painting a flat canvas in 2-3 thin layers. And with the help of a brush they paint glazing beads, recesses, recesses.
Interesting: Which interior doors are better for an apartment?
How and what to decorate a door beautifully with?
a beautifully covered interior door after renovation.
Among the common ways of decorating an old door is gluing a new covering entirely or in fragments.
For this you will need:
- wallpaper
- textile
- leather and its substitutes
- photo wallpaper
- metal rivets, beads
- patchwork
- cut fragments of a picture, for example, a world map
To stick this or that material, select an effective adhesive, for example, PVA glue, special for wallpaper, tape, double-sided self-adhesive tape.
How to beautifully wallpaper a door?
the old door is covered with wallpaper after renovation.
The main thing is to follow the wallpapering technology.
- First, prepare the door leaf for renovation. The technique was presented in the first section of the article.
- Decide on the color and texture of the wallpaper.
- Apply special wallpaper glue to the surface of the door and attach a paper decorative element.
- Level the result with a dry cloth.
- Trim any overhanging edges with a utility knife.
- Wait until the wallpaper on the door is completely dry.
If desired, add decor:
- molding
- design features, for example, small shells and cut nets, glued on top and covered with paint
In addition to regular wallpapers, the following are popular:
- photo wallpaper depicting three-dimensional objects/paintings
- decoupage
- self-adhesive tapes
Finishing decoration with planks
A decorative strip, even applied crosswise with your own hands, will make the door structure look avant-garde.
Carved decors in a modern interior
Embossed, carved or flat strips of various shades can transform even the most ordinary blind door. If the restoration process is complex, then creating three-dimensional figures on the plane of the canvas is a simple matter, but requires diligence.
The decor layout on the surface of a wooden door can be in a classic style, imitating the canvas of the old assembly format. Using the slats, you can create a volumetric relief over the entire area, placing each of them tightly one to one. It is permissible to lay out the decor in such a way that a barn door appears in the interior opening. Decorating the sash with openwork fragments is the simplest. You don’t need to invent anything; you can recreate the carved door leading to the master’s chambers. In any of the location options, it is worth first marking the location of the planks on the plane so that you do not subsequently shorten them if necessary in the finished painted form.
As a rule, trim strips are offered for sale in a full-color assortment of various shades.
The decorative strip is just selected in the desired shade of decor and it’s done. At the same time, door trim and carved openwork details are often presented to the retail consumer in virgin form.
The door is stylized with carved canvas overlays
It is good if the wood was pre-impregnated before sale, which will protect it from moisture and other damage. And if not, then it’s not a problem to solve this problem with your own hands at home.
Before installing embossed decorative overlays on the door leaf, you need to prepare:
- The strips are laid out on a thick piece of paper to process the primer.
- After the primer layer has dried, the parts should be sanded with fine sandpaper.
- Next, dust deposits on the planks are removed, and the elements can be coated with paint or varnish. Or paint it in the desired color and varnish it.
- It is advisable to polish each of the varnish layers.
Planting of decorative elements is done using glue or small furniture nails. Decors can be fixed to the canvas with large decorative nails to give the structure an even more interesting look.
(Your vote will be first)
Loading…
The best posts
- How to make a plasterboard ceiling in the hallway yourself
- Screen partition at IKEA: the beauty is in impermanence
- Door seal: the culprit of drafts, noise and odors
- Installing trim on doors: several installation techniques
- Advantages and disadvantages of dry mixtures for plastering walls
- The door opens or closes by itself: reasons and solutions
- Tips and tricks for ceiling putty
- Characteristics of Bosch gas hobs
How to update an outdated metal front door?
old metal entrance door after renovation
Metal doors also tend to become morally and physically obsolete. If you set out to update them, keep in mind that the approach and methods will be different for the external and internal parts of the front door.
So, the internal part will be updated by the following solutions:
- drawing a picture using a stencil
- art painting
- full door mirror
- dermantine upholstery
- self-adhesive film
- veneer
- laminate
And for the outside of the door the following are suitable:
- veneer
- MDF panels
- laminate
To secure any material to the surface of a metal door, you will need an adhesive liquid, for example, liquid nails when working with wood.
Rules for restoring a metal door
Not only wooden doors can be restored. Metal entrance doors that have lost their appearance are also being improved.
Restoration of a metal door
Step one. The metal sheet is removed and laid horizontally. This makes it easier to carry out all subsequent work.
Step two. You can cover it with masking tape, or better yet dismantle it:
- peephole;
- door handle;
- all other fittings.
Step three. Using a drill or wire brush, remove any signs of corrosion. The surface is sanded with sandpaper with a grain size of 80-150. After this, the canvas should be vacuumed and treated well with a solvent.
Step four. Using car polish, the entire door is treated.
Polish for cleaning stainless steel
For your information. Wood putty is not applicable here, because its adhesion to metal is weak.
Car polish hides all kinds of micro-scratches and small dents that are revealed after removing the rust. The polish is smoothed out with a spatula. The composition dries in about 30-40 minutes.
Step five. The entire surface of the door is polished with sandpaper (selected with 400 grit). The canvas is wiped with a damp cloth, always clean. After this, the surface is degreased. White spirit, another degreaser, is used.
Step six. The door is coated with an anti-corrosion primer (for metal). Use either a narrow brush or a roller. When the primer layer is completely dry, you need to sand the canvas using sandpaper.
Restoration of a metal door
Step seven. Metal paint is used to paint the door. Paint is applied in several layers. After applying each new layer, you should wait until it dries. You can paint:
- brush;
- roller;
- spray gun.
Cleaning and painting the door frame is done in the same way. After completing the work, remove the masking tape and replace the fittings. You can hang the door leaf in place.
Sometimes not the entire surface is restored, but only the damaged area. Then you will need to select paint of exactly the same tone as the remaining sections of the door structure.
For step-by-step instructions on installing a metal door, see here.
How to beautifully decorate an old nursery door yourself: ideas, photos
DIY updated door in a children's room
A children's room is an area of creativity, leisure and intellectual work for a child. Consult with him before you start updating the door to the nursery.
Even better, involve your child in the process.
For inspiration, we will add a number of ready-made solutions for decorating the door to the children's room.
decor options for doors to a children's room after updating them, example 1
decor options for doors to a children's room after updating them, example 2
decor options for doors to a children's room after updating them, example 3
decor options for doors to a children's room after updating them, example 4
decor options for doors to a children's room after updating them, example 5
decor options for doors to a children's room after updating them, example 6
decor options for doors to a children's room after updating them, example 7
decor options for doors to a children's room after updating them, example 8
decor options for doors to a children's room after updating them, example 9
decor options for doors to a children's room after updating them, example 10
decor options for doors to a children's room after updating them, example 11
decor options for doors to a children's room after updating them, example 12
decor options for doors to a children's room after updating them, example 13
How to beautifully decorate an old kitchen door yourself: ideas, photos
updating an old kitchen door with mosaics
To make the kitchen door transformed after restoration, choose a concept for its decor. It can be:
- painting
- opening with varnish
- decoupage
- gluing wallpaper and any adhesive surfaces
- art painting and stencils
- stained glass elements
- mosaic and gluing of loose, small elements
See below for implemented ideas with updated kitchen doors.
embodied ideas for restoring an old kitchen door in the interior, option 1
embodied ideas for restoring an old kitchen door in the interior, option 2
embodied ideas for restoring an old kitchen door in the interior, option 3
embodied ideas for restoring an old kitchen door in the interior, option 4
embodied ideas for restoring an old kitchen door in the interior, option 5
embodied ideas for restoring an old kitchen door in the interior, option 6
embodied ideas for restoring an old kitchen door in the interior, option 7
How to beautifully decorate an old bathroom door yourself: ideas, photos
options for updated bathroom doors in the interior
The bathroom is a special place in any home. Here we bring beauty and relax after everyday work. I want the door to have its own style.
If you're currently upgrading, consider these ideas:
- drawing a picture through a stencil
- self-adhesive film
- imitation of stained glass and paneled elements
- combination of colors when painting fragments
- mirror interior
- photo wallpaper
For more details, see the implemented ideas for decorating the bathroom door in the pictures below.
bathroom door design options after do-it-yourself renovation, example 1
design options for bathroom doors after do-it-yourself renovation, example 2
bathroom door design options after do-it-yourself renovation, example 3
design options for bathroom doors after do-it-yourself renovation, example 4
bathroom door design options after do-it-yourself renovation, example 5
design options for bathroom doors after do-it-yourself renovation, example 6
Design options for bathroom doors after a DIY update, example 7 Design options for bathroom doors after a DIY update, example 8
design options for bathroom doors after do-it-yourself renovation, example 9
design options for bathroom doors after do-it-yourself renovation, example 10
design options for bathroom doors after do-it-yourself renovation, example 11
design options for bathroom doors after do-it-yourself renovation, example 12
So, we looked at the features of restoring an old door in a house on our own. We got ideas from looking at photos of finished ideas. We learned how to properly prepare the door surface for renovation.
If you feel the potential but don't have the courage to take the plunge, start with dollhouse elements. Your child will appreciate creative solutions for decorating doors, and you will gain courage and realize your desires to update them in your home.
Door Upgrade Methods
Simple ways to update the canvas include:
- applying varnish;
- coloring;
- use of stain and veneer;
- stained glass
Painting, varnishing and staining
Old wooden doors can be updated by painting, varnishing and staining.
Water-based, synthetic and organic dyes are used to paint doors. After this, the door takes on a neat appearance.
The door leaf can be varnished. Wood varnish is well absorbed into the wood, evenly covering the entire surface of the structure. The main advantage of the protective and decorative composition is the presence of a tint base . To apply the varnish, use a sprayer or brushes. Experts advise decorating the wood with a brush, which easily follows the structure of the structure, well saturating hard-to-reach areas. To increase the protective properties, it is recommended to paint the door in 2 layers.
If you have to refresh the box again, stain is used. Then the coating is treated with varnish. Stain can be used to update the color scheme of the canvas. It prevents the mixing of tones, and subsequent varnishing enhances the brightness of the color. Sanding gives it a matte finish.
If there is no need to create a matte surface, polishing and drying are carried out after grinding. This technology gives the door a crystal shine.
Veneering
Veneer is used to decorate the door. This technique for decorating wooden canvases is used if they are made from cheap sawdust. Due to veneering, the door acquires an aesthetic appearance. Veneer must be glued transversely to the wood fiber.
Veneer gives the door the noble appearance of real solid wood
Self-adhesive film
You can decorate the box with self-adhesive vinyl that imitates wood. Using this technique, coating defects can be easily hidden. Before gluing a wooden door, you will need to prepare a hairdryer, fabric, and scissors.
At the first stage, the coating is cleaned of various defects. This stage is considered the most difficult. Next, marking is done using a tape measure. These canvases are transferred to millimeter markings made by the manufacturer on the back side of the film. A knife is used to cut the product.
The film hides all minor defects and gives the surface the appearance of natural wood.
The cut pieces of self-adhesive are applied to the desired area of the door. On the reverse side of the film there is a protective layer, under which there is glue. A few centimeters of the layer are carefully peeled off to stick the product on the door.
The lining, completely applied to the door, is smoothed with a rubber spatula or soft material. Self-adhesive is wrapped on all ends of the covering. Immediately cut the corners of the PVC product and install a lock with a handle.
Photo wallpaper
With the help of modern photo printing, an image of the desired size is transferred to paper. Photo wallpaper on wooden doors looks beautiful. Any image can be printed. To do this, you can use the services of an advertising agency or printing house. The image can be selected at home or with the help of specialists.
Wallpaper with moldings
Polyurethane or foam moldings can be glued to plain wallpaper. In this case, the style in which the doors were decorated will change. The resulting design is suitable for a room decorated in a classic style. If you use a colored background or moldings with curves, then the doors will be decorated in Provence style.
Before applying the design, the surface is leveled and treated with glue. If paint comes off the door, remove it. Wallpaper is also treated with glue .
A rubber roller is used to level the canvas. If any bubbles remain, remove them with a plastic spatula. Then the remaining air is removed from the center of the structure to the edges. Using this spatula, smooth the wallpaper joints (if any). If the technology is performed correctly, then the joints are not visible.
Wallpaper with moldings is suitable for interiors in a classic style
The edges of the wallpaper need to be trimmed with a knife. This is done until the wallpaper softens from the glue. Otherwise, they will tear and stretch easily. It must be left to dry for several hours. The process of decorating fiberboard or solid wood continues after 12-24 hours. This depends on the temperature and humidity level.
A simple pencil is used to apply markings. After the drawing has been applied, you will need to measure the length of the component elements of the molding with a tape measure. Then they are cut off and the edges are filed at an angle of 45 degrees. Using PVA glue, apply the back surface of the pieces. They need to be glued according to the marked markings. When the canvas has dried, it can be installed back. Using this principle, you can update the doors of a bedroom, nursery, or kitchen at home.
Drawings and paintings
The advantages of this decor include:
- beautiful and original appearance;
- simple execution;
- the ability to use ready-made stencils;
- wide choice of materials;
- embodiment of different ideas.