Cardboard box, basic master class on the basics of cardboard art. For those who want to try, but do not know where to start, I will explain the basics of making a simple rectangular fabric box with a lid, which consists of four parts. Manufacturing time will take about 2 - 3 hours; with this example you will understand the basics and subsequently be able to make any more complex box.
First, let's figure out what materials and tools we need.
Materials:
- Cardboard 2 mm, sheet size 420 mm x 297 mm (A3) – 1 piece.
Bottom and cover: 60 mm x 100 mm (2 sheets)
Side long side: 30mm x 100mm (2 sheets)
Side short side: 30mm x 56mm (2 sheets)
- Cardboard 0.35 mm, (Kent paper, thick paper with a smooth texture), you can use drawing paper such as Whatman paper or folders - binders - 1 piece.
60 mm × 100 mm (3 sheets)
27 mm × 100 mm (2 sheets)
27 mm x 56 mm (2 sheets)
- Textile. Depends on the chosen design, in this master class three fabric patterns are used, outside, inside and the inside of the lid.
If this is your first cardboard box, it's best to start with linen or cotton, and you should avoid thinner or too stretchy fabrics until you get the hang of it and get the hang of it.
Pieces of fabric (approx. 50 × 50 cm)
- Decorative beads and lace or ribbons
Tools:
- Ruler
- Pencil (a mechanical pencil is preferable because it draws finer 0.3mm lines than a regular 0.5-1mm pencil).
- Stationery knife
- Scissors (large scissors for work, small scissors with sharp ends)
- Glue, not fast drying (PVA construction, carpentry).
- Brush, preferably use a hard brush. If you make a mistake, do not correct it with your hands as the fabric will get dirty. You can also use a sponge instead of a brush.
- Putty knife. It is used to hold corners when gluing, or when gluing fabric to cardboard. A ruler or bamboo skewer can serve as a substitute.
- Awl (when decorating with beads).
Cardboard box:
Now let's understand the basic concept of cardboard design. We make a small box about 60 mm long, 100 mm wide and 30 mm high, this will be a fabric cardboard box.
Let's mark the box taking into account the thickness of 2 mm cardboard
First of all, let’s draw the size of the bottom: length 60 mm and width 100 mm.
Let's build a long side part (red color) height 30 mm.
The two long sides will be glued to the bottom, the cardboard thickness is 2mm, so the short side (blue) glued between them will be shorter than 60mm. In other words, the size of the short side is the length of the bottom - the thickness of two cardboard sheets is 60 mm - (2 mm + 2 mm) = 56 mm.
Now prepare two sheets of cardboard of each size.
Box bottom + one for lid: 60 mm x 100 mm
Long side: 30 mm x 100 mm
Short side: 30 mm x 56 mm
When you start cartoning, you will see that every millimeter matters.
Even if we designed the dimensions "box 60 mm × width 100 mm × height 30 mm", the thickness of the cardboard bottom and lid will actually be added, and the final dimensions of the box will also depend on the fabric used, and it will change depending on the thickness.
When there is a specific purpose for using the box, take note of this and pay special attention to the external and internal dimensions.
Required materials and tools
Components for manufacturing:
- Cardboard with a density of 260-280 g/m3.
- Several pieces of different materials.
- Glue (the more the better).
- Lots of fleece.
- Decoration materials (beads, seed beads, etc.).
- Paper tape.
- Office tools.
Cardboard box shape
Simple rectangular or square
A do-it-yourself cardboard box for crafts is formed from a box and paper tubes. First you need to choose a suitable base for the box - for example, a shoe box. It is better to take a base for the bottom approximately the size of an A4 sheet or less, this will make the finishing process easier.
To form the tubes you will need glue and knitting needles. For weaving, you can use tubes made from ordinary printing paper, waste press and magazines. The finished cardboard box can be painted with acrylic paints or left as usual.
It is advantageous to use colored paper for a printer: it has a wide color palette.
The process of creating a cardboard box with your own hands will not take much time. First, on the outside of the box you need to glue vertical tubes that serve as guides. You need to glue at intervals of 4-6 cm - it all depends on the size of the box. Then the tubes are bent onto the side edges, and then inward.
A compacted cardboard of suitable size is glued to the bottom, which will hide the place where the tubes are attached. Then the tubes are intertwined around the circumference of the base. The lid also folds.
Round box
For needlewomen, a round spool of tape left over is an expensive material. This base can be used in different types of needlework: decoupage or scrapbooking, decorated with coffee beans, seed beads, beads, jewelry stones, glued on leather or fabric. To make a box from round cardboard with your own hands, it is recommended to use interwoven cardboard.
First you need to attach the reel to the cardboard and draw three circles along the inner and two outer diameters. Circles with a smaller diameter are glued together; it is recommended to use Moment glue. Treat the finished element with sandpaper and glue it to a circle of larger diameter, placing it in the central part.
As a result, a lid will be formed that will seal the box tightly.
If there is a need to sand the edges. The box layout is ready. You can decorate it to your taste with different beads and decorative stones using any needlework technique. The lid can be made slightly protruding: you need to enlarge one of the circles with a larger diameter. This will make the box easier to open.
Heart shaped box
This heart-shaped box is perfect as a wrapper for a Valentine's Day surprise. First of all, you need to cut out a heart-shaped element from cardboard - this is the bottom of the box, the dimensions of which will determine the parameters of the box as a whole. Then you need to cut a wide strip of cardboard with teeth on one side. Glue the strip to the bottom. Assemble the other side in the same way.
You need to glue the two halves of the walls and secure them with paper clips, wait for the glue to dry. Decorate the inside and outside of the box with paper with different textures or patterns. Glue two pieces of fringe to the base - they will act as curtains on which the lid is held. Next, cut out the second heart, this will be the top cover. It needs to be glued to the curtains.
Decorated paper should be glued in the same way. Then you need to decorate the cardboard box in the shape of a heart to your taste. Alternatively, you can glue lace along the contour. Decorate the top with flowers, beads, ribbons, etc.
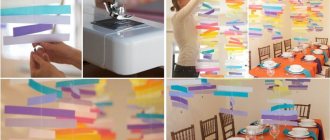
LiveInternetLiveInternet
A round monochrome box with a removable lid is made from scratch cardboard. Diameter 17 cm, height with lid about 11 cm.
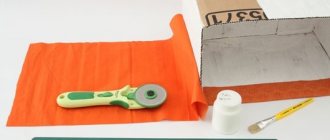
1. 2. 3. What do we need for work? Everything is in the photo and, in fact, the fabric itself and the cardboard itself. I used 2mm thick cardboard for the box itself (cardboard is sold in craft stores). For interior decoration - thin cardboard from a candy box. And I took our fabric, Russian calico, although, of course, the American one is undoubtedly better... But you will agree with me that for the first time and (maybe for throwing away), take the one that you don’t mind throwing away... Well, who cares , everyone's business...
4. Now that we have everything we need to create a box, we decide on its dimensions... Its dimensions depend on the presence in your cabinets of a cylindrical object, such as a can from the times of the USSR, which I accidentally had lying around in the garage)))!!! thanks to the toad who didn’t let us get rid of him))) We measure his “waist”, this measurement will mean the circumference of our box...
5. Cut out a strip of cardboard with a length equal to the circumference of our “waist” + 1 cm and a width equal to the height of your box. We cut, holding the knife strictly perpendicular to the surface of the mat... We don’t press too hard, first, as if we were marking a line, then lightly cut-cut-cut several times... In the same way, we cut out a strip for the lid of the same length and width, equal to the height of the lid....
6. We spray the cut-out strips of cardboard from a spray bottle (without fanaticism!!!) and bandage them onto our little can... When I cut out the strips exactly 48 cm, they didn’t meet at my “waist”... the notorious centimeter was not enough...
7. All this action is so exciting that you forget to take pictures... This is how the rings turned out after they dried on the can... We coat the ends with “moment” glue and glue them according to the instructions for the glue, i.e. let it dry a little... The rings have “set.” We glue the top with masking tape on both sides... I think it should have been covered with one strip, but I “slowed down”... - I cut it off separately on each side. But I think this is not important...
8. Now we put our cylinder on the cardboard and draw two circles from the inside - for the bottom and the lid. You can, of course, calculate the radius from the length of the circle and use a compass, but I took the path of least resistance... Then the most difficult thing is to cut out these same two circles... The task, I tell you, is not an easy one... There is a compass knife in nature, maybe they and it’s easier to cut, but for now we’re cutting with a stationery knife. Very carefully, perpendicularly, first very lightly outlining the future line of the circle and slowly cutting along it several times.
9. Here they are - our circles and the place where our cylinder is glued...
10. Now you need to glue the bottom into the cylinder... We coat the end with Moment glue and put it into the cylinder... I couldn’t “put it in”, I pushed it through and the bottom fell into place very tightly... Do the same with the lid... You can do it right away, you can make the lid separately... There was no need to apply glue, everything fit very tightly. I recommend that before applying glue, try how it fits in... 11. Now we strengthen the bottom with masking tape. Glue it on the side and bend it to the bottom, making cuts.
12. That’s how it happened...Actually. I think we need to cut it with cloves, this will be correct... 13. Cut out a strip from our fabric with a length equal to the circumference of our box + 2 cm and a width equal to the height of the box + 4 cm. We glue it with PVA “Lux” glue... It’s impossible to glue and take pictures at the same time... We coat 10 centimeters of the box with glue, spread the glue evenly. so that there is no excess and we lay the fabric so that 2 cm is left for the fold on both sides... I smooth the fabric with a rubber spatula, or just with a rag... And so we glue the entire strip... We bend the edge and glue it to the beginning with an overlap... A photo would be useful here, but You have to work quickly, otherwise the glue dries quickly. We bend the top inward and also glue it, spreading the cardboard... We secure the edge with a clothespin... My mistake!!! Put something soft under the clothespin, like a piece of foam rubber, so that there are no marks left...
14. Next, we cut the fabric (preferably with teeth) and glue it to the bottom...
15. I do it like this...
16. We measure the circumference inside the box...
17. …height +1cm
18. We cut out a strip of the length and width we need from thin cardboard, cut out the fabric along this strip, making allowances on all sides of 1.5 cm and glue the fabric onto the cardboard using PVA glue, bending and gluing the allowances on the long sides, without gluing on one long side 2 centimeters to the corners
19. Cut out one circle from thin cardboard with a diameter slightly smaller than the inner diameter of the bottom, since it is covered with fabric. it may not fit into the box... This will be the inner bottom. The outer bottom should be slightly smaller than the outer diameter... 20. We cover both bottoms with fabric, let them dry under a load and glue one inside, the other from the bottom onto the box 21. ... like this... and place it under the weight...
22. We glue our dry side plate into the inside of the box... 23. We fix it with clothespins, but... placing pieces of foam rubber under them... I shot this shot on the finished box, so I didn’t attach clothespins around it... the principle, I think, is clear... And we dry it ... Then I completely forgot about the camera while making the lid... I'll try to explain without a photo. 24. Our blank for the lid is the same as the box itself, only lower... First, I covered the side surface from the inside with a strip of fabric, folding it a centimeter at a time to the bottom of the box, having previously cut out the teeth, and bending it outward.. Then I cut out a circle from padding polyester along the diameter of the lid and circle of fabric in diameter + hem. I put a padding polyester on the lid, then a circle of fabric and carefully folded and glued the allowances. We made allowances on the side of the lid and on the top and bottom. I covered them with a piece of thin cardboard covered with fabric, gluing it to PVA. I glued the button on top with hot glue.
Author MK
Ideas for creativity Knot for memory
How to make a lid for a box
Recommendations for making a lid for a box:
- Determine the dimensions of the cover . Lay the cardboard on a table or floor and measure a rectangle of the desired size in the center. To accurately draw the corners of a rectangle, you must use a triangle or a drawing ruler. This will be the bottom of the lid.
- Draw a straight line from one edge of the box. The height of the box lid is the length of the line. The height of the sides is much less than that of the box. You must not forget about the allowances in order to connect the sides of the lid. They should be 3-5 cm.
- On each of lid edges you need to connect the edges of the line in a straight line. These are the sides of the lid. You also need to draw allowances for other connections at an acute angle. It will be enough to enlarge on both sides.
- Cut out the parts using a utility knife.
- It is necessary to carefully bend the cardboard along the contour of the folds.
- Carefully fold the edges of the box and tape them together along the length of the seams.
Kinds
A jewelry box can be very different. Very often, after using adhesive tape, such a strong paper reel remains. It can serve as just the perfect base for your beautiful new and unique piece. Naturally, choose one that matches the height and diameter.
To get the workflow started, you will need a reel, cardboard, pencil, glue and scissors. Cardboard blanks will help you cover the bottom and top. All this is done quite simply - the same reel is applied to the sheet, measurements are taken, and then all the parts are cut out.
It must be remembered that it is better to cut a circle with a diameter several centimeters larger. Then all this will help to conveniently glue all the parts. The result is a large jewelry box with neat edges. The main thing is that you should be pleased with the final result.
It is also not so easy to make a fold line correctly and according to all quality standards. Run along it with tweezers or a ruler made of some metal. Then you will see a neat execution of the folding. When pasted on top, a cardboard ribbon hides the petals located on the side.
Test the cap again to ensure it fits snugly. This is a very important part, without which you won’t really succeed. Carefully glue all edges. If you are not sure that the rigidity is acceptable, then you can additionally glue more layers of cardboard from the bottom and lid, then you can do whatever you want with it.
It was just a master class on how to make a beautiful box using the simplest recipe. Otherwise, it’s best to take acrylic paints so that you can brightly and efficiently decorate it all in your unique style.
Decorate the box with fabric
To decorate a cardboard box with your own hands, you can use not only old press or wallpaper, but also decorate it with fabric. Using the covering, it is possible to cover the box with fabric. Such a thing can serve as a separate gift, as well as as an organizer for storing small household items, for example: toys for children, home decor items, sewing supplies.
Materials and accessories that are indispensable for covering the box with fabric:
- Box. When choosing, you are allowed to apply the rules described above for working with press, magazines, and wallpaper.
- The fabric itself will be used to cover the box.
- Specialized glue, tape.
- Sharp scissors.
- You may need an awl, as well as a strong cord (you need to choose the color of the fabric).
In order to do everything accurately and get an excellent result, you need to follow the recommendations:
- To make a pattern, you need to determine the dimensions of the sides, and also remember to leave allowances for the part that bends to the other side.
- Glue the main part. It is recommended to choose an adhesive that does not saturate the fabric, causing stains. You can use suitable double-sided tape if it adheres the fabric to the cardboard well.
- The fabric should be pressed tightly against the cardboard. If necessary, you need to remove excess material.
- When you have finished decorating the outside, move on to decorating the inside.
DIY jewelry box
Making a jewelry box with your own hands is not as difficult as it might seem at first glance. A little time and imagination is enough to create a small but very beautiful jewelry box from simple and affordable materials. To work, you will need glue and a glue gun, a knife or scissors, a ruler and a protractor, as well as other tools.
Box made from a tape reel
For a small box you will need an empty tape reel, thick cardboard, scissors, glue and a small amount of fabric. To make the lid hinged, you should additionally take a few centimeters of any cord or edging. The casket can be made using a simple algorithm:
- Trace the tape spool onto the cardboard and cut out two even circles (the bottom and lid of the box).
- Attach a small side to one of the cardboard circles, and glue the second to the reel.
- Fasten the main part of the box and the lid with a cord and secure it with glue.
- Cover both parts with any fabric you like and dry in the sun.
The jewelry box is ready. It turned out to be simple and discreet, but you can add a few decorative elements to the lid. These can be artificial flowers, beads and rhinestones, bright edging, lace and any other decorations to your taste.
Jewelry box made from a shoe box
You can create a large rectangular box from an old shoe box. You don’t even need to cut it out - the frame is already ready. Just cover it with fabric and add any decorations you like. Particularly popular are hand-painted fabrics and the decoupage technique—applying an image using glue and napkins.
To make a convenient jewelry chest with several compartments, you will need some cardboard. They should be made into partitions, the size of which will correspond to the length and width of the shoe box. They are fixed together and covered with fabric to match the interior decoration - now storing jewelry will be even more convenient.
DIY baguette box
The best way to create a designer box in retro style is with baguettes. This technique is close to professional, but the box will last a long time and will be more durable. It will require about 3 m of baguette, several pieces of thick cardboard (hardboard) for the bottom and lid, hinges and screws, and fabric for decoration. It is also worth preparing tools: a hacksaw, drill, ruler and scissors, as well as regular PVA and Moment glue.
Algorithm for making a baguette box step by step:
- Cut out 4 pieces of baguette for the lid and connect them with glue.
- Cut out 4 more pieces for the walls, and also secure them with glue.
- Connect the main part of the box and the lid with hinges.
- Secure the lock as necessary.
- Cut one piece of hardboard for the bottom and 2 for the lid.
- Drill holes for screws at the bottom, and then cover a piece of cardboard with fabric.
- Secure the bottom of the box with screws.
- Insert two pieces of hardboard on the top (smaller piece) and bottom (larger) surfaces of the lid.
A distinctive feature of baguette boxes is the upper part of the lid. It can be decorated in any style: add embroidery, lace, replace cardboard with plastic and perform decorative modeling.
Patterns made of white acrylic on a gold background are especially popular - before work, you can view photos of finished boxes and choose the design you like. Particularly original craftswomen add decorative magnets, as well as large mirrors or watches.
Bamboo napkin box
For a simple and original box you will need a bamboo napkin, a small amount of thick cardboard, fabric, glue, scissors, thread and a needle. Even a beginner can handle this technique. Instructions:
- Roll up the rug and cut out the sides of the box from cardboard.
- Cover or cover the walls and inside of the rug with fabric.
- Connect the main part of the box with the side walls, secure them with glue or stitch them.
- Add a loop closure and decorate the box however you like.
Bamboo napkins are lightweight and made from environmentally friendly materials. They can be additionally varnished to protect them from dust, moisture and temperature changes. Such boxes can be painted in any shade, but more often they are left in their natural color.
Beaded box
Beads are a material that can be given any shape. Such boxes are made in the shape of a cube, rectangle or circle. To work, you will need beads of any shade, as well as thick wire, scissors and a needle. Instead of wire, you can immediately use metal rings as a frame - you will need 4 pieces for one box. Step-by-step instruction:
- Completely braid each ring with a strand of beads.
- Connect 3 rings using weaving to create the walls of the box.
- Weave the bottom and lid of the box - for the latter you can use any pattern.
These options are not a complete list of boxes that can be purchased in stores or made with your own hands. Porcelain, clay, glass and other chests will be a stylish addition to the interior and a wonderful gift for a loved one.
Soft box made of cardboard and fabric
You can make a box with your own hands from compacted cardboard and cover it with fabric. Make the lid using padding polyester - it will be soft. This box is perfect for storing jewelry and craft materials. The parameters of such a box are 18 cm by 9 cm. Also, you can enter your own size based on what you will use it for.
To create you need:
- thick paper,
- matter,
- filler,
- glue,
- stationery,
- paper tape.
You need to draw a circle of the required diameter on thick paper and cut it out. For the sides, cut out rectangles.
Instructions:
- Use tape and clamps to form a box.
- Cover the box.
- Cover the bottom of the box with fabric.
- To seal the side edges, cut out a rectangle from not very thick cardboard and cover it with fabric.
- Cut out a lid from cardboard and glue the side. Place the padding polyester on the lid and cover it with cloth.
- Use an additional piece of paper and fabric to cover the edge of the lid.
Decoration with vinyl wallpaper
If after repair there is a piece of vinyl wallpaper left, you can use it to decorate a wooden or cardboard box. Our master class will tell you how to decorate a simple thing with your own hands using textured wallpaper and give the surface a metallic effect. Let's say you have this roll of wallpaper left. Wallpaper can be of any color; our task is to paint the paper to match the color of the metal.
To work you will need:
- A piece of wallpaper or textured paper.
- PVA construction adhesive.
- Paper towels.
- Acrylic paints: black, copper, red, silver, green, dark gold.
- Varnish for coating.
To decorate a box with your own hands, you need to take a roll of wallpaper or textured paper, attach it to the box and cut off a piece with an allowance for the sides.
You can decorate only the lid of the box without touching the side walls. You can decorate both the lid and sides. Who likes it more? To cover the lid, apply a brush or sponge to the back of the paper. Take PVA glue and dilute it a little with water. You need to spread it so thickly that the paper is well saturated with glue and swells. Leave the paper aside for a while until it swells completely. Then we glue it onto the surface of the box. Press firmly with a sponge or with your hands to the surface. Make sure there are no wrinkles or bubbles.
Next, let the glue dry and only then paint the box and give it the look of metal, aged by time. To apply paint to the surface, use disposable paper towels soaked in water. We need the paint to lie unevenly and in irregular islands. First, cover the surface of the box with black acrylic paint. We have it in a can, but it can also be in a jar.
Let it dry and then cover it with red acrylic paint.
Add silver paint after the previous one has dried.
We tone down the red silver with bronze color.
Next, add a little black. Then again a little red.
Next, it’s time to oxidize our product. We proceed as in previous cases: with a damp disposable towel we cover the product with green paint. The latest decor is dark gold.
At the end of the master class, we apply a varnish coating to the resulting product. The varnish can be any: matte or glossy, aerosol or simple. You can also decorate a vase, you will get a set.
Pincushion box
To create a pincushion box you need:
- White fabric with polka dots.
- Satin ribbon.
- A roll of tape.
- Compacted cardboard.
- Glue gun or regular quality glue.
- Scrapbooking paper.
- Stationery.
- Fillers.
Instructions for making a cardboard pincushion box with your own hands:
- A braid slightly wider than the bobbin is laid on a sheet of cardboard.
- Trace the bobbin from the inside and outside with a pencil.
- The result should be two identical strips and two circles of different diameters.
- Using a glue gun, glue one strip inside the bobbin (try to make the seam carefully).
- Use a utility knife to remove excess edges. Hide the seam with tape (it’s better to glue it with a “moment”).
- Glue a circle with a large diameter to the bobbin.
- Glue the second braid to the outside of the box - cut off the excess borders.
The pincushion box is almost ready - all that remains is to decorate:
- Glue red satin ribbon on top, bottom and sides.
- Trace the spool on a white fabric with scarlet polka dots.
- Sew the fabric, leave half unsewn.
- Cut the parts so that the seam does not come apart.
- Turn right side out.
- Insert the cardboard circle into the fabric.
- Put some filler inside.
- Glue the bottom of the fabric with cardboard.
- Add more filler, fold the top of the fabric, and glue it to the cardboard.
In order to decorate the cover of the pincushion, make a bow from ribbon and glue it to the cover.
DIY heart-shaped cardboard box
Many girls will like the original shape of the box; besides, you can make such a craft yourself. All you need is thick cardboard, glue and decoration material.
Cut out 2 cardboard bases into a heart shape. Also prepare the sides of the box, the height of which you will determine yourself, based on the purpose of the craft. Cut the bottom edge of the sides as shown in the photo and glue them to the base using Moment glue.
You can connect the lid and the box using pieces of thick fabric, which are fixed with glue.
Cover the inside of the box with decorative paper, and decorate the top with lace, decoupage designs, ready-made flowers made of fabric or paper, and beads.
Creating crafts with your own hands and contemplating the results of the work brings great joy to needlewomen. Caskets created independently are unique objects that have absorbed the hard work and creative abilities of their creator. These items will be a wonderful decoration for your home or can serve as a great gift idea.
Master class on creating a box with drawers
You can make an excellent box with retractable drawers with your own hands from available resources, such as cardboard or matchboxes. Regular matchboxes will only hold tiny rings, but if you buy travel or fireplace matches, you can make a full-fledged box.
Required items to create a box:
- thick cardboard - for the frame;
- matchboxes for boxes;
- decorative buttons for handles;
- for decoration, adhesive-based film, wallpaper or leftover leather.
Formation will take very little time:
- matchboxes, without a layer of sulfur, glued together;
- Glue thick cardboard on the outside;
- surfaces that are visible to decorate with wallpaper or film;
- Secure decorative buttons onto fishing line or wire using an awl.
If desired, decorate with beads, drawings, bows.
Box in the shape of a doll sofa
Instructions for making a box in the form of a doll sofa:
- cut out the parts in the form of a parallelepiped approximately 7 by 15 cm;
- make an identical element 2-2.5 cm high;
- in a larger box, leave an open hole at the top, fill it with filler and compact it well;
- assembly: place the smaller closed element on the end (this will be the back), and need to be glued from the back to the soft seat;
- form upholstery with beautiful fabric. Completely cover doll furniture and measure to make a cover;
- cut a piece of fabric and sew it, the seam should be at the bottom;
- For better fastening at the bottom of the cardboard, you can make small holes through which you can pass ties or staple the fabric.
Step-by-step instructions for an organizer box
To design an organizer box you must have:
- untreated wooden box;
- velvet fabric;
- high-quality glue;
- tassels.
Tools needed to create an organizer box:
- drill and drill bits;
- screwdriver;
- pinking shears;
- sewing machine.
Making a cardboard box with your own hands is very simple if you follow the step-by-step photo instructions.
Instructions:
- Treat the wooden box with stain; anything that is not absorbed should be wiped off with a rag.
- Using a drill, you need to drill a hole in the center in order to fix the handle
- Cut two pieces of fabric slightly smaller than the bottom and lid of the box. Then you need to cut another piece half the size. Next you need to lay a short piece of fabric on a long one and stitch it to make a pocket. Secure the velvet fabric and organizer inside the lid and at the bottom of the box.
Cartoning for beginners
STEP 1: Preparation
Cut the cardboard with a 2mm utility knife, using a ruler and holding the knife at a right angle to the cardboard.
Using scissors, cut the cardboard to 0.35 mm. This thin cardboard is used inside the box. The height of the inner side should be a few millimeters less than the outer height. The dimensions will be adjusted later, but you can immediately adjust the side height to 27 mm.
Required dimensions of thin cardboard parts
Three parts 60 mm x 100 mm. Used on the inside of the lid, from the bottom inside the box and from the bottom outside the box
2 parts - 27 mm x 100 mm. Used inside long sides.
2 parts - 27 mm x 56 mm. Use inside short sides.
The width of each side will always need to be adjusted in subsequent steps, so we'll leave it as is.
STEP 2: Assembling the box
We glue the long side parts vertically to the bottom.
When gluing the short sides, apply glue to the cross section of three sides. Make sure the bottom and long side pieces are securely connected.
STEP 3: Applying fabric to the outside of the box
The fabric size is about 370mm x 50mm.
The fabric is cut, adding at least 10 mm to the bottom, top and sides so that the outer circumference of the box can be covered with sufficient margin.
Glue about 10 mm to the right edge of the long side and apply the fabric.
Apply a thin layer of glue to the surface of the box, and glue the fabric on top. Leave about 10mm at the end, trim off the excess fabric, fold 10mm and glue it overlapping.
Tip: The layer of glue to be applied should be quite thin, so you need to add a little water to the glue, but if the amount of water is too much, the fabric may get wet or not stick when drying.
STEP 4: Bottom treatment
Completely cut off the overlapping pieces of fabric shown in red, and then cut a V shape at the corners. So that when the fabric is glued, the cuts are at an angle of about 45 degrees, and do not overlap each other.
First glue the long side, and then the short side.
STEP 5: Finishing the Top
Cut off the overlapping part of the fabric in the same way as when finishing the bottom.
Then we use scissors to cut smaller cuts in the shape of the letter V, not reaching the edge by about 5 mm.
At the corners where the cover will be attached in the future, we make an additional cut.
Glue the long side, and then both short sides; do not glue the long side where the lid will be attached.
STEP 6: Bottom of the box
Take 2 sheets of 0.35 mm cut cardboard measuring 60 mm × 100 mm and adjust the size. One sheet should fit inside the box on the bottom, the second on the outside.
Glue fabric measuring approximately 80mm x 100mm with a 10mm allowance to the adjustable sheets of cardboard. Cut the corners diagonally.
First, glue the cardboard to the bottom of the box with a thin layer of glue over the entire surface of the bottom, then, using a spatula, lay the fabric along the joints of the bottom and walls, paying special attention to the corners, no matter where there are folds or wrinkles.
We take a second cardboard sheet for the outer bottom and glue the allowances inside the sheet. First the long sides, then the short ones. Then we glue it all to the bottom of the box from the outside.
STEP 7: Box Lid
We take 2 mm cardboard, a sheet measuring 60 mm x 100 mm prepared for the lid.
We cut off the corners on the fabric diagonally with a margin of about 3 mm.
Glue the long side of the hem (allowance) first, bend the corners with your nails, and then glue the short side.
If you want to decorate the lid, now is the time to do it.
In this case it will be pearl beads.
Make a hole on the front side of the lid, and through it, pull a thread with beads strung, tie it several times on the back side.
On the back side of the lid, the thread can be secured with a paper clip or toothpick for greater reliability. Cover the top with a small piece of paper.
STEP 8: Attaching the Cover
We glued the lid to the long side of the box, which we left unglued to attach the lid.
If you put the paper as shown in the picture, it is easy to stick the cover. Place the lid on the box while leveling it, using a putty knife from the inside to securely attach the fabric and lid.
Then cut a piece of fabric that will cover the side of the box from the inside, and create a fastening, a kind of hinge for reliable and repeated opening and closing of the box. First we attach a piece of fabric to the side of the box. Adjust the height accordingly so that the height is about 25mm and the width covers the long side of the box.
Attach (attach) the top of the piece of fabric to the lid, and adjust the angle of the lid when opening. Glue the fabric (firmly) using a putty knife (ruler) so that the fabric fits tightly to the cross section of the cardboard.
Once the lid is glued to the box, place a weight on top of the closed lid for a while. However, open the lid from time to time to see how the gluing is progressing.
STEP 9: Decorating the inside of the box
Let's start preparing with the long parts, adjust them so that the inner long side of the cardboard 0.35 mm fits in the box. Prepare the fabric with an allowance of 10 mm, cut off the four corners, and glue the long sides to the cardboard.
We insert the parts into the sides of the box and, using a spatula, firmly glue the short sides to the sides of the box as shown in the photo.
In the same way, adjust the cardboard pieces to the short side and cut the fabric with a 10mm allowance. Cut off the four corners and glue the seam allowances, starting with the longest ones. Insert the parts into the short side of the box, if everything is glued properly. The main thing is to make sure that the entire surface is tightly attached.
STEP 10: Attaching the Inner Cover
Adjust the cardboard for the inside of the lid so that it is a few millimeters away from the edge on each side, as shown in the photo.
If the size is too large, it will protrude when the lid is closed or prevent the lid from closing tightly.
We cut the fabric with a 10 mm allowance to fit the cardboard. First, cut off the four corners, fold and glue the long and short sides. We made the reverse side of the resulting one, spread a thin layer of glue all over and glue it to the back of the lid, paying attention to the position in which it will be glued.
The cardboard box is ready, all that remains is to decorate it.
Box in the shape of a book with a hiding place
Instructions for making a hiding box:
- Cut out a 15 by 22 cm rectangle from colored cardboard;
- mark out;
- bend and get a workpiece;
- for decoration you need to cut out four rectangles 14.5 by 9.5 cm;
- cut two strips 14.5 by 2 cm;
- glue the parts, placing ribbons under them for ties, for decoration inside;
- decorate outside;
- receive the workpiece;
- take two rectangles 12 by 14 cm and two 9 by 12 cm;
- Mark all the blanks into strips 1 cm wide, they also need to be folded like an accordion;
- glue four parts together: insert the edges of one element into the edge of another;
- check the corners - they should be straight;
- glue the remaining accordions;
- glue the part inside;
- decorate the hiding box.
Photo decor of the box
- Fireplace decor - 145 photos of modern ideas and methods of decoration in a house and apartment
- Bathroom decor: 125 photos of the best ideas and original design options from professionals
- Mirror decor - ideas for using and rules for decorating mirrors in the interior (110 photos and videos)
Look here: Kitchen decor - a review of the best ideas and 130 photo examples of current kitchen decoration options
Did you like the article?
0
1
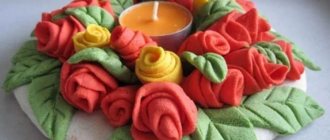
Making a box in shabby chic style
Components for making a box:
- candle;
- decoupage napkins;
- casket;
- decoupage glue;
- white acrylic primer;
- acrylic lacquer;
- acrylic paint;
- sandpaper;
- sponge.
You need to cut out a pattern from a decoupage napkin, then divide it into layers. Cover the entire area of the pre-made cardboard box with paint. Use a hairdryer to dry and leave until completely dry. Rub the candle on the box in places where there will be abrasions. Be sure to rub the corners with a candle. Cover the box with white acrylic primer and dry.
Rub the box with sandpaper to create a worn effect. Attach the decoupage pattern to the box and apply glue on top. Let it dry and paint the edges of the pattern with your own hands. Dry and varnish.