If you have a summer cottage, then you will certainly want to arrange it in such a way that the time spent here will be remembered for a long time as vivid impressions.
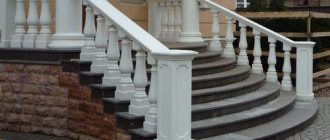
Wooden terrace around the pool
Some people make a mini football field, others a tennis court, others prefer their own garden. This article will look at how to arrange the space around the pool so that it is comfortable not only in the water, but also near the pool itself. And to do this, you can build a wooden terrace around the pool, which will accommodate a table with chairs, a sun lounger, and if you wish, you can even set up a barbecue.
Swimming pool with decking
In a word, relaxing near the water in your courtyard will brighten up your leisure time, and the guests you invite to your place will not remain indifferent to such an original solution for arranging a recreation area.
Preparatory stage of construction
To begin with, it is best to make a sketch of the structure that will need to be built. The plan will help calculate the amount of materials, visualize the final material and take into account various important details of the construction.
The first illustration shows a sketch of the pool around which the wooden deck will be built. Since in this particular case the pool is not immersed in the ground, but is located above the surface of the earth, the platform around it will be quite high, and there will be steps leading to the terrace. Fencing structures will be installed along the entire perimeter of the wooden terrace:
- railings (they are shown in green in Figure 1);
- the fence, or Privacy Screen, is what this structure is called in the west (shown in red in Figure 1). The purpose of this element is to create a closed recreation area from prying eyes.
Figure 1. Plan of the terrace around the pool
Privacy Screen - Curly carved wood panels
Consider the direction of the boards.
Construction and decoration of a swimming pool in a country house is a multi-stage and labor-intensive process that includes both decorative and technological tasks. Ideally, the presence of a swimming pool is included at the design stage of the cottage. An extension is being made to what has already been built.
What is included in the project
- Choice of location: indoors or outdoors. If people live in the house only in the summer, then the second option is appropriate. If the owners spend outside the city all year round, the first one is advisable.
- Purpose of the pool: for a family holiday with a child, exclusively for children, for individual use or in the company of friends. The next point depends on this.
- Calculation of dimensions and shape.
- Determining the location where the pool design places communications, disinfection equipment, heating and filtration devices.
- Selection of options: waterfalls, artificial flow, hydromassage, etc.
- Development of the style of the room.
Types of pool by design and filtration
According to the design, they are divided into stationary and collapsible. Stationary, all-season, are most often performed indoors, durable and not subject to deformation, expensive due to the complexity of construction, but infinitely varied in terms of shape. The material for the bowl is hydraulic concrete.
Collapsible ones are made of metal, plastic, and less often wood. There are seasonal and frost-resistant. Cheaper than stationary ones, the design of the pool is limited to round, oval and rectangular shapes.
The filtration system and the type of pool - skimmer or overflow - depend on the shape. A skimmer is a device that takes the contaminated top layer of water and sends it for cleaning and disinfection. Purified water enters the bowl from the wall holes. This filtration system is suitable for a classic rectangular pool.
In overflow systems, the edge of the water coincides with the level of the side, and clean water coming from the bottom displaces the top layer into the side gutters. These technological features should be taken into account by the design of the pool.
Finishing materials for different styles
The future interior of the pool, if it is designed inside the house, is logically tied to the style of the remaining rooms. The main requirement for materials is moisture resistance.
- Classic.
The walls are painted or finished with plaster. Decorative columns made of plaster or stone will emphasize luxury. It is better to use gypsum elements away from water; they can be replaced with moisture-resistant polyurethane ones. A mosaic panel with a natural or antique theme will decorate the interior design of the pool.
- Art Deco.
The decoration is dominated by mosaics, ceramic tiles, reflective surfaces, and mirrors. A stretch ceiling can have several levels, in a dark palette. The focus is on the eye-catching chandelier, which is complemented by spotlights around the perimeter.
- Country.
Wood, stone, and plaster are used for walls. A color palette of natural shades was chosen for finishing. The ceiling can be decorated with beams.
- Ethnic.
Japanese pool design favors minimal decor and open space. African - motley panels, bright colors and original accessories. Indian - ornate carved decor, paintings, niches with aromatic lamps.
- Modern pool design.
Finishing materials are least limited in choice by style concept. An interesting option: make one of the walls completely transparent, made of glass, and cover the rest with mosaics with a metal effect. The pool, located in the extension, can be surrounded on three sides by glass walls, plus a transparent roof.
Porcelain tiles and floor tiles must have an anti-slip surface. Stretch fabric is perfect for the ceiling - moisture-resistant, durable and varied in color.
Bowl decoration
For finishing the following are used:
- Mosaic. A universal lining for the bowl, the design of the pool with mosaics allows you to work with any shape, laying out ornamental and narrative panels on the bottom.
- Ceramic tile. This means specifically made for swimming pools, with minimal water absorption rates. Manufacturers complete such tiles with the decor of steps and sides in a single ensemble.
The color of the water depends on the color of the bowl. The best pool design is in blue and light blue shades, which give the water an attractive blue color. Sand, beige, and golden tones from a warm range are also pleasant in terms of perception.
In a white bowl, the water visually looks colder. Be very careful with the green colored bowl. The water will appear green and may resemble a swamp.
Difficulties and how to solve them
When installing a swimming pool in a private home, the owner faces a whole range of tasks and difficulties:
- work to protect the building from high humidity,
- organization of room heating, ventilation, cleaning,
- choice of lighting,
- decor.
By contacting, you will solve these problems without headaches and extra costs. Our specialists will develop and implement a turnkey pool design: from design, detailed visualization and cost optimization to the final decoration of the finished interior.
Supports
We are considering a terrace project on supports, each of which needs an individual foundation.
Consider the option of arranging concrete supports with a diameter of 12 inches each.
| Feet | Centimeters | Inches | Centimeters |
| 1 | 30,48 | 1 | 2,54 |
| 2 | 60,96 | 2 | 5,08 |
| 3 | 60,96 | 3 | 7,62 |
| 3,5 | 106,68 | 3,5 | 8,89 |
| 4 | 121,92 | 4 | 10,16 |
| 5 | 152,4 | 5 | 12,7 |
| 10 | 304,8 | 12,7 | 32,258 |
| 11 | 335,28 | 11 | 27,94 |
| 12 | 365,76 | 12 | 30,48 |
| 15 | 457,2 | 15 | 38,1 |
| 20 | 609,6 | 20 | 50,8 |
- According to the project, holes are dug of the appropriate diameter and a depth of about 4 feet.
The holes should be the same depth when preparing - 4 feet or approximately 123 cm - Afterwards, so-called “sleeves” made of roofing material secured with adhesive tape are inserted into these holes. They should protrude approximately 1 foot above the ground surface.
Roofing felt is installed and a frame of three reinforcing rods connected with wire is placed inside - Concrete is poured into these “sleeves”, and metal connectors are installed on top, to which wooden supports will be attached.
The solution is transported by wheelbarrow and poured into the formwork with a shovel, compacting or piercing the mixture with an in-depth vibrator
An example of attaching timber to concrete supports
To avoid digging holes again, make a sketch with dimensions that will show the coordinates of each support. It’s better, of course, to do this on a site plan, especially if there are plants in the construction area or there are communications, then you won’t have to uproot a tree or repair the water supply.
Figure 2 shows the location of concrete supports (Footings), as well as their coordinates. If the support ends up on a water pipe, or if there is a tree growing nearby, simply move the support slightly to the side. It is better to calculate everything and draw it on paper rather than face unpleasant surprises during the construction process.
Figure 2. Location of supports
Having marked the location of the supports on the site, dig holes for them and concrete them. Don't forget to install post connectors into the wet concrete supports. After the concrete has hardened, secure the vertical supports in metal connectors. Use 4" x 4" cross-section posts for supports since the deck is less than 6 feet high. If the height exceeds 6 feet, posts with a cross section of 6x6 inches should be used for supports. Metal connectors should be installed in the appropriate size.
The third picture shows a diagram of the concrete supports used in this project.
Figure 3. Scheme of concrete supports
Beams. Longitudinal location
Next, according to the project, it is necessary to install beams on vertically located supports. This is the next step in building a deck around the pool.
Triple or double beams are installed according to the load. In the case where there is no more than 12 feet between adjacent beams located in one row, then double beams are installed, as in this project under consideration, where between each two nearest beams there is no more than ten feet.
The cross-section of the longitudinal beams can vary, ranging from 2x4 inches to 2x12 inches. This choice will depend on the number and distance between adjacent lines of longitudinal beams. It is best to use as few supports as possible; accordingly, there will also be fewer beam lines, and the distance between them will be greater. But then you won’t have to dig a lot of holes for supports, which are not so easy to build.
The fourth picture is a diagram of the beams. The dimensions of these items are 2 x 10 inches.
Figure 4. Beam diagram
Bottom line
Today, a house with a swimming pool has ceased to be something unique; such projects are in increasing demand, and this has provided developers with a wide variety of offers. Among the many standard designs of houses with a swimming pool, it is almost always possible to find exactly what will satisfy the client’s needs. Only when you want to emphasize your own style, when there is a need for uniqueness, should you apply for an order for an individual project.
Ratings 0
Cross beams
After the longitudinal beams are installed on the supports, transverse beams are installed on top of them. At this stage, it is important to maintain an equal gap between the timber being laid. This value will depend on two conditions:
- how the deck boards will be laid (across the beams or at an angle);
- what material will the deck board be made of?
If the boards are laid at an angle, the distance between adjacent cross beams will be 12 inches. If the deck board is laid perpendicular to the joists, then the distance between the joists will be either 16 or 24 inches.
The cross beams are installed at 24" spacing if the following materials are to be used for the deck board:
- ironwood (Ipe Wood),
Ipe decking board (Iron wood) - Tiger Wood,
tiger tree - polymer board.
Wood-polymer composite decking board
These rocks have very high strength and are slightly deformed by bending under vertical loads, so the beams can be placed at a considerable distance from each other.
Also, durable and stable materials used for deck boards include polymer boards. Their advantage also lies in the fact that they do not require protective paint coatings, and also do not have knots that reduce the strength of the materials.
This project uses a fairly soft material, namely cedar deck boards. Therefore, the cross beams will be fixed at 16 inch intervals.
Canadian red cedar decking board
For cross beams, beams with a cross section of 2" x 8" are most commonly used.
Figure 5 shows what the frame of a wooden deck around a pool will look like with the cross beams installed.
Figure 5. Frame of a wooden deck around the pool with installed cross beams
Once the beams are installed, they should be tied together, as shown in Figure 6, so that the structure becomes solid and as stable as possible.
Figure 6. Bundle of decking boards
Prices for the model range of decking boards
Terrace board
Projects, standard and individual
Construction companies offer catalogs of standard designs for houses with a swimming pool inside, which can be viewed directly on the official websites.
Creating a project for a house with a swimming pool includes several stages:
- Development of a cottage project.
- Calculation of the overall dimensions of the pool.
- Drawing up a master plan.
Design of a swimming pool using natural materials Source realstroi-m.ru
Projects developed by experienced architects are diverse:
- have different areas, number of rooms, several floors;
- with garage, attic, terrace, basement;
- in different styles: modern, classic, European, hi-tech, antique and other;
- from different materials: brick, aerated concrete, wooden beams;
- special - for problematic, narrow land plots.
There are projects of small buildings, the total area of which does not exceed 100 m2. We offer houses with an area of more than 300 m2. Construction companies offer projects designed for a wide range of budgets.
Clients are provided with free consultations, including by phone or through the official website on the Internet.
Construction companies offer to develop a unique house project with a swimming pool inside, created for the interests of a specific client.
steps
The next step in building a wooden deck is to install the frame for the steps. The basis is the stringers, which are located at a distance of 16 inches from each other.
To calculate the size of the steps, you can use our calculator with instructions.
Scheme of stringers
To make them, use a board with a cross section of 2x10. In order for all the steps to be the same in length and height, you first need to make a pattern for one step, and then sequentially mark the steps on the blank for the stringer.
Stair stringer is a sawtooth-shaped wooden board or beam with rectangular teeth
For the convenience of ascending and descending the steps, the dimensions of each step, firstly, must be the same, and secondly, in terms of the height and depth of the step, they must be within certain limits. For height, it measures 6 to 8 inches, and for depth, it measures 12 to 16 inches.
There are, of course, non-standard sizes of steps, but most often they are made within the limits given above.
At the bottom, all stringers are connected by one board for stability of the structure. Figure 7 shows the frame of the terrace and steps.
Figure 7. Frame of the terrace and future steps
Base for railings and fences
Before laying down the deck boards, you need to install the posts for the railings and fence. The posts are made from timber with a cross section of 4x4 inches. The height of the fence is 6 feet, this is enough to make the recreation area enclosed. But the height of the railing can be of two sizes.
- If the height of the terrace is less than 6 feet, then the railings are 3 feet.
- When the deck height is more than 6 feet, the railing increases to a size of 3.5 feet.
The distance between railing and fence posts should not be more than 6 feet to ensure the structure is secure enough.
In Figure 8, the posts for the railing and fence are already attached to the main frame of the terrace.
Figure 8. Diagram of fixed posts for the fence
Decoration of the outdoor pool
A swimming pool in a private house on the street is suitable for a family living outside the city, as well as for those who prefer to enjoy swimming in the fresh air. When developing and designing a stationary pool, the following points are taken into account:
- Small debris, leaves and twigs pollute the water, so you will need a well-thought-out filtration system, and you can also think about a protective cover.
Bowl of natural contours Source st.hzcdn.com
- Most outdoor pools have a rectangular shape, which is explained by their simplicity of design and ease of maintenance. The rectangular option is practical: it fits easier into the surrounding landscape, it is easier to surround it with a path, or arrange a recreation area.
Classic shape Source www.flauminc.com
- In production, hydraulic concrete is mainly used; the bowl is lined with tiles. The area around the bowl is decorated with concrete or stone tiles, natural or artificial.
In an area with difficult terrain Source st.hzcdn.com
- Space for sun loungers and deck chairs can be allocated using wooden flooring made from terrace boards. If you make the flooring large enough and equip it with a canopy, a cozy dining area will be created.
With wooden flooring Source st.hzcdn.com
In order for your time to be enjoyable, you cannot do without several pieces of furniture: two or three sun loungers, a table and chairs. Furniture for a swimming pool in a private home must withstand specific operating conditions, be resistant to moisture and direct sunlight.
With a touch of modernity Source st.hzcdn.com
Summer furniture is often moved from place to place, so it should be light and durable at the same time; Plastic products fully possess this quality. Manufacturers also offer summer wicker furniture made from artificial rattan. Stylish loungers, sofas, and armchairs are ideal for creating a comfortable relaxation area.
Minimalistic solution Source st.hzcdn.com
Deck board
Now you can proceed directly to laying the deck boards on the surface of the terrace, as well as sheathing the steps. Under no circumstances should the board be installed without gaps. When the boards swell from moisture, they will increase in volume, and if there is no gap between them, they will float on top of each other. It's like if you lay laminate flooring close to the walls, leaving no gap or room for expansion.
Installation diagram for decking boards
Boards can be fastened with screws or nails, depending on how convenient it is for you and what tools are available. If you are planning to nail a deck board, an automatic nail gun will make this task easier. They will work much faster, and most importantly, your fingers will remain safe and sound.
Do-it-yourself deck board installation
When laying deck boards, it is not necessary to measure each one to the nearest inch. Along the edge of the terrace, the board may overhang a little, just after the entire terrace is covered, you will need to go with a saw along the contour and cut off the excess. The result of laying the deck board is shown in Figure 9.
Figure 9. Terrace cladding
The same deck board as on the terrace is laid on the surface of the steps. You can also cover the steps with vertical boards so that the internal frame is not visible. Such steps are called closed type, and these are the ones made in this project (Figure 10).
Figure 10. Step cladding
Railings and fence
Once the patio deck and steps are laid, you can begin installing the railings and fence.
Examples of decorative fencing - diagrams
The design of these structures is very diverse, and the materials that can be used to manufacture the components of the fencing sections may vary.
For example, sections for railings may include the following elements:
- glass partitions;
- vertical or horizontal balusters made of metal or wood;
- combined inserts.
The easiest way is to first assemble the sections for the railings, and then simply install them between the corresponding supports. But to do this, you need to accurately measure the openings between the pillars in order to make the sections correctly and not make mistakes with the dimensions.
In this project, sections were used, along the contour of which a beam with a cross section of 2x4 inches is located, and glass is inserted inside. Glass should be at least 3/4 inch thick. Figure 11 shows one such section.
Figure 11. Fence section
When all sections are made, they can be installed in place, as shown in Figure 12.
Figure 12. Installation of fencing sections
Since this terrace is not high, handrails were made for the steps along the upper part to make it more convenient to go up and down without fear of losing your balance. If the terrace is higher than 6 feet, then it is advisable to make full-fledged fencing sections along the steps.
The fence uses a board with a cross section of 1x6 inches, which is driven horizontally to the posts at 0.5 inch intervals. It is easiest to stuff it from the outside, since it is quite difficult to join the boards and supports from the inside, and you will have to make additional stiffening ribs. The thirteenth illustration shows the final result of construction.
Figure 13. The final result of constructing a terrace around the pool
Naturally, after all the work, it is necessary to apply a paint coating that will protect against moisture and termites; accordingly, the terrace will last much longer.
For this type of terrace construction, the deck board is replaced every 5-7 years, but the frame will last for decades if you make it from specially treated wood, which is called pressure treated wood, and has a characteristic green color.
Building a three-dimensional model on a computer is very helpful during construction. With this model, firstly, you will be able to clearly see the end result and see different design solutions, as well as make changes before you start construction. Secondly, with the help of such a model you can easily calculate the material and not purchase too much, which will help you save a lot.
Good luck with the construction and have a nice holiday!
Terrace board near the pool
Video - Laying decking near the pool
Video - Installation of decking boards on Twin fasteners
Today there are different types of pools:
— inflatable pools;
— frame pools;
- capital pools that need to be built.
We will talk about capital pools in this article. Capital pools can be built both outside and indoors. The construction rules are basically the same, but there are slight differences.
Before building a pool, it is worth choosing a depth that will be suitable for all family members. The most optimal depth is up to 1.2 meters. If you like to dive from the side, you should increase the depth of the pool to 2.5 m at the jumping point. The difference in pool depths should be smooth.
The size and shape of the pool depend only on your financial capabilities and your imagination.
If you want to build a pool outside, then you should choose the most protected places, since foliage, grass and dust will create additional troubles for you.
You should immediately think about a cover that will protect your pool from dust and rain and allow you to extend the swimming season. It is also necessary to cover the water surface with a heat-insulating coating. This applies not only to outdoor pools, but also to indoor ones. This coating will allow you to retain the warmth of the water longer and reduce its evaporation; in addition, the coating acts as an excellent protection against external contaminants. You can also purchase mechanized coating. All you have to do is press a button and the louvered cover that appears from the bottom of the pool will cover your pool.
An important issue for those who have a swimming pool in their home is water purification.
When building a swimming pool, it is necessary to purchase equipment for water purification, as it becomes polluted very quickly.
In addition to purifying water with special equipment, it is necessary to add special agents to the water that regulate the color and turbidity of the water, disinfect it, protect it from the appearance of algae and regulate acidity. The most common products are those based on bromine, chlorine and active oxygen.
Today, a type of purification such as water ozonation is very often used. For a home pool, this cleaning method is acceptable with full automation of the ozonation complex, since it requires great qualifications.
But these are not all pool cleaning methods. Periodically it is necessary to clean the bottom of accumulated dirt. For such purposes, there are various devices - hand brushes, special vacuum cleaners, as well as automatic robots.
Water heating, drainage and ventilation of the pool
A swimming pool requires a lot of energy - large amounts of heat are needed to initially heat the water to the required temperature. Since heat constantly leaves through the walls and bottom of the pool, as well as from the surface of the water, it needs to be heated regularly. Special electric heaters are used to heat water.