The cherished dream of every woman is to have a make-up mirror at home or, as it is also called, a makeup artist’s mirror for makeup, a cosmetic mirror, etc.
However, it is not at all necessary to buy it for a lot of money. With inexpensive tools and materials, as well as practical advice, any man can make such a practical and useful gift to his beloved in just a couple of days.
Keep in mind that a high-quality makeup mirror cannot be assembled technically competently in one day. Even experienced masters rarely manage to pull off such a trick.
Too much of everything here is tied to aspects of painting and wood processing. But a properly assembled product will delight your soulmate for many years.
After all, situations often arise when literally six months later, everyone who looks in such hastily assembled mirrors begins to look small and fat. We'll tell you why this happens a little later.
This mirror also perfectly replaces a ring light.
You can take great selfies next to him.
Let's look at all the tricks and life hacks of a makeup mirror and note the mistakes that will lie in wait for you when making it at home.
Choosing a board for a dressing room mirror - dimensions, material
Many people use ordinary pine boards, which are freely sold in Leroy Merlin. It is the most popular material.
Secret No. 1
When purchasing it, pay special attention to the knots.
There should be a minimum number of them, and they should be located in such places that they do not interfere with drilling holes for light bulb sockets.
Secret No. 2
However, for a higher quality product, professionals recommend using furniture panels.
This is what the use of pine boards leads to.
Over time, you are bound to develop cracks. First of all, this will happen on the back side of the frame.
This happens because the board is initially raw. When moisture begins to leave it, the tree bursts. And this is a natural process.
In our Russian climate, finding dry wood is a very big problem.
But the main evil of damp pine is different - the wood will warp and deform as it dries.
Accordingly, the mirror will begin to bend. This is where small and fat people appear in the reflection.
If you have no choice, then at least wait a while until the pine board dries out. Do not assemble the mirror immediately after purchasing the wood.
See how she behaves, and only then get to work.
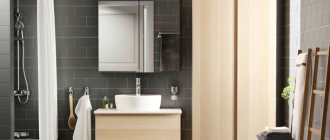
Benefits of a makeup mirror
“Makeup rooms” are mirrors illuminated by lamps that are located around the perimeter of the frame or on the mirror surface itself. Initially, this item was invented for applying makeup in the “dressing room” for theater and film actors, singers and other stage representatives.
Advantages:
- uniform distribution of light on the mirror surface, you can see all facial defects and makeup inaccuracies;
- the possibility of additional lighting of the room area;
- original interior decor;
- some models increase the size of the reflection if necessary;
- variety of shapes, sizes and colors of frames;
- long service life, lamps can be replaced with new ones.
Using a make-up mirror, you can highlight a specific area.
Disadvantages arise when purchasing budget models with low-quality fittings, mirror surfaces and lamps. This could be reflection distortion, excessive heat from lamps, or sensitivity to moisture.
Today, such an accessory is actively used by ordinary women to apply makeup and carry out cosmetic procedures.
Making a mirror frame
The first step is to make a blank for the future frame from the boards. You will need four pieces - two short and two long.
Remember, sizes are always individual and depend on the available mirror.
Secret No. 3
The main thing is that the inner perimeter is 1.0-1.5 cm larger than the mirror itself.
A standard frame suitable for a small dressing room has approximately the following dimensions:
- board width 9-10mm
- thickness - 18-20mm
- long section – 75-80cm
- short – about 30cm
This is for an interior mirror 55*65cm.
Next, the boards need to be somehow connected to each other. Fold them into a rectangle of the desired shape and glue them together with furniture glue.
There is no need to additionally go through the joints with staples from a construction stapler, as some advise. This spoils the appearance and destroys the wood.
Secret No. 4
Wipe off the glue thoroughly, do not leave the slightest drip.
Otherwise, they will not allow the varnish layer to lay down normally. And you will have problems with painting.
Secret No. 5
If after joining you still have large wide gaps, buy an inexpensive moisture-resistant wood putty.
Cover all sloppy seams and joints with it.
For greater reliability of the structure, the pieces of wood are additionally connected to each other with furniture corners.
Plus, some people drill a self-tapping screw onto the oblique. To prevent it from being visible, first make a recess in the end with a drill.
Choose your corners responsibly. Use ones that do not bend at the first lateral load.
Pay attention to their thickness.
Secret No. 6
Be careful when attaching the corners - leave an appropriate distance under the mirror, cartridge and side strips.
Only then screw in the screws.
Give the workpiece and glue time to dry. For greater stability and in order to hide the cartridges as much as possible in the future, attach additional sides to the frame.
Use leftover boards. First glue them and then attach them to the main frame with self-tapping screws.
Secret No. 7
To get the most monolithic-looking structure possible, follow the following procedure.
- glue two edges of wood
- tighten them with clamps
- plant a few self-tapping screws
Then everything is polished at the same time and one single cast edge is obtained.
From the side it feels like it's solid wood.
Mirror design
Before you make a makeup mirror with your own hands, you need to think about what design will be appropriate in the interior of the room.
If indoors:
- the clear geometry of the patterns prevails; it is better to choose a rectangular or square model;
- there are mainly soft, pastel colors; a rounded shape of the mirror will look better;
- spacious and high ceilings - a floor-mounted dressing room mirror is appropriate;
- There are patterns in the decor of walls and curtains; it would be ideal to repeat the pattern when decorating the frame of the product.
Drilling holes for cartridges
Now you need to mark the places for installing the light bulbs. Usually there are 8 or more of them.
Measure the length of the board, without taking into account the bottom strip, since in most cases it plays the role of a fixing element and there will be no light bulbs in it.
Then you divide the entire distance into equal parts. Two light bulbs must be in the upper corners.
Having measured the width, find the middle and put a mark.
From these marks, as starting points, draw all other holes. Next, using a feather drill with a diameter of 38-40mm, you need to drill out the marked areas.
Select this drill diameter if you have an E27 chuck. For E14 chucks, a D-26mm drill is suitable.
Professional carpenters use a forstner drill for this task rather than a feather drill.
Secret No. 8
When using a drill, do not go all the way through the wood at once.
Otherwise, the back side of the board will collapse and the wood structure will break.
To prevent this from happening, when the tip of the pen just begins to show on the other side, turn the frame over and start drilling from there. In this case, the hole will be more accurate.
Carefully sand the resulting holes and all boards with sandpaper. You can also use sandpaper to round the ends.
The look will be more aesthetic.
Next, remove all dirt, dust and wipe the resulting frame until perfectly clean, preparing it for painting.
How to paint a mirror frame correctly
In fact, it is with painting that a lot of questions and nuances arise. Sometimes even more than with electrics.
Firstly, always be sure to read what the manufacturer writes on their packaging and jars of varnishes, paints, stains, etc.
And strictly adhere to these recommendations. If it says that after applying the first layer you need to wait two or more hours, just do it, don’t rush.
Secret No. 9
Secondly, not all varnishes are applied with a brush.
Some use only a rag or sponge. They literally have to be forcibly rubbed over the surface.
Again, it is better to paint with a roller rather than a brush.
Secret No. 10
The wooden frame must be protected with a layer of varnish or paint on both sides.
Never leave a back wall unfinished.
The cheapest and fastest option is to paint the frame with spray paint.
One small can is enough for two layers. However, such a result will most likely not please either you or your significant other.
The second way to process the frame is to first apply stain and then varnish everything.
To avoid drips, to apply varnish and stain, as mentioned above, use a foam sponge rather than a brush.
Secret No. 11
After applying the first layer of varnish, be sure to remove any raised lint with sandpaper.
Secret No. 12
In this case, you cannot use coarse-grained sandpaper; the optimal grain size is 220.
Larger grains will leave scratches that you will not be able to get rid of later.
After this, apply the varnish around the second circle. Everything will be smooth and will last for many years.
The third method is to first apply acrylic color to the wood. For example Palizh.
Then, after an hour, treat the frame with Teknos wood oil.
Secret No. 13
The oil is applied in two layers with an intermediate drying time of 8 hours!
After that, to reveal the texture, the surface is rubbed with a cotton cloth. The end result is a gorgeous thing. See the results for yourself.
Secret No. 14
However, keep in mind that black is not always suitable for professional work as a makeup artist.
When doing this kind of work, it is very important to thoroughly see the real texture of the skin (pores, defects). This requires a lot of soft light.
The black frame will interrupt it. Although this option is very popular for home interiors.
Frame
The hassle of arranging light for applying cosmetics is more speculative, and the physical ones come down to purchasing components. But you need to make the frame for the backlit mirror yourself, otherwise why all this fuss? Its design is traditionally copied from theatrical makeup mirrors; The lamp sockets are recessed into the frame up to the rim. But there are no physical, technical, physiological or other objective reasons for this. There is only one, and rather historical one - tours.
Traditional design
In the old days, but already familiar with electric lighting, the only mass media that existed were periodicals and embryonic cinema. The main distributors of living culture were artists. We toured everywhere where a good gathering was expected. All kinds of breakdowns are inevitable when constantly moving, and in some places in the outback of those days it was no easier to buy a light bulb socket to replace a broken one than it is now to buy a Pentium Core series processor in a rural grocery store.
According to the same tradition, the frames of dressing room mirrors were made too massive and durable for household use - the entire expensive, fragile product had to withstand frequent transportation, incl. horse-drawn transport on broken roads. The actual mirrors for theater dressing rooms were made small, like the ones we have today at home “for one’s own use.” Nowadays, you can make an illuminated mirror for home make-up of the “old-fashioned” type yourself, within 1000 rubles, see for example. story below:
Video: dressing room mirror for 780 rubles
We are looking for ways to improve
However, as the size of the mirror increases, the complexity and labor intensity of the design increases disproportionately to the operating conditions of the product. Mainly due to the use of thick boards or beams for the frame.
Frame details of a traditionally designed illuminated dressing room mirror
The lamp socket is recessed into the frame partially or completely, up to the rim (item 2 in the figure). In both cases, the hole (item 1) or a through hole for it must be drilled with a feather or core drill. Taking into account the subsequent decorative finishing, you need to choose grooves for steel fasteners, and grooves for wiring. This requires either an expensive special tool (a hand-held wood router) or tedious work with a hammer and chisel. After that, the gaps visible on the rough product must be puttied, pos. 3. If you work on the balcony or in the living room, so many shavings are formed that the future happy owner will not be happy with the gift.
We are looking for a way out
The simplest way is to assemble the lighting instead of wall-mounted sockets on suspended flange sockets, see fig.
Using a table lamp socket in a backlit mirror
They are suspended, again, conditionally, because... Mainly used in table lamps. An additional threaded flange is purchased for the sockets (sold optionally), and you get a floor-mounted fitting mirror with lighting that is reliable enough for home use, see video:
Video: dressing room mirror for a makeup artist
However, problems remain. The first is the rigidity of the frame; it has large glass. The second is wiring. According to electrical safety rules, leaving it open is unacceptable. This means that it needs to be covered with something like a box. But then why not use wall flange sockets, pos. 4 in Fig. higher? These are used in plasterboard, plywood, etc. hollow thin-walled building structures.
The design of a large dressing room or floor fitting mirror in a box frame is shown in the figure:
Wall-mounted straight flange sockets for backlight lamps are attached to the bottom of the plywood box. The thickness of plywood is 4-5 mm; then the box is assembled on cranial bars made of slats from 16x16 to 25x25 (not shown in the figure). The wiring is laid in a box. For its lid, you can take thin textured MDF (see also below), then there is no need for front finishing.
Holes for the necks of the cartridges are pre-drilled in the lid. After its installation, the flanges are screwed onto the necks and additionally attached to it with white self-tapping screws. The strength and rigidity of the frame are excellent. An additional plus is that the installation depth of the mirror in the frame can be adjusted in advance to the light characteristics of the available lamps. You can, for example, install more powerful lamps (8-12 W LEDs), turn them on through a thyristor regulator, and recess the mirror deeper, about half the height of the box, then its glare will be eliminated.
Connecting lamp sockets
Let's move on to one of the important and incomprehensible stages for many - connecting the electricity. In fact, there is nothing super complicated here.
Buy not simple cartridges, but ones with a locking ring.
Secret No. 15
If your task is to make a mirror where the cartridge will purposefully act as a decorative element in the loft style, then the black E27 cartridge is your choice.
But when you want to see only light bulbs and no unnecessary elements, then small white E14 models are suitable.
Each cartridge will have to be disassembled. Unscrew the fastening washer and the “bottom”. Pass the end of the wire through it.
Use a two-core wire, type ShVVP 2*0.75mm2. For such a small load this section is quite sufficient.
Remove the insulation from the outer sheath of the cable by 3 cm and from the cores themselves by 0.5-1 cm.
Inside the cartridge there are two contacts with screws. You need to insert the stripped wires into them and tighten the bolts.
Then put everything back together in reverse order. The first cartridge is ready. To avoid making mistakes, read the detailed instructions.
Insert it into its place in the frame and measure the distance to the next light bulb. Cut the insulation lengthwise.
And again you peel off 2-3cm of the outer shell.
Secret No. 16
Attention! There is no need to cut the cores inside the cable.
They must remain intact. You will only have to remove the insulation from them. This can even be done with a lighter.
Next, squeeze the stripped wire in half, twist the wires and insert them into the next cartridge.
Do a similar procedure with all the remaining light bulbs. Do not forget to measure the required length of wire each time.
As a result, you should have a homemade garland with lamps connected in parallel.
The connection here is parallel, not serial!
If you make a sequential connection, you will get a completely unexpected effect.
In modern cartridges, the connection is made without any screws. They have 4 plug-in contacts on the “ass”.
In this case, the wires will still have to be cut. The two wires of the power cord are plugged into one contact, and the two wires going out into the other.
Secret No. 17
To prevent the wires from dangling on the back wall, they can be hidden in a plastic cable channel for greater safety.
Cut it to the size of the frame, make holes for the cartridges and attach it to the back as in the photo below.
To completely cover the cartridges, the lid must be quite high.
If you have a router, a chamfer is simply removed from the board, where all the wires are laid.
To prevent the wire from falling out, it can be nailed down with special cable clamps.
At the very end of the cord there is a plug. There should be a switch between it and the first light bulb.
Only one core is passed through it - the phase one. You don't even need to cut the second wire.
At the same time, a standard room switch looks cumbersome.
Therefore, it is better to install a small “nutcracker” in the frame instead.
Often it is simply placed on double-sided tape on the side of the mirror.
Just be sure to bring the wire to it through the frame, and don’t run it on top. Otherwise, the mirror will not press close to the wall.
Secret No. 18
But the best option is to use a miniature infrared switch.
These are often used to illuminate the work area in the kitchen.
It consists of a small box (it is secured inside the frame with double-sided tape) and a barrel-shaped button.
This barrel is brought out through a drilled hole on the side of the mirror.
There are 4 terminals on the box. Connect the wires from the first light bulb to two, and the wire from the plug to the other two.
To turn on the mirror, it will be enough to bring your hand to this sensor without even pressing it.
Well, the simplest option is a cord with a built-in switch on the wire.
These are usually sold for table lamps.
You can even choose one with a dimmer to adjust the brightness.
How to make a makeup mirror at home - the first two stages
In order to make a make-up mirror with light bulbs with your own hands, you will need the following tools:
- mirror;
- straight wide wooden beams - 2 pieces (size corresponding to the selected mirror);
- sandpaper,
- measuring tapes,
- copper wire - white and blue,
- wire cutters,
- dye,
- light bulbs (25 Watt), sockets for them and additional fuses,
- wire plug,
- bolts 2.5 cm long,
- drill,
- double-sided tape (industrial),
- screwdriver.
One of the easy options for getting a mirror with lamps is decorating with large garlands
When making a homemade illuminated mirror, precautions should be taken. In particular, we recommend that you use shoes with rubber soles. It will provide additional security.
Creating an illuminated mirror is not a labor-intensive job, but requires free time
At the first stage, cut out a frame from the beams, matching the dimensions of the original mirror. Saw the beams so that their ends form 45-degree angles. To do this, use a ruler and pencil. Don't forget to make notes first. Sand the resulting frame parts thoroughly using sandpaper. They must be perfectly smooth.
Preparing wood to create a frame for a mirror
In the second stage of work, measure and make appropriate marks for the holes at the same distance. You will later insert light bulb sockets into them.
Which light bulbs to choose for the dressing room mirror
For the makeup artist's mirror, buy only LED bulbs.
Definitely with a matte flask. It gives a soft diffused light, unlike transparent ones.
The glow temperature should be 4000K.
This is a white neutral light. If you see 4100K or 4200K in a store, buy them. These nuances do not greatly affect the final picture and how the light will fall on the face.
Your eye won't tell the difference.
Do I need to install the bottom row of lamps? Almost always the backlight is done in the letter P.
The bottom row only increases the cost of labor, plus it interferes with the makeup artist’s work and takes up extra space on the makeup table. Light from three sides is enough to create even, good lighting on the face.
However, with the huge size of the mirrors, it is no longer possible to do without the bottom row.
What wattage should all light bulbs be? It all depends on their quantity.
For full-length mirrors or make-up stations, 6W lamps are used.
For a small home mirror for a makeup artist, 3-4W is enough. No more than 5W. Otherwise, there will be uncomfortable sensations and constant eye fatigue.
Also, to prevent your eyes from hurting, choose light bulbs without pulsations.
On quality products this is written right on the packaging.
How to choose?
A small portable mirror with light that can be installed in any convenient place
When choosing a makeup mirror, you need to consider several criteria.
- The location of its future installation. If you choose a tabletop option, you should prepare a strong tabletop. If it is wall-mounted, provide reliable fastenings and determine the exact location.
Ladies' corner with small dressing table and make-up mirror - Purpose. Mirror canvas can be used in different rooms: beauty salons, medical centers, schools, and at home. Based on this, models are selected. For commercial premises it is better to choose luxury options, for home – budget ones are suitable.
- Quality. The mirror cloth must be thick, durable, and resistant to moisture. Light bulbs should not pose a potential hazard.
- Shape, size. These criteria depend on the size of the room and the personal desires of the buyer. For home use, a small medium-sized canvas is suitable.
Narrow dressing room with good lighting near the mirror - Price. If the quality is high, the mirror cloth can last for decades. For this reason, there is no point in saving on it. It is better to purchase a luxury product.
A large number of lamps around the makeup mirror helps you see yourself as clearly as possible and create the perfect makeup
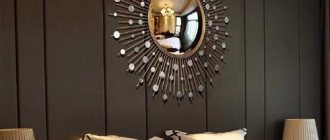
A black frame with a makeup mirror looks stylish and discreet
How to fix a mirror
The mirror itself is attached to the table in different ways. Most often with self-tapping screws with plastic washers.
They are soft enough and will not press the mirror with force, which could cause it to crack.
Professionals glue the mirror.
Secret No. 19
In this case, only transparent glue is used and specifically designed for mirrors.
Other brands, of course, will also hold, but ask mirror makers and they will tell you how other glue compositions eat up amalgam in literally six months. Amalgam is what is used to coat the back of the mirror.
But even with gluing, additional fixation will not hurt.
Secret No. 20
Just do not use hard metal corners for this task.
As mentioned above, with damp boards the frame begins to move over time. And if you fasten it tightly, your mirror may crack.
Shapes and types of dressing room mirrors
First of all, mirrors differ in shape. The most classic of them is considered square or rectangular. It was in front of such a model that such a film star as Marilyn Monroe was preparing for her release. You can purchase the same option for your premises. However, a round-shaped mirror still seems more suitable and aesthetically attractive. In addition, this model is suitable for any room style.
In terms of size, a 50/50 square mirror is considered standard. But keep in mind that the larger the mirror, the better you can see yourself.
A large number of lamps around the mirror helps you see yourself as clearly as possible and create the perfect makeup
Advice! At the same time, you shouldn’t go overboard with the size, otherwise the mirror threatens to take up most of the wall, and it will look unnecessarily overloaded. So, a smaller mirror looks much neater.
Dressing room at home, equipped in a dressing room
Finally, there are full-length mirrors that are placed on the floor and allow you to appreciate the entire appearance.
Mirrors also differ in the method of fastening and installation. To prevent it from falling, it is advisable to mount it in the wall adjacent to the dressing table. Or buy a table or trellis with a mirror right away. But more professional mirrors are still sold separately.
A small dressing table combined with a dressing room mirror will not take up much space
If buying a makeup mirror seems like an unnecessary expense to you, then you can try making it yourself. In this case, you will receive a unique copy that will meet exactly your tastes and needs. Fortunately, a dressing room mirror with lights can be bought on the Internet.
Chic DIY floor-length mirror, illuminated in a frame made of natural materials