A mirror is an integral household item in human life. It is impossible to imagine the interior of an apartment or a handbag without it. But over time and improper care, the appearance loses its reflective ability. Chips, scratches, and amalgam peeling often appear on the inner surface of the mirror.
It is impossible to imagine the interior of an apartment or a handbag without it.
Often in antique mirrors the glass itself is already so cloudy that it simply does not make sense to repair, preserve, or polish it.
Although all the ingredients for restoring a mirror surface are freely sold in pharmacies and stores, you will not be able to create a smooth mirror surface on your own the first (or even the fifth) time.
If the mirror is badly broken, then, of course, it is better to dispose of it. Because it is simply impossible to restore a broken mirror at home - this is a labor-intensive and hazardous technological process using mercury. But you can repair minor damage with your own hands.
A mirror is an integral household item in human life.
The original table accessory is ready; it will last for many years and will be a worthy part of any interior.
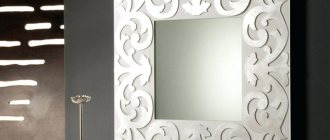
If the frame of the mirror is wooden and has lost its shine, you can update it by applying varnish of the required color.
Benefits of DIY restoration
What are the advantages of restoring a mirror with your own hands?
- Not every city and town has a restorer who knows how to restore damaged amalgam.
- Repairing a mirror coating is labor-intensive and requires investment, so mirror restoration will probably not be cheap.
- Time is wasted in searching for a restorer, delivering the item to him and back home, and on the way the mirror may break due to improper transportation. Therefore, it is easier to repair minor damage at home using improvised means.
Chips, scratches, and amalgam peeling often appear on the inner surface of the mirror.
Restoring a mirror with your own hands is quite accessible to a home craftsman.
Or change the look of the mirror by decorating it with jewelry, shells, bamboo sticks or broken dishes.
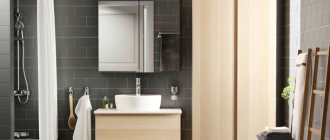
Installation of illuminated mirror - choosing a model and location
For convenient use, a mirror or a combined mirror cabinet must meet certain parameters, as well as installation conditions:
Installation of illuminated mirror
- width – at least 40 cm;
- height of location - the upper limit is 10-20 cm higher than the height of the tallest person in the family, the lower limit for large mirrors is not lower than 30 cm from the floor;
- adequate lighting arrangement - the built-in one does not cause discomfort, casting glare on the surface or directing it directly into the eyes; the main one is also not reflected in the mirror, illuminating a person, not an object.
When choosing a model and considering how to hang an illuminated mirror in the bathroom, take into account everything that can affect the ease of use of the item for its intended purpose. There should be free access to the mirror surface - no obstacles on the floor or blocking the light and reflection of objects on the walls.
Methods for restoring a mirror surface
Depending on the damage to the amalgam, different methods and materials for restoration will be used. For minor damage, silicone sealant is used, and large areas are restored using foil and glue.
If the mirror is badly broken, then, of course, it is better to dispose of it.
A simple mirror restoration can be done at home; this will eliminate minor scratches, or at least make them less visible.
It all depends on the owner’s imagination.
Sequence of procedure
Some cut an old, previously glued mirror, while others use new canvases. But regardless of this, cutting requires mandatory preliminary preparation, as well as correct execution of the procedure. Only then will you choose the method of attaching the mirrors, or select the appropriate glue for the mirror to fix it.
If we consider the process step by step, it involves the following steps:
- First you need to prepare a flat surface of appropriate size. Often this is done simply on the floor, but it is better on the table. The canvas is laid face up;
[adv2]
- Be sure to place a soft lining under the mirror so as not to damage it when pressed;
- The surface is cleaned with a soda solution and then with alcohol;
- All irregularities on the reverse side should also be removed and leveled;
- At the next stage, markings are applied. The line should run 2 mm further than the future cut, since finishing is still to be done;
- Using a ruler to control the straight cutting stroke, a glass cutter is used;
- After making the cut, the mirror is moved to the edge of the table and hangs out a little. The cut part is carefully separated;
- You can remove excess after a cut with gloved hands, a rubber hammer, or pliers with plastic (rubber) pads;
- Using fine-grained sandpaper, process the sections.
That's it, now you have managed to cut out the required element. What to do with it next depends on specific goals and objectives.
As you can see, using a glass cutter is not so easy, but it is the most effective and useful tool in such matters.
See also:
Recliner chair: what functions it performs, where to buy
Materials and tools required for mirror restoration
For major damage:
- glue for metal and glass;
- brush;
- soft fabric;
- glass cleaner;
- gasoline or alcohol-containing product;
- foil;
- brush;
- scissors;
- sponge.
But you can repair minor damage with your own hands.
Polishing, as a separate method of mirror restoration, is also performed in case of clouding of the reflective surface.
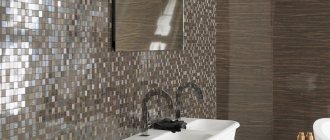
In modern interiors, mirrors often play an important role.
For small scratches and chips:
- water;
- alcohol;
- sponge, soft napkins;
- silicone sealant.
But over time and improper care, the appearance loses its reflective ability.
If abrasion or a shallow scratch appears, the mirror can be ground, and the top layer is removed from the reflective plane using coarse abrasives.
Mirrors not only have a utilitarian meaning, but also serve to decorate the interior and visually enlarge the space.
How to glue a mirror?
Gluing a mirror is a somewhat difficult task. Because you need to not only mount the product to make it look beautiful. In addition, this method can only be used if you are planning to lay tiles. The mirror can then be wedged between its elements. Otherwise it will stick out awkwardly from the wall.
It is also important to remember that it is almost impossible to remove a glued mirror from the wall. Since it will hold on very tightly and, when removed, most likely, it will simply crumble in your hands or split into several parts. But if you decide to glue the mirror rather than hang it, when installing the tiles, leave a small space that just fits the size of the product.
After installing the building material, choose a good glue and get to work. Apply it to the back of the mirror using zigzag strokes. Press the surface against the wall. Hold this for 3-10 minutes until the glue sets completely. Make a beautiful frame for the mirror. To do this, you can use various ceramic borders of any color and shape.
Note! Nowadays, a common option for gluing a mirror to a wall is to use special mirror tape. But! It must be remembered that it is not as reliable as glue or canopies that hold the mirror in place.
If you are not sure that you can glue or hang a mirror yourself, then it is better to use the services of professional craftsmen. Many companies include this service in the overall calculation of the cost of a turnkey bathroom renovation, and sometimes even provide it, as they say, “as a gift.”
Step-by-step instruction
How to restore a mirror with large amalgam damage?
You need to carefully remove the mirror from the frame and place it on a table covered with a soft cloth. Thoroughly clean the damaged surface with a brush. Then wash with glass cleaner and dry. Now degrease the damaged area with gasoline or alcohol and dry again. Using scissors, cut a piece of foil slightly larger than the size of the damaged area. Apply glue to the treated area of the mirror, apply the foil with the shiny side down and press. Use a napkin to smooth the surface of the foil from the center to the edges. Carefully remove excess glue with a sponge and dry the mirror for several hours. Place the restored mirror back into the frame.
Repairing a mirror coating is labor-intensive and requires investment, so mirror restoration will probably not be cheap.
To restore the surface of a mirror that has minor damage, grinding and polishing are used.
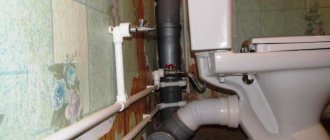
Proper installation as a way to protect against moisture
The mirror can be protected from harmful influences using some methods of attachment to the base:
- The mirror sheet can be attached tightly to a flat surface - a wall, a wooden or plastic panel using liquid nails. The cracks along the edge are sealed using any suitable sealant, for example, silicone. Then the mirror is placed on the wall of the room.
The mirror is mounted on a flat base
- Another installation method is directly on the wall or in a niche, flush with the finishing tiles. In this case, you can attach a mirror sheet to the wall using tile adhesive.
Niche for subsequent installation of the mirror flush with the tiles
How to restore a mirror with scratches and chips
Using a solution of water and alcohol, thoroughly rinse the damaged surface of the mirror and dry with napkins. Now carefully fill the scratch with sealant and let it dry. Remove excess from the surface and place the mirror in the frame.
As you can see, restoring a mirror at home is not a labor-intensive task and does not require much expense or time.
Small damages are easier to repair at home using improvised means.
But it should be noted that there are cases so serious that restoring a mirror costs more than buying a new mirror.
Ways to get rid of the mirror
There are quite a lot of them. Below are the best of them.
- Remove the mirror. No mirror - no problem. It sounds easy, but sometimes it may not be such an easy task. For example, the bedroom already has a closet with mirrored doors. Shouldn't we get rid of the closet now? And if the housing is rented, then what to do?
- Vinyl sticker. A compromise solution that will not only cover the mirror, but also give self-expression to your interior. We choose any color and picture according to the size of the surface and rejoice at how our home has been transformed. It is worth noting that the sticker is made of vinyl film - a durable material that can withstand drops of water and grease, so this option is perfect for the kitchen.
- Chalk sticker. A type of vinyl sticker, but I would like to highlight it in a separate item, because it is specially designed for drawing on it with crayons. Just imagine how delighted a child will be if, instead of falling asleep in a frightening mirror, he looks at his own creations!
- Color the mirror. Armed with paints (acrylic, nitro, aerosol and other types), you can easily cover the mirror surface. And with the help of reusable stencils, the drawing takes on new patterns and becomes completely unique. The same mirrored wardrobe in the bedroom can easily be transformed into a canvas, open to your creativity.
- Stained glass. There is plenty to choose from: you can use a strict matte color without patterns, or, on the contrary, take something brighter that attracts attention. It all depends on your taste. Stained glass looks surprisingly natural on mirrors, and is not that difficult to install, so lovers of aesthetics and those who want to cover a mirror should find this option very tempting.
So, we have every reason to close some mirrors; there are ready-made solutions. Therefore, all that remains is to get ready and get down to business! Let beauty and prosperity come to your home!
Added 08/01/2017
Decorating a mirror
If the frame of the mirror is wooden and has lost its shine, you can update it by applying varnish of the required color. Or change the look of the mirror by decorating it with jewelry, shells, bamboo sticks or broken dishes. It all depends on the owner’s imagination.
Restoring mirrors is a rather painstaking task, the result of which should be the preservation of the original surface, especially if the mirror is antique.
Depending on the damage to the amalgam, different methods and materials for restoration will be used.
For minor damage, silicone sealant is used, and large areas are restored using foil and glue.
Back surface processing methods
Home craftsmen traditionally use several time-tested methods of insulating the reflective layer of a mirror:
- Painting the back surface of the mirror with moisture-resistant paint or varnish. For example, nitro enamel from a spray can or furniture varnish applied with a brush or roller can be used. The insulating composition is applied in 2-3 layers, drying between coats. The main condition for high-quality insulation is preliminary degreasing and drying of the surface to be painted.
- Instead of painting, gluing to the back surface of plastic film is sometimes used. It is glued using liquid nails. Film should be used with high density. After drying, the mirror is attached to the wall surface.
- Do not forget that a good measure of protection is prevention. The bathroom should be equipped with ventilation, and regular ventilation will remove excess moisture.
The back surface of the mirror can be covered with paint or polymer film
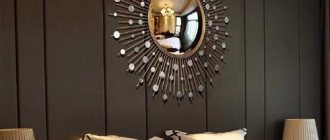
Mirrors in the bedroom interior
The interiors themselves are decorated with standing mirrors, which are ideal for many bedrooms. They make it easier to achieve a glamorous style indoors. Mirrors add elegance, but also emphasize the harmony and intimacy of the relaxation and sleeping area. Here you can choose a really large mirror or opt for a beautiful decorated frame, choosing a minimalist and modern option for a reflective surface.
We invite you to familiarize yourself with Country style in the interior: a nostalgic image of your home
Mirror on double-sided tape: dismantling and tools
Recommendations on how to properly peel off a mirror using double-sided tape can vary. One of the most effective methods is the use of a thin wire, which is passed through the entire perimeter of the mirror and moves smoothly with measured force to the lowest point.
Repeat the procedure, gradually peeling the mirror off the cabinet door, moving towards the center and other edges of the surface.
Note! To create improvised fastenings at the extreme points of the wire, you can use long nails. This will simplify the work and eliminate cuts.
It is with this method that you can solve the problem of how to quickly remove any mirror from double-sided tape.
If the mirror is to be reused, its dismantling must be done carefully.